background image


40

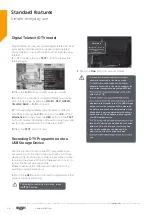
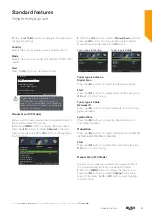
If you require any technical guidance or find that your product is not operating as intended, a simple solution can often be found in the 

Troubleshooting 

section of these instructions,

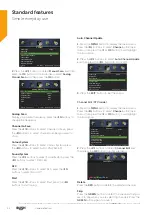
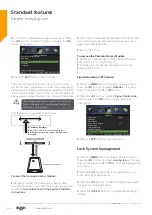
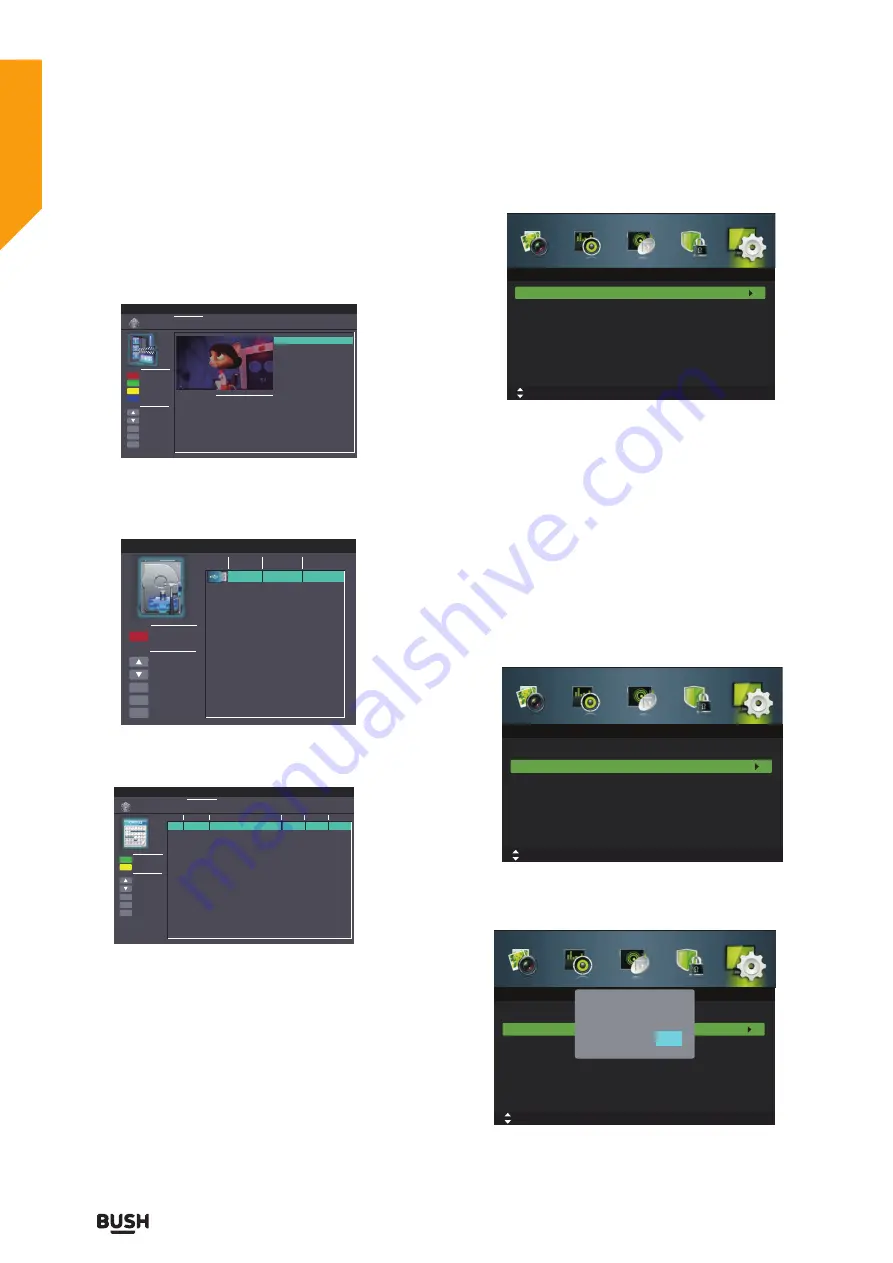
File Manager

Select File Manager to display the recorded programme 
list, press the 



 buttons to select the recorded 

programme and then press the 

OK

 or 

II button to 

view.

Device List

Select Device List to check the information of the 
connected USB storage device for PVR. Press the 

RED 

button to format the selected USB device.

Scheduled Record

Select Scheduled Record to view the scheduled 
recordings list.

4.

 Press the 

EXIT

 button to exit the menu.

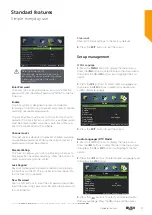
First Time Setup

1. 

Press the 

MENU

 button to display the main menu. 

Press the 



 buttons to select 

Setup

 in the main menu, 

then press the 

 or 

OK

 button,it will highlight the first 

option.

2.

 Press the 



 buttons to select 

First Time Setup

 and 

then press the

 OK 

button.

3.

 Press the 



buttons to navigate the menu and 

change the settings. Then it will search automatically

4. 

Press the

 EXIT

 button to exit the menu.

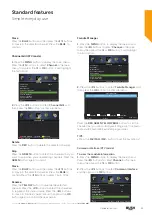
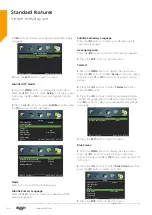
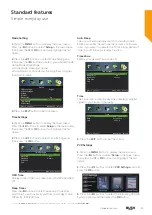
Reset

1.

 Press the 

MENU

 button to display the main menu. 

Press the 



 buttons to select 

Setup

 in the main menu, 

then press the 

 or 

OK

 button,it will highlight the first 

option.

2. 

Press the 



 buttons to select 

Reset

 and then press 

the 

OK

 button.

3. 

Press the 



 buttons to select Yes or No on the 

screen. All settings will be reset to factory defaults and 
the Setup menu will disappear.

Delete One

Move Up
Move Down
Select
Return
Exit

Function

OK

MENU

EXIT

Hot Key

Scheduled Record 

File Manager

Standby

Delete All
Zoom In/Out

Replay

Channel Name

Program Name

Recorded Time

Total Time
Parental Pating

BBC ONE

Pinky and Perky

25 Dec 2008 10:05

00:00:20

BBC ONE_Pinky and Perky_20081225_100524,is

BBC ONE_Pinky and Perky_20081225_100529,is

BBC ONE_Pinky and Perky_20081225_100530,is

Current Playing File Info

Device List

Format

Move Up
Move Down
Select
Return
Exit

Format

OK

MENU

EXIT

Device

USB1

Hot Key

1188 MB

FAT32

Available Space File System

Delete One

Move Up
Move Down
Select
Return
Exit

Function

OK

MENU

EXIT

Frequency

Off

Off
Off
Off
Off
Off
Off
Off
Off
Off
Off
Off
Off
Off
Off
Off

Hot Key

Date

Scheduled Record 

Scheduled Record Setting List

Standby

Delete All

Group

1

2
3
4
5
6
7
8
9
10
11
12
13
14
15
16

Channel

Start Time Duration

10:03

25 Dec 2008 Thu.

Move

OK: Select MENU: Return    EXIT: Exit

Setup

First Time Setup

Reset

Move

OK: Select MENU: Return    EXIT: Exit

Setup

First Time Setup

Reset

Move

OK: Select MENU: Return    EXIT: Exit

Setup

First Time Setup

Reset

Reset

Yes

No

Standard features

Simple everyday use

Standard features

Содержание VL19HDLED

Страница 1: ...Instruction manual VL19HDLED ...

Страница 2: ...ere with your instructions Don t worry there s nothing too technical coming up Just simple step by step guidance to get you up and running quickly Sound good Then let s get started Help and Guidance We re here to help you get the most from your television Should you require any guidance a simple solution can often be found online at www bush support com If you still require further assistance call...

Страница 3: ...l setup 17 General operation 17 Connections Left side connections explained 20 Left bottom connections explained 21 HDMI Connections 22 SCART Connections 22 VGA Connections 22 Standard features How to navigate menus Selecting source 26 Electronic programme guide EPG DTV mode 26 Teletext ATV mode 27 Digital Teletext DTV mode 28 Recording DTV Programme onto a USB Storage Device 28 Timer Programming ...

Страница 4: ......

Страница 5: ...1 Safety information ...

Страница 6: ...Never touch the power cord plug with wet hands as this could cause a short circuit or electric shock Never make a knot in the power cord or tie it with other cords Power cords should be placed in such a way that they are not likely to be stepped on or driven over A damaged power cord plug can cause fi re or give you an electric shock When damaged it must be replaced this should only be done by qua...

Страница 7: ...ease note that this does not affect the performance of your product Take care not to scratch the screen with fi ngernails or other hard objects Cleaning Before cleaning unplug the TV from the wall socket Do not use liquid or aerosol cleaners Only use a soft dry cloth Batteries Warning Incorrect installation of batteries may cause battery leakage and corrosion resulting in damage to the remote cont...

Страница 8: ......

Страница 9: ...2 Getting to know your TV ...

Страница 10: ...ease read these instructions carefully They contain important information which will help you get the best from your TV and ensure safe and correct installation and operation If you require any further assistance our technical experts are happy to help For full details refer to the product support section at the end of these instructions Accessories Stand Base MINI YPBPR Cable MINI AV Cable Remote...

Страница 11: ...een directly Total darkness or a reflection on the screen can cause eyestrain Soft and indirect lighting is recommended for comfortable viewing Allow enough space between the TV and the wall to permit ventilation Avoid excessively warm locations to prevent possible damage to the cabinet or premature component failure Wall Mounting Installation Guidelines 1 Place the LED LCD Television onto a solid...

Страница 12: ...ey to control the auto time of turn off Press again to restore the picture ASPECT Select from the following mode settings Full Zoom1 Zoom2 4 3 EXIT Exit the OSD On Screen Display menu EPG Display the EPG Electronic Program Guide DTV mode SUBTITLE Display the subtitle which is broadcast with the program DTV mode SUBPAGE Displays the subpage on the teletext screen ATV DTV mode REVEAL Reveals hidden ...

Страница 13: ...L Decrease the volume 3 CH Selects the next channel up 4 CH Selects the next channel down 5 INPUT Accesses the Source menu 6 MENU Accesses the TV menus 7 POWER Turns the TV on and into standby 8 Standby LED Remote Control Sensor Getting to know your TV 8 1 2 3 4 5 6 7 Getting to know your TV You ll be up and running in no time Viewing control panel ...

Страница 14: ...ion 11 VGA Socket PC Monitor connection 12 SCART Socket SCART lead connection 13 COAXIAL Out 14 RF Input ANT 15 HDMI Socket High Definition lead connection 16 USB Socket USB connection optional 17 MINI YPbPr 18 MINI AV YPbPr R L 19 CI Slot 9 10 11 14 13 16 17 18 19 15 12 HDMI CI SLOT USB MINI AV MINI YPbPr R L IN MINI YPbPr IN EARPHONE OUT PC AUDIO IN VGA IN SCART COAX OUT RF IN Getting to know yo...

Страница 15: ... a The Remote control Press the button b The TV Press the button on the right of the TV Switching the TV Off Either press the button on the remote control or press the button on the right of the TV the TV will then switch to standby mode Aerial connection Connect a coaxial cable not provided to the ANT CABLE IN jack on the back of your TV and to the antenna or cable TV wall jack Connect the incomi...

Страница 16: ...me Selection Press CH CH buttons to select the next or previous programme Operation using remote control The remote control is designed to control all the functions of the model you selected Volume Setting Press VOL button to increase the volume Press VOL button to decrease the volume A volume level scale slider will be displayed on the screen Programme Selection Previous or Next Programme Press C...

Страница 17: ...The default country is set as UK Tuner Type Select Tuner Type Cable Antenna Auto Scan Selects the auto scan type DTV ATV DTV ATV LCN Select LCN Type On or Off Auto Channel Update Select Auto Channel Update Type On or Off Start Press the OK button to start auto tuning Auto Scan will commence The display will show the progress of the tuning and the number of channels found 6 If you want to skip the ...

Страница 18: ......

Страница 19: ...Connections 3 ...

Страница 20: ...onnect devices to the TV providing fast data exchange USB will have function in USB DTV mode 3 MINI YPbPr YPbPr Input socket is just suitable for YPbPr Mini Cable Connect to a DVD player Digital Set Top Box or other AV devices with component YPbPr video output sockets Note Pls use MINI AV YPbPr R L socket when you want to connect to YPbPr audio 4 MINI AV YPbPr R L Connect to the composite VIDEO an...

Страница 21: ...d also use an audio cable to connect your device to the PC AUDIO INPUT to enable audio 8 SCART socket Inputs or outputs for external devices Connect the SCART cable between the SCART socket on the TV and the SCART socket on the external device decoder VCR or DVD player Note If an external device is connected via the SCART socket the TV will automatically switch to SCART mode 9 COAXIAL To connect t...

Страница 22: ...n connect a DVD recorder VCR or decoder to the TV using the SCART socket Power off both the TV and the device before making any connections For more information refer to your device s own instruction book Note The Scart cable is not supplied VGA Connections You can connect a computer PC to the TV to display your computer s screen image on the TV Power off both computer and TV before making any con...

Страница 23: ...23 or online at www bush support com If you still require further assistance call one of our experts on 0345 604 0105 Connections ...

Страница 24: ......

Страница 25: ...Standard features 4 ...

Страница 26: ...rev Date Press the RED button to view the schedule of the previous day GREEN Next Date Press the GREEN button to view the schedule of the next day YELLOW Schedule Press the YELLOW button to view the preset reminders in the schedule list Press the YELLOW button to return to the EPG BLUE Reminder Press the BLUE button while on the selected programme the Reminder setting menu will be displayed Press ...

Страница 27: ...mme Double height text If you have difficulty reading the text on the TV you can double the height of the text Press the SIZE button The top half of the page will be displayed in double height text Press the SIZE button again The bottom half of the page will be displayed in double height text Press the SIZE button again to return to the full page Page HOLD If the page of text you have selected con...

Страница 28: ...the DTV programme you are watching on the main screen and save it for future viewing The recording from timer programme or direct recording may have a little bit of delay when it starts to record the broadcast programme Please make sure the USB device is inserted If not a warning message will pop up 1 Press the REC button to record the programme that you are currently watching 2 Press the Stop but...

Страница 29: ... Record Setting List will then be displayed with your preset reminders shown 5 Press the EXIT button to exit EPG Move PROGRAM GUIDE 26 Dec 2008 10 00 26 Dec 2008 10 25 Big Cook Little Cook Penguin Cookey series with Big Cook Ben and foot high Little Cook Small Ben comes in to the cate wearing flippers and a mask he s found in the fancy dress box AD S PrevDate NextDate Schedule Reminder Rec Record ...

Страница 30: ... Type 7 Press the EXIT button to return to the previous menu Picture management ATV DTV Mode 1 Press the MENU button to display the main menu Press the buttons to select Picture in the main menu then press the or OK button it will highlight the first option 2 Press the buttons to select the option you want to adjust in Picture menu 3 Press the buttons to change the following settings TIPS You can ...

Страница 31: ... selection of a picture enhancement technical from among the following options Dynamic Standard Mild Personal Brightness This item can adjust the optical fiber output of the entire picture it will affect the dark region of the picture Contrast This item can adjust the highlight intensity of the picture but the shadow of the picture is invariable Sharpness This item can adjust the peaking in the de...

Страница 32: ...p Reset Channel management ATV DTV Mode Tuner Type 1 Press the MENU button to display the main menu Press the buttons to select Setup in the main menu then press the or the OK button it will highlight the first option 2 Press the buttons to select Tuner Type and then press the buttons to select Cable or Antenna 3 Press the EXIT button to exit the menu Auto Scan Use this to automatically find and s...

Страница 33: ...ttons to select Symbol Rate Auto or nter digital numbers Modulation Press the buttons to select Modulation Auto 16QAM 32QAM 64QAM 128QAM 256QAM Start Press the buttons to select Start and then press the OK button to start tuning Manual Scan ATV Mode Allows you to make manual fine tuning adjustments if the channel reception is poor under ATV mode 1 Press the MENU button to display the main menu Pre...

Страница 34: ... to On or Off 3 Press the EXIT button to exit the menu Channel Edit DTV mode 1 Press the MENU button to display the main menu Press the buttons to select Channel in the main menu then press the or OK button it will highlight the first option 2 Press the buttons to select Channel Edit and then press the OK button to enter submenu Delete Press the RED button to delete the selected channel Skip Press...

Страница 35: ...n menu then press the or OK button it will highlight the first option 2 Press the buttons to select Favorite Manager and then press the OK button to enter submenu Press the RED GREEN YELLOW BLUE button to set the channel that you are currently watching as set the Favori te1 Favorite2 Favorite3 Favorite4 programmes TIPS Press the FAV FAV FAV button to set the Favorite List Common Interface DTV mode...

Страница 36: ... the TV on Signal Information DTV mode 1 Press the MENU button to display the main menu Press the buttons to select Channel in the main menu then press the or OK button 2 Press the buttons to select Signal Information and then press the OK button to view the Signal Information 3 Press the EXIT button to exit the menu Lock System management 1 Press the MENU button to display the main menu Press the...

Страница 37: ... the EXIT button to exit the menu Setup management OSD Language 1 Press the MENU button to display the main menu Press the buttons to select Setup in the main menu then press the or OK button it will highlight the first option 2 Press the buttons to select OSD Language and then press the buttons to select your desired on screen display language 3 Press the EXIT button to exit the menu Audio Langua...

Страница 38: ...e OK button 3 Press the buttons to select your desired Digital Teletext Language Press the button and then press the buttons to select your desired Decoding Page Language 4 Press the EXIT button to exit the menu Blue Screen 1 Press the MENU button to display the main menu Press the buttons to select Setup in the main menu then press the or OK button it will highlight the first option 2 Press the b...

Страница 39: ...5 hours after the last time the remote control was used If you want to operate the TV for a long period of time turn off the auto standby function Time Zone Selects your desired Time Zone city Time The clock is set automatically when receiving a digital signal or you can set it manually 3 Press the EXIT button to exit the menu PVR Settings 1 Press the MENU button to display the main menu Press the...

Страница 40: ...ighlight the first option 2 Press the buttons to select Reset and then press the OK button 3 Press the buttons to select Yes or No on the screen All settings will be reset to factory defaults and the Setup menu will disappear Delete One Move Up Move Down Select Return Exit Function OK MENU EXIT Hot Key Scheduled Record File Manager Standby Delete All Zoom In Out Replay Channel Name Program Name Re...

Страница 41: ...mme will be affected and a warning statement will be shown on the screen If this happens please upgrade your USB storage device The TV screen will be blank temporarily as it will take time to start up and stabilize the connected hard disk This is normal and the starting time may vary depending on the brand and the memory size of the connected hard disk Disconnect the USB storage device if it is no...

Страница 42: ...then press the buttons to MEDIA and then press the OK button 2 Press the buttons to select Movie and then press the OK button 3 Press the buttons to select your storage device and then press the OK button 4 Press the buttons to navigate in the movie folder and then press the OK button If you want to select the specified movie press the buttons to select the movie file and then press the OK button ...

Страница 43: ...ode Type 7 Press the EXIT button to return to the previous menu Movie Move Change Page OK Selete EPG Quick Menu EXIT Return USB1 Movie AITEMP Movie MY PVR Photo Text Music LE32G 1 1 00 05 13 00 00 22 FileName VideoCodec Resolution Bitrate Animals AVI MPEG4 640 x 480 4158120 bps AudioCodec SampleRate Channel MP3 44100 Hz 2 Photo Music Movie Text Text Move Change Page OK Selete EPG Quick Menu EXIT R...

Страница 44: ......

Страница 45: ...Other information 5 ...

Страница 46: ...s DxLxH with foot 134 x 443 x 312 mm Weight with foot 1 9 kg Panel Dimensions DxLxH without foot 72 x 443 x 274 mm Weight without foot 1 75 kg Energy Consumption Data EEI A On Mode Power Consumption W 30W Standby Mode W 0 5W Standby Mode After 4 Hours MHEG 5 ENGINE compliant with ISO IEC 13522 5 UK engine Profile 1 for UK Object carousel support compliant with ISO IEC 135818 6 and UK DTT profile f...

Страница 47: ...must be replaced by a qualified electrician Energy label This is called the product Fiche the information needs to be presented in the following order also this maybe in the form of a copy of the label in colour or black and white the label however must display all the information below Supplier s name or trade mark Supplier s model product model no The energy effi ciency class of the model The vi...

Страница 48: ......

Страница 49: ...Product support 6 ...

Страница 50: ... unrecognisable 4 Check if you have entered the correct frequency 5 Please retune the channels 6 The picture quality may degrade when two devices are connected to the TV at the same time In such a case disconnect one of the devices No picture 1 No Picture means that your TV is not receiving a transmission Have you selected the correct button on the remote control Try once more Also make sure the c...

Страница 51: ...or on its packaging means that your electrical and electronic device should be disposed of at the end of its service life separately from your household wastes There are separate collection systems for recycling in EU The cold cathode fluorescent lamp in LCD PANEL contains a small amount of mercury please follow the local laws or regulations for disposal Notice The sign Pb below the symbol for bat...

Страница 52: ...elp give us give you a fast and efficient service please have the following information ready Model Ref Serial number Date of purchase You can find these on the rating plate a small information panel usually a sticker or metal plate on the rear of your product This will be shown on your receipt Local call rates applies Lines open 8am 7pm Monday to Saturday and 10am 4pm Sunday Calls to Argos enquir...

Страница 53: ...tet volorro videmped essequid essimpos di te volorum que sequides moditatem veliti test cum solorrum fugiasit ma nam idunt opta sapidic iendigenit vendio dolupti num volorem fugiani maximagnieni dolum audit dolore aborum fuga Ga Ficidelit facimin If you are creating instructions you may find the following links helpful www environmentlaw org uk www hse gov uk waste waste electrical This product is ...

Страница 54: ...ned in the manual It must be used solely for domestic purposes The guarantee will be rendered invalid if the product is re sold or has been damaged by inexpert repair Specifications are subject to change without notice Bush disclaim any liability for loss or damage arising from the breakdown of the product This guarantee is in addition to and does not diminish your statutory or legal rights Import...

Страница 55: ...55 or online at www bush support com If you still require further assistance call one of our experts on 0345 604 0105 Product support ...

Страница 56: ...90101 22930 Contact Helpline 0345 604 0105 www bush support com ...

Отзывы: