background image

English

   - 8 -

For any help concerning set up and use of your TV please call the Customer Helpline: 

0345 604 0105 

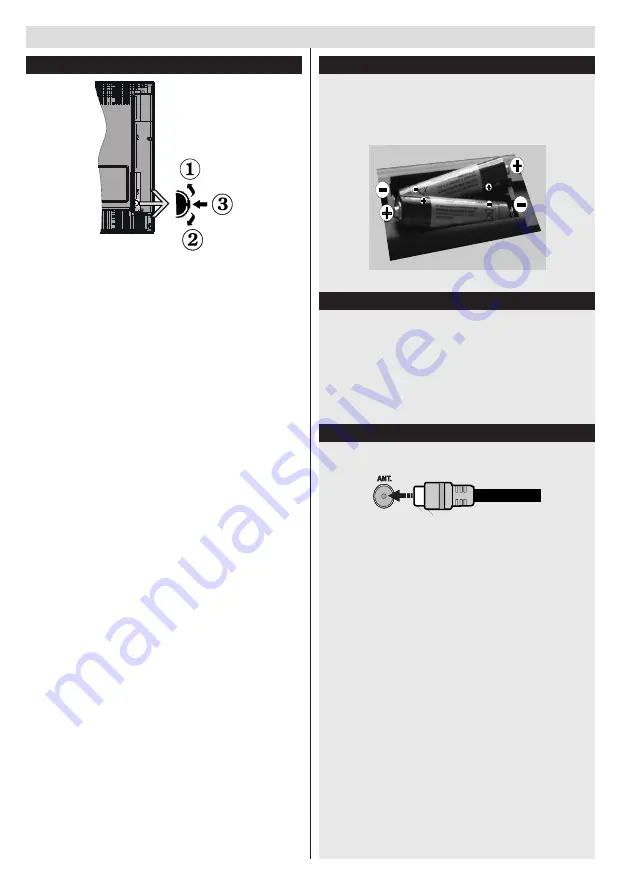
TV Control Switch & Operation

1. 

Up direction

2.

 Down direction

3.

 Programme/Volume / AV / Standby-On selection 

switch

The Control button allows you to control the Volume/ 

Programme/  Source  and  Standby-On  functions  of 

the TV.
To change volume: Increase the volume by pushing 

the button up.  Decrease the volume by pushing the 

button down.
To change channel: Press the middle of the button, 

the channel information banner  will appear on screen. 

Scroll through the stored channels by pushing the 

button up or down
To  change  source:  Press  the  middle  of  the  button 

twice, the source list will appear on screen.  Scroll 

through the available sources by pushing the button 

up or down.
To turn the TV off: Press the middle of the button down 

and hold it down for a few seconds, the TV will turn 

into standby mode.

Inserting the Batteries into the Remote

Lift the cover on the back of the remote upward gently. 

Install two 

AAA

 batteries. Make sure to match the + 

and - ends of the batteries in the battery compartment 

(observe the correct polarity) Replace the cover.

Connect Power 

IMPORTANT

: The TV set is designed to operate on 

220-240V AC, 50 Hz

 socket. After unpacking, allow 

the TV set to reach the ambient room temperature 

before you connect the set to the mains. Plug the 

power cable to the mains socket outlet.

Antenna Connection

Connect the “aerial” plug to the AERIAL INPUT (ANT) 

socket located on the back of the TV.

Getting Started

Содержание LED24265HDDVD

Страница 1: ...9 IMPORTANT Please read these instructions fully before installing or operating These instructions contain important information which will help you get the best from your television and ensure safe and correct installation and operation For any help concerning set up and use of your TV please call the Customer Helpline 0345 604 0105 Lines open 9am 8pm Monday to Saturday and 10am 4pm Sunday LED242...

Страница 2: ... Switch the TV On 13 To Switch the TV Off 13 Media Playback via USB Input 14 Media Browser Menu 14 Quick Menu 14 TV Menu Features and Functions 15 Sound Menu Contents 16 Other Settings Displays other setting options of the TV set 16 General TV Operation 17 Using the Channel List 17 Configuring Parental Settings 17 Electronic Programme Guide EPG 17 Software Upgrade 18 Troubleshooting Tips 18 Tv wil...

Страница 3: ...e if the device is not used as intended or unauthorized modifications have been made To operate your LED TV in extreme ambient conditions may cause the damage of the device WARNING Never let people including children with physical sensory or mental abilities or lack of experience and or knowledge unsupervised use electrical device Children may not recognize dangers right The swallowing of batterie...

Страница 4: ... hearing loss please take care Wall Mounting optional To prevent injury this TV must be securely attached to the wall in accordance with the installation instructions if the option is available Cleaning Before cleaning unplug the TV from the wall socket Do not use liquid or aerosol cleaners Only use a soft dry cloth Batteries Warning Incorrect installation of batteries may cause battery leakage an...

Страница 5: ...ol to the TV set NOTE The TV set should be stored in a dry and dust free room Symbols in this Instruction Book The following symbols are used in the Instruction Book as a marker for restrictions and precautions and safety instructions Note such information for security reasons WARNING If you do not pay attention to such a marked warning it can cause serious injury or death Note these warnings stri...

Страница 6: ...pare parts including that lost remote control Any other technical issues you may need assistance with Call us today 0345 604 0105 Local call rates applies Lines open 9am 8pm Monday to Saturday and 10am 4pm Sunday Calls to Argos enquiry lines may attract a charge and set up fee from residential lines depending on your call plan tariff Mobile and other providers costs may vary see www bt com pricing...

Страница 7: ...ve any input signal e g from an aerial or HDMI source for 5 minutes the TV will go into standby When you next switch on the following message will be displayed Standby Cause No Signal Press OK to continue 2 If the TV has been left on and not been operated for a while the TV will go into standby When you next switch on the following message will be displayed Standby Cause No Operation Press OK to c...

Страница 8: ...n twice the source list will appear on screen Scroll through the available sources by pushing the button up or down To turn the TV off Press the middle of the button down and hold it down for a few seconds the TV will turn into standby mode Inserting the Batteries into the Remote Lift the cover on the back of the remote upward gently Install two AAA batteries Make sure to match the and ends of the...

Страница 9: ...cilities for appropriate recycling Notice The sign Pb below the symbol for batteries indicates that this battery contains lead Products Battery Specification TV Broadcasting PAL B G D K K I I Receiving Channels VHF BAND I III UHF BAND U HYPERBAND Number of Preset Channels 1000 Channel Indicator On Screen Display RF Aerial Input 75 Ohm unbalanced Operating Voltage 220 240V AC 50Hz Audio German Nica...

Страница 10: ...l list 9 Navigation buttons 10 OK Select 11 Menu on off 12 Back button Index page in TXT mode 13 No function 14 Media browser 15 Electronic Programme Guide 16 Teletext 17 Volume up down 18 Mute button 19 Programme up down 20 Screen mod 21 Info Reveal in TXT mode 22 My button 1 23 My button 2 24 Exit 25 Q Menu 26 Channel swap 27 Rapid advance 28 Subtitle on off 29 Stop 30 Pause 31 AV Source Using M...

Страница 11: ... the Customer Helpline 0345 604 0105 Getting Started Attaching the Stand 1 Stand is placed on a flat surface fig 1 2 The product is held over the stand so that it coincides with the stand mounting point and then it is left to be mounted with its own weight fig 2 fig 1 fig 2 ...

Страница 12: ...tput will not be available via the scart socket When using the wall mounting kit optional we recommend that you plug all your cables into the back of the TV before mounting on the wall Insert or remove the CI module only when the TV is SWITCHED OFF You should refer to the module instruction manual for details of the settings Connector Type Cables Device Scart Connection back VGA Connection back SI...

Страница 13: ... features such as Standby Search Over Air Download or Timer is active The LED can also blink when you switch on the TV from standby mode First Time Installation When turned on for the first time the language selection screen is displayed Select the desired language and press OK The First Time Installation FTI screen will be displayed next Set your preferences using the navigation buttons and when ...

Страница 14: ...era Byte or more file capacity you can experience problems with the formatting process Do not repeatedly quickly plug and unplug the drive This may cause physical damage to the USB player and USB device itself Do not pull out USB module while playing a file Media Browser Menu You can play photo music and movie files stored on a USB disk by connecting it to your TV Connect a USB disk to one of the ...

Страница 15: ... SCART PIN8 high voltage low voltage switching HDMI True Black While watching from HDMI source this feature will be visible in the Picture Settings menu You can use this feature to enhance blackness in the picture Film Mode Films are recorded at a different number of frames per second to normal television programmes Turn this feature on when you are watching films to see the fast motion scenes cle...

Страница 16: ...nu Timeout Changes timeout duration for menu screens Scan Encrypted Channels When this setting is on the search process will locate the encrypted channels as well Blue Background Activates or deactivates the blue background system when the signal is weak or absent Software Upgrade To ensure that your TV always has the most up to date firmware Application Version Displays application version Hard o...

Страница 17: ... programmes channels and menus can be locked by using the parental control system To display parental lock menu options the PIN number should be entered The factory default PIN number is 0000 After coding the correct PIN number parental settings menu will be displayed Menu Lock Menu lock setting enables or disables the menu access Child Lock Optional When Child Lock is set the TV can only be contr...

Страница 18: ...rect channel frequency if you have done manual tuning The picture quality may degrade when two devices are connected to the TV at the same time In such a case disconnect one of the devices No picture No Picture means that your TV is not receiving a transmission Have you selected the correct button on the remote control Try once more Also make sure the correct input source has been selected Is the ...

Страница 19: ...ng table is an illustration of some of the typical video display modes Your TV may not support all resolutions Your TV supports up to 1920x1080 Index Resolution Frequency 1 800x600 56 Hz 2 800x600 60 Hz 3 1024x768 60 Hz 4 1024x768 66 Hz 5 1280x768 60 Hz 6 1360x768 60 Hz 7 1280x960 60 Hz 8 1280x1024 60 Hz 9 1400x1050 60 Hz 10 1600x1200 60 Hz 11 1920x1080 60 Hz Supported File Formats for USB Mode Me...

Страница 20: ...w Earth E As the colours of the wires in the power cable may not correspond with the coloured markings identifying the terminals in your plug and proceed as follows The green yellow wire must be connected to the terminal in the plug that is marked with the letter E or by the earth symbol The blue wire must be connected to the terminal that is marked with the letter N The brown wire must be connect...

Страница 21: ...ot air ducts or leave it in a car parked in direct sunlight as the temperature can rise quickly and damage the disc After playing store the disc in its case On cleaning Before playing clean the disc with a cleaning cloth Wipe the disc from the center out Do not use solvents such as benzine thinner commercially available cleaners or anti static spray intended for vinyl LPs Licence Notification This...

Страница 22: ... disc via the remote control While playing a file you should press STOP button three times to eject 1 Standby 2 Play 3 Language selection Set language 4 Rapid reverse 5 Zoom 6 Repeat 7 Numeric buttons 8 Navigation buttons 9 OK 10 Menu 11 Return 12 Angle 13 volume up down 14 Mute 15 Info 16 My button 1 Display time DVD menu 17 My button 2 Search mode 18 Exit 19 Root 20 Title 21 Rapid advance 22 Sub...

Страница 23: ...lable Fast reverse Fast forward Views the scene from different angles if available Changes slide effect depends on the content X MY BUTTON1 Displays time Views main setup menu i Time counter mode selection during playback Press repeatedly to switch between modes LANG Audio language X X MENU Displays TV menu OK SELECT Enter View Play GREEN Displays repeat options RETURN Returns back to the previous...

Страница 24: ... the initial settings If this language is not recorded on the disc only the available language on the disc will be heard 10 Some DVDs may not contain root and or title menus 11 Reverse stepping is not available 12 For your convenience If you attempt to enter a number greater than the total time of the current title the time search box disappears and Input Invalid message appears on up left corner ...

Страница 25: ...rder spare parts including that lost remote control Any other technical issues you may need assistance with Call us today 0345 604 0105 Local call rates applies Lines open 9am 8pm Monday to Saturday and 10am 4pm Sunday Calls to Argos enquiry lines may attract a charge and set up fee from residential lines depending on your call plan tariff Mobile and other providers costs may vary see www bt com p...

Страница 26: ...t must be correctly installed and operated in accordance with the instructions contained in this manual It must be used solely for domestic purpose The guarantee will be rendered invalided if the product is re sold or has been damaged by inexpert repair Specifications are subject to change without notice The manufacturer disclaims any liability for the incidental or consequential damages The guara...

Страница 27: ... Brand BUSH C Product No 10091410 D Model No LED24265HDDVD E Energy efficiency class A F Visible screen size diagonal approx inch cm 24 inches 61 cm G On mode average power consumption Watt 25 H Annual energy consumption kWh annum 36 I Standby power consumption Watt 0 5 J Off mode power consumption Watt 0 K Display resolution px 1366x768 ...

Страница 28: ...English 28 For any help concerning set up and use of your TV please call the Customer Helpline 0345 604 0105 Home Retail Group 489 499 Avebury Boulevard Saxon Gate West Central Milton Keynes MK9 2NW ...

Отзывы: