background image

29

For any help concerning set up and use of your TV please call the 

Customer Helpline: 0845 604 0105

Basic Features

Mode: 

Selects to turn On/Off subtitle language.  

Subtitle Primary Language

Press the     buttons to select your desired 
subtitle primary language. 

Subtitle Secondary Language

Press the     buttons to select your desired 
subtitle secondary language. 

Hearing Impaired

Press the     buttons to turn On/Off hearing 
impaired. 

3. 

 Press the 

EXIT 

button to exit the menu.

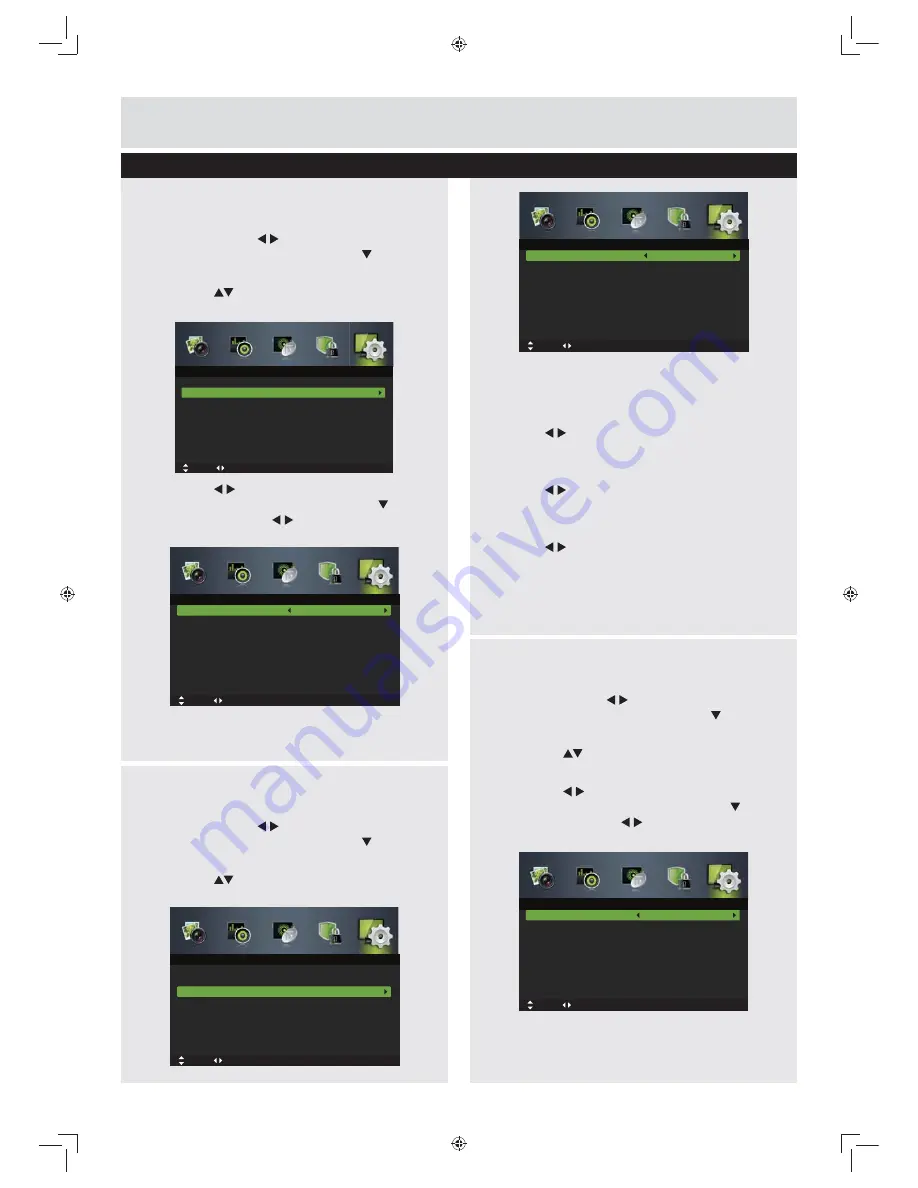
Audio Languages (DTV Mode)

1. 

Press the 

MENU

 button to display the main 

menu. Press the     buttons to select 

Setup


     or the 

OK

   *    !

2. 

Press the 

 buttons to select 

Audio 

Languages

 and then press the 

OK

 button. 

3. 

Press the     buttons to select your desired 
Audio Primary Language. Press the   button 
and then press the     buttons to select your 
desired Audio Secondary Language.

4. 

 Press the 

EXIT 

button to exit the menu.

Setup management 

OSD Language

Audio Language

Subtitle
Teletext
Blue Screen
Mode Setting
Time Settings
PVR Settings

English

On

Home Mode

Move

Adjust

MENU: Return    EXIT: Exit

Setup

Audio Primary Language

Audio Secondary Language

English

English

Move

Adjust

MENU: Return    EXIT: Exit

Audio Languages

Subtitle (DTV Mode)

1. 

Press the 

MENU

 button to display the main 

menu. Press the     buttons to select 

Setup


     or the 

OK

   *    !

2. 

Press the 

 buttons to select 

Subtitle

 and 

then press the 

OK

 button to enter sub-menu. 

OSD Language
Audio Language

Subtitle

Teletext
Blue Screen
Mode Setting
Time Settings
PVR Settings

English

On

Home Mode

Move

Adjust

MENU: Return    EXIT: Exit

Setup

Mode

Subtitle Primary Language
Subtitle Secondary Language
Hearing Impaired

On

English
English

Off

Move

Adjust

MENU: Return    EXIT: Exit

Subtitle

Teletext

1. 

Press the 

MENU

 button to display the main 

menu. Press the     buttons to select 

Setup


     or the 

OK

   *    !

2. 

Press the 

 buttons to select 

Teletext

 and 

then press the 

OK

 button. 

3. 

Press the     buttons to select your desired 
Digital Teletext Language. Press the   button 
and then press the     buttons to select your 
desired Decoding Page Language.

4. 

Press the 

EXIT

 button to exit the menu.

Digital Teletext Language

Decoding Page Language

English

West EUR

Move

Adjust

MENU: Return    EXIT: Exit

Teletext

LE-28GBR-A HD 黑色 (英国 SY13096)_IM V01.indd   29

2013-5-3   11:26:27

Содержание LE-28GX01

Страница 1: ... best from your television and ensure safe and correct installation and operation For any help concerning set up and use of your TV please call the Customer Helpline 0845 604 0105 Lines open 9am 8pm Monday to Saturday and 10am 4pm Sunday Important Please read these instructions fully before installing or operating Issue 1 10 05 13 LE 28GBR A HD 黑色 英国 SY13096 _IM V01 indd 1 2013 5 3 11 25 42 ...

Страница 2: ...LE 28GBR A HD 黑色 英国 SY13096 _IM V01 indd 2 2013 5 3 11 25 43 ...

Страница 3: ...5 HDMI Connections 16 SCART Connections 16 VGA Connections 16 Connections 14 16 How to navigate menus 17 Electronic programme guide EPG DTV mode 17 Teletext ATV mode 18 Digital Teletext DTV mode 19 Time Shift Function DTV mode 19 20 Recording DTV Programme onto a USB Storage Device 20 Timer Programming 21 Play Recorded Programme 22 Picture management 22 23 Sound management 23 24 Basic Features 17 ...

Страница 4: ...o not place any objects on top of the TV Only use the TV in moderate climates 10cm 10cm 10cm Power cord and plug The power cord plug should be easily accessible In case of storms and lightning when going on holiday or when the TV is not used for a long period of time t e k c o s r e w o p s n i a m e h t m o r f d r o c r e w o p e h t t c e n n o c s i d Do not place the TV furniture etc on the p...

Страница 5: ...g Do not dry cloth Batteries Warning Incorrect installation of batteries may cause the remote control Do not batteries of different types Do not Do not dispose of batteries with normal household Replacement parts hazards Servicing Warning Risk of exposure to radiation from class 1 class 3b visible and invisible laser beams Do not open the TV and stare directly into beam Warning J Customer Helpline...

Страница 6: ... other devices to your system or a games console control Any other technical issues you may need Call us today 0845 604 0105 Local call rates applies Lines open 9am 8pm Monday to Saturday and 10am 4pm Sunday Calls to Argos enquiry lines may attract a charge and set up fee from residential Y Z see www bt com pricing for details centres maybe recorded and monitored Calls from Republic of Ireland wil...

Страница 7: ...evices such as video video games audio set etc Stereo sound system Teletext fastext TOP text Headphone connection Automatic programming system Forward or backward manual tuning Sleep timer Child lock AVL Automatic Volume Limiting PLL Frequency Search PC input Plug Play for Windows 98 ME 2000 XP Vista Getting Started TV Features CH LIST P MODE S MODE LANG X TTX CANCEL FAV TV RD SUBTITLE TIMESHIFT S...

Страница 8: ...g is recommended for comfortable viewing Allow enough space between the TV and the wall to permit ventilation Avoid excessively warm locations to prevent possible damage to the cabinet or premature component failure WALL MOUNTING INSTALLATION GUIDELINES This television can be wall mounted as follows 1 Place the LED LCD Television onto a solid surface Please place some soft material over the front ...

Страница 9: ... DTV mode 9 LANG Select DTV audio language DTV mode 10 SOURCE Select among the different input signal sources DTV ATV AV SCART YPbPr HDMI1 HDMI2 HDMI3 PC USB 11 DISPLAY Display the present screen information such as the current channel and the input source 12 CH Select a channel 13 VOL 14 NICAM Switch between different audio channels only applicable when the TV programme has this feature 15 ASPECT...

Страница 10: ...V Display the Favourite Channel list ATV DTV mode 22 Record the current programme DTV mode 23 To start the timeshift playback DTV mode To start playback or pause USB mode 24 TIMESHIFT Start the time shift function DTV mode 25 TTX Turn on and off the Teletext function ATV DTV mode To skip to the beginning of the previous chapter track photo USB mode 26 SUBTITLE Display the subtitle which is broadca...

Страница 11: ... INDEX To select the page number of the index from teletext ATV DTV mode 31 REVEAL Reveals hidden information such as the answer to a quiz in teletext ATV DTV mode To advance playback rapidly USB mode 32 SUBPAGE Displays the subpage on the teletext screen ATV DTV mode 33 RED GREEN YELLOW BLUE Press these buttons directly to select corresponding function on the screen Getting Started CH LIST P MODE...

Страница 12: ...bPr HDMI1 HDMI2 HDMI3 PC USB Confirmed the selection on OSD menu 7 button Turns the TV on when in standby mode or turns the TV off into standby mode Getting Started Aerial connection TV Control buttons Rear side LE 28GBR A HD 黑色 英国 SY13096 _IM V01 indd 10 2013 5 3 11 26 04 1 2 3 4 5 6 7 Please note After unpacking allow the TV to reach ambient room temperature before connecting the TV to the mains...

Страница 13: ...hould be removed Otherwise the remote control may be damaged caused by battery leakage and corrosion Getting Started Switching the TV On With power cord plug connected to the mains power socket and TV in Standby mode To switch the TV on from standby mode either a The Remote control Press the button b The TV Press the button at the right of the TV Switching the TV Off Either press the button on the...

Страница 14: ...G TV RD The remote control is designed to control all the functions of the model you selected Volume Setting Press VOL button to increase the volume Press VOL button to decrease the volume A volume level scale slider will be displayed on the screen Programme Selection Previous or Next Programme Press CH button to select the previous programme Press CH button to select the next programme Programme ...

Страница 15: ...can Selects the auto scan type DTV ATV DTV ATV Start Press the OK button to start auto tuning Auto Scan will commence The display will show the progress of the tuning and the number of channels found Getting Started Initial setup Press the SOURCE button on the remote control and select DTV to switch the TV to Digital Terrestrial Television Broadcasting Information Banner Whenever you change channe...

Страница 16: ... an HDMI socket The TV can display High Definition pictures from devices such as a High Definition Satellite Receiver or DVD Player These devices must be connected via the HDMI sockets or Component Socket No sound connection is needed for an HDMI to HDMI connection 4 CI Slot Used to insert a CI card A CI card allows you to view all the channels that you subscribe to For more information see Condit...

Страница 17: ...ected via the SCART socket the TV will automatically switch to SCART mode 9 PC Input VGA PC AUDIO Connects a personal computer to the TV Connect the PC cable between the PC INPUT on the TV and the PC output on the PC Note If you connect a device to the TV via the PC cable you should also use an audio cable to connect your device to the PC AUDIO INPUT to enable audio 10 RF Input ANT Connects to aer...

Страница 18: ... off both the TV and the device before making any connections For more information refer to your device s own instruction book Note The Scart cable is not supplied You can connect a computer PC to the TV to display your computer s screen image on the TV Power off both computer and TV before making any connections Use a 15 pin D sub display cable to connect a PC to the TV Use an audio cable between...

Страница 19: ...w the schedule of the next day YELLOW Schedule Press the YELLOW button to view the preset reminders in the schedule list Press the YELLOW button to return to the EPG BLUE Reminder Press the BLUE button while on the selected programme the Reminder setting menu will be displayed Press the buttons to adjust the settings and then press the Save button to confirm the settings After confirmation the EPG...

Страница 20: ...letext Function TTX button to enter Teletext mode Press the INDEX button to display the index page Press the TTX button once to exit and the TV will return to the channel you were watching To select a page of text Find the number of the page in the index and enter it using the 0 9 buttons The number of the page will appear on the top left corner of the screen The page counter will search for your ...

Страница 21: ...video and sound may have a little bit of delay or be out of sync for a few seconds when the unit starts to playback the missed broadcast programme It will soon turn to normal 2 Press the 0 9 buttons to select a page number 3 Follow the instructions on digital teletext and move onto the next step by pressing OK RED GREEN YELLOW BLUE or 0 9 buttons etc 4 different service by pressing the 0 9 buttons...

Страница 22: ...ess the button again to resume playback Y button to return to normal playback OK If you want to exit the PVR Time Shift progress bar and OK button and then press the button to confirm Time Shift Function DTV mode Recording DTV Programme onto a USB Storage Device Recording will stop automatically when the disk is full adapter is connected to the mains supply adapter is connected to the mains supply...

Страница 23: ...e PROGRAM GUIDE 26 Dec 2008 10 00 26 Dec 2008 10 25 Big Cook Little Cook Penguin Cookey series with Big Cook Ben and foot high Little Cook Small Ben comes in to the cate wearing flippers and a mask he s found in the fancy dress box AD S PrevDate NextDate Schedule Reminder Rec Record OK Display EXIT Exit 009 BBC FOUR 071 CBeebies 081 BBC Parliament 087 Community 301 301 302 302 10 00 Big Cook Littl...

Страница 24: ...y Recorded Programme 1 Press the MENU button to display the main menu Press the buttons to select Picture in the main menu then press the or OK button it will highlight the first option 2 Press the buttons to select the option you want to adjust in Picture menu 3 Press the buttons to change the following settings TIPS You can change the value of brightness contrast sharpness and saturation when th...

Страница 25: ...NU button to display the main menu Press the buttons to select Sound or OK 2 Press the buttons to select the option you 3 Press the buttons to change the following settings TIPS You can change the value of treble and bass when the sound is in Personal mode You can press the S MODE button on the remote control to change the Sound Mode directly Sound Mode Allows the selection of an audio enhancement...

Страница 26: ...V DTV Mode Brodcast On Screen Display Mono Mono Stereo STEREO Dual DAUL I Sends the primary broadcast language to the loudspeakers DAUL II Sends the secondary broadcast language to the loudspeakers DAUL I II Sends the primary and secondary broadcast languages to the loudspeakers Auto Scan Use this to automatically find and store all available channels This is normally recommended if some channels ...

Страница 27: ...l reception is poor under ATV mode 1 Press the MENU button to display the main menu Press the buttons to select Channel in the main menu then press the or OK button it will highlight the first option 2 Press the buttons to select Manual Scan and then press the OK button On the sub menu select Analog Manual Scan and then press the OK button Analog Scan Displays the current frequency press the butto...

Страница 28: ...n to set the channel that you are currently watching as one of the favorite programmes Press the RED button to delete the selected channel Basic Features Channel Edit DTV mode 1 Press the MENU button to display the main menu Press the buttons to select Channel or OK 2 Press the buttons to select Channel Edit and then press the OK button to enter sub menu Delete Press the RED button to delete the s...

Страница 29: ...ation 2 Settings 3 Upgrade Press OK to confirm EXIT to quit Signal Information DTV mode 1 Press the MENU button to display the main menu Press the buttons to select Channel or OK button 2 Press the buttons to select Signal Information and then press the OK button to view the Signal Information 3 Press the EXIT button to exit the menu Network Name Channel Frequency Modulation Strength Quality MENU ...

Страница 30: ...select an age rating Key Lock is designed to prevent children from pressing the buttons on the TV The Lock System must be set On for this function to operate Use the 0 9 buttons to input the old password and then input the new 4 digit password Re enter new password for confirmation Reset all the lock settings to the factory defaults 5 Press the EXIT button to exit the menu Lock System management E...

Страница 31: ...ove Adjust MENU Return EXIT Exit Setup Audio Primary Language Audio Secondary Language English English Move Adjust MENU Return EXIT Exit Audio Languages Subtitle DTV Mode 1 Press the MENU button to display the main menu Press the buttons to select Setup or the OK 2 Press the buttons to select Subtitle and then press the OK button to enter sub menu OSD Language Audio Language Subtitle Teletext Blue...

Страница 32: ...SD Language Audio Language Subtitle Teletext Blue Screen Mode Setting Time Settings PVR Settings English On Home Mode Time Settings 1 Press the MENU button to display the main menu Press the buttons to select Setup or the OK 2 Press the buttons to select Time Settings and then press the OK button OSD Time Displays time of the on screen menu 10s 20s 30s 60s Off Sleep Timer Press the buttons to sele...

Страница 33: ...cord File Manager Standby Delete All Zoom In Out Replay Channel Name Program Name Recorded Time Total Time BBC ONE Pinky and Perky 25 Dec 2008 10 05 00 00 20 BBC ONE_Pinky and Perky_20081225_100524 is BBC ONE_Pinky and Perky_20081225_100529 is BBC ONE_Pinky and Perky_20081225_100530 is Current Playing File Info Device List Select Device List to check the information of the connected USB storage de...

Страница 34: ...tup management Move OK Select MENU Return EXIT Exit Setup Teletext Blue Screen Mode Setting Time Settings PVR Settings First Time Setup OAD Reset On Home Mode Move OK Select MENU Return EXIT Exit Setup Teletext Blue Screen Mode Setting Time Settings PVR Settings First Time Setup OAD Reset On Home Mode Reset Yes No 1 Press the MENU button to display the main menu Press the buttons to select Setup o...

Страница 35: ...and a warning statement will be shown on the screen If this happens please upgrade your USB storage device The TV screen will be blank temporarily as it will take time to start up and stabilize the connected hard disk This is normal and the starting time may vary depending on the brand and the memory size of the connected hard disk Disconnect the USB storage device if it is not in use Viewing Phot...

Страница 36: ...SB mode and then press the OK button 2 Press the buttons to select Movie and then press the OK button 3 Press the buttons to select your storage device and then press the OK button 4 Press the buttons to navigate in the movie folder and then press the OK button If you want to select the specified movie press the buttons to select the movie file and then press the OK button Entertainment If this fo...

Страница 37: ...code Type 7 Press the EXIT button to return to the previous menu Entertainment Movie Move Change Page OK Selete Quick Menu EXIT Return USB1 Movie AITEMP Movie MY PVR Photo Text Music LE32G 1 1 Quick Menu 00 05 13 00 00 22 FileName VideoCodec Resolution Bitrate Animals AVI MPEG4 640 x 480 4158120 bps AudioCodec SampleRate Channel MP3 44100 Hz 2 Photo Music Movie Text Text Move Change Page OK Selete...

Страница 38: ...ergy Consumption Data EEI A On Mode Power Consumption W 30W Standby Mode W 0 5W Maximum Power W 45W Standby Mode After 4 Hours Other Information Digital reception MHEG 5 ENGINE compliant with ISO IEC 13522 5 UK engine Profile 1 for UK Object carousel support compliant with ISO IEC 135818 6 and UK DTT profile for UK Frequency range 474 850 MHz for UK models 170 862 MHz for EU models Transmission st...

Страница 39: ...e terminal that is marked with the letter N The brown wire must be connected to the terminal that is marked with the letter L Plug replacement UK and Ireland only Connect blue lead to N Neutral Connect brown lead to L Live N L 5 display all the information below Supplier s name or trade mark Supplier s model product model no The visible screen diagonal in centimetres and in inches The on mode powe...

Страница 40: ...urning screen in still picture mode for extended periods No power plug is connect to the mains power socket No picture 1 No Picture means that your TV is not receiving a transmission Have you selected the correct button on the remote control Try once more Also make sure the correct input source has been selected 2 Is the aerial connected properly 3 Are the plugs connected tightly to the aerial soc...

Страница 41: ...indicate that equipment with these symbols should not be disposed of as general household waste If you want to dispose of the product or battery please consider the collection systems or facilities for appropriate recycling Notice The sign Pb below the symbol for batteries indicates that this battery contains lead Information for Users on Disposal of old Equipment and Batteries European Union only...

Страница 42: ...PRODUCT GUARANTEE LE 28GBR A HD 黑色 英国 SY13096 _IM V01 indd 40 2013 5 3 11 26 36 ...

Страница 43: ...LE 28GBR A HD 黑色 英国 SY13096 _IM V01 indd 41 2013 5 3 11 26 36 ...

Страница 44: ...LE 28GBR A HD 黑色 英国 SY13096 _IM V01 indd 42 2013 5 3 11 26 36 ...

Отзывы: