background image

11

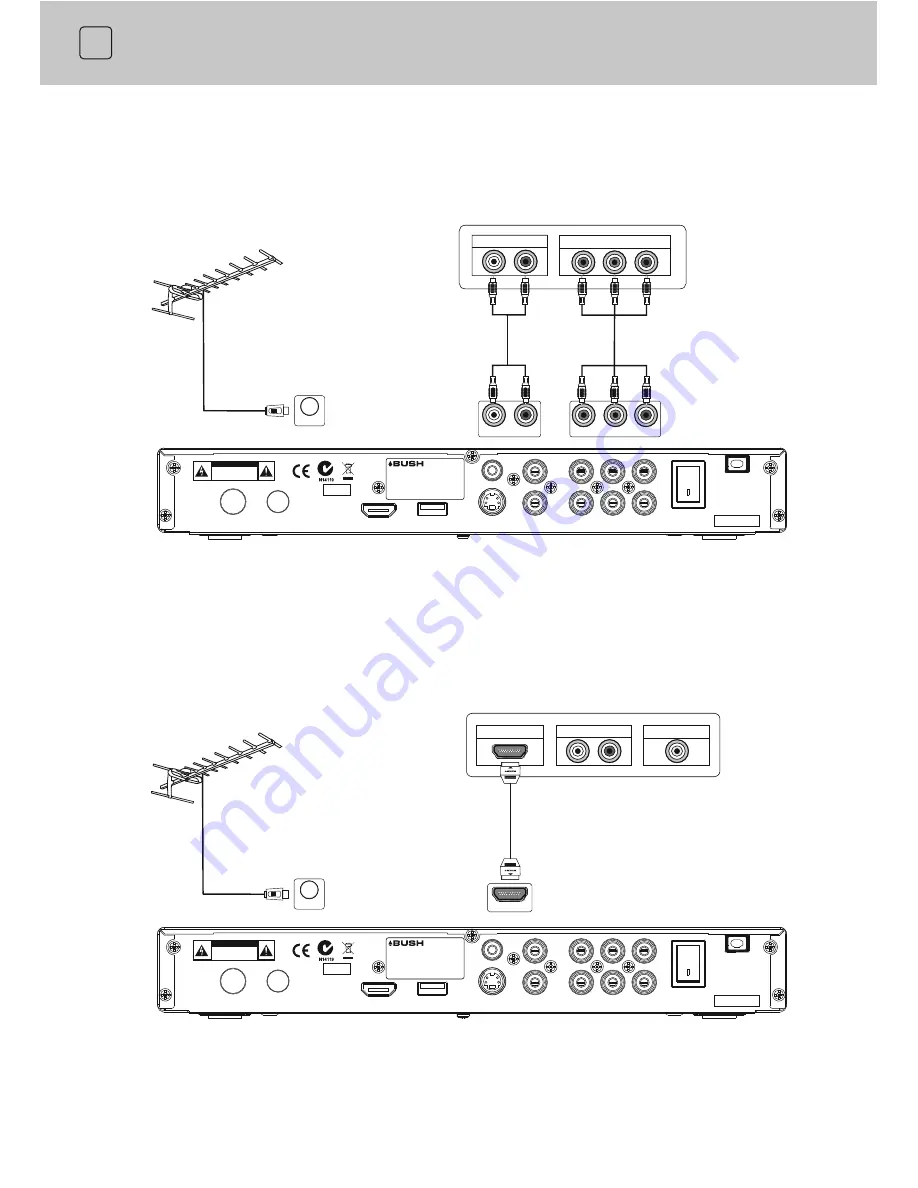
Connect the STB receiver via YPbPr output and Audio output
(for high definition viewing)

Connect the receiver via HDMI output (for high definition viewing)

Connecting to Equipments

AUDIO INPUT

HDTV Interface

Component VIDEO INPUT

Set Top Box Rear Panel

HDTV Interface

AUDIO INPUT

VIDEO INPUT

HDMI INPUT

Set Top Box Rear Panel

Antenna

Y

Pb

Pr

L- AUDIO - R

Antenna

HDMI

VIDEO

L

AC IN 240V~

50Hz 10W

OFF

ON

USB

ANT IN

RF OUT

HDMI

VIDEO

S-

R

L - AUDIO - R

COAXIAL

Pb

Pr

Y

Serial No.:

YYYY/MM

CAUTION

RISK OF ELECTRIC SHOCK

DO NOT OPEN

POWER SUPPLY: 240V~50Hz
POWER CONSUMPTION: 10WATTS
MADE IN P.R.C
BUSH WARRANTY: 1800 509 394 AUSTRALIA
BUSH WARRANTY: 0800 450 259 NEW ZEALAND

VIDEO

L

AC IN 240V~

50Hz 10W

OFF

ON

USB

ANT IN

RF OUT

HDMI

VIDEO

S-

R

L - AUDIO - R

COAXIAL

Pb

Pr

Y

Serial No.:

YYYY/MM

CAUTION

RISK OF ELECTRIC SHOCK

DO NOT OPEN

POWER SUPPLY: 240V~50Hz
POWER CONSUMPTION: 10WATTS
MADE IN P.R.C
BUSH WARRANTY: 1800 509 394 AUSTRALIA
BUSH WARRANTY: 0800 450 259 NEW ZEALAND

ANT IN

ANT IN

Содержание DFTA13HD

Страница 1: ...INSTRUCTION MANUAL Digital Set Top Box DFTA13HD DFTA13HDSIL The Gold Technical Support Line 1902 215 259 Personal Product Support Charges will apply at 2 95 per minute...

Страница 2: ......

Страница 3: ...ise you with the units many features and to ensure you get the very best from your purchase Your safety and the safety of others is important Therefore please ensure you read the Safety Instructions b...

Страница 4: ...ice in an unventilated cabinet or on top of a unit which emits heat Copyright Statement No part of this publication may be reproduced in any form by any means without prior written permission of BUSH...

Страница 5: ...tem Installation 22 23 System Configuration 24 Media Manager 29 Trouble shooting 34 Technical specifications 35 Warranty 36 Main Features 5 Package Contents 5 Front Panel 6 Rear Panel 6 Using the Remo...

Страница 6: ...le press of a button Main Features Fully compliant with Australian DVB T standards Full MPEG2 ISO IEC 13818 transport stream compliant audio video decoding Bandwidth of 7MHz supported COFDM demodulato...

Страница 7: ...to your TV VIDEO CVBS output to connect to your TV POWER Switch ON OFF USB To view JPG files via USB Input 6 1 2 3 1 2 3 4 5 6 7 9 8 10 Front Panel and Rear Panel Illustration 8 LED The LED light ind...

Страница 8: ...s on the bottom of the menu available To set the sleep time OK Select a channel or menu option VOL Increase or decrease the volume CH To change channels TV RADIO Toswitch the program between TV and Ra...

Страница 9: ...or an extended period remove the batteries to prevent possible leakage and corrosion 5 Do not drop apply shock or step on the remote control 6 Do not spill water on the remote control Notes If the rec...

Страница 10: ...ys at TV remote control such as VOL VOL CH CH and F1 F2 are reserved for any other keys you want to set up Note 1 When you finish setting the learning 2 The learning function of this remote control ma...

Страница 11: ...ceiver to the TV and Hi Fi System For high definition viewing your TV must support either 576p 720p or 1080i resolution Also the connection between the STB receiver and TV must be YPbPr component or H...

Страница 12: ...L AC IN 240V 50Hz 10W OFF ON USB ANT IN RF OUT HDMI VIDEO S R L AUDIO R COAXIAL Pb Pr Y Serial No YYYY MM CAUTION RISK OF ELECTRIC SHOCK DO NOT OPEN POWERSUPPLY 240V 50Hz POWERCONSUMPTION 10WATTS MADE...

Страница 13: ...IN 240V 50Hz 10W OFF ON USB ANT IN RF OUT HDMI VIDEO S R L AUDIO R COAXIAL Pb Pr Y Serial No YYYY MM CAUTION RISK OF ELECTRIC SHOCK DO NOT OPEN POWERSUPPLY 240V 50Hz POWERCONSUMPTION 10WATTS MADEINP...

Страница 14: ...e receiver for the first time or restored to factory default the Main Menu will be displayed Select the System Installation and choose auto scan to search for channels When the unit has finished scann...

Страница 15: ...ancel mute press the key again or press VOL VOL Key Change an audio language and audio mode TIMER Press the button to TIMER set the sleep timer Quick Select Press the button to show the channel list P...

Страница 16: ...es on off NOTE Transmission of subtitles depends on the program providers Teletext service 1 PresstheTEXTbuttontoopenateletextpage iftheteletextistransmitted 2 Press the TEXT EXIT button again or pres...

Страница 17: ...iew the event information of the previous day press the button to the view the event information of the next day press the button to Wakeup Timer YELLOW enter For more detailed information view Wakeup...

Страница 18: ...downward to the desired menu 3 Press the button to enter into the sub menu you select OK 4 Press the EXIT button to exit the main menu The main menu is divided into 4 sections please refer to the men...

Страница 19: ...System Installation Auto Scan Manual Scan Delete Carrier System Configuration System Setup Factory Default Accessories Game Version New Channel Edit Channel Delete All Language OSD TV Time Wakeup Tim...

Страница 20: ...l to the place you want then press the 3 Press 5 to rename the channel name 4 Press to exit the menu OK OK OK OK EXIT delete button numeric 2 Press to select the channel and 0 9 to select the group th...

Страница 21: ...the change according to the menu showed on the below menu bar 3 Press to exit the menu New Channel Edit Channel OK EXIT 1 Go to Main Menu Channel Manager 2 Press and to select the item and press numer...

Страница 22: ...menu will be with you if you want to do press to choose yes or no then press to confirm 3 Press to exit the menu Delete All OK EXIT TV Carriers want to showed to confirm that Delete All There are thre...

Страница 23: ...nual Scan 2 Press to choose the Channel No or Frequency or Scan press and to set what you want 3 Press to exit the menu 22 Auto Scan 1 Go to Main Menu System Installation Auto Scan 2 Press to start sc...

Страница 24: ...stem Installation Delete 2 Press to select one you want to delete and press There will be an info up to remind you of confirming deleting YES or NO Press to choose and confirm 3 Press to exit the menu...

Страница 25: ...Wakeup Timer Parental Lock Language 1 Select Language and press to enter into it 2 Press to choose the item you want to set Press and OK to select what you would like There are eight languages for OS...

Страница 26: ...s When you choose ON the initiate time is about 15 20 seconds 4 Press to exit the menu OK OK EXIT TV 1 Select TV and press to enter into it 2 Press to choose the item and press to match with your TV s...

Страница 27: ...the date and time with the numeric keys 0 9 3 Press to exit the menu OK EXIT 1 Select Wakeup Timer and press to enter into 2 Press to choose the item and press or numeric keys 0 9 to set No Timer Mode...

Страница 28: ...to exit the menu 1 Go to the Main Menu System Configuration Factory Default 2 Press there will be a window displayed to confirm with you if you want to default all of the settings Press to choose YES...

Страница 29: ...K EXIT Game OK OK EXIT 1 Select Game and Press to enter it 2 Press to choose the game you want then Press to enter There are two games Snake and Tetris 3 Press to exit the menu System Configuration Ac...

Страница 30: ...OSD picture displayed as below press the colour button to playlist You will see the Media Browser as pictured below You should note that there are four in the OSD picture They are Folder File Playlist...

Страница 31: ...JPG file in the File pane Press the coloured button the JPG file will list in the Playlist pane Press the arrow button the highlight bar will show in the Playlist Press the picture will display on fu...

Страница 32: ...play For one by one displaying you can press the coloured button to set the preference In the Preference menu you can set play mode intro time slide show time and transition by and buttons Press to sa...

Страница 33: ...delete the playlist Press the coloured button to add another playlist The operation is the same as the above steps from 5 to 7 Press the coloured button to rename the playlist which operation is the s...

Страница 34: ...afe Remove 2 Press it will shows an OSD to confirm with you if remove media 3 Select YES to remove the USB NO to cancel remove Please remove the USB from the receiver as per the above instructions Do...

Страница 35: ...aerial Scrambled channel message Channel is scrambled Select an alternative channel Forgotten channel lock code Use the override code 4000 Receiver off Plug in and turn on receiver Handset not aimed...

Страница 36: ...Aspect Ratio 4 3 Letterbox 16 9 Panscan fullscreen Auto Sound Mode Right Left Stereo Size 280x195 5x37mm Others Weight Net 2 1 kg Specifications are subject to change without prior notice This marking...

Страница 37: ...id within boundaries of the country of purchase 2 The product must be correctly assembled and operated in accordance with the instructions contained in the manual 3 This product must be used solely fo...

Страница 38: ...www bushaustralia com au...

Отзывы: