background image

Product support

Help is always at hand

Troubleshooting

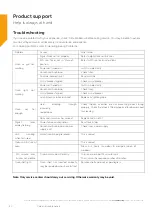
If you have a problem with your appliance, check the table below before calling service. You may be able to avoid a 
service call by and avoid unnecessary inconvenience and expense.  
For cooking problems, refer to Handling Baking Problems. 

Problem 

Causes 

What to do 

Oven  or  grill  not 
working  

Digital Clock not set properly 

Refer to digital timer instructions 

120  min  Timer  not  in  “Manual” 
position 

Refer to 120 min timer instructions 

Power not turned on 

Switch on electricity 

Household fuse blown 

Check fuses 

Controls incorrectly set 

Reset controls 

Circuit breaker tripped 

Check circuit breaker 

Oven 

light 

not 

working 

Power not turned on 

Switch on electricity 

Household fuse blown 

Check fuses 

Circuit breaker tripped 

Check circuit breaker 

Lamp blown or loose in socket 

Replace or tighten globe 

Oven 

not 

hot 

enough 

Heat 

escaping 

through 

incorrectly 

sealed door 

Check  shelves  or  dishes  are  not  preventing  door  closing 
properly, Check that door is fitted properly after door removal 
for cleaning  

Door seal is worn or has moved 

Replace seal or refit it 

timer 

Digital 
display flashing 

Power failure or interruption 

Reset time of day 

Household fuse blown or power 
supply is off 

Check fuses, power supply 

Unit 

smoking 

when first used 

Protective oils being removed 

This is normal 

Odour on first use of 
oven 

This is normal 

Allow  2–4  hours  for  odour  to  dissipate  (open  all 
windows) 

120  minute  timer 

buzzer not audible 

Timer not wound sufficiently 

Turn timer knob past 15 minute mark 
Then turn to the required number of minutes 

Oven shelf tight 

Oven  shelf  not  inserted  correctly, 
may be upside down or back to front 

Remove shelf and insert as per diagram 

Note: Only service centers should carry out servicing. Otherwise warranty may be void.


Care and maintenance

30

If you require any technical guidance or find that your product is not operating as intended, a simple solution can often be found in the 

Troubleshooting

 section of these instructions, 

Содержание BETAW50B

Страница 1: ...Instruction manual BETAW50B BETAW50W ...

Страница 2: ...ns here with your instructions Don t worry there s nothing too technical coming up Just simple step by step guidance to get you up and running quickly Sound good Then let s get started Help and Guidance We re here to help you get the most from your Freestanding Cooker Should you require any guidance a simple solution can often be found online at www bush support com If you still require further as...

Страница 3: ...11 Safety information Safety information Getting to know your Freestanding Cooker Overview Accessories 12 Installing your Freestanding Cooker 14 15 1 2 3 4 5 6 Electrical connection 18 26 27 Using your Freestanding Cooker 27 Care and Maintenance Cleaning Replacing oven lamps How to remove the oven doors 19 20 21 Control panel Oven functions General oven and cooking tips Practical Cooking Advice Us...

Страница 4: ......

Страница 5: ...1 Safety information ...

Страница 6: ...n for the first time your cooker may give off an unusual odour from the heating elements and insulation materials This is normal for cooking appliances To eliminate this odour run the oven at 250 degrees for 40 60 mins with the oven empty WARNING Before obtaining access to terminals all supply circuits must be disconnected DURING USAGE IMPORTANT This appliance can be used by children aged from 8 y...

Страница 7: ... in accordance with all applicable local and international standards and regulations IMPORTANT Maintenance and repair work must only be performed by authorised service technicians Installation and repair work that is carried out by unauthorised technicians is dangerous and could invalidate your guarantee IMPORTANT When the door of the oven is open do not hang or lean anything on it You may unbalan...

Страница 8: ......

Страница 9: ...Getting to know your Freestanding Cooker 2 ...

Страница 10: ...now your Freestanding Cooker You ll be up and running in no time Ready Let s begin Please read these instructions carefully They contain important information which will help you get the best from your freestanding cooker and ensure safe and correct installation and operation If you require any further assistance our technical experts are happy to help For full details refer to the product support...

Страница 11: ...itions 5 Wire shelf 6 Grill door 7 Shelf positions 8 Door seal 9 Baking tray 10 Hinge 11 Main oven door 12 Anti slip feet Overview Getting to know your Freestanding Cooker 11 or online at www bush support com If you still require further assistance call one of our experts on 01759 487838 13 14 13 14 13 Small hot plate 14 Big hot plate ...

Страница 12: ... Baking tray 1 x Grill insert 1 x Grill pan handle 2 x Chrome shelf 3 1 2 4 Getting to know your Freestanding Cooker 12 If you require any technical guidance or find that your product is not operating as intended a simple solution can often be found in the Troubleshooting section of these instructions ...

Страница 13: ...Installing your Freestanding Cooker 3 ...

Страница 14: ...he back wall and the rear of the appliance to allow for ventilation and air circulation 5 If fitted the extractor fan must be at least 65cm above the hotplates If no fan is fitted the minimum distance between the hotplates and any cabinet or other structure must be 75cm First Use IMPORTANT When using your oven for the first time your cooker may give off an unusual odour from the heating elements a...

Страница 15: ...ELECTRIC SHOCK DO NOT REMOVE COVER OR BACK NO USER SERVICEABLE PARTS INSIDE REFER SERVICING TO QUALIFIED SERVICE PERSONNEL RISK OF ELECTRIC SHOCK DO NOT OPEN CAUTION CAUTION TO REDUCE THE RISK OF ELECTRIC SHOCK DO NOT REMOVE COVER OR BACK NO USER SERVICEABLE PARTS INSIDE REFER SERVICING TO QUALIFIED SERVICE PERSONNEL Levelling feet The height and level of the appliance can be adjusted by rotating ...

Страница 16: ... E 1N Min4 Min4 Min4 Connecting the supply cable to the mains Install an approved circuit breaker with a minimum contact opening of 3 mm between the appliance and the mains fuse box The circuit breaker should be sized according to the load and should comply with current regulations the earth wire should not be interrupted by the circuit breaker The supply cable should be positioned so that it does...

Страница 17: ...Using your Freestanding Cooker 4 ...

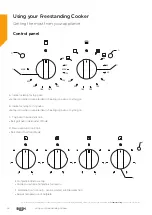
Страница 18: ...urned on A Indicator lamp for top oven Lamp is on when oven element is heating up oven or cycling on B Indicator lamp for top oven Lamp is on when oven element is heating up oven or cycling on C Top oven thermostat knob Sets grill oven thermostat Mode D Main oven function Knob Sets Oven Function Mode F Hotplate Control Knob can be rotated in either direction Adjusts temperature of hotplate Control...

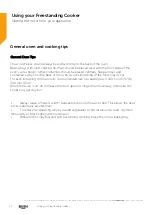
Страница 19: ...tom Element Hot air comes from the upper and lower element in the oven This is the conventional cooking method that cooks your food equally Joints of meat will benefit using this cooking function and any roasted items Bottom Element Bottom element cooking is used for foods that typically need cooking from the underneath side Cakes and bread as an example can be cooking using this function mode Usi...

Страница 20: ...leave the door open for longer than necessary otherwise the knobs may get very hot Always leave a finger s width between dishes on the same shelf This allows the heat to circulate freely around them To reduce fat splashing when you add vegetables to hot fat around a roast dry them thoroughly or brush lightly with cooking oil Where dishes may boil and spill over during cooking place them on a bakin...

Страница 21: ...ke from forming place a dripping pan on the 1st oven rack from the bottom Baking Cakes When baking cakes always place them in a preheated oven Make sure you wait until the oven has been preheated thoroughly the pilot lamp will turn off Do not open the oven door during baking to prevent the cake from dropping In general Pastry is too dry Increase the temperature by 10 and reduce the cooking time Pa...

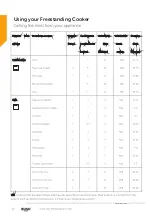
Страница 22: ...Freestanding Cooker Troubleshooting Selector knob setting Food to be cooked Weight in kg Cooking rack position from bottom Preheating time Minutes Thermostat knob setting Cooking time Minutes Convection Grill 1 1 ...

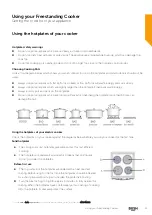
Страница 23: ... pots and pans which are too large Pans which overhang the hotplate more than 50 mm can damage the hob Using the hotplates of your electric cooker Check the hotplates on your cooker against the diagrams below before you use your cooker for the first time Solid hotplates The strong solid cast hotplates give wide contact for fast efficient cooking The hotplates are sealed all around which means that...

Страница 24: ......

Страница 25: ...Care and maintenance 5 ...

Страница 26: ...ollow the instructions provided with the cleaner Never use steam cleaner for cleaning inside the cooker Do not clean using caustic creams abrasive cleaning powders thick wire wool or hard tools Enamelled parts of the cooker can be damaged if excess cleaning liquids are not immediately removed After cleaning the interior parts of the cooker with a soapy cloth rinse it and then dry thoroughly with a...

Страница 27: ... 300 with the following characteristics Voltage 220 240V Wattage 25W Type E 14 Replace the glass cover Reconnect the appliance to the mains power supply Cleaning the oven door How to remove the oven doors For a more thorough clean you can remove and disassemble the oven door Proceed as follows Oven door structures 1 remove and assemble procedure Open the lever A completely on the left and right hi...

Страница 28: ... capacity Lower oven usable capacity Power consumption for big hot plate Power consumption for small hot plate Total Hot plate power consumption Total power Energy rating BETAW50B BETAW50W 220 240V AC 50Hz 1210 1440W 2220 2640W 3430 4080W 31L 62L 1370 1630W x2 915 1090W x2 4570 5440W 8000 9520W A ...

Страница 29: ...Product support 6 ...

Страница 30: ...rectly sealed door Check shelves or dishes are not preventing door closing properly Check that door is fitted properly after door removal for cleaning Door seal is worn or has moved Replace seal or refit it timer Digital display flashing Power failure or interruption Reset time of day Household fuse blown or power supply is off Check fuses power supply Unit smoking when first used Protective oils ...

Страница 31: ...open 8am 7pm Monday to Saturday and 10am 4pm Sunday Calls to Bush enquiry lines may attract a charge and set up fee from residential lines depending on your call plan tariff Mobile and other providers costs may vary see www bt com pricing for details For Security and training purposes telephone calls to and from customer service centres maybe recorded and monitored Calls from Republic of Ireland w...

Страница 32: ...anying the product the crossed out wheelie bin symbol indicates that this appliance fitting may not be treated as household waste Instead it shall be handed over to the applicable collection point for the recycling of electrical and electronic equipment Disposal must be carried out in accordance with local environmental regulations for waste disposal For more detailed information about treatment r...

Страница 33: ...t with us today so we can provide you with our best possible after sales service and useful updates www bushregistration co uk FREEPHONE 0800 597 8548 Lines are open 8am 8pm 365 days a year Calls may be recorded and monitored Your Bush Guarantee This product is guaranteed for twelve months from the date of original purchase Any defect that arises due to faulty materials or workmanship will be repa...

Страница 34: ......

Страница 35: ......

Страница 36: ...Contact www bush support com Helpline 01759 487838 ...

Отзывы: