background image

Page 4

Page 4

Page 4

Page 4    

Burnside P355 GSM Phone

Burnside P355 GSM Phone

Burnside P355 GSM Phone

Burnside P355 GSM Phone    

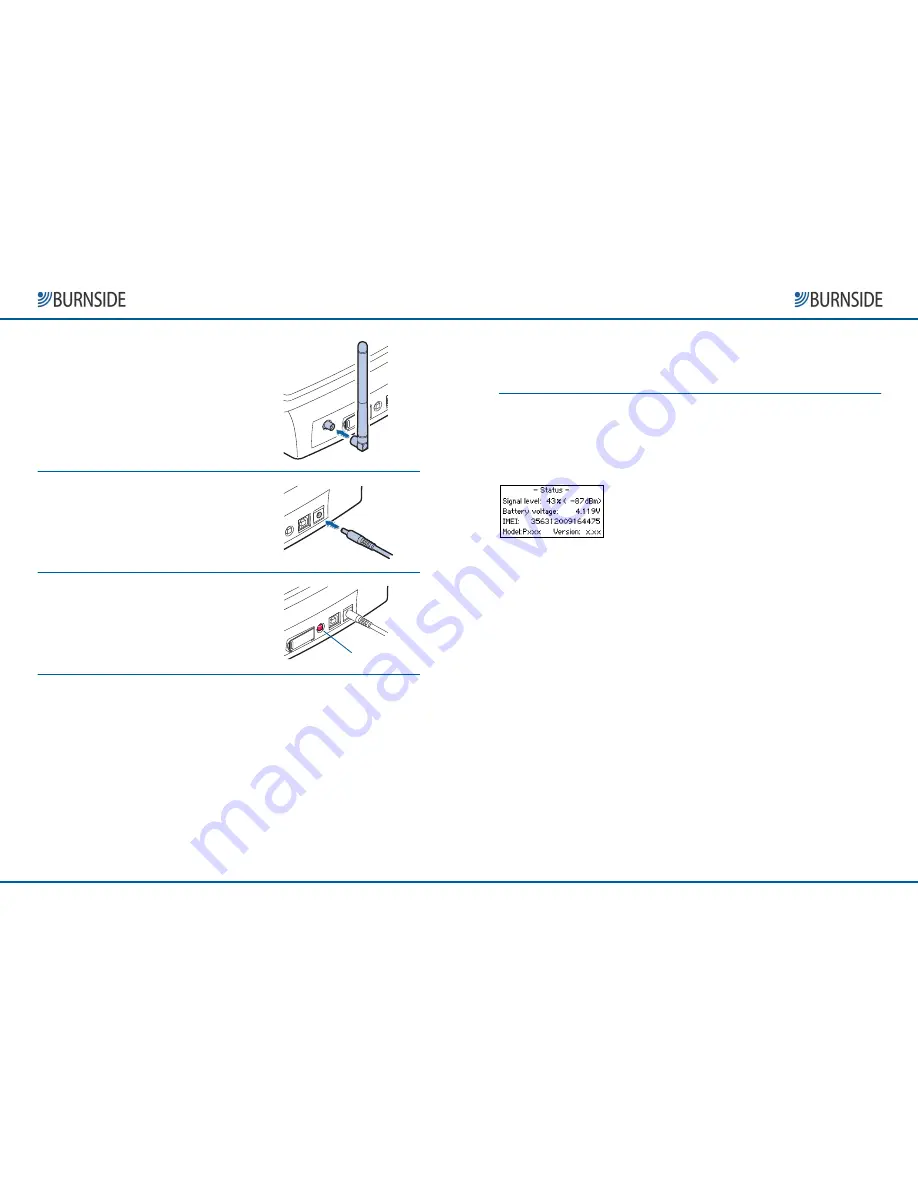
STEP 4 - Attach the antenna 

Align the supplied antenna with the 
circular connector on the far left of the 
rear panel. Attach the antenna by twisting 
the connector collar clockwise until it is 
finger-tight: do not overtighten. 
 
In use, the antenna should always be 
vertical. The supplied antenna has a hinge 
so that you can position it correctly. 

STEP 5 - Connect the power adapter 

Connect the lead from the supplied power 
adapter to the socket on the far right of 
the rear panel. Plug the power adapter 
main body into a nearby mains outlet. 

STEP 6 - Switch on the phone 

On the rear panel, press and hold the red 
button until the display responds, then 
release it. To switch the phone off, press 
and hold the red button until the display 
goes blank.


Power switch 

Congratulations! 

Your new phone is now ready to use. For detailed instructions on configuring 
and personalising your phone, refer to the Menu Options section, starting at 
page 11.


Page 27

Page 27

Page 27

Page 27    

User Guide: Menu options 

User Guide: Menu options 

User Guide: Menu options 

User Guide: Menu options ---- Settings

 Settings

 Settings

 Settings    

Restore 

Use this option to reset the phone settings to their factory defaults. The restore 
operation does not affect the contents of the phonebook, the SMS message 
boxes or the call register. 

 
Status 

This screen provides additional status information about your phone. In 
particular, it shows the currently available network signal strength, as a more 
precise measurement than the 'strength bars' displayed in the standby screen. 
This is helpful if you have difficulty obtaining a good signal, and want to try the 
phone in different locations. 


To view this status information, press the Menu 

Menu 

Menu 

Menu button 

from standby, and use the arrow keys to display the 

Status 

option and then press Select

Select

Select

Select. The detailed 

items are described below. 


Signal level


Shows the current signal strength expressed in logarithmic 
form (dBm) and as a percentage roughly equivalent to actual 
received signal level compared to its possible maximum. 


You can use this signal level reading when positioning the 
phone and antenna for best reception. Display the 

Status


screen and move the phone and antenna until you achieve 
the highest percentage reading (or lowest negative dBm 
reading) available in the location. 


Battery voltage

  Indicates the voltage charge of the battery. The working 

range is between 3.6V and 4.2V. At 3.6V, the phone will 
automatically switch off to protect the battery from 
discharging completely. 


IMEI


The International Mobile Equipment Identity is the unique 
code stored on your phone that differentiates it from every 
other phone, worldwide. 


Model


Indicates the model number of the phone. 


Version


Indicates the current version of the internal phone software. 


Содержание P355

Страница 1: ...the antenna as far away as practical or consult your hearing aid supplier Other medical devices Other medical devices Other medical devices Other medical devices Operation of any radio transmitting e...

Страница 2: ...e Version 1 2 Published November 2010 Burnside P355 GSM Phone Burnside P355 GSM Phone Burnside P355 GSM Phone Burnside P355 GSM Phone Page 31 Page 31 Page 31 Page 31 User Guide Accessories User Guide...

Страница 3: ...ngs General Advanced Settings Enable the Headset option and press Select Select Select Select to save the setting Note When using the Handset Headset Handset Headset Handset Headset Handset Headset Bo...

Страница 4: ...olume during calls and to control menus Page 29 Page 29 Page 29 Page 29 User Guide Troubleshooting accessories User Guide Troubleshooting accessories User Guide Troubleshooting accessories User Guide...

Страница 5: ...percentage level Signal strength more bars better If you continue to have difficulty receiving a reliable wireless signal you might need to use an alternative antenna Visit www burnsidetelecom com fo...

Страница 6: ...ents of the phonebook the SMS message boxes or the call register Status This screen provides additional status information about your phone In particular it shows the currently available network signa...

Страница 7: ...with the seconds using two digits per item and a 24 hour clock The Clear Clear Clear Clear key can be used to delete incorrectly entered digits Press the Select Select Select Select button to save the...

Страница 8: ...ion Page 25 Page 25 Page 25 Page 25 User Guide Menu options User Guide Menu options User Guide Menu options User Guide Menu options Settings Settings Settings Settings Edit banner Within the General m...

Страница 9: ...code even if the contact is in your area To erase the last entered digit press and release the Clear Clear Clear Clear button To erase all entered digits press and hold the Clear Clear Clear Clear bu...

Страница 10: ...her pick up the handset or press the Handsfree Handsfree Handsfree Handsfree button to place the call Page 23 Page 23 Page 23 Page 23 User Guide Menu options User Guide Menu options User Guide Menu op...

Страница 11: ...A message will be displayed to confirm the diversion or notify an error Page 9 Page 9 Page 9 Page 9 User Guide Managing your calls User Guide Managing your calls User Guide Managing your calls User Gu...

Страница 12: ...er Call register Call register Call register Call register The call register holds a record of all recent incoming and outgoing calls Using the list you can quickly place a call to a recent number or...

Страница 13: ...r s message service centre to retrieve incoming text messages Usually the service centre number is pre configured on your SIM card and requires no alteration However your phone provides access to the...

Страница 14: ...er a space character press the 0 0 0 0 key To begin a new line press the 0 0 0 0 key twice To erase the last entered character press and release the Clear Clear Clear Clear button To erase the whole m...

Страница 15: ...ect button twice to send Page 13 Page 13 Page 13 Page 13 User Guide Menu options User Guide Menu options User Guide Menu options User Guide Menu options Phonebook Phonebook Phonebook Phonebook Phonebo...

Страница 16: ...ance Paris 01 9876 5432 enter 33198765432 To erase the last entered digit press and release the Clear Clear Clear Clear button To erase all entered digits press and hold the Clear Clear Clear Clear bu...

Страница 17: ...original details The phone will check that there is sufficient space for the entries to be copied in the destination memory before starting Note Most SIM cards cannot store contact names as long as t...

Отзывы: