


EN
24
carried out after use when the product
has cooled and when the gas supply from
the gas cylinder is turned off.
• Do not use aggressive detergents or oven
cleaners on enamelled surfaces. Wash
with a mild, non-abrasive detergent and
hot soapy water. Wipe dry with a soft
cloth.
• Do not use abrasive or flammable
detergents, they can damage the product
and are a fire risk.
STORAGE
• Your gas cylinder must be stored outdoors
in a well ventilated area and must be
disconnected from your boiling burner for
outdoor use when not in use. Ensure that
you are outdoors and away from any
sources of ignition before attempting to
disconnect your gas cylinder from your
boiling burner for outdoor use.
• When you are using your boiling burner
for outdoor use after a period of storage,
please ensure to check for gas leaks and
check for any obstructions in the burner
etc. before using.
• If boiling burner for outdoor use is stored
outdoors ensure to check that all areas
under the front control box is free from
any obstructions (dirt, insects etc.) as this
may affect the flow of gas.
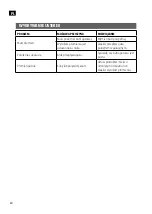
TROUBLESHOOTING
PROBLEM
POSSIBLE CAUSE
ACTION
Small flame.
Low level in gas cylinder.
Replace with a full gas cylinder.
The height of the flame is set
too low.
Increase the flow of gas with
the control knob.
The burner will not light.
No gas flow.
Check if the gas cylinder is
empty.
The flame goes out.
Strong or gusty wind.
Put the product in a sheltered
place, or increase the height of
the flame.
• Store your boiling burner for outdoor use
in a cool dry place. It may be necessary to
dry the boiling burner for outdoor use and
the inside of the cover if used.
REFITTING THE BURNER
When refitting the burner, be careful to check
that the venture tubes of the burner fit over
the valve outlets. It is extremely important
to center the burner on the orifice properly
to prevent a fire hazard or explosion. When
properly installed, all screws holding the burner
in place will be able to screw in without force.
If the refit of the burner fails, please contact
service center, and do not repair yourself.
After successfully refitting all burners, the
leakage test should be performed. Please see “
LEAKAGE TEST SECTION”.
After leakage test, the light test should be also
performed. Please see “LIGHTING SECTION”.
Please note the burner lighting test should be
done burner by burner.
FIG. 10
Содержание 012682
Страница 4: ...1 2 1 x1 5 x3 2 x1 6 x3 3 x3 7 x3 4 x1 1 2 3 4 ...
Страница 5: ...3 5 4 5 6 7 ...
Страница 6: ...590mm 310mm 6 O C L O S E P E N 7 8 1 2 3 4 5 ...
Страница 7: ...10 9 ...