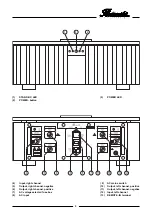
Burmester 956 MK 2 Скачать руководство пользователя страница 5

ACCESSORIES

4

14

+

-

+

-

+

-

15

+

-

+

-

WIRING DIAGRAM FOR STEREO OPERATION

WIRING DIAGRAM FOR MONO OPERATION (bridged)

from pre - amp 

right channel

WIRING DIAGRAM FOR BI - AMPING

with a split passiv frequence - crossover 

built into the speaker

from pre - amp right and

left channel respectively

from pre - amp right and

left channel respectively

from pre - amp 

left channel

16

adapter plugs

XLR - RCA

Tweeter /

midrange driver

Bass driver

red 

blue

BI - AMP
adapter

MONO
adapter

red

blue

necessary to connect unbalanced cables 

to the balanced input terminals

supplied as standard

Содержание 956 MK 2

Страница 1: ......

Страница 2: ......

Страница 3: ...ing quality with technical innovation and the highest degree of operating flexibility We urge you to read this user manual in its entirety before setting up the 956 MK 2 for the first time It will ena...

Страница 4: ...Input right channel 5 Output right channel negative 6 Output right channel positive 7 AC voltage selector fuse box 8 AC input 9 AC mains switch 10 Output left channel positive 11 Output left channel n...

Страница 5: ...siv frequence crossover built into the speaker from pre amp right and left channel respectively from pre amp right and left channel respectively from pre amp left channel 16 adapter plugs XLR RCA Twee...

Страница 6: ...offers the possibility of remotely switching the 956 MK 2 on and off from your preamplifier or the D A converter In order to do this the REMOTE IN terminal 13 of the 956 MK 2 must be connected to the...

Страница 7: ...use the 956 MK 2 in STEREO mode make the following connections 4 input right channel 6 speaker terminal right channel positive 5 speaker terminal right channel negative 12 input left channel 10 speake...

Страница 8: ...owering the volume and waiting The 956 MK 2 will re enable the speaker outputs as soon as the voltage falls below the upper limit GENERAL INSTRUCTIONS Before opening the housing cover the AC cord must...

Страница 9: ...W Idling 90 W Power max 600 W 230 V setting 2 x 3 15 A slow blow 115V setting 2 x 6 3 A slow blow The specifications do not take into account the space needed for connecting plugs We reserve the righ...

Страница 10: ......

Страница 11: ......

Страница 12: ......

Отзывы: