Burg Wächter 4003482560228 Скачать руководство пользователя страница 29

English I 

29 

secuENTRY KeyApp - iOS

 English I 

29 

Fig. 1

Fig. 1

Fig. 3

Fig. 2

Choose a Video Bell

Swipe to the left 

Show lock 

Swipe to the left 

Remove Video Bell:

Remove assigned locks:

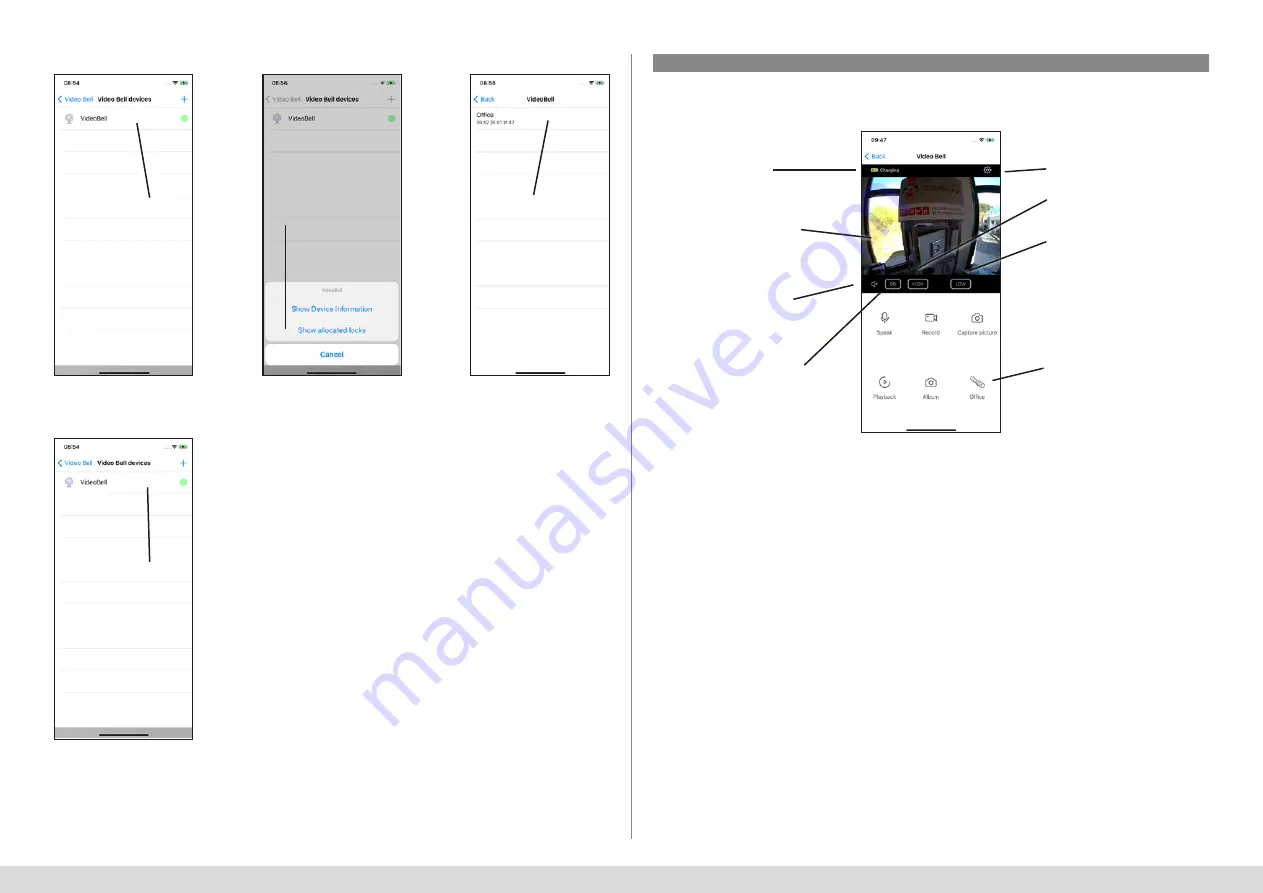
5.3.4 Video Bell display

Locks that are contacted per Bridge may also contain access codes limited by time. In doing so however, it is important 

that these are also activated in the chronological order. 

One-time access keys are also possible in the future.

Speak:


Activates/deactivates the microphone enabling you to speak to the person at the door.

Record:


Starts and stops the recording of video and sound images on the smartphone,

Take photo:


Saves a photo to the smartphone

Playback:


Retrieves recordings from the SD card inserted in the device 

Album:


Opens your photo/video app to view the recorded media

Important: 

Please observe the legal requirements of the General Data Protection Regulation (GDPR).

Fig. 1

Battery level 

Open settings menu

View of the device 

Setting the PIR sensor sensitivity 

Switch between Standard & 

High Definition

Set motion sensitivity

Switch between mute & 

sound playback on your 

smartphone

Open lock

(only available with 

assigned lock)

secuENTRY KeyApp - iOS

Содержание 4003482560228

Страница 1: ...ignments 26 5 3 4 Video Bell display 29 5 3 5 Firmware update 30 5 3 6 Direct access button 30 5 4 BURGcam 30 5 4 1 Login create an account 31 5 4 2 Family 33 5 4 3 BURGcam units assignments 36 5 4 4...

Страница 2: ...y considerably The secuENTRY 5670 Bridge allows you to open your lock conveniently from a long distance An internet connection is required for both the smart device and the bridge It is also possible...

Страница 3: ...nter the e mail address of the locking system administrator here Select whether you wish to set up a BW Cloud account wish to receive automatic information about updates wish to receive the BW Newslet...

Страница 4: ...hort period Press the OK button Press to open Using the GET ACCESS button now the lock can be actuated For this purpose hold the smartphone in front of the lock and press the button If the transmissio...

Страница 5: ...in the lock after a short period Press the OK button This section gives you a description of the various functions The E Key menu contains functions for using secuENTRY profile cylinders Note The Man...

Страница 6: ...ould be opened in this manner As soon as the registered smartphone is within the area of detection the lock is opened automatically Attention the response time until releasing for opening the lock dif...

Страница 7: ...tically within 3 minutes as soon as it is within the reception range and the system has been detected Then the KeyLess function deactivates again Timer Under this menu you can setup the time window wh...

Страница 8: ...ame lock Remove lock Fig 1 Fig 3 Fig 2 Fig 1 Fig 3 Fig 1 Fig 4 Fig 2 Fig 1 Fig 2 Enter the name for the device and corresponding administrator code Press the START PROCESS button The KeyApp is registe...

Страница 9: ...he buttons Then confirm with OK As an alternative a direct access button that has not been assigned on the start screen can be pressed to open the menu Fig 1 Add a lock Fig 3 Fig 4 Fig 2 Press the Add...

Страница 10: ...are contacted via a bridge are contacted by WLAN instead of Bluetooth As a result the opening takes a little longer but you are able to open the lock from everywhere as long as you have an internet c...

Страница 11: ...are connected via one bridge can also be programmed via this and receive codes that have been entered via the keypad Add a lock Remove lock Fig 1 Fig 2 Fig 3 Press the Menu button Press the Bridge bu...

Страница 12: ...out Fig 1 Fig 1 Fig 2 Enter your password and press the button You have successfully logged in Press this button Fig 4 Fig 6 Fig 5 Fig 7 Click on this button to access for registration Choose a passw...

Страница 13: ...that you have received per e mail and press the button Enter your email address and press the button Press this button Press this button Enter your new password Press the command button Enter the 6 di...

Страница 14: ...st once by the family administrator The administrator must then add a family group and invite the rest of the family members to it Once the invitations have been accepted the devices are available to...

Страница 15: ...onger be displayed Display family list Select family group Add family members Family members can only be added by the family administrator Display family members Fig 1 Fig 3 Fig 2 Fig 4 Display family...

Страница 16: ...that have not yet been accepted are marked with a yellow icon next to the name These steps must be performed on the invited family member s smartphone Remove family members Fig 1 Fig 1 Fig 3 Fig 2 Fig...

Страница 17: ...password for your WLAN network Press this button Search for locks nearby View locks in the WHITE list Choose a lock 5 2 3 secuENTRY Bridge assignments Add secuENTRY Bridge Supply the secuENTRY Bridge...

Страница 18: ...ed locks Remove Bridge Create an access code Remove assigned locks 5 2 4 Access codes Locks that are contacted per Bridge may also contain access codes limited by time In doing so however it is import...

Страница 19: ...istrator code of the lock The transmission is completed after a short period and the lock recognises the Init Key and the access code Confirm with OK The Init Key must be entered once on the keypad be...

Страница 20: ...lete an access code 5 3 Video Bell With a DOOR eGUARD Video Bell you can see what your device sees using these functions Communicate with the other party via two way audio It is also possible to take...

Страница 21: ...Fig 4 Fig 6 Fig 5 Fig 7 Click on this button to access for registration Choose a password and enter it Press the button to receive a verification code per e mail Enter the 6 digit verification code t...

Страница 22: ...that you have received per e mail and press the button Enter your email address and press the button Press this button Press this button Enter your new password Press the command button Enter the 6 di...

Страница 23: ...st once by the family administrator The administrator must then add a family group and invite the rest of the family members to it Once the invitations have been accepted the devices are available to...

Страница 24: ...onger be displayed Display family list Select family group Add family members Family members can only be added by the family administrator Display family members Fig 1 Fig 3 Fig 2 Fig 4 Display family...

Страница 25: ...that have not yet been accepted are marked with a yellow icon next to the name These steps must be performed on the invited family member s smartphone Remove family members Fig 1 Fig 1 Fig 3 Fig 2 Fig...

Страница 26: ...Vary the distance if necessary Then continue by pressing the button The unit information is divided into the general unit information the power management the basic settings and the PIR settings 5 3...

Страница 27: ...settings This menu indicates whether the camera is connected to a power cable or whether it is battery operated In addition it is possible to set the battery level at which an alarm signal is to be se...

Страница 28: ...uENTRY KeyApp iOS 28 I English Fig 1 Fig 3 Fig 2 Select Video Bell View locks in the WHITE list Choose a lock Allocate a lock Fig 1 Fig 3 Fig 2 Select Video Bell Show lock Display assigned locks secuE...

Страница 29: ...enabling you to speak to the person at the door Record Starts and stops the recording of video and sound images on the smartphone Take photo Saves a photo to the smartphone Playback Retrieves recordin...

Страница 30: ...y audio It is also possible to take photos videos and open an assigned lock The direct access button enables the user to open the view of a selected DOOR eGUARD Video Bell device from the start screen...

Страница 31: ...out Fig 1 Fig 1 Fig 2 Enter your password and press the button You have successfully logged in Press this button Fig 4 Fig 6 Fig 5 Fig 7 Click on this button to access for registration Choose a passw...

Страница 32: ...that you have received per e mail and press the button Enter your email address and press the button Press this button Press this button Enter your new password Press the command button Enter the 6 di...

Страница 33: ...st once by the family administrator The administrator must then add a family group and invite the rest of the family members to it Once the invitations have been accepted the devices are available to...

Страница 34: ...onger be displayed Display family list Select family group Add family members Family members can only be added by the family administrator Display family members Fig 1 Fig 3 Fig 2 Fig 4 Display family...

Страница 35: ...that have not yet been accepted are marked with a yellow icon next to the name These steps must be performed on the invited family member s smartphone Remove family members Fig 1 Fig 1 Fig 3 Fig 2 Fig...

Страница 36: ...eep sounds Vary the distance if necessary Then continue by pressing the button 5 4 3 BURGcam units assignments Add BURGcam Switch on the BURGcam by connecting the power cable The camera will emit an a...

Страница 37: ...More information will be displayed in this menu in the future Currently this menu is only designed for battery operated cameras Video Bell Basic settings For example if you mount the camera upside do...

Страница 38: ...secuENTRY KeyApp iOS 38 I English Fig 1 Fig 3 Fig 2 Select BURGcam View locks in the WHITE list Choose a lock Allocate a lock Fig 1 Fig 3 Fig 2 Select BURGcam Show lock Display assigned locks secuENTR...

Страница 39: ...mages on the smartphone Take photo Saves a photo to the smartphone Playback Retrieves recordings from the SD card inserted in the device Album Opens your photo video app to view the recorded media Imp...

Страница 40: ...arcels securely when you are away Generated codes that you communicate to the deliverers enable them to deliver your parcels The direct access button enables the user to open the view of a selected BU...

Страница 41: ...er them in the KeyApp Register eBoxx Fig 1 Fig 1 Fig 3 Fig 1 Fig 4 The the camera opens Scan the QR code of your device Enter the name for the device and corresponding administrator or user code Press...

Страница 42: ...d press the Reset code button After a short time the user code is reset and displayed Then press the OK button Add a new user Swipe the user to the right and press the icon that appears on the left En...

Страница 43: ...he eBoxxes intended for your own use The eBoxx is set up according to chapter Account settings for the parcel box marked as a dedicated eBoxx in this menu Create user code This menu includes all the s...

Страница 44: ...1 Fig 2 Fig 2 Fig 2 Add a new deliverer Fill in the fields as desired and enter the user code Press the START PROCESS button After a short time the deliverer code is created and displayed Press the OK...

Страница 45: ...e Fig 1 Fig 1 Fig 2 Fig 2 Generate one time codes Enter the user code and press the Start button Ten one time codes are created after just a short time Press the OK button Select a hidden code Confirm...

Страница 46: ...file Fig 1 Fig 1 Fig 3 Fig 3 Fig 4 Fig 2 Fig 2 Select your eBoxx Select your eBoxx Press Lock history Press Lock history Select the history file which you wish to display Take the info from the histo...

Страница 47: ...Fig 2 Fig 2 Select a history file Swipe the history file which you wish to delete to the left Tap the input field Press KeyApp history Press KeyApp history Press Set date and time Lock Procedure Resul...

Страница 48: ...elect the time and confirm with the OK button 5 5 3 Direct access button 5 5 3 1 Assign direct access button The direct access button enables you to perform a status query of your eBoxx unit from the...

Страница 49: ...ps that make it possible to access your files in order to for example open these with the KeyApp Fig 1 Fig 1 Fig 3 Fig 2 Fig 2 Press the eboxx Direct access button A status query is performed when the...

Страница 50: ...enu button Choose lock config file 5 6 2 Readout history 5 6 3 View history Fig 1 Fig 1 Fig 2 Enter the administrator code Choose history file Readout the history Executed by Procedure Date time Batte...

Страница 51: ...ENTRY KeyApp iOS English I 51 5 6 4 Remove history 5 6 5 Program lock 5 6 6 Remove config files Fig 1 Fig 1 Fig 1 Swipe to the left Enter the administrator code Swipe to the left Program the lock secu...

Страница 52: ...e button Now the history is read out confirm with OK You can then view the history as described under Lock history Press the Menu button Press the History button Choose a lock 5 7 History 5 7 1 Readou...

Страница 53: ...ipe to the left Choose a lock 5 7 2 Readout history Lock history Remove a lock history Display the history of a lock Fig 1 Fig 2 Select the history data that you want to view Choose a lock Fig 3 Execu...

Страница 54: ...up to date Executing a firmware update takes a few minutes The batter level must therefore be considered in advance change the batteries if necessary Fig 2 Fig 3 Fig 5 Fig 4 Fig 6 Fig 1 Press the Men...

Страница 55: ...URG W CHTER which are used to improve the app You can also view information such as the version of the app Fig 2 Fig 8 Fig 3 Fig 9 Fig 1 Fig 7 Press the Menu button Then press the OK button The firmwa...

Страница 56: ...or all devices As a result the administrator code is filled in automatically with requests With this function you send anonymised data to BURG W CHTER and thus help to improve the app In this menu imp...

Страница 57: ...g instructions are held exclusively by BURG W CHTER KG Any reproduction even into digital storage media requires the written consent of BURG W CHTER KG Reprinting even excerpts is forbidden Subject to...

Страница 58: ...hofer Weg 15 58300 Wetter Germany www burg biz secuENTRY KeyApp iOS BA Operating instructions secuENTRY KeyApp iOS hbg 050122 BURG W CHTER UK LTD Eurocam Technology Park Chase Way Bradford West Yorksh...

Отзывы: