background image


36 

Front frame 

M10 

deformed 

Rear frame/ 
Front frame 

Axle  M20  /  Locknut 
M20 

Ratchet cap 30 

20 - 30 

No play 

FRONT FRAME 


2x  side  frame/ 
bottom frame 

4x M8 x 70 hex bolt 

Ratchet cap 13 

35 - 40 


Front cover 

6x  M6  x  16  button 
head screw 

Allen key 5 

hand-tight 


24" front wheels 

2x M10 wheel nuts 

Ratchet cap 15 

35 


Cargo 

box 

connecting rod 

4x  M6  x  10  button 
head screw 

Allen key 4 

hand-tight 


Battery plate 

2x recessed M5 x 16  Allen key 3 

hand-tight 


Steering joint 

4x M5 x 10 

Allen key 3 

hand-tight 


Safety belts 

2x M6 x 16 

Allen key 5 

hand-tight 


10.


Warranty 

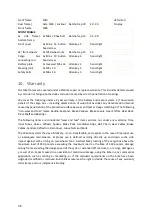
Our bike frames are covered under a lifetime repair or replace warranty. This includes defects caused 
by corrosion or fatigue but excludes corrosion caused by scratch penetration of coatings.  

We cover the following under a 2 year warranty: 1) the battery and motor system. 2) The wooden 
panels of the  cargo box  –  including delamination of  wood but excludes  any deterioration of wood 
caused by penetration of the protective surface by wear and tear or deep scratching. 3) The following 
“non-wear and tear” items: Saddle, Seatpost, Brake Calipers, Brake Levers, Gear Shifter, Rear Rack, 
Pivot Shaft and Bearings.  

The  following items  are  considered  “wear  and  tear”  items  and  are  not  under  any  warranty:  Tires, 
Inner  Tubes,  Valves,  Wheels,  Spokes,  Brake  Pads,  Handlebar  Grips,  Bell,  Chain,  Gear  Cables,  Brake 
Cables, Fenders, Reflectors, Rain Cover, Loose Nuts and Bolts.  

The Warranty starts the day of delivery, is non-transferable, and expires in the case of improper use 
or  inadequate  maintenance.  Improper  use  is  defined  as  riding  directly  up  and  down  curbs,  side 
impact against curbs, riding on two wheels (on a 3-wheel bike), loading of the cargo box above the 
maximum  load  of  250  pounds,  exceeding  the  maximum  load  on  the  bike  of  330  pounds,  damage 
arising from exceeding the design speed of the cycle or extended off road use (i.e. racing), damage as 
a result of an impact caused in an accident or malicious damage, using the bike in any commercial 
application  such  as  renting  or  marketing,  or  if  the  standard  components  on  the  bike  have  been 
upgraded, modified or removed. Bunch Bikes reserves the right to decide the cause of any warranty 
claim items, and our judgment is binding.  


Содержание Coupe

Страница 1: ...User Manual The Coupe Version 1 5 January 2021 ...

Страница 2: ......

Страница 3: ...nd operation of the pedal assist automatic stepless gearbox brakes and battery In addition we will provide recommendations and tips for cycling on your Bunch cargo bike and explanations of the warranty and maintenance The Bunch Bikes team wishes you many happy Miles of cycling Serial number The serial number frame number is located on the information placard on the main frame just below the batter...

Страница 4: ......

Страница 5: ...l assist 7 2 Display and operation 8 3 Automatic acceleration the Enviolo Automatic system 188 4 Brakes 22 5 Battery 23 6 Battery Charger 28 7 Accessories 31 8 Tips for use and safety 32 9 Maintenance 35 10 Warranty Error Bookmark not defined ...

Страница 6: ......
Страница 7: ...thout assist it makes it easy to start from a stationary position or on a hill or to ride against a headwind and of course you can reach higher speeds comfortably Our advice is first to try out The Coupe on a quiet bike path for instance without children in the cargo box and also with limited assist see Display and operation Note that the rear frame will tilt slightly to the left or the right on c...

Страница 8: ...ys of fluctuating display of the battery level Operation of lights The headlight taillight and screen display illumination switch on and off automatically depending on the light conditions Screen illumination Choose between different lighting levels from level 1 dim to level 5 bright Assist level indicator This indicates the current assist mode level 0 to 5 Trip distance indicator The maximum dist...

Страница 9: ...Trip distance indicator This shows the distance traveled during a single trip or the total distance traveled Depending on the setting selected G Assist level This shows the level of motor assist selected 1 5 H Pedal assist This shows that pedal assist is activated for support When cycle assist is activated to pedal the bike forward the WALK symbol appears I Lighting The characters will light up as...

Страница 10: ...nctions 2 5 Normal operation 2 5 1 POWER ON OFF Press D and hold for 2 seconds Turns on the display and the system Press D again and hold down for 2 seconds Turns off the display and the system The system is switched off automatically after 5 minutes without activity 2 5 2 Selecting the motor assist level Press the A or B button to switch between the different assist levels The lowest level is lev...

Страница 11: ...MAXS AVG 2 5 4 Turning the bike lights and display illumination on and off Press C and hold for 2 seconds The display illumination and your lights will turn on Press C again and hold for 2 seconds The display illumination and your lights will turn off When you use the display in the dark the illumination of your system is turned on automatically Exception If you turned on the light manually you mu...

Страница 12: ...econds Walk assist is turned on WALK appears on the display As soon as you release the button walk assist mode is turned off Switching between pedal assist and walk assist modes Pedal assist indicator Walk assist indicator 2 5 6 Charge status indicator To ensure optimal performance of your E bike check your battery charge status before each trip When the display is on the 10 LEDs will indicate the...

Страница 13: ...d begins to blink press the A button to increase the parameter value or the B button to decrease the parameter value Once you have selected your setting you can return to the main menu by pressing the E button TWICE for more than 0 3 seconds If no changes in the settings have been made within 10 seconds the display will return to the normal operating settings Normal operating settings Parameter en...

Страница 14: ...ct a parameter value between 0 and 5 using A or B If you select 0 the sensor function will be turned off The lower the number the darker it must be before the sensor turns the bike lighting on automatically Function off Lowest level Highest level 2 6 5 Light brightness display For this setting mode bL1 appears on the display Select a parameter value between 1 and 5 using A or B 1 is the dimmest ba...

Страница 15: ...ntenance indicator appears when you have reached a certain number of charging cycles 100 charges and or you have traveled a certain distance 5 000 kilometers Each time you turn on the display the word SERVICE will appear and continue to blink for 4 seconds The time intervals can be individually adjusted by a supplier They can also be changed later by a supplier or manufacturer with a USB connectio...

Страница 16: ...splayed in the area where speed is indicated Error Explanation Error resolution 03 Braking action Check whether a brake is stuck or locked on 07 Protection from high voltage Take your electric bike to your dealer or to a specialist to have the problem repaired 08 Error in the Hall sensor of the motor Take your electric bike to your dealer or to a specialist to have the problem repaired 10 The temp...

Страница 17: ...paired 30 Communication error Take your electric bike to your dealer or to a specialist to have the problem repaired Explanation of Error Resolution Note Error code 10 will probably appear on the display when the eBike climbs for a long continuous period This indicates that the temperature of the motor has reached the maximum protection value If this occurs the user must stop the eBike and wait If...

Страница 18: ...functioning the system must be calibrated Switch on the system Start the calibration process via the drive system menu For more information consult the manual of the eBike system or our manual Lift up the rear wheel or hang the bike up while the system switches from low to high and back again several times and this completes the calibration Enviolo controller or app If you are using an enviolo AUT...

Страница 19: ...n also be done via the enviolo app in the Dashboard submenu 1 System functionality The AUTOMATiQ SYSTEM ensures a continuous automatically shifting system It can be combined with both the CO and the CA controller making shifting as easy as choosing the desired pedaling cadence by pressing the button 2 Setup A ENVIOLO CO CONTROLLER Set the desired pedaling cadence using the enviolo CO controller Th...

Страница 20: ...stall automatically Switch on the motor system Activate BLE Bluetooth on your mobile telephone Activate the wireless pairing mode of your hub interface by pressing the button for 5 seconds until a blue light shows The app will now search for available devices Select the correct device recognizable using the SN that is also on the underside of the hub interface ...

Страница 21: ...stem is ready for use Option B On the Configuration tab page you can adjust all system settings using the sliders The settings are saved in real time You do not have to confirm anything System Configuration Step 2 The app offers a few additional optional functions 1 System configuration in the Configuration tab 2 System data analysis in the Diagnosis tab 3 System data in the Logistics tab 4 Riders...

Страница 22: ... any type of vehicle two or three wheel with or without a motor In addition each brake lever has a parking brake When parking the bike on a downhill or uphill part of a road operate the brake press it in then turn the small knob on the brake actuator to the outside and release it Do the same when starting up press the brake turn the knob toward the inside and the handbrake is released again Note T...

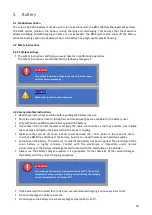
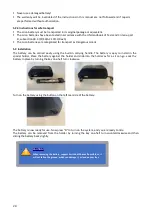
Страница 23: ... clamps and tighten the bolts well on the proper coupling Make sure that you do not cause a short circuit between the and poles In the case of a short circuit the BMS does disconnect the battery but this can nevertheless cause hazardous sparks Do not open the battery The warranty is voided if the battery has been opened The electrolyte of the Li ion battery is highly corrosive Contact with the ele...

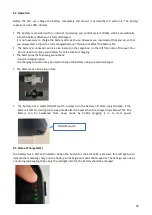
Страница 24: ...ttery can be carried easily using the built in carrying handle The battery is easy to install in the special holder Place the battery against the holder and slide into the holder as far as it can go Lock the battery in place by turning the key one half turn clockwise Turn on the battery using the button on the left rear side of the battery The battery is now ready for use Now press D to turn on th...

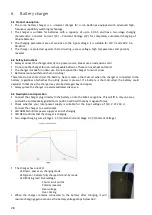
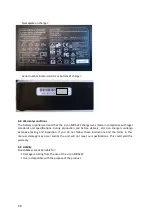
Страница 25: ...ery from the bike for charging The battery has the following connections 3 point charging option The charging connector may be used to charge the battery using an external charger The battery has a 30A plug in fuse The battery has a metal ON OFF switch Always turn the battery off after using the bike If the battery is left on it will go into sleep mode after 36 hours when the charge drops below 75...

Страница 26: ...ifications Property Value Unit Cell chemistry Li ion Nominal voltage 36 Volts Capacity 20 Ah Internal consumption 150 µA Max charging voltage 42V 0 1V A Limit discharged voltage 28V 0 1V A Max continuous charging current 4 A Max continuous discharging current 20 A Pulse discharging current 120 A Housing material ABS Charging temperature 0 to 65 C Discharging temperature 20 to 65 C Storage temperat...

Страница 27: ... connected This prevents the battery from gradually draining To wake up the battery briefly connect the charger to local power 5 10 Warranty conditions The battery supplier warrants that the battery was made in compliance with legal standards and specifications During production and before delivery all batteries undergo extensive testing and inspection If you do not follow the instructions and the...

Страница 28: ...y Never create a short circuit when the charger is connected to the battery regardless of whether the utility power is present If a battery is short circuited the battery could explode In that case the charger may also be damaged beyond repair Always place the charger in a well ventilated dry space 6 3 Description and operation Connect the charger plug directly to the battery or into the bike s ca...

Страница 29: ...ake the battery to a registered waste processor for disposal 6 7 Technical specifications Property Value Unit Model MDA222 Input voltage 90 264 V AC Input frequency 47 63 Hz Internal consumption without load 1 0 W Max amperage input under full load 2 5 A Surge current 75 A Efficiency 85 Output voltage 41 9 0 2 V DC Charging current 4 0 0 3 A Shut off current stop charging 150 100 mA Nominal output...

Страница 30: ...cations During production and before delivery all Li ion chargers undergo extensive testing and inspection If you do not follow these instructions and the terms in this manual damage may occur and or the unit will not meet our specifications This could void the warranty 6 9 Liability Bunch Bikes cannot be liable for Damage resulting from the use of the Li ion MDA222 Use incompatible with the purpo...

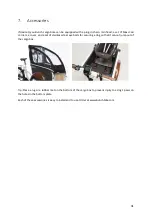
Страница 31: ...s a cover and a set of stainless steel eye bolts for securing a dog so that it cannot jump out of the cargo box Tip Place a rug or a rubber mat on the bottom of the cargo box to prevent injury to a dog s paws on the holes in the bottom plate Each of these accessories is easy to install and to use Order at www bunchbike com ...

Страница 32: ...n significantly reduce your chance of head injury in the event of a crash Riding a Bunch cargo bike does not protect you or your children from the risk inherent in riding with traffic Make sure your helmet is U S Consumer Product Safety Commission certified and always make sure you follow the manufacturer s instructions for proper fit and size Always properly attach your helmet Never use a damaged...

Страница 33: ...be prepared to yield even if you have the right of way Never carry anything which obstructs your vision or your complete control of the bicycle Never ride with more weight than you can handle Use approved hand signals for turning and stopping Because of your riding position on the cargo bike it may be hard for drivers to ready Use approved hand signals for turning and stopping Because of your ridi...

Страница 34: ...conditions can vary and all Bunch cargo bikes are designed to hold up to the abuse of commuting on city streets They are not however intended for off road use extended gravel or dirt road use commercial use racing or any uneven terrain If you must take your bike across a section of off road area or up down any curb feature we recommend dismounting and walking the bicycle especially if the bike is ...

Страница 35: ...ey 5 Disk adapter 2x M6 Allen key Allen key 5 8 10 Loctite Caliper 2x M6 Allen key Allen key 5 6 8 Loctite Rear fender 2x M5x16 button head screw Allen key 3 hand tight Lock 2x M5x16 button head screw Allen key 3 hand tight Loctite Rear light 2x M5 nut Open end wrench 8 5 7 Central motor cranks 2x M8 crank screw Allen key 8 40 Copper grease Central motor sprocket 1x Circlip Torque wrench 35 Left h...

Страница 36: ...eep scratching 3 The following non wear and tear items Saddle Seatpost Brake Calipers Brake Levers Gear Shifter Rear Rack Pivot Shaft and Bearings The following items are considered wear and tear items and are not under any warranty Tires Inner Tubes Valves Wheels Spokes Brake Pads Handlebar Grips Bell Chain Gear Cables Brake Cables Fenders Reflectors Rain Cover Loose Nuts and Bolts The Warranty s...

Страница 37: ...Bunch Bikes 2170 Collins Rd Suite 1101 Denton TX United States Phone 800 730 9497 or 940 536 0597 Email info bunchbike com Business hours Monday Friday 8am 4pm www bunchbike com ...

Отзывы: