


5.
To add expansion units to the end of an existing SPCN loop, do the following:
a.
Move the SPCN cable from connector SPCN 1 on the system unit to connector SPCN 0 on one of
the expansion units to be added.
b.
Connect another SPCN cable to connector SPCN 1 on the expansion unit added in step 5a.
c.
If there is another expansion unit to add, do the following:
1)
Find the other end of the cable attached to connector SPCN 1 on the expansion unit just
added. Connect this end to connector SPCN 0 on the next expansion unit to be added.
2)
Connect another SPCN cable to connector SPCN 1 on the expansion unit added in step 5c1.
d.
Repeat step 5c for each additional expansion unit.
e.
Connect the other end of the cable from connector SPCN 1 on the last expansion unit added to
connector SPCN 1 on the system unit.
f.
Return to the procedure that sent you here.
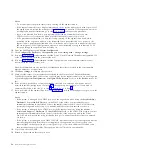
Examples: SPCN connections
Review examples that show how SPCN cables are connected to expansion units and system units for
form SPCN loops.
Note:
The physical connectors on the system units and expansion units might not have labels, or might
have labels that are different from what is shown in the examples. In all cases, the top or left SPCN
connector corresponds to SPCN 0 in the examples, and the bottom or right SPCN connector corresponds
to SPCN 1 in the examples.
Figure 3. Example of SPCN connections
I/O expansion units
19
Содержание Escala Power7 Series
Страница 1: ...Enclosures and expansion units ESCALA Power7 REFERENCE 86 A1 23FF 07 ...
Страница 2: ......
Страница 88: ...76 Enclosures and expansion units ...
Страница 146: ...134 Enclosures and expansion units ...
Страница 147: ......
Страница 148: ...Printed in USA ...


