background image

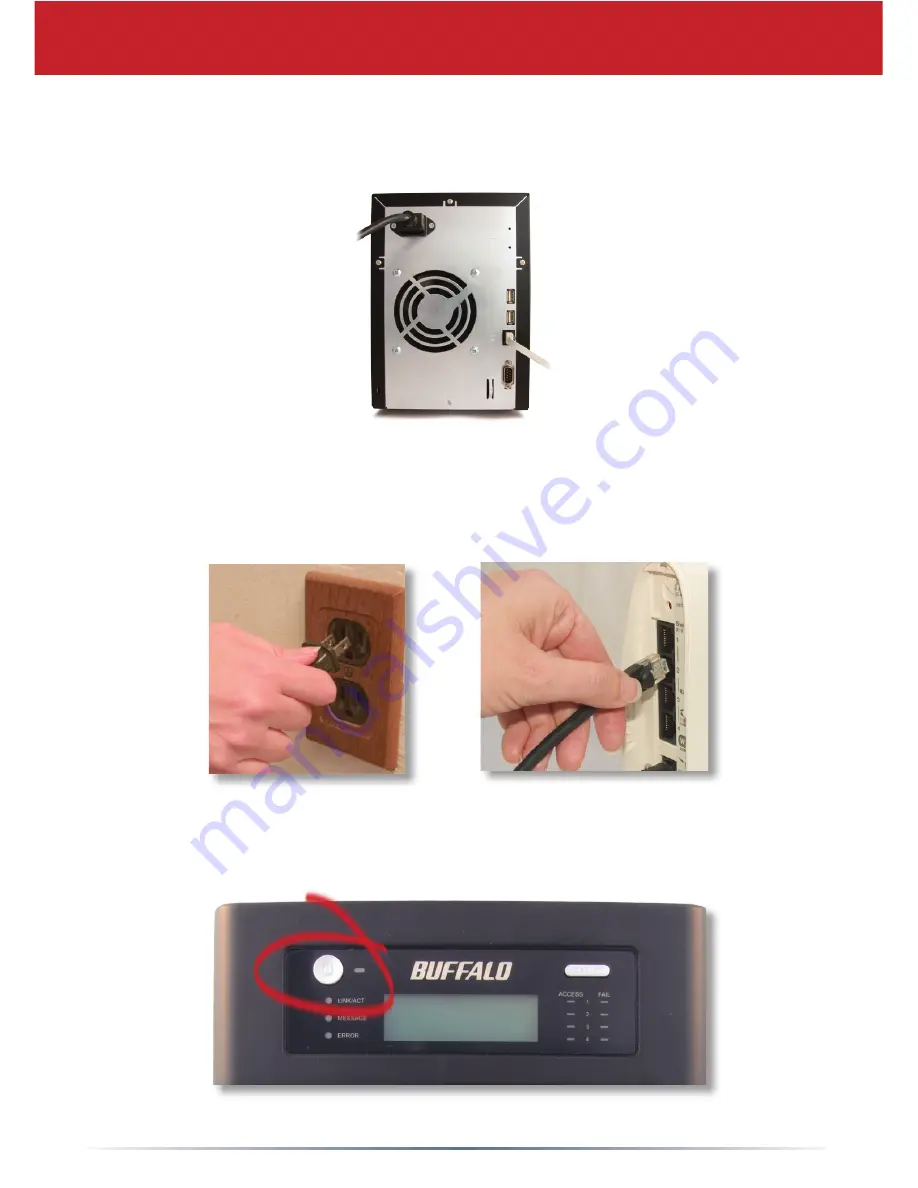
Step 1:  Connect your Cables

Plug TeraStation’s power cord and Ethernet cable into the back of 

the TeraStation.   

Connect the power plug to a power outlet.  Plug the other end of 

the Ethernet cable into a hub, switch, or router on the network.

Press the power button on the front panel to turn your 

TeraStation on.

Содержание TS-0.6TGL

Страница 1: ...Package Contents Main Unit TeraStation Ethernet Cable Power Cable TeraNavigator Installation CD Quick Setup Guide this manual Warranty Card www buffalotech com Quick Setup Guide TeraStation Pro v1 2 ...

Страница 2: ...r cord and Ethernet cable into the back of the TeraStation Connect the power plug to a power outlet Plug the other end of the Ethernet cable into a hub switch or router on the network Press the power button on the front panel to turn your TeraStation on ...

Страница 3: ...aStation is not lit your TeraStation is not properly connected to your network Make sure that If problems persist contact our technical support Refer to page 9 for more details both TeraStation and the hub switch or PC are powered on the Ethernet cable is securely fastened to both devices and the Ethernet cable is not damaged To verify try using another Ethernet cable Step 2 Check your Connection ...

Страница 4: ...he CD ROM drive Press OK to continue Each TeraStation on the network will have a tab in the client utility Make sure that your Terastation s tab is selected click Setup from the pull down menu and choose Browser Management Step 3 Using the Client Utility TeraNavigator should now be running Press the Install Client Utility button and then press the Start button Once the installation has completed p...

Страница 5: ...ion Utility Here on the Basic page begin by changing the name of your TeraStation in the TeraStation Hostname field A friendly easy to remember name is recommended such as TeraStation The name cannot contain any spaces or special characters Enter a short description of your TeraStation in the TeraStation Description field You ll then see this description in Network Neighborhood Make sure that the ...

Страница 6: ...Drive Note If you cannot access the TeraStation please disable or reconfigure your software firewalls Select the drive letter you want to map share to from the Drive list box In the Folder field enter TeraStation_Name share where TeraStation_Name is the friendly easy to remember name you gave your TeraStation on page 5 If you set up other shares on your TeraStation you may map them by substituting...

Страница 7: ... parity All drives in a RAID 5 array reserve part of their data space for parity information allowing all data to be recovered if a single drive fails The parity information takes up about one hard drive s worth of space so if you set up all four drives in the TeraStation as a RAID 5 array your usable capacity will be about 3 4 of the total capacity of the TeraStation RAID 5 is an excellent compro...

Страница 8: ...rference that may cause undesired operation Technical Specifications LAN Standards IEEE 802 3u 100BASE TX IEEE 802 3 10BASE T Transmission 1000 100Mbps 10 Mbps 1000BASE T 8B1Q4 PAM5 X 4B 5B MLT 3 10BASE T Manchester Coding Access Media CSMA CD Media Interface RJ 45 USB Standard USB 2 0 Hi Speed HS Full Speed FS Low Speed LS USB Connector USB A Connector 2 Data Transmission Speed Max 480 Mbps HS Mo...

Страница 9: ... 7 days a week Toll Free 866 752 6210 email info buffalotech com Europe Technical Support is available between 9am 6pm Monday Thursday GMT and 9am 4 30pm on Fridays email helpdesk buffalo technology ie 2005 Buffalo Technology USA Inc http www buffalotech com ...

Отзывы: