background image

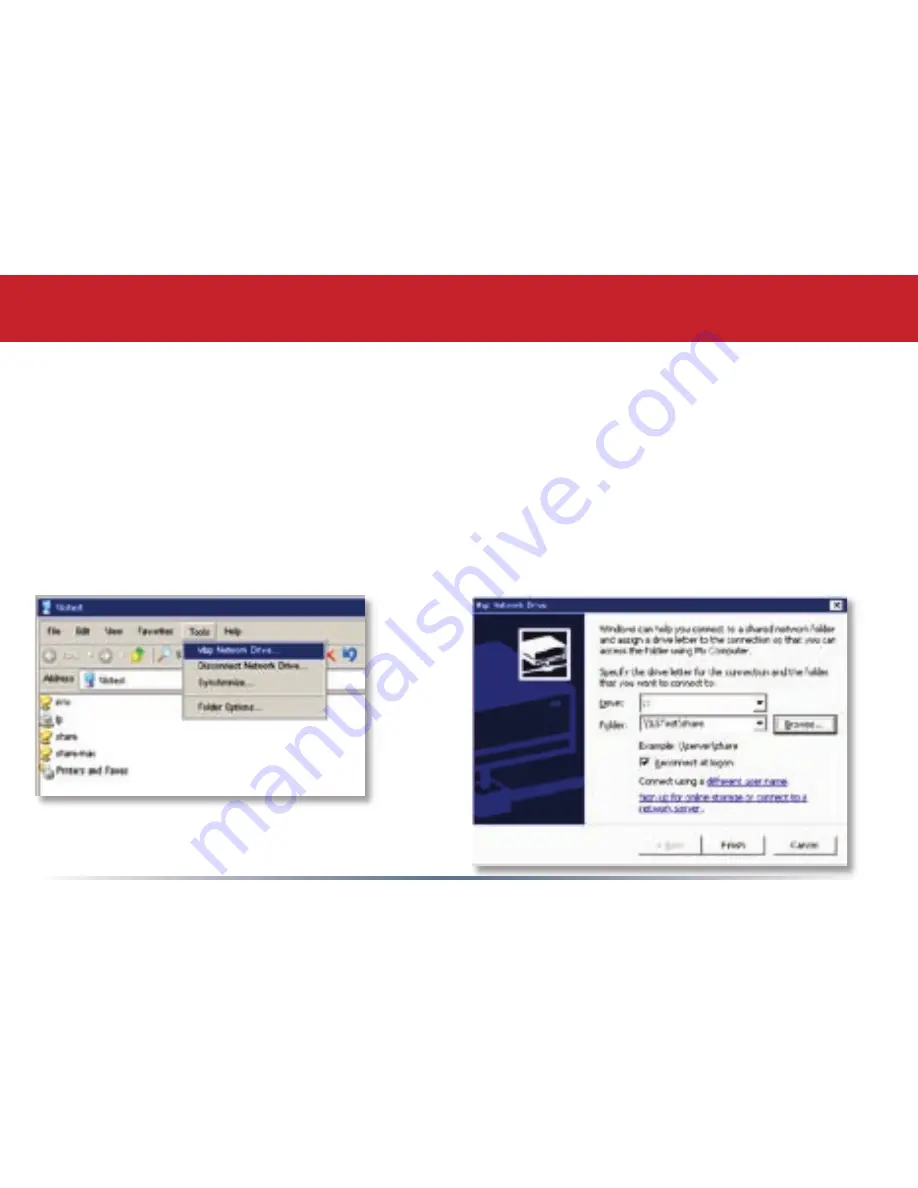
From the previous step’s 

Root Directory

 screen, use the pull down menu and click 

Tools

 and then 

select 

Map Network Drive

. The 

Map Network Drive

 program will run.  Select the drive letter you 

would like LinkStation to assume from the 

Drive:

 pull down menu.   Enter the \\LinkStation_

Name\share_name in the 

Folder:

 field (where

 LinkStation_Name

 is the 

LinkStation Name

 set on 

page 18

 and

 share_name 

is the

 Shared Folder Name 

set on 

page 20

).  You can also browse for the 

shared folder by pressing the 

Browse 

button and searching through the 

Entire Network

 and then 

the 

Microsoft Windows Network

.  Check the 

Reconnect at logon

 checkbox to create this mapped 

drive everytime Windows starts.  Once complete, press the 

Finish

 button.  LinkStation is now 

mapped to a drive letter. 

Accessing LinkStation Data from a PC

NOTE:  If errors occur while mapping multiple 
drive shares, see 

page 76

 for help.

Содержание LINKSTATION HD-HLAN

Страница 1: ...User Manual LinkStation HD HLAN Series www buffalotech com v5 4...

Страница 2: ...user interfaces and software Future user interfaces and software may be available for download from http www buffalotech com Support Section Downloads Due to the evolving state of the product the ima...

Страница 3: ...from a Mac 24 LinkStation Expansion 27 Basic Settings 28 Network Settings 31 Security Settings 35 USB Settings 43 USB Printer Installation 47 Maintenance Settings 51 Restoring LinkStation Backups 57...

Страница 4: ...ds until the Power LED light begins blinking At that time stop pressing the button and shutdown should complete within 30 seconds 2 Power LED The Power LED light will blink during startup or shutdown...

Страница 5: ...on Page 27 5 Diagnostic LED The Diagnostic LED flashes if the LinkStation encounters an error In this event please contact our technical support 6 USB Port Front Rear LinkStation offers two USB Ports...

Страница 6: ...LinkStation s power cord into the back of LinkStation Then plug the other end of the power cord into a power outlet Also plug the included Ethernet Cable into LinkStation s Ethernet Port located on th...

Страница 7: ...rectly to a nearby running PC NOTE It is recommended that you connect LinkStation to a hub or switch on your network Connecting it directly to the back of a PC should only be used if absolutely necess...

Страница 8: ...Turn the LinkStation on by pressing the power button until the green Power LED begins to flash Quick Setup...

Страница 9: ...k the LINK ACT light on the front of the LinkStation If it is lit then your LinkStation is connected properly please turn to page 12 to continue setup If it is not lit continue to the next page Quick...

Страница 10: ...over or Patch cable Verify that the LINK ACT LED on the front of LinkStation is lit see page 9 s picture If it is lit continue to page 12 to continue setting up LinkStation If the LINK ACT LED is stil...

Страница 11: ...n The Ethernet Cable is securely fastened to both devices The Ethernet Cable is not damaged verify this by trying another Ethernet Cable When verifying new cables try the Cable Selection switch in bot...

Страница 12: ...uration the EasySetup program may launch If it does not automatically launch manually launch it by pressing the Start menu selecting the Run option When the Run dialog opens type x easysetup exe where...

Страница 13: ...3 LinkNavigator is now running Please press the Install IP Setup Utility icon then press the Start button The LinkStation IP Configuration Utility will launch and scan for networks Link Navigator Setu...

Страница 14: ...the network for any and all LinkStations available The drop down menu lists all available LinkStations If there are multiple LinkStations on the network then select the proper LinkStation from the pul...

Страница 15: ...rator Password field sets an administrator password for the web based configuration If desired type a password in the field When finished press the OK button LinkStation will set the IP Address and Pa...

Страница 16: ...n type that password in otherwise leave the password field blank Press the OK button when finished In the future LinkStation can be accessed by typing http LINKSTATION_NAME into a Web browser where LI...

Страница 17: ...us Please bookmark this page for easy access For detailed explanations of each menu and setting please refer to the Settings section starting on page 28 of this manual To continue setup click on the B...

Страница 18: ...on Name field The name cannot contain any spaces or special characters Alphanumeric characters including hyphen and underscore are allowed A short description of the LinkStation can be created in the...

Страница 19: ...are If you would like to create additional shares for specific users or specific types of data then click on the Security tab on the left Then click on the Shared Folder Setup link to continue From th...

Страница 20: ...the desired function Access Restriction will turn on security features Please refer to the Settings section starting on page 28 of this manual before using the Access Restriction function Press the Ap...

Страница 21: ...a from a PC To access LinkStation data Press the Start menu select the Run option When the Run dialog opens type LinkStation_ Name where LinkStation_Name is name of the LinkStation set on page 18 Pres...

Страница 22: ...and password protection please refer to the Settings section starting on page 28 of this manual To setup a printer see the LinkStation Expansion section found on page 27 LinkStation can be accessed by...

Страница 23: ...is the LinkStation Name set on page 18 and share_name is the Shared Folder Name set on page 20 You can also browse for the shared folder by pressing the Browse button and searching through the Entire...

Страница 24: ...on to the Mac s server list Begin by clicking Go and then choose Connect to Server Accessing LinkStation Data from a Mac In the Server Address field enter your LinkStation s IP address in the form smb...

Страница 25: ...ation select Registered User and enter your Registered User credentials Accessing LinkStation Data from a Mac Select the volume that you want to mount such as share or share mac from the list of folde...

Страница 26: ...d you ll be able to read its IP address You must have a Windows PC running on the network to use the LinkStation or TeraStation client utility If you have an all Mac network with no Windows PCs availa...

Страница 27: ...t USB port and the hard drive into the rear USB port You may not install two USB Printers or two USB Hard Drives on a single Linkstation only one of each device To connect a USB device to LinkStation...

Страница 28: ...entify it over the network A general description can be given for the device as well Date and Time Setup To properly catalogue shares and files by date and to properly schedule tasks such as backups t...

Страница 29: ...e of data that will be installed on it If there is only one LinkStation on the network then naming it LinkStation would be fine LinkStation Description is a handy way of differentiating multiple LinkS...

Страница 30: ...ed again in the spring each year Select the appropriate region from the Character Codes pull down menu This activates LinkStation s International Character Support NTP Settings The NTP function enable...

Страница 31: ...ss can be given to LinkStation within IP Address Settings The gateway and subnet can also be set here Workgroup Settings Configure Windows workgroup name and Wins Server Network Settings FTP Server Se...

Страница 32: ...t mask manually Contact your administrator to determine a proper IP Address and Subnet mask for this device 255 255 255 0 is the recommended default Subnet mask Most users should use DHCP unless they...

Страница 33: ...opriate Network ID Enter the name of your workgroup in the Workgroup Name field Workgroup is recommended for most home networks Wins Client Settings LinkStation does not require a WINS Server Don t en...

Страница 34: ...at are to be added to the FTP Server must be checked Check the appropriate checkboxes under Registered Users Public Shared Folder Settings Multiple shared folders can be added when the Registered User...

Страница 35: ...administration groups should be created for users to control shared folder access Once a group has been created settings on shared folders can be modified to limit access to a group or groups Also in...

Страница 36: ...ters The other share is for Macintosh only The default shares may be deleted if desired Add a New Folder This begins the process to create a new share The next page describes this process further Edit...

Страница 37: ...Linux can read Win or Win Mac shares Access Restriction Function This function turns on user group permissions Using this function will password protect a folder For more information see the next page...

Страница 38: ...which groups and which users will have access to the new shared folder The group hdusers gives access to all users on the LinkStation so this will allow access to every user on the LinkStation Anonymo...

Страница 39: ...ve access to a shared folder that the regular employees do not have access to By default there is a share called hdusers This share cannot be deleted Add New Group This begins the process of creating...

Страница 40: ...fferent groups on LinkStation A brief sentence or phrase regarding the users inside of the group is recommended Select Affiliated Users Select the users that are to be added to this new group The chec...

Страница 41: ...proper user account credentials then access to the data will be denied NOTE User accounts will only be used on shares with the Access Restriction function turned on Add New User This begins the proces...

Страница 42: ...user The password can be up to 8 characters and can contain spaces hyphens and underscores The password will need to be confirmed on the Password Confirm line as well The password can be changed at a...

Страница 43: ...nkStation printer setup to ensure proper operation Once installed the printer will be available to users on LinkStation USB Disk Setup An attached USB Disk can be configured as an additional shared fo...

Страница 44: ...USB Information table lists information about connected USB devices such as printers and hard drives It lists the USB Class Printer or Storage the manufacturer if available the device name and whethe...

Страница 45: ...ith USB Printers Recycle Bin The recycle bin is a feature that moves deleted data to a recycle bin before completely deleting If the recycle bin is disabled then any deleted data inside the USB Disk c...

Страница 46: ...er s documentation to manually configure this page select a compatible printer from the Printer Type pull down menu and get it to work but our technical support cannot help you with this Press the App...

Страница 47: ...option and entering LinkStation_ Name where LinkStation_Name is the name set on page 18 Press the OK button when finished Right click on the lp icon and select Connect You may receive a warning about...

Страница 48: ...Press the The printer is now successfully installed To further configure and test the printer open your PC s Control Panel The Control Panel can be accessed through My Computer or through the Start Me...

Страница 49: ...printer s documentation for more information on changing the printer s settings Notes The printer installation process can be done on any machine on your network Multiple machines may print to the pr...

Страница 50: ...ng the print jobs will require that users re send their print jobs to the printer If there are still problems printing to the printer then check the printer manufacturer s documentation for troublesho...

Страница 51: ...ackup or the backup will fail Disk Backup Individual Shares or folders inside of shares can be scheduled for backup to an attached USB Disk The scheduled backup time should not conflict with a schedul...

Страница 52: ...xternal USB Disks attached to LinkStation will need to be formatted via this Disk Format utility before being used by LinkStation Administrator Password By default the administrator name login is root...

Страница 53: ...Maintenance Settings System Status The System Status page lists configuration information about LinkStation No configuration changes can be made from this screen but it s a good place to review settin...

Страница 54: ...ard drive shuts off until the Wakeup Time Disable Sleep Mode if you want LinkStation to always remain on When LinkStation is sleeping data cannot be accessed and scheduled backups will fail Schedule S...

Страница 55: ...p down menu under Folders for Backup It is important to note that all files and folders underneath the share or folder recursive selected will also be backed up Once a share or folder is selected pres...

Страница 56: ...e Run Backup Daily at the Specified Time option makes LinkStation perform backups daily at a scheduled time The Run Backup Every Day at the Specified Time option makes LinkStation perform a backup at...

Страница 57: ...s case is YEARMONTHDAYTIME Thus 0408062200 is a backup that occurred on August 6th 2004 at 22 00 or 10pm If Overwrite Backup was set when the backup ran then only one backup folder will exist Also if...

Страница 58: ...sk that should be scanned If both disks are to be scanned then the Disk Scan must be run twice once for each disk Disk Scan Type The Disk Scan Type pull down menu allows you to select whether the Disk...

Страница 59: ...ting a drive will erase all data Do not format a drive unless you need to Brand new USB Disks may need to be formatted before the LinkStation can write to them but the internal LinkStation hard drive...

Страница 60: ...sword into this field By default there is no LinkStation password If a password has already been set on LinkStation then enter the current password New Password Please enter the new desired administra...

Страница 61: ...ing the power button This feature can be handy if LinkStation is being configured from a location not close to the LinkStation s power button Press the Execute button to shutdown the LinkStation The L...

Страница 62: ...television and streams multimedia content The PCast service allows you to stream any multimedia content directly from LinkStation to the LinkTheater If you do not own a LinkTheater then these setting...

Страница 63: ...fies which shared folder to share with LinkTheater All of the multimedia files inside this shared folder will be available to LinkTheater NOTE At this time only one shared folder can be accessed with...

Страница 64: ...put alphanumeric characters with the LinkTheater remote control Password Confirm Confirm the password set above If the fields do not match then you will be required to re input the password NOTE LinkS...

Страница 65: ...t Windows only one set of credentials can map drive letters for a network resource LinkStation Thus only one username and password can be used while mapping to your LinkStation even if different drive...

Страница 66: ...d password can be used for all mapped shares Thus a PC cannot have two mapped secured shares that use different usernames and passwords It is important to remember that all mapped drives on a single L...

Страница 67: ...drive will delete all of the data on it so try to backup any data you can before beginning Finally if none of the above solutions help then please contact Technical Support for further assistance LED...

Страница 68: ...CD Media Interface RJ 45 USB Standard USB 2 0 Hi Speed HS Full Speed FS Low Speed LS USB Connector USB 2 0 Connectors 2 Data Transmission Speed Max 480 Mbps HS Mode Max 12 Mbps FS Mode Electric Curren...

Страница 69: ...C Warning Thisdevicecomplieswithpart15oftheFCCRules Operationissubjecttothefollowingtwoconditions 1 This device may not cause harmful interference and 2 this device must accept any interference receiv...

Страница 70: ...ology com TECHNICAL SUPPORT Technical Support in Europe is available between the hours of 9am 6pm GMT Monday to Thursday and 9am 4 30pm GMT Friday for this product Customers in Europe can obtain Techn...

Отзывы: