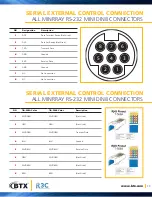
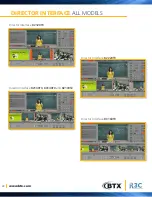
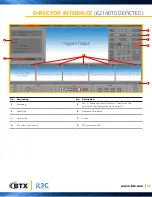
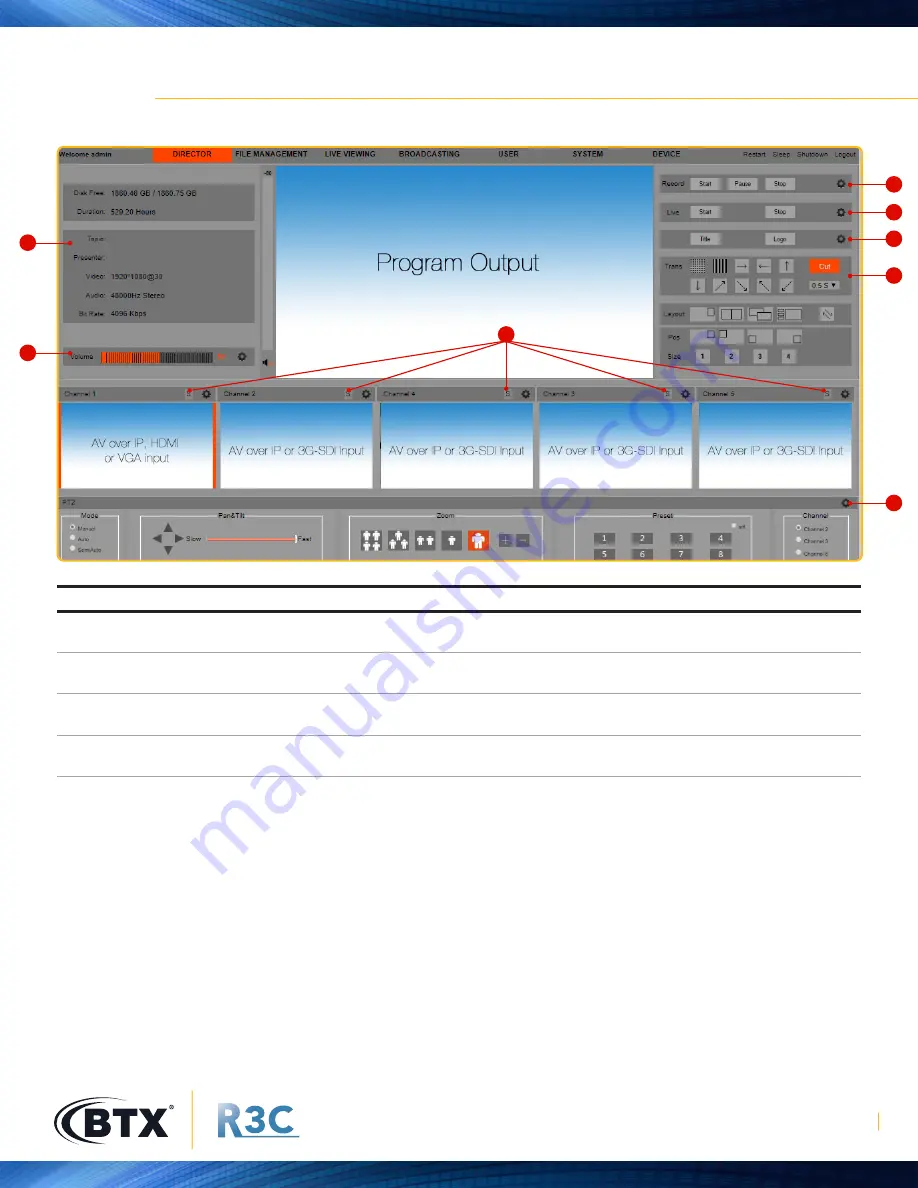
BTX R3C K2100T2 Скачать руководство пользователя страница 23

www.btx.com

23

DIRECTOR INTERFACE


(K2140T0 DEPICTED)

1

6

2

7

3

4

8

5

No.

Description

No.

Description

1

Recording

5

The “S” above the Channel Sources. It stands for Sub  

and means the alternate source to Layouts.)

2

Streaming

6

Appliance Dashboard

3

Annotation

7

Audio

4

Transitions and Layouts

8

PTZ camera controls

Содержание R3C K2100T2

Страница 1: ...Advanced Capture Record Streaming Solutions USER MANUAL K2100T2 K2120T0 K2121T0 K2140T0 K2141T0 K3160T0 K3100T2 K4140T0 MAY 2019 Distributed by...

Страница 2: ...15 CONFIGURING THE NETWORK IDENTITY 16 17 PRE CONFIGURING AV OVER IP SOURCES 18 ASSIGNING SOURCES TO CHANNELS 19 21 HDMI and 3G SDI Inputs 19 AV Over IP Inputs ONVIF Enabled 20 AV Over IP Inputs Non O...

Страница 3: ...ecture Connecting sources such as cameras media players or any other source you can imagine with an Ethernet port makes the R3C solution flexible scalable and futureproof 3G SDI and HDMI Each input an...

Страница 4: ...and stop recording Pause recording available by external control and recorder interfaces 4 Streaming Controls Start and stop Live Streams 5 USB 2 0 PORTS Keyboard and mouse connections 6 Status LED D...

Страница 5: ...Never disconnect the power or hold the power button down when the unit is on It can corrupt the Storage medium and create a non volatile image in the system memory 1 No Explanation 1 15 6 10 point tou...

Страница 6: ...ansfer 10 MIC 2 5mm pitch Microphone Input Phantom Power 4 COM 2 5mm pitch RS 232 Serial Port full duplex for tracking devices 11 HDMI_IN HDMI Input 5 COM_P 2 5mm pitch RS 232 Serial Port full duplex...

Страница 7: ...ameras RJ 45 x2 11 HDMI_OUT2 Output 2 Director output for local control 4 SDI 1 SDI 2 3G SDI Inputs BNC x2 12 AUDIO Audio out 3 5mm 5 MIC Microphone Input Phantom Power 2 5mm pitch x2 13 LINE_IN Audio...

Страница 8: ...input 1 non looping 13 HDMI_OUT2 Output 2 Director output for local control 5 SDI2_IN SDI2_OUT 3G SDI input 2 looping BNC x2 14 AUDIO Audio out 3 5mm 6 SDI1_IN SDI1_OUT 3G SDI output 2 looping BNC x2...

Страница 9: ...meras RJ 45 11 HDMI_OUT2 Output 2 Director output for local control 4 SDI 1 4 3G SDI inputs BNC x4 12 AUDIO Audio out 3 5mm 5 MIC Balanced MIC inputs with phantom power 2 5mm pitch x2 13 LINE IN Audio...

Страница 10: ...t 2 Director output for local control 4 COM3 COM3 serial for control panel P2000 RJ 45 12 AUDIO Audio out 3 5mm 5 COM1 2 Serial connection for PTZ cameras 2 5mm pitch x2 13 LINE IN Audio in 3 5mm 6 Co...

Страница 11: ...l 5 COM_S COM_T Serial connection for PTZ cameras RJ 45 x2 15 AUDIO Audio out 3 5mm 6 SDI 1 6 3G SDI inputs 1 6 BNC x6 16 LINE IN Audio in 3 5mm 7 VGA_IN VGA connection HD 15 17 COM COM_P 3 Pin COM fo...

Страница 12: ...ut 3 SDI 1 4 3G SDI inputs BNC x4 12 HDMI_OUT2 Director HDMI out 4 MIC Balanced MIC inputs w phantom power 13 HDMI_OUT1 Program HDMI out with embedded audio 5 VGA_IN Legacy VGA input HD 15 14 HDMI_OUT...

Страница 13: ...nal Ready Not Used 2 DSR Data Set Ready Not Used 3 TXD Transmit Data 4 GND Ground 5 RXD Receive Data 6 GND Ground 7 NC No Connection 8 NC No Connection PIN TIA 568A Color TIA 568B Color Description 1...

Страница 14: ...DEVICES R3CI SRC1 AND P2000 SERIAL EXTERNAL CONTROL CONNECTION R3CI P2000 DETAIL DB 9 Pin Phoenix COM P Pin Description 1 2 3 Tx 3 1 Rx 4 DB 9 Pin Phoenix COM P Pin Description 5 2 Ground 6 7 8 PLUGG...

Страница 15: ...SETTING UP THE APPLIANCE FOR THE FIRST TIME OUT OF BOX STEPS...

Страница 16: ...pability of connecting devices and automatically assigning an IP address by Dynamic Host Configuration Protocol DHCP This would be the preferred method as you will not have to manually change the IP a...

Страница 17: ...N continued 1 2 Select the Device button to navigate to the Device Settings page Click the advanced IP address settings button then populate the network identity text boxes and click OK NOTE The recor...

Страница 18: ...rch the LAN for potential sources and they will populate in the table When all cameras appear they will not be available until they are authorized Enter the user name and password for each source then...

Страница 19: ...he channel settings auto detect the signal type and displays that information in the window For discrete sources like 3G SDI and HDMI a user may accept the automatic adjustments for brightness contras...

Страница 20: ...on frame rate and state will be displayed in the window Unlike discrete sources like 3G SDI and HDMI any encoded signal will not be adjustable and therefore any picture adjustments should be made at t...

Страница 21: ...lect a source its signal type resolution frame rate and state will be displayed in the window Unlike discrete sources like 3G SDI and HDMI any encoded signal will not be adjustable and therefore any p...

Страница 22: ...www btx com 22 DIRECTOR INTERFACE ALL MODELS Director Interface K2120T0 Director Interface K2140T0 K4140T0 and K2100T2 Director Interface K2220T0 Director Interface K3160T0...

Страница 23: ...6 2 7 3 4 8 5 No Description No Description 1 Recording 5 The S above the Channel Sources It stands for Sub and means the alternate source to Layouts 2 Streaming 6 Appliance Dashboard 3 Annotation 7 A...

Страница 24: ...The le will be nalized and available for viewing within a few seconds 4 Click the gear to con gure record parameters 8 4 2 5 3 6 1 No Description No Description 1 Check the enable box to record the F...

Страница 25: ...vided by the CDN 7 Check the enable box to also stream RTSP streams 3 Choose the streaming protocol 8 Switch to the SOURCE tab to con gure source streaming 4 Choose the Bitrate 9 Copy the displayed UR...

Страница 26: ...RTMP Push as the streaming protocol from the drop down menu 8 Copy the RTMP stream name sometimes referred to as key from the RTMP provider and paste it into the Name text box details on next page 4 C...

Страница 27: ...MP URL and paste it into the URL Text Box on the live streaming settings as described on the previous page 3 Click the Copy button to copy the RTMP Stream key and paste it into the Name Text Box on th...

Страница 28: ...switch between sources 3 Select the transition you want to use The selected transition will highlight orange 4 Double click the source you would like to transition to No Description No Description No...

Страница 29: ...range 3 In the Layout section Click the Layout you would like The program screen now displays the selected layout NOTE if all sources are not active and you select the All Up layout the channels witho...

Страница 30: ...www btx com 30 TITLE AND LOGO FUNCTIONS 1 No Description 1 To add or modify a title or logo click the settngs gear...

Страница 31: ...d Y position of the Logo please see step 4 3 Select the H and V size of the logo Note to avoid geometric distortion it is recommended to create your logo in the size you wish it to appear on screen 4...

Страница 32: ...in dropdown 8 When finished with all changes click OK No Description 9 To display the title you entered press the Title button on the Director Page The button will now be highlighted orange and the lo...

Страница 33: ...www btx com 33 FILE MANAGEMENT No Description 1 On the Navigation Menu along the top click the FILE MANAGEMENT tab 9...

Страница 34: ...details on page 35 for more information 2 File search box 3 Delete files Please see details on page 36 for more information 4 Export files or sessions Please see details on page 37 38 for more informa...

Страница 35: ...Session icon to view the content recorded for that session It will include all the files you selected to record in record settngs 2 Click the Info button to view the individual file info No Descriptio...

Страница 36: ...lete all files on the local HDD check the all button not recommended 2 Click to select the sessions or 3 Individual files you wish to delete When you are finished click the Delete button again 4 As de...

Страница 37: ...export all files on the local HDD check the all button not recommended 2 Click to select the sessions or 3 Individual files you wish to export When you are finished click the Export button again 4 As...

Страница 38: ...xport all files on the local HDD check the all button not recommended 2 Click to select the sessions or 3 Individual files you wish to export When you are finished click the Export button again 4 As d...

Страница 39: ...www btx com 39 FILE MANAGEMENT EDITOR FUNCTION 1 No Description 1 Click the Editor button The Editor interface will open on a new page...

Страница 40: ...n 5 Return to File Management Page 9 Add Audio Content Button 2 Show Audio Bin 6 Bin Selected above 10 Video Content Timeline 3 Show Edited File Bin 7 Editor Preview Window 11 Audio Content Timeline 4...

Страница 41: ...eo button OR double click the first open container on the timeline to add video files to the timeline This opens a file list of content available on the appliance Alternately you can select a file on...

Страница 42: ...www btx com Distributed by...

Отзывы: