background image

3

Battery Installation

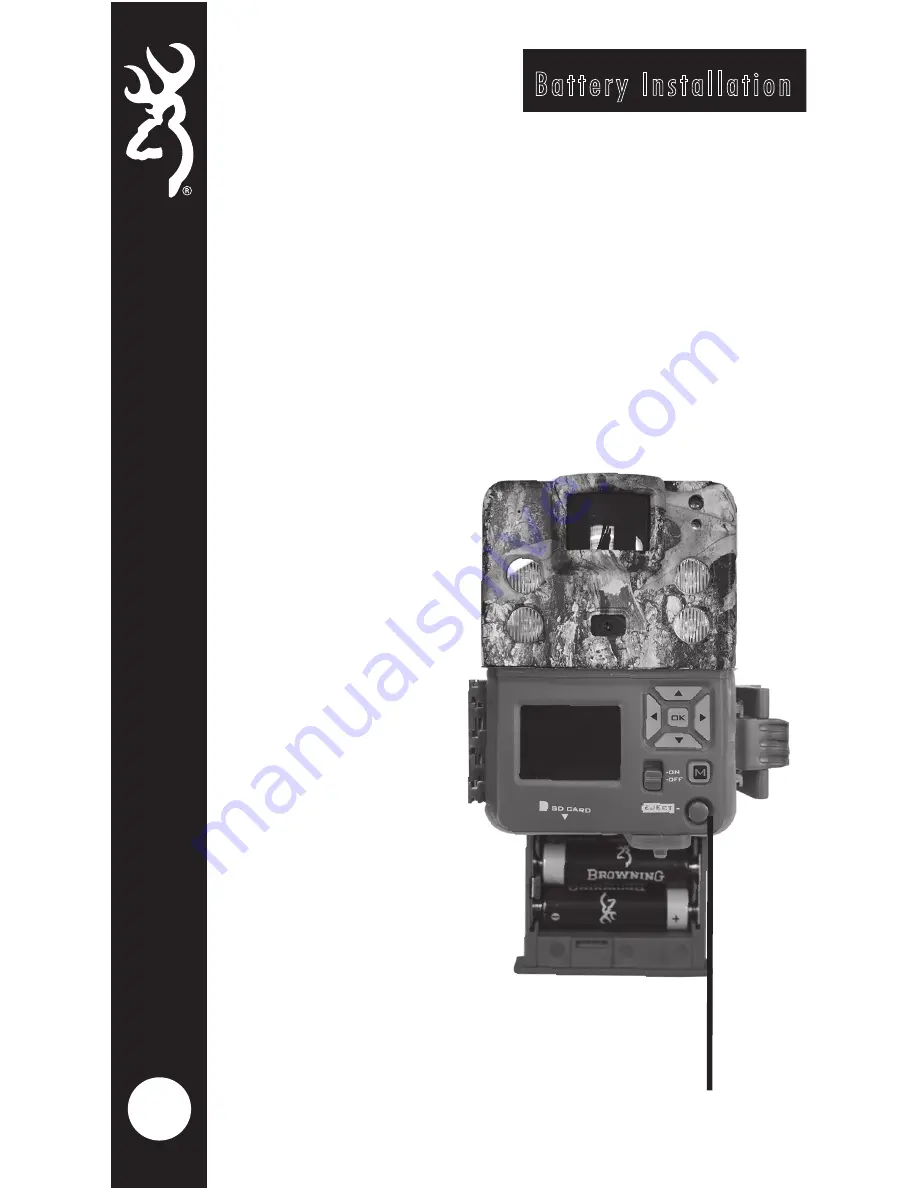
Release the battery tray by pressing the 
Battery Eject button. The battery tray will
eject about 1/2”. To completely remove 
the battery tray, simply pull the tray with
a bit of force.

Install 6 AA Alkalineor Lithium batteries in 
the battery tray. Make sure you install the 
batteries with the
correct polarity,
following the 
markings on the 
battery tray. For 
opimtimal 
performance we 
recommend using 
Browning 
branded 
batteries,Energizer  
or Duracell.

Slide the battery 
tray into the 
closed position.

Battery

Eject

Button

Содержание Strike Force HD Pro X BTC-5HDPX

Страница 1: ...PLEASE READ THIS MANUAL BEFORE USE MODEL BTC 5HDPX I N S T R U C T I O N M A N U A L ...

Страница 2: ...t of your time in the field We hope you enjoy scouting game for years to come with your new Browning Trail Camera Our customer service team is here to help you with any questions you may have operating or setting up your new trail camera Our representatives are available Monday through Friday from 9am to 5pm CST Toll Free Customer Service 1 888 618 4496 Customer Service email service browningtrail...

Страница 3: ... eject about 1 2 Insert6 AA Alkaline Batteries and an SD card into the camera Insert SD Card Battery Eject STEP 2 Using the control pad set the time and date STEP 3 Press the MODE button once Camera will countdown a 10 second delay and then be ready to capture images QUICK START GUIDE ...

Страница 4: ... 7 Multishot Modes 8 Video Quality Video Length 9 Smart IR Adjustable IR Flash 10 Timelapse Settings 11 Temp Units Info Strip SD Management 12 Motion Test Camera Name 13 Default Settings Delete Images 14 Software Upgrade 14 Image Retrieval 15 Timelapse Viewer Software 16 Field Installation 17 Accessories 18 Warranty 19 FCC 20 Camera Specifications SD card size chart 21 ...

Страница 5: ...ston branded cards Your camera can operate on standard class 10 or higher SD cards ranging from 4 32 GB You can also use higher capacity SDXC cards ranging from 64 512GB Please see page 21 for a graph showing how many photos videos and timelapse segments can be stored on SD cards from 4 32GB Based on your intended camera usage this table will help you determine what size SD card you need to usein ...

Страница 6: ...Gamera Diagram 2 ...

Страница 7: ...ly pull the tray with a bit of force Install 6 AA Alkalineor Lithium batteries in the battery tray Make sure you install the batteries with the correct polarity following the markings on the battery tray For opimtimal performance we recommend using Browning branded batteries Energizer or Duracell Slide the battery tray into the closed position Battery Eject Button ...

Страница 8: ...help position the camera in the field The battery life meter shows the percentage of charge left in your batteries When the delay counter counts down to 00 00 The camera is now ready to take a picture or video To playback images or videos on the SD card on the color screen simply press the RIGHT arrow key while the Main Screen is displayed Your first image or video will be displayed on screen The ...

Страница 9: ...WN arrows select the current month Press the RIGHT arrow key to set the current day Using the UP or DOWN arrows to set the correct day Press the RIGHT arrow key will highlight current year setting Use the UP and DOWN arrows to select the correct year Once finished press the OK button Press the DOWN arrow to highlight the TIME setting Using the arrow keypad set the current time and date Make sure t...

Страница 10: ... take still pictures of game in daytime and nightime This is the setting most people use for trails and feeding areas This setting allows you to take timelapse images during the day In addition your camera will also take motion activated pictures during the day and night to make sure you do not miss any game activity This setting will take HD video clips of game in daytime and nightime STILL PICTU...

Страница 11: ...T buttons select the delay Capture Delay options are 1 5 10 20 30 60 seconds and 2 5 10 30 or 60 minutes To select the Picture Size highlight the PICTURE SIZE Use the RIGHT or LEFT arrow keys to make your selection OPTIONS LOW 4MP MEDIUM 8MP HIGH 12MP ULTRA 20MP TIP A 4MP picture size works for almost any application You can store more 4MP images on an SD card as well ...

Страница 12: ...ur options are as follows 8 MULTI SHOT OFF MULTI SHOT STANDARD RAPID FIRE This is the default setting Your camera will only take 1 picture when triggered The selections available are 1 8 shots in this mode If you select 8 SHOT STANDARD your camera will take 8 pictures spaced 2 seconds apart This selection allows rapid image capture When triggered your camera will take 2 8 RAPID FIRE shots with onl...

Страница 13: ...VIDEO LENGTH window Your options are 5 10 20 30 seconds 1 minute or 2 minute lengths NOTES To conserve battery power your night videos are limited to a maximum time of 20 seconds For example if your video length is set at 30 seconds your camera will take 30 second videos during the day and your night videos will be limited to 20 seconds HIGH 1296 x 720p 30fps ULTRA 1600 x 900 24fps ...

Страница 14: ...re is 2 minutes To enable Smart IR Video press the RIGHT or LEFT arrow buttons to turn the feature ON Adjustable IR Flash You can adjust the IR LED power in night photos to your specific application POWER SAVE LONG RANGE FAST MOTION This is the most economical power setting Perfect for wooded areas and where game is within 70 ft of the camera This setting is perfect for pictures in open areas or w...

Страница 15: ...er locations you may need to only take images for 2 hours in the morning and 2 hours before sundown Your available TIMELAPSE DURATION options are ALL DAY Camera takes images from sunrise to sunset 2 3 or 4 HOUR These Durations limit the camera from taking images either 2 3 or 4 hours after sunrise and 2 3 or 4 hours prior to sunset NOTE Your trail camera learns the length of a day and constantly a...

Страница 16: ... and camera ID This option can be turned on or off using the RIGHT or LEFT arrow buttons SD Card Management By turning the SD Card Management feature ON the camera will erase the oldest pictures or videos on the SD card when the SD card becomes full This allows your camera to continue taking pictures if you cannot get to the field to swap out a full SD card If the SD Card Management feature is tur...

Страница 17: ...lash when motion is detected Make sure you turn OFF the MOTION TEST function before leaving the camera in the field by pressing the OK button to stop the test You can add a custom name for your camera if needed To name your camera Press the OK button once This will highlight the first character in the camera name Use the UP and DOWN arrows to change the field Press the RIGHT ARROW button to move t...

Страница 18: ...for each setting By selecting DELETE ALL all of the images on your SD card are erased This function also reformats your SD card It is a good idea to use the DELETE ALL function and reformat your SD card each time you install it in the camera for use The software upgrade function allows you to upgrade your software If a software upgrade is available for your camera it will be posted on our website ...

Страница 19: ...lot you will need an SD card reader These are inexpensive and can be found at your local sporting goods or electronics store After your SD card is inserted into your computer navigate to START MY COMPUTER Look for the SD card icon Double click on the SD card icon A folder named DCIM will appear Double click on the DCIM folder A new folder appears with called 100_BTCF Your pictures are in this fold...

Страница 20: ...PSE FILES you need to install the Browning Buck Watch Timelapse Viewer software This software will work on any PC running Windows XP or later version The Buck Watch Timelapse Viewer can be downloaded from our website at www browningtrailcameras com Buckwatch IMPORTANT Once you have loaded the Buck Watch viewer on your computer a full set of operation instructions is available by clicking on the HE...

Страница 21: ...ighten the tension knob We recommend mounting your new trail camera at a height of approximately 3 feet off the ground For best results use the MOTION TEST feature after mounting the camera This ensures the camera is pointed at the correct location The adjustable steel mounting bracket is also equipped with built in security cable loops These are perfect for using a locking steel cable or a 5 16 P...

Страница 22: ...18 We offer a full line of accessories for use with your new Browning Trail Camera Accessories AA Batteries STEEL SECURITY BOXES SD CARDS BATTERY PACKS ...

Страница 23: ... storage 2 Modifications or repairs by unauthorized agents 3 Damaged cameras that have cracked or broken outer cases due to excessive impact heat or mishandling 4 Damages caused by wild animals WARRANTY SERVICE In the event warranty service is needed contact Browning Trail Camera s customer service at 1 888 618 4496 Our knowledgeable agents can help troubleshoot any issues with your trail camera I...

Страница 24: ...t occur in a particular installation If this equipment does cause harmful interference to radio or television reception which can be determined by turning the equipment off and on the user is encouraged to try to correct the interference by one or more of the following measures Reorient or relocate the receiving antenna Increase the separation between the equipment and receiver Connect the equipme...

Страница 25: ...lus Ba ery requirements 6AAAlkaline or Lithium Ba eries Moun ng 1 nylon strap 6 long Aux Power Input 12V IR Detec on 80 Average IR Flash Illumina on 120 Cer fica ons FCC CE Info printed on Picture me date moonphase temp cam ID Other features SD card management Smart IR Video 8GB 16GB 32GB PHOTOS 20MP 750 1500 3000 12MP 1200 2400 4800 8MP 2400 4800 9600 4MP 4500 9000 VIDEOS 20 Seconds High Resolu on...

Страница 26: ...Manufactured and Distributed by Prometheus Group LLC P O Box 130100 Birmingham Alabama 35213 0100 1 888 618 4496 Prometheus Group LLC Browning trademarks licensed from Browning ...

Отзывы: