background image

Quick Operation Guide of Digital Video Recorder 

DVR Pre-Installation 

The HD-TVI series DVR is highly advanced surveillance equipment that should be installed carefully. Please take 

into consideration the following precautionary steps before installation of the DVR. 

1.


Keep all liquids away from the DVR. 

2.


Install the DVR in a well-ventilated and dust-free area. 

3.


Ensure environmental conditions meet factory specifications. 

4.


Install a manufacturer recommended HDD. 

DVR Installation 

During the installation of the DVR: 

1.


Use brackets for rack mounting. 

2.


Ensure there is ample room for audio and video cables. 

3.


When installing cables, ensure that the bend radius of the cables are no less than five times than its diameter. 

4.


Connect both the alarm and RS-485 cable. 

5.


Allow at least 2cm (≈0.75-inch) of space between racks mounted devices. 

6.


Ensure the DVR is grounded. 

7.


Environmental temperature should be within the range of -10


º

C ~ 55


º

C, 14º

F ~ 131º

F. 

8.


Environmental humidity should be within the range of 10% ~ 90%. 

Hard Disk Installation 

Before you start: 

Before installing a hard disk drive (HDD), please make sure the power is disconnected from the DVR. A factory 

recommended HDD should be used for this installation. 

Up to 4 SATA hard disks can be installed on your DVR. 

Tools Required: 

Screwdriver. 


As the installation steps of HDD are similar among different models, here we take one model as an example. 

Steps: 

1.


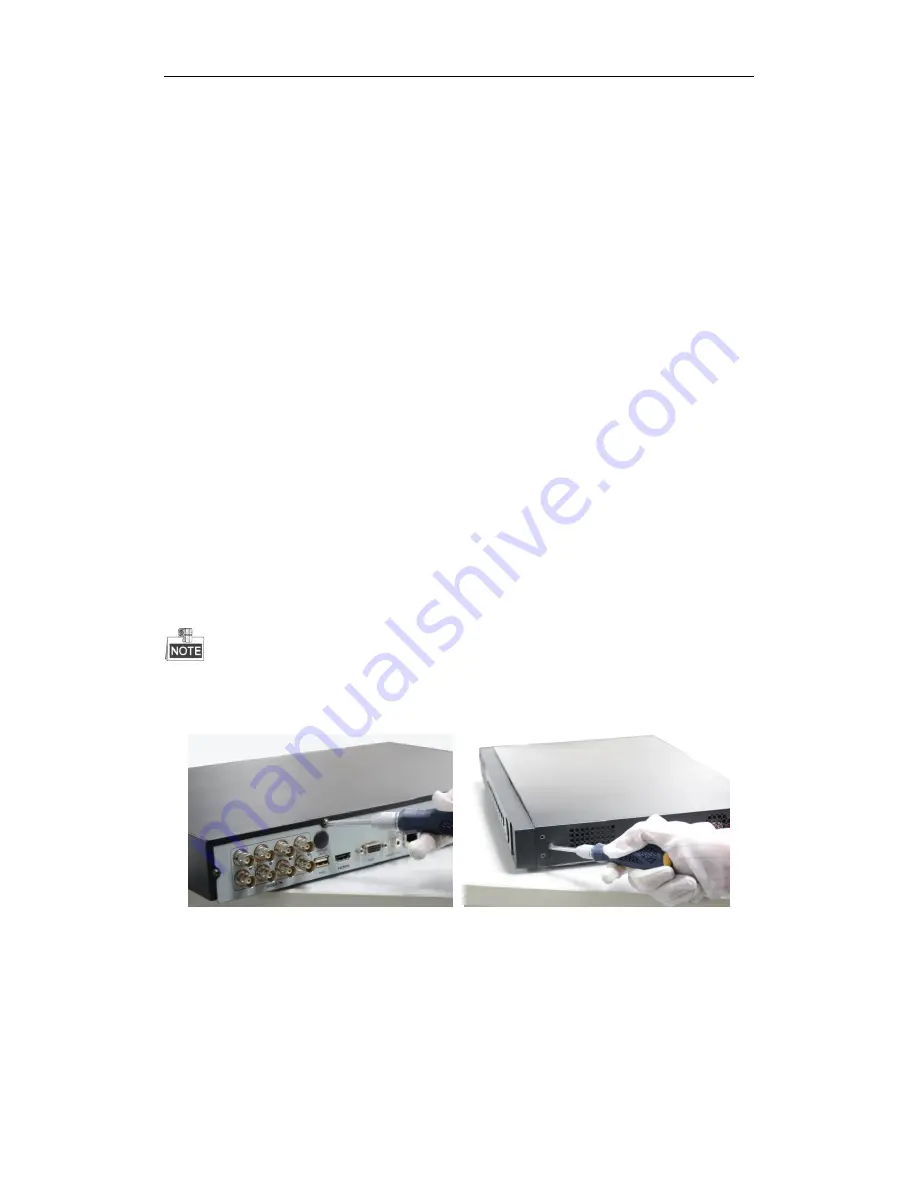
Remove the cover from the DVR by unfastening the screws on the back and side. 


2.


Connect one end of the data cable to the motherboard of DVR and the other end to the HDD. 

Содержание WH-D52 series

Страница 1: ...Digital Video Recorder Quick Operation Guide ...

Страница 2: ...Alarm Connection 11 RS 485 and Controller Connection 12 Termination Switch Operation 13 Specifications 14 Table 1 Specification 14 Table 2 Specification 15 HDD Storage Calculation Chart 16 Accessing by Web Browser 17 Logging In 17 Live View 17 Recording 18 Playback 19 Log 20 Menu Operation 21 Menu Structure 21 Startup and Shutdown 21 Live View 22 Adding IP Cameras 22 Record 24 Instant Recording 24...

Страница 3: ...nterference received including interference that may cause undesired operation EU Conformity Statement This product and if applicable the supplied accessories too are marked with CE and comply therefore with the applicable harmonized European standards listed under the Low Voltage Directive 2006 95 EC the EMC Directive 2004 108 EC the RoHS Directive 2011 65 EU 2012 19 EU WEEE directive Products ma...

Страница 4: ...gh Definition Multimedia Interface are trademarks or registered trademarks of HDMI Licensing LLC The products contained in this manual are authorized by HDMI Licensing LLC with the use right of the HDMI technology VGA is the trademark of IBM UPnPTM is a certification mark of the UPnPTM Implementers Corporation Other names of companies and product contained in this manual may be trademarks or regis...

Страница 5: ... Operation Guide of Digital Video Recorder 4 Thank you for purchasing our product If there is any question or request please do not hesitate to contact dealer This manual is applicable to 4 8 16ch HD TVI DVR ...

Страница 6: ...ss than five times than its diameter 4 Connect both the alarm and RS 485 cable 5 Allow at least 2cm 0 75 inch of space between racks mounted devices 6 Ensure the DVR is grounded 7 Environmental temperature should be within the range of 10 º C 55 º C 14º F 131º F 8 Environmental humidity should be within the range of 10 90 Hard Disk Installation Before you start Before installing a hard disk drive ...

Страница 7: ...ide of Digital Video Recorder 6 3 Connect the power cable to the HDD 4 Place the HDD on the bottom of the device and then fasten the screws on the bottom to fix the HDD 5 Re install the cover of the DVR and fasten screws ...

Страница 8: ...ring HDD the indicator flickers red when HDD is reading writing Tx Rx TX RX indicator flickers green when network connection is functioning normally 2 USB Interfaces Universal Serial Bus USB ports for additional devices such as USB mouse and USB Hard Disk Drive HDD 3 Composite Keys 1 MENU Enter numeral 1 Access the main menu interface 2 ABC F1 Enter numeral 2 Enter letters ABC The F1 button when u...

Страница 9: ...d functions of the composite keys Input letter or numbers when the light is out Realize functions when the light is red 5 Control Buttons Directional buttons In menu mode the direction buttons are used to navigate between different fields and items and select setting parameters In playback mode the Up and Down buttons are used to speed up and slow down record playing and the Left and Right buttons...

Страница 10: ...Operation Guide of Digital Video Recorder 9 Rear Panels The rear panel vaires according to different models 4 8Ch Series without alarm 4 8Ch Series with alarm 16CH Series without alarm 16CH Series with alarm ...

Страница 11: ...VGA DB15 connector for VGA output Display local video output and menu 5 HDMI HDMI video output connector 6 USB Port Universal Serial Bus USB port for additional devices 7 Network Interface Connector for network 8 RS 485 Interface Connector for RS 485 devices 9 Power Supply DC 12V power supply 10 Power Switch Switch for turning on off the device 11 GND Ground 12 Alarm Alarm in out ...

Страница 12: ...he limit of 12V 1A safely To connect an AC load jumpers should be left open you must remove the jumper on the motherboard in the DVR Use an external relay for safety as shown in the figure above There are 4 jumpers JP1 JP2 JP3 and JP4 on the motherboard each corresponding with one alarm output By default jumpers are connected To connect an AC load jumpers should be removed Example If you connect a...

Страница 13: ...terminal block Fasten stop screws 4 Connect pluggable block back into terminal block Series 2 To connect PTZ to the DVR 1 Disconnect pluggable block from the RS 485 terminal block 2 Press and hold the orange part of the pluggable block insert signal cables into slots and release the orange part Ensure signal cables are in tight 3 Connect A on PTZ to T on terminal block and B on controller to T on ...

Страница 14: ...if needed Purpose To connect the DVR with several speed domes the bus topology can be adopted which means the speed domes are connected with each other via the R and R of RS 485 serial interface But due to the impedance of 485 wire the longer the wire is the greater the impedance gets To avoid the signal reduction caused by the great impedance of long distance transmission please connect two 120Ω ...

Страница 15: ...e Video bitrate 32 Kbps 6 Mbps Audio output 1 ch RCA Linear 1KΩ Audio bitrate 64 Kbps Dual stream Support Stream type Video Video Audio Synchronous playback 4 ch 8 ch 16 ch Playback resolution 1080P 720P VGA WD1 4CIF CIF QVGA QCIF Network management Remote connections 128 Network protocols TCP IP PPPoE DHCP DNS DDNS NTP SADP SMTP SNMP NFS iSCSI UPnP HTTPS Hard disk SATA 1 SATA interface 2 SATA int...

Страница 16: ...Kbps 6 Mbps Audio output 1 ch RCA Linear 1KΩ Audio bitrate 64 Kbps Dual stream Support Stream type Video Video Audio Synchronous playback 4 ch 8 ch 16 ch Playback resolution 1080P 720P VGA WD1 4CIF CIF QVGA QCIF Network management Remote connections 128 Network protocols TCP IP PPPoE DHCP DNS DDNS NTP SADP SMTP SNMP NFS iSCSI UPnP HTTPS Hard disk SATA 1 SATA interface 2 SATA interfaces Capacity Up...

Страница 17: ...e Bit Rate Storage Used 96K 42M 128K 56M 160K 70M 192K 84M 224K 98M 256K 112M 320K 140M 384K 168M 448K 196M 512K 225M 640K 281M 768K 337M 896K 393M 1024K 450M 1280K 562M 1536K 675M 1792K 787M 2048K 900M 4096K 1800M 8192K 3600M 16384K 7200M Please note that supplied values for storage space used are just for reference Storage space used is estimated by formulas and may have some deviation from actu...

Страница 18: ...afari Mozilla Firefox and Google Chrome The supported resolutions include 1024 768 and above The default IP address is 192 0 0 64 The default user name is admin and password is 12345 You are highly recommended to change the default password right after the first login to avoid safety problem When you log in for the first time the system will remind you to install the Plug in control After the inst...

Страница 19: ...e following table for the description of buttons on the live view window Icon Description Icon Description Select the window division mode Previous page Start Stop all live view Next page Capture pictures in the live view mode Open Close audio Start Stop all recording Start Stop two way Audio Enable Disable digital zoom Adjust volume Recording Before you start Make sure the device is connected wit...

Страница 20: ... day to the whole week You can also check any of the checkboxes before the date and click Copy 4 Click OK to save the settings and exit the Edit Schedule interface 6 Click Advanced to configure advanced record parameters 7 Click Save to validate the above settings Playback Interface Introduction No Name Description 1 Channel List Displays the list of channels and the playing status of each channel...

Страница 21: ...box and click button to locate the playback point The color of the video on the progress bar stands for the different video types Log You can view and export the log files at any time including operation alarm exception and information of device Before you start The Log function can be realized only when the device is connected with HDD or network disk And make sure the HDD or network disk has bee...

Страница 22: ...s HDD Detect Image VQD Manual VQD Alarm RS 232 Startup and Shutdown Proper startup and shutdown procedures are crucial to expand the service time of the DVR To start the DVR Check the power supply is plugged into an electrical outlet It is HIGHLY recommended that an Uninterruptible Power Supply UPS be used in conjunction with the device Turn on the power switch on the rear panel the Power indicato...

Страница 23: ...annel showing the status of the record and alarm in the channel so that you can find problems as soon as possible Indicating that there is an alarm or are alarms Alarm includes video loss tampering motion detection or sensor alarm etc Recording manual record continuous record motion detection or alarm triggered record Alarm Recording Event Exception event and exception information appears at the l...

Страница 24: ...camera is marked in white while the camera not added is marked in yellow Explanation of the icons Icon Explanation Icon Explanation Edit basic parameters of the camera Add the detected IP camera The camera is connected The camera is disconnected you can click the icon to get the exception information of camera Delete the IP camera Advanced settings of the camera 4 To add other IP cameras 1 Click t...

Страница 25: ...rd and All day Record And for other record types you may refer to the user manual for detailed information After rebooting all the manual records enabled are canceled Instant Recording On the live view window of each channel there is a quick setting toolbar which shows on the bottom of the window when you click on it Click the icon to enable the record and the icon turns to And click icon to disab...

Страница 26: ...ion menu Only record files recorded during the last five minutes on this channel will be played back OPTION 2 1 Enter the Playback menu Right click a channel in live view mode and select Playback from the menu Pressing numerical buttons on the front panel will switch playback to related channels during playback process 2 Playback management The toolbar in the bottom part of Playback interface can ...

Страница 27: ...les can be backed up to various devices such as USB flash drives USB HDDs or USB DVD writers To export recorded files 1 Enter Video Export interface Choose the channel s you want to back up and click the Quick Export button 2 Enter Export interface choose backup device and click the Export button to start exporting 3 Check backup result Choose the record file in Export interface and click button t...

Отзывы: