background image

97.htm

Arrange Text (only for a layout document)


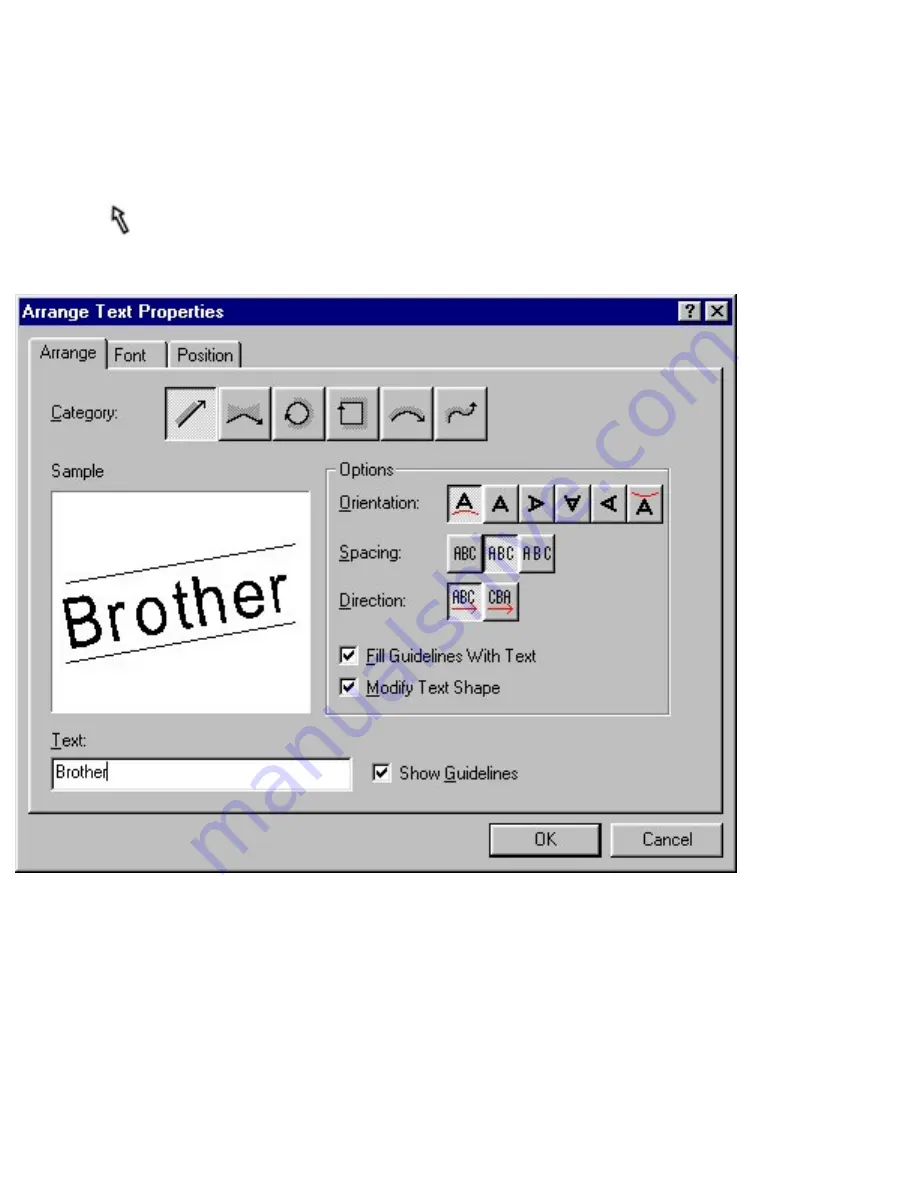
Selecting the [Arrange Text] command in the [Insert] menu displays the Arrange Text Properties 
dialog box, which puts a powerful selection of text-arranging tools at your fingertips. 


To edit an Arrange Text object that has already been added to the layout, select the object with 

the 

 pointer, then double-click the left mouse button to display an Arrange Text Properties 

dialog box which also contains the [Position] tab. 

Category:


Select the shape that you wish to use for arranging the text.

Sample:


This box shows how the arranged text will appear when it is added to the layout.


file:///E|/insiders/97.htm (1 of 2) [9/26/2007 1:55:28 PM]

Содержание SC-2000

Страница 1: ...main page Getting Ready Basic Operation Reference Index file E MAIN HTM 9 26 2007 1 54 56 PM ...

Страница 2: ... InstallShield Wizard 3 Personalize your copy of Stamp Editor 4 Install the desired options 5 Install the printer driver Deleting Reinstalling Stamp Editor Starting Up Stamp Editor Getting Ready Home Getting Ready Basic Operations Reference Index file E Getmenu htm 9 26 2007 1 54 56 PM ...

Страница 3: ... This chapter walks you through the basics you need to know in order to start using Stamp Editor We recommend that you go through the examples to become familiar with how to use the mouse to create objects and move them around the layout area and how to create your own database Note that this chapter provides only enough information to help you get started More detailed explanations of commands an...

Страница 4: ...the object Changing the size of an object Moving an object using the pointer Moving an object using your computer s arrow keys Deleting objects Using the Auto Format Wizard Creating a layout using the Auto Format Wizard Printing a layout 1 Select the printer 2 Print the layout file E Basimenu htm 2 of 4 9 26 2007 1 54 57 PM ...

Страница 5: ...ve a name Saving a layout under a different name Databases Creating a database 1 Create a new database document and new table 2 Define the field names and their formats 3 Create records and input record data Maintaining the database Using database data in layouts file E Basimenu htm 3 of 4 9 26 2007 1 54 57 PM ...

Страница 6: ...ined fields 2 Merge database fields into the selected layout 3 Arrange the fields in the layout Printing a layout containing data merged from a record Saving a database document file E Basimenu htm 4 of 4 9 26 2007 1 54 57 PM ...

Страница 7: ...ar Record view window Database tree view Record view Record selector column Field selector row Reference This chapter is organized as a reference It contains detailed information about the Stamp Editor s windows docks toolbars commands and dialog boxes Home Getting Ready Basic Operations Reference Index file E Refemenu htm 1 of 3 9 26 2007 1 54 57 PM ...

Страница 8: ...op up menu Object pop up menu Database tree view pop up menu Record view pop up menu Menu bar commands File Edit View Insert only for a layout document Format Layout only for a layout document Tool only for a database document file E Refemenu htm 2 of 3 9 26 2007 1 54 57 PM ...

Страница 9: ...Refemenu htm Window Help file E Refemenu htm 3 of 3 9 26 2007 1 54 57 PM ...

Страница 10: ... Align Aligning objects Aligning text Arrange Icons Arrange Text Auto Format 1 Auto Format 2 Auto Format 3 Auto Text 1 Auto Text 2 B Background Baud rate Bitmap importing Bring Forward file E Indemenu htm 1 of 15 9 26 2007 1 54 58 PM ...

Страница 11: ...endars Cascade Change Size Change Name Changing record data displayed 1 Changing record data displayed 2 Changing text Clear Clip Art Clip text Close Copy 1 Copy 2 CSV files Cut 1 Cut 2 file E Indemenu htm 2 of 15 9 26 2007 1 54 58 PM ...

Страница 12: ...ting Database saving Database Field Database Properties Database tree view Date Time Calendar Define Fields Deleting fields objects Stamp Editor program records Delimiter Display draw toolbar field names 1 field names 2 file E Indemenu htm 3 of 15 9 26 2007 1 54 58 PM ...

Страница 13: ...ecord data 1 record data 2 rulers standard toolbar status bar Docked object dock 1 object dock 2 property dock 1 property dock 2 Draw toolbar Drawing E Edit commands Effects drawings text Exit file E Indemenu htm 4 of 15 9 26 2007 1 54 58 PM ...

Страница 14: ...xport Extension F Fields changing changing order creating merging 1 merging 2 merging 3 naming 1 naming 2 naming 3 Field selector row File commands list naming saving file E Indemenu htm 5 of 15 9 26 2007 1 54 58 PM ...

Страница 15: ...asimenu htm Find Fit text Font Font Properties 1 Font Properties 2 Form View 1 Form View 2 Format commands Frame G Go To Graphics Group H Help 1 Help 2 I file E Indemenu htm 6 of 15 9 26 2007 1 54 58 PM ...

Страница 16: ... Importing graphics Insert commands Insert OLE Installation printer driver Stamp Editor program J Joined Fields 1 Joined Fields 2 Joined Fields 3 L Larger Layout commands creating options file E Indemenu htm 7 of 15 9 26 2007 1 54 58 PM ...

Страница 17: ...ut Properties Line styles widths M Make Picture Maintain Ratio Margins Maximum Menu bar Menu commands Merge Options Merge into Layout 1 Merge into Layout 2 Monochrome image layout options file E Indemenu htm 8 of 15 9 26 2007 1 54 58 PM ...

Страница 18: ...nochrome Display Moving objects N New 1 New 2 New Object New Window O Object Object sizing Object text Object dock options Open 1 Open 2 Optimize Database Options Order file E Indemenu htm 9 of 15 9 26 2007 1 54 58 PM ...

Страница 19: ...entation setup size Page Properties Paste 1 Paste 2 Personalization Pointer drawing selecting Pop up menus Position Print 1 Print 2 Print Preview 1 Print Preview 2 Print Setup file E Indemenu htm 10 of 15 9 26 2007 1 54 58 PM ...

Страница 20: ...er Printing layout record Property dock R Read only File Recent files Records creating Record selector column Record view window Redo 1 Redo 2 Reinstalling Replace Rotate Rulers file E Indemenu htm 11 of 15 9 26 2007 1 54 58 PM ...

Страница 21: ...earching Select All Selecting objects Send Backward Send to Back Setup printer driver Stamp Editor program Set As Object Defaults Show Icon Name Size object 1 object 2 Smaller Sort 1 Sort 2 file E Indemenu htm 12 of 15 9 26 2007 1 54 58 PM ...

Страница 22: ...olbar Starting Stamp Editor Stamp Editor installation printer driver installation Status bar Strikeout System configuration T Text cursor line spacing orientation size 1 size 2 Text Properties Tile file E Indemenu htm 13 of 15 9 26 2007 1 54 58 PM ...

Страница 23: ...Basimenu htm Time Tool commands Toolbars draw standard viewing U Underlining Undo 1 Undo 2 Ungroup V View commands W Window command Z file E Indemenu htm 14 of 15 9 26 2007 1 54 58 PM ...

Страница 24: ...Basimenu htm Zoom 1 Zoom 2 Home Getting Ready Basic Operations Reference Index file E Indemenu htm 15 of 15 9 26 2007 1 54 58 PM ...

Страница 25: ...1 htm Getting Ready file E insiders 1 htm 9 26 2007 1 54 59 PM ...

Страница 26: ...erly The following is the general procedure for installing Stamp Editor 1 Check your system to make sure that it meets the necessary requirements 2 Start up the InstallShield Wizard 3 Personalize your copy of Stamp Editor 4 Install the desired options 5 Install the printer driver Each step of the above procedure is described in detail in this chapter 1 Check your system The following describes the...

Страница 27: ...ing Windows NT Hard disk free space At least 20 MB Note A few hundred megabytes of additional free space may be needed when printing large amounts of data Parallel port 25 pin connector jack or Serial port 9 pin connector jack Monitor VGA or higher graphics card CD ROM drive NEXT file E insiders 2_11 htm 2 of 2 9 26 2007 1 54 59 PM ...

Страница 28: ...r s serial port and turn both of them on 2 Insert the Stamp Editor CD ROM into the computer s CD ROM drive Note The Installers for the Stamp Editor program the printer driver and the User s Guide can also be copied from the CD ROM onto floppy disks Refer to the Readme file on the CD ROM for more details 3 Click to install the Stamp Editor program and the SC 2000 printer driver file E insiders 3 ht...

Страница 29: ...3 htm 4 Click to start up the InstallShield Wizard for installing the Stamp Editor program BACK NEXT file E insiders 3 htm 2 of 2 9 26 2007 1 55 00 PM ...

Страница 30: ...ndow Click to proceed to the User Information dialog box which lets you personalize Stamp Editor with your name and company name 1 Type your name into the Name field 2 Type the name of your company into the Company field 3 Click The following dialog box appears file E insiders 4 htm 1 of 2 9 26 2007 1 55 00 PM ...

Страница 31: ...4 htm 4 Click to register the entered information and display the Setup Type dialog box BACK NEXT file E insiders 4 htm 2 of 2 9 26 2007 1 55 00 PM ...

Страница 32: ...lick to install the basic options Installing only the minimum options necessary Select the Compact setting and then click to install the minimum options Selecting which options to install Select the Custom setting and then click The following dialog box appears file E insiders 5 htm 1 of 3 9 26 2007 1 55 01 PM ...

Страница 33: ...you selected Custom and chose to install the contents of the User s Guide onto your computer it will quickly be available each time you wish to refer to it The window shown above appears while the application files are being copied onto your hard disk file E insiders 5 htm 2 of 3 9 26 2007 1 55 01 PM ...

Страница 34: ... Note Never remove the CD ROM from the drive while installation is in progress unless a message appears on the computer screen telling you to do so BACK NEXT file E insiders 5 htm 3 of 3 9 26 2007 1 55 01 PM ...

Страница 35: ...ked if you wish to install the SC 2000 printer driver Note To install the printer driver separately without first installing the Stamp Editor program click in the screen that allows you to select which components to install Then click 1 Click file E insiders 7 htm 1 of 4 9 26 2007 1 55 02 PM ...

Страница 36: ...7 htm 2 Select Install and then click For Windows 95 98 A dialog box that allows you to select the PTCOM port where the SC 2000 is connected appears file E insiders 7 htm 2 of 4 9 26 2007 1 55 02 PM ...

Страница 37: ...7 htm For Windows NT4 0 2000 A dialog box that allows you to add a PTCOM port appears file E insiders 7 htm 3 of 4 9 26 2007 1 55 02 PM ...

Страница 38: ... by clicking Select the port where the SC 2000 is connected and then click 3 For Windows NT 4 0 2000 Click The dialog box that allows you to select the PTCOM port where the SC 2000 is connected appears BACK NEXT file E insiders 7 htm 4 of 4 9 26 2007 1 55 02 PM ...

Страница 39: ...tamp Editor files Double click Add Remove Programs in the Control Panel window and then select Stamp Editor 3 and click the Reinstalling Stamp Editor or changing the setup Repeat the installation procedure described in this chapter file E insiders 12 htm 9 26 2007 1 55 02 PM ...

Страница 40: ...clicking the Stamp Editor 3 icon Double click the Stamp Editor 3 icon in the Stamp Editor 3 group window Starting up using the Start button 1 Click the Start button in the taskbar to display the Start menu 2 Select Programs 3 Select Stamp Editor 3 4 Click Stamp Editor 3 Starting up using Windows Explorer 1 Start up Windows Explorer file E insiders 13a htm 1 of 2 9 26 2007 1 55 03 PM ...

Страница 41: ...13a htm 2 Select the drive and directory where Stamp Editor is installed 3 Double click Ptedit3 exe file E insiders 13a htm 2 of 2 9 26 2007 1 55 03 PM ...

Страница 42: ...the examples to become familiar with how to use the mouse to create objects and move them around the layout area and how to create your own database Note that this chapter provides only enough information to help you get started More detailed explanations of commands and dialog boxes can be found in Reference file E insiders 13 htm 9 26 2007 1 55 03 PM ...

Страница 43: ...able objects along with a short explanation of the type of information it contains Text objects text Graphics objects pictures drawn using the draw toolbar Bitmap data objects bitmap data bmp dib jpg tif ico or wmf data imported from another application such as Paintbrush Arranged text objects text created using the Arrange Text command Date Time Calendar objects date time or calendar data created...

Страница 44: ...ditor Click here pulling down the File menu and selecting the New command and then clicking the Layout command in the New submenu 1 Menu bar 7 Print area 2 Standard toolbar 8 Cursor 3 Property dock 9 Layout area 4 Rulers 10 Object dock 5 Draw toolbar 11 Status bar 6 Title bar file E insiders 15 htm 1 of 2 9 26 2007 1 55 04 PM ...

Страница 45: ...15 htm Click here for a detailed explanation of the layout document window and its components file E insiders 15 htm 2 of 2 9 26 2007 1 55 04 PM ...

Страница 46: ...r 2 Move the I beam pointer to any place in the layout area then click the left mouse button The cursor flashes in the layout area to indicate that you can now type in text 3 Type in some text To change the text you can use your computer keyboard s arrow keys or the mouse to move the cursor to the part of the text that you wish to change Then you can use the keyboard s delete key to delete any tex...

Страница 47: ...16_18 htm NEXT file E insiders 16_18 htm 2 of 2 9 26 2007 1 55 05 PM ...

Страница 48: ...e time For details on using these commands click here The Font Properties allow you to make a single change at a time Click here Here let s use the Font Properties to make the first letter of the text larger than the other letters 1 Highlight the first letter of the text by holding down the left mouse button and dragging the I beam pointer across it 2 Click in the property dock to display the Font...

Страница 49: ...let you lay out your text in exactly the orientation and style you want See the following pages noted for detailed information about how to perform these text layout operations Auto formatting Aligning Rotating Filling the print area with an object Inserting the date the time or a calendar Auto arrangement of text Text alignment inside a box Auto editing of text in an existing layout BACK file E i...

Страница 50: ... layout area and hold down the left mouse button This makes the current location of the pointer one of the corners of the box 3 Move the pointer to where you want the opposite corner of the box to be and release the mouse button You can use the other graphic tools in the same way to draw lines rounded boxes ellipses and frames Click here for details on using all of the draw toolbar buttons Holding...

Страница 51: ...etailed information Drawing lines boxes rounded boxes circles and frames Specifying a line style line width and fill pattern Specifying a frame style Specifying the background line and patterns Auto formatting Aligning Rotating Filling the print area with an object Importing images Inputting clip art Combining parts to create an illustration or selecting ready made pictures file E insiders 19_20 h...

Страница 52: ...does not change 2 Move the pointer on top of the object you wish to select then click the left mouse button Small solid squares called handles appear around text or graphic objects to indicate that they are selected 3 To deselect the object move the pointer anywhere in the layout area outside of the selected object and click the left mouse button again At this time the handles disappear from aroun...

Страница 53: ...ter to the next object you wish to select then hold down the keyboard s shift key while clicking the left mouse button Now two objects are selected 4 Repeat step 3 to select all of the objects you want selected 5 To deselect the objects click anywhere in the layout area outside of the selected objects NEXT file E insiders 21_23 htm 2 of 2 9 26 2007 1 55 07 PM ...

Страница 54: ... drawing style of the object The dialog box can also be displayed by clicking the right mouse button then clicking the Properties command in the pop up menu 3 Select the desired settings then click Changing the size of an object 1 Use the pointer to select the object you wish to modify 2 Use the mouse to grab one of the object s handles then drag the mouse To grab a handle move the pointer over it...

Страница 55: ...odifies both dimensions Holding down your keyboard s shift key while dragging a corner handle maintains the vertical to horizontal ratio as you change the size of the object BACK NEXT file E insiders 22 htm 2 of 2 9 26 2007 1 55 08 PM ...

Страница 56: ...o move You could also select more than one object and move them all at one time 2 Press the arrow key on your computer s keyboard for the direction that you want the object to move Holding down an arrow key continually moves the selected object Deleting objects 1 Use the pointer to select the objects you wish to delete 2 Pull down the Edit menu and select either the Cut or the Clear command You ca...

Страница 57: ...23 htm The Clear command or your keyboard s backspace delete key simply deletes the selected object BACK file E insiders 23 htm 2 of 2 9 26 2007 1 55 08 PM ...

Страница 58: ...ically formatted templates which are divided into135 different categories in 9 folders Creating a layout using the Auto Format Wizard As an example let s create a stamp like the following This stamp was created using the template named 202 LBL located in the OFFICE folder 1 Click or pull down the File menu and select the Auto Format command file E insiders 24_27 htm 1 of 4 9 26 2007 1 55 09 PM ...

Страница 59: ... category containing the template that you wish to use For this example first select OFFICE and then click Note Click to display the Browse for Folder dialog box Then select OFFICE and then click file E insiders 24_27 htm 2 of 4 9 26 2007 1 55 09 PM ...

Страница 60: ...24_27 htm 3 Click 4 In the Template list view select your desired template Let s select 202 LBL file E insiders 24_27 htm 3 of 4 9 26 2007 1 55 09 PM ...

Страница 61: ...it is displayed in the Input edit box Here the first piece of text that we wish to change the name is already selected The text can be selected by either clicking it in the sample that is shown or by clicking or NEXT file E insiders 24_27 htm 4 of 4 9 26 2007 1 55 09 PM ...

Страница 62: ...ur computer printer or create a stamp using your SC 2000 1 Select the printer 1 Pull down the File menu and click the Printer Setup command to display the Printer Setup dialog box 2 Click P touch Stamp Series Printer and select SC 2000 file E insiders 28_29 htm 1 of 2 9 26 2007 1 55 10 PM ...

Страница 63: ...Pull down the File menu and click the Print command to display the Print dialog box Note The Options that appear differ according to the printer that is selected 2 Select the desired settings 3 Make sure the printer is turned on and ready then click file E insiders 28_29 htm 2 of 2 9 26 2007 1 55 10 PM ...

Страница 64: ...ady assigned to it Saving a layout that does not have a name Pull down the File menu and click the Save command A dialog box appears so that you can specify a drive directory and file name for the layout Click here Saving a layout under a different name Pull down the File menu and click the Save As command A dialog box appears so that you can specify a drive directory and new file name for the lay...

Страница 65: ... a format which determines the type of data that the field can contain The records are the rows of the table and the fields are the columns The field names appear at the top of each column If your database is a list of customers for example each record could contain a field for the first name a field for the last name a field for the telephone number etc Any of the fields in the database can be us...

Страница 66: ...ata First Name Last Name Address City State Zip Code John Jones 1 Baker Street Portsmouth OH 32468 Mary Smith 1 Crescent Road Chicago IL 46901 Peter Brown 1 Main Street Los Angeles CA 92802 Jane Thompson 1 Bradford Street New York NY 60867 John Peterson 1 Green Street Miami FL 32960 1 Create a new database document and new table A new table can easily be created by following the steps below 1 Pull...

Страница 67: ...n edit box select the folder where you wish to save the table 3 In the Field Name edit box type in the name that you wish to give the new table 4 Click to display the Define Fields dialog box file E insiders 32_36 htm 2 of 3 9 26 2007 1 55 11 PM ...

Страница 68: ...32_36 htm NEXT file E insiders 32_36 htm 3 of 3 9 26 2007 1 55 11 PM ...

Страница 69: ... Field Name edit box type the name of one of your fields Let s type in Last Name first so we can use the last name data to identify the records in our database 3 In the Field Format box pull down the list of field formats and select the format of the entered field name All of the fields in this database can have the text format applied to them BACK NEXT file E insiders 33 htm 9 26 2007 1 55 11 PM ...

Страница 70: ...mple the cursor is already positioned in the edit box beside Last Name 3 Type in the data for that field Now enter Jones 4 Press your computer keyboard s tab key to move the cursor to the next field 5 Repeat steps 3 and 4 to enter data into the other fields of this record After entering data into the last field of the record pressing the keyboard s return key instead of the tab key creates a new r...

Страница 71: ...35_36 htm BACK file E insiders 35_36 htm 2 of 2 9 26 2007 1 55 12 PM ...

Страница 72: ...nge then change the data 4 Click to close the form view window Deleting a record 1 In the record selector column of the record view window click the record that you wish to delete To delete more than one record hold down the keyboard s Ctrl key while clicking all of the records that you wish to delete 2 In the Edit menu click the Clear command Changing a field name 1 In the Tool menu click the Def...

Страница 73: ... name into the Field Name edit box and select the new field format from the Field Format box 5 Click to close the Edit a Field dialog box 6 When you are finished making changes click to close the Define Fields dialog box NEXT file E insiders 37_39 htm 2 of 2 9 26 2007 1 55 13 PM ...

Страница 74: ... into the selected layout 3 Arrange the fields in the layout All of these steps are described in detail below 1 Define joined fields The following operation describes how you can join two or more fields into a single field which makes it easier to check that your text fits As an example let s join the First Name and Last Name fields of the data we entered into our database 1 In the Tool menu click...

Страница 75: ...40_44 htm 2 Click to display the Add a Joined Field dialog box file E insiders 40_44 htm 2 of 3 9 26 2007 1 55 14 PM ...

Страница 76: ...40_44 htm NEXT file E insiders 40_44 htm 3 of 3 9 26 2007 1 55 14 PM ...

Страница 77: ...s already linked to a database is selected an error message is displayed 2 In the Database Fields That Can Be Merged list box in the Merge Fields dialog box click the field that you wish to merge into the layout To select more than one field hold down the keyboard s Ctrl key while clicking all of the fields that you wish to merge To select a range of fields click the first field in the range and t...

Страница 78: ...42 htm selected field Let s set all of these fields to Auto BACK NEXT file E insiders 42 htm 2 of 2 9 26 2007 1 55 14 PM ...

Страница 79: ...rd view window its data appears in the fields merged into the layout To display the field names instead of the record data in the merged field objects click in the Database Properties 3 Arrange the fields in the layout After merging the database fields into the layout you can change the font size style bold italic bold italic etc and file E insiders 43_44 htm 1 of 2 9 26 2007 1 55 15 PM ...

Страница 80: ...laying data from another record To select a different record which contains data that you wish to display in the layout pull down the Edit menu then open the Go To submenu and select the First Record Last Record Previous Record or Next Record command You can also change the record data displayed in the layout by using the record selection buttons in the Database Properties BACK file E insiders 43_...

Страница 81: ...ged from a record The print operation lets you print the layout which contains the merged data from the selected record in your database file Use the same procedure as that outlined in Printing a layout file E insiders 45 htm 9 26 2007 1 55 16 PM ...

Страница 82: ...46 htm Saving a database document Use the same procedures as those outlined Saving a layout document file E insiders 46 htm 9 26 2007 1 55 16 PM ...

Страница 83: ...htm Reference This chapter is organized as a reference It contains detailed information about the Stamp Editor s windows docks toolbars commands and dialog boxes file E insiders 47 htm 9 26 2007 1 55 16 PM ...

Страница 84: ...onment Layout document window 1 Menu bar 7 Print area 2 Standard toolbar 8 Cursor 3 Property dock 9 Layout area 4 Rulers 10 Object dock 5 Draw toolbar 11 Status bar 6 Title bar file E insiders 48_58 htm 1 of 2 9 26 2007 1 55 16 PM ...

Страница 85: ...creen corresponds to a printer dot Menu bar When a layout document is displayed When a database document is displayed The menu bar provides pull down menus containing various commands Refer to menu bar commands for detailed explanations of each menu and command NEXT file E insiders 48_58 htm 2 of 2 9 26 2007 1 55 16 PM ...

Страница 86: ...le menu Click here for more details 2 Open button Clicking this button is the same as selecting the Open command in the File menu Click here for more details 3 Save button Clicking this button is the same as selecting the Save command in the File menu Click here for more details 4 Auto Format button Clicking this button is the same as selecting the Auto Format command in the File menu Click here f...

Страница 87: ...ing this button is the same as selecting the Print command that appears in the File menu when a layout document is displayed Click here for more details BACK NEXT file E insiders 49 htm 2 of 2 9 26 2007 1 55 17 PM ...

Страница 88: ...Properties to select the printer and to specify the size of the stamp These Properties are simply shortcuts to settings on the Printer Setup and Page Setup tabs in the Printer Setup dialog box which appears when you select the Printer Setup command on the File menu Click here for more detailed explanations of these settings file E insiders 52 htm 1 of 2 9 26 2007 1 55 17 PM ...

Страница 89: ...52 htm BACK NEXT file E insiders 52 htm 2 of 2 9 26 2007 1 55 17 PM ...

Страница 90: ... merged into a layout Click here for more details Rulers The rulers provide you with a convenient scale for aligning objects in your layout You can use the Rulers command Click here on the View menu to display or hide the rulers and the Options command Click here on the Format menu to specify either millimeters inches or points as the unit of measurement You can also switch between the three units...

Страница 91: ...e left mouse button The dialog box can also be displayed by selecting an object then clicking the right mouse button and selecting the Properties command from the pop up menu 2 Text button Click this button to change the pointer to the I beam pointer when it is moved into the layout area To create a new text object position the pointer at the desired position in the layout area then click the left...

Страница 92: ... itself disappears 3 Line button Click this button to change the pointer to when it is moved into the layout area To draw a straight line hold down the left mouse button and drag the mouse Then release the mouse button at the end of the line Holding down the keyboard s shift key while dragging the mouse keeps the line vertical horizontal or at a 45 degree angle BACK NEXT file E insiders 56 htm 2 o...

Страница 93: ...n the Insert menu Click here for more details 3 Make Picture Clicking this option is the same as selecting the Make Picture command in the Insert menu Click here for more details 4 Image Clicking this option is the same as selecting the Image command in the Insert menu Click here for more details 5 Date Time Calendar Clicking this option is the same as selecting the Date Time Calendar command in t...

Страница 94: ...ion of the command or button that the pointer is currently positioned over In addition when Caps Lock or Num Lock is turned on the corresponding indicator appears on the right side of the status bar BACK file E insiders 58 htm 2 of 2 9 26 2007 1 55 19 PM ...

Страница 95: ...Record view The record view window allows you to view the record data entered in the table or query selected in the database tree view From this window you can compare data entered into different records or even edit the data in existing records file E insiders 59_60 htm 1 of 2 9 26 2007 1 55 20 PM ...

Страница 96: ... in the current database document Record view This table displays the records entered in the table or query that is currently selected in the database tree view The field names appear in the top row with the records listed below them NEXT file E insiders 59_60 htm 2 of 2 9 26 2007 1 55 20 PM ...

Страница 97: ... column selects the clicked records Field selector row This row allows you to select specific fields in all of the records of the current table or query Clicking a field name in this row selects the corresponding field in all of the records Holding down the keyboard s shift key and clicking another field name in this row selects all of the corresponding fields in the range between the previously s...

Страница 98: ...s command on the Format menu Click here for more details of these settings Docked Selecting the Docked command in the property dock pop up menu is the same as selecting the Docked option on the Property Dock tab of the Options dialog box which is displayed by selecting the Options command on the Format menu Object dock pop up menu A pop up menu which can be used to change how the object dock appea...

Страница 99: ...as selecting the Show Icon Name option on the Object Dock tab of the Options dialog box which is displayed by selecting the Options command on the Format menu Click here for more details on this option Insert Selecting the Insert command in the object dock pop up menu inserts the OLE object that the pointer is positioned over Delete Selecting the Delete command in the object dock pop up menu delet...

Страница 100: ...ste command in the Edit menu Click here for more details Properties Selecting the Properties command from the object pop up menu is the same as double clicking an object or selecting an object and clicking the Properties button in the standard toolbar Click here for more details Set as Object Defaults Selecting the Set as Object Defaults command from the object pop up menu changes the settings for...

Страница 101: ...62 htm BACK NEXT file E insiders 62 htm 2 of 2 9 26 2007 1 55 21 PM ...

Страница 102: ...is the same as selecting the Cut command in the Edit menu Click here for more details Copy Selecting the Copy command from the database tree view pop up menu is the same as selecting the Copy command in the Edit menu Click here for more details Paste Selecting the Paste command from the database tree view pop up menu is the same as selecting the Paste command in the Edit menu Click here for more d...

Страница 103: ... as selecting the Cut command in the Edit menu Click here for more details Copy Selecting the Copy command from the record view pop up menu is the same as selecting the Copy command in the Edit menu Click here for more details Paste Selecting the Paste command from the record view pop up menu is the same as selecting the Paste command in the Edit menu Click here for more details Merge into Layout ...

Страница 104: ... of many of the dialog boxes in this section were included as examples the actual contents of these boxes will reflect the files that you are working with File New Selecting the New command in the File menu displays the New submenu which allows you to select whether a blank layout or database document will be created A new layout document is automatically assigned the name Layout followed by a num...

Страница 105: ...65_82 htm Save in Select the disk or folder where you want to save the file NEXT file E insiders 65_82 htm 2 of 2 9 26 2007 1 55 22 PM ...

Страница 106: ...n the Clipboard The selected data is left unchanged in its original layout Paste Selecting the Paste command in the Edit menu pastes the contents of the Clipboard Data can be placed on the Clipboard using either the Cut or Copy command Note You can cut or copy data in this application and paste it into another application In such a case the paste operation produces a bitmap image Selecting the Cut...

Страница 107: ...8 htm Select All Selecting the Select All command in the Edit menu selects all of the objects text and graphics in the layout area or database BACK NEXT file E insiders 83_88 htm 2 of 2 9 26 2007 1 55 23 PM ...

Страница 108: ...splays appears in front of the command or hides no appears the property dock Click here Object Dock Selecting the Object Dock command in the View menu displays appears in front of the command or hides no appears the object dock Click here Status Bar Selecting the Status Bar command in the View menu displays appears in front of the command or hides no appears the status bar Click here Rulers only f...

Страница 109: ...lows you to choose from a variety of clip art illustrations that can be added to the layout Category Select the category containing the desired clip art illustration Data This list box shows the illustrations belonging to the category specified in the Category box Double click an illustration to add it to the layout file E insiders 95 htm 1 of 2 9 26 2007 1 55 24 PM ...

Страница 110: ... button to display an Open dialog box which lets you add an illustration to the category specified in the Category box Click here for more details on the Open dialog box Click this button to delete the selected clip art illustration BACK NEXT file E insiders 95 htm 2 of 2 9 26 2007 1 55 24 PM ...

Страница 111: ... position the cursor in the layout and type the new text To edit font settings for a text object that has already been added to the layout first use the I beam pointer to highlight the text or use the pointer to double click on the text object in the layout then change the settings on the Font tab Any settings that you specify are only applied to the selected text object Settings you make on the F...

Страница 112: ... your computer Effects underlines and strikeouts are always available Font Select the True Type font that you want to use from those installed on your computer Style Select the font style that you want to use The styles that are available depend on the selected font BACK NEXT file E insiders 112_125 htm 2 of 2 9 26 2007 1 55 25 PM ...

Страница 113: ...A group can be manipulated moved copied deleted made larger made smaller etc just like any other object can Ungroup only for a layout document Selecting the Group command in the Layout menu unlinks the objects that make up the selected group Order only for a layout document Selecting the Order command in the Layout menu displays the Order submenu which allows you to rearrange overlapping objects B...

Страница 114: ...on the form view window Define Fields only for a database document Selecting the Define Fields command in the Tool menu displays the Define Fields dialog box which allows you specify the names and formats for the fields that will be used in your database 1 This list shows the field names defined in the current database 2 This list shows the formats for each field file E insiders 131_136 htm 1 of 2...

Страница 115: ... button to display the Add a Field dialog box which allows you to create new fields for the current database Click this button to delete the field selected in the Fields list box Click this button to display the Edit a Field dialog box which allows you to edit the name and format of the field selected in the Fields list box BACK NEXT file E insiders 131_136 htm 2 of 2 9 26 2007 1 55 26 PM ...

Страница 116: ...ntire window of the application Arrange Icons Selecting the Arrange Icons command in the Window menu arranges the icons of open windows that are reduced and lined up at the bottom of the window Split Window only for a layout document Selecting the Split Window command in the Window menu splits or removes the split in the current window File list Stamp Editor automatically maintains a list at the b...

Страница 117: ...137_138 htm Help Help Topics Selecting the Help Topics command in the Help menu opens the on line Help table of contents BACK file E insiders 137_138 htm 2 of 2 9 26 2007 1 55 26 PM ...

Страница 118: ... the Right command in the Align submenu aligns the right sides of the selected objects Top Selecting the Top command in the Align submenu aligns the tops of the selected objects Vertical Center Selecting the Vertical Center command in the Align submenu aligns the top bottom centers of the selected objects Bottom Selecting the Bottom command in the Align submenu aligns the bottoms of the selected o...

Страница 119: ...128 htm BACK NEXT file E insiders 128 htm 2 of 2 9 26 2007 1 55 26 PM ...

Страница 120: ...ions in the layout When Align in Relation to Print Area is on appears in front of the command the selected objects are aligned based on the print area Left Left Horizontal Center Horizontal Center Right Right Top Top Vertical Center Vertical Center Bottom Bottom BACK NEXT file E insiders 129 htm 9 26 2007 1 55 27 PM ...

Страница 121: ...the new text To edit text settings for a text object that has already been added to the layout first use the pointer to double click on the text object in the layout then change the settings on the Text tab Any settings that you specify are only applied to the selected text object Settings you make on the Text tab for a particulor text object are reflected in the Text Properties Click here Text ta...

Страница 122: ...114 htm Top Center Bottom BACK NEXT file E insiders 114 htm 2 of 2 9 26 2007 1 55 27 PM ...

Страница 123: ...an Arrange Text object that has already been added to the layout select the object with the pointer then double click the left mouse button to display an Arrange Text Properties dialog box which also contains the Position tab Category Select the shape that you wish to use for arranging the text Sample This box shows how the arranged text will appear when it is added to the layout file E insiders 9...

Страница 124: ...97 htm BACK NEXT file E insiders 97 htm 2 of 2 9 26 2007 1 55 28 PM ...

Страница 125: ...d template for quickly and easily creating layouts Category Select the category which contains the Auto Format template that you wish to use Use Text From Current Layout Click this option to select whether or not the text in the currently open layout is used in the selected Auto Format template file E insiders 72 htm 1 of 2 9 26 2007 1 55 29 PM ...

Страница 126: ... containing more Auto Format templates for example when you wish to use a template from the Catalog folder while the template catagories in the Others folder are displayed Click this button to advance to the next Auto Format dialog box BACK NEXT file E insiders 72 htm 2 of 2 9 26 2007 1 55 29 PM ...

Страница 127: ...re details 10 Undo button Clicking this button is the same as selecting the Undo command in the Edit menu Click here for more details 11 Redo button Clicking this button is the same as selecting the Redo command that appears in the Edit menu when a layout document is displayed Click here for more details 12 Auto Text button Clicking this button is the same as selecting the Auto Text command that a...

Страница 128: ...nu when a database document is displayed Click here for more details 17 Sort button Clicking this button is the same as selecting the Sort command that appears in the Tool menu when a database document is displayed Click here for more details 18 Joined Fields button Clicking this button is the same as selecting the Joined Fields command that appears in the Tool menu when a database document is dis...

Страница 129: ... to the text shown in the Input edit box Input Type in the text that you want to appear in the layout 1 This indicates whether the text shown in the Input edit box is a normal text object or an Arrange Text object Click this button to display the text in the next text or Arrange Text object Click this button to display the text in the previous text or Arrange Text object Click this button to close...

Страница 130: ...en the text is added to the layout Object only for a layout document Selecting the Object command in the Edit menu displays a menu for the OLE object selected in the layout area The menu commands are different depending on the type of OLE object that is selected BACK NEXT file E insiders 84 htm 2 of 2 9 26 2007 1 55 30 PM ...

Страница 131: ...out and draw the new frame To edit a frame that has already been added to the layout first use the pointer to double click on the frame in the layout then change the settings in the Frame dialog box Any settings that you specify are only applied to the selected frame Category Select the category that contains the frame pattern that you wish to use Stretch Center Only Click this option to select wh...

Страница 132: ...ecting the Background command in the Format menu displays the Background Properties dialog box which lets you specify the pattern and colors of the layout area Double clicking anywhere in the layout area also displays the Background Properties dialog box Drawing tab Click this tab to display various settings which let you select special drawing effects Click here for more details BACK NEXT file E ...

Страница 133: ...9_10 htm 6 Click The Change Baud Rate Wizard starts up 7 Select the serial port where the SC 2000 is connected then click file E insiders 9_10 htm 1 of 3 9 26 2007 1 55 31 PM ...

Страница 134: ... baud rate then click A dialog box that asks whether or not the settings are correct appears Note Be sure that the selected baud rate is the same as the baud rate of the SC 2000 file E insiders 9_10 htm 2 of 3 9 26 2007 1 55 31 PM ...

Страница 135: ...9_10 htm BACK NEXT file E insiders 9_10 htm 3 of 3 9 26 2007 1 55 31 PM ...

Страница 136: ... you can obtain a certain level of image quality by using the proper method and options when importing a bitmap quality is naturally limited by the Stamp Editor s own resolution Best results can be obtained with bitmaps that are clearly defined and have little fine detail To edit an imported image that has already been added to the layout select the image with the pointer then double click the lef...

Страница 137: ...101 htm Clip Click this option to select whether or not to clip the image to the shape selected in the Shape list box BACK NEXT file E insiders 101 htm 2 of 2 9 26 2007 1 55 32 PM ...

Страница 138: ...submenu makes the selected object the bottom object in a stack Bring Forward Selecting the Bring Forward command in the Order submenu moves the selected object one position forward in a stack of objects Send Backward Selecting the Send Backward command in the Order submenu moves the selected object one position backward in a stack of objects file E insiders 127 htm 1 of 2 9 26 2007 1 55 32 PM ...

Страница 139: ...127 htm BACK NEXT file E insiders 127 htm 2 of 2 9 26 2007 1 55 32 PM ...

Страница 140: ...e calendar object is the functional icon Functional icons are only displayed by turning on Display Functional Icons of Objects on the Display tab of the Options dialog box Options command To edit a Date Time Calendar object that has already been added to the layout select the object with the pointer then double click the left mouse button to display a Date Time Calendar Properties dialog box which...

Страница 141: ...te Click this option if you want the date to be added to the layout Time Click this option if you want the time to be added to the layout Calendar Click this option if you want a calendar to be added to the layout BACK NEXT file E insiders 105 htm 2 of 2 9 26 2007 1 55 33 PM ...

Страница 142: ... Selecting the Rotate 90 Right command in the Rotate submenu rotates the selected objects 90 to the right clockwise 0 90 180 270 Selecting the 0 90 180 or 270 command in the Rotate submenu rotates the selected objects the specified amount from the object s original position Change Size only for a layout document Selecting the Change Size command in the Layout menu displays the Change Size submenu ...

Страница 143: ...eight of the selected objects while maintaining their original height to width ratio Maximum Selecting the Maximum command in the Change Size submenu resizes the selected objects so that they completely fill the print area Maintain Ratio Selecting the Maintain Ratio command in the Change Size submenu resizes the selected objects so that they fill the print area while maintaining their original hei...

Страница 144: ...pacing that you want to use between the characters and the lines of text inside the selected text object Orientation Select the orientation of the text within the selected text object Note file E insiders 115 htm 1 of 3 9 26 2007 1 55 34 PM ...

Страница 145: ...ect so that all of the text can be displayed Clip Select this option to keep the set text size even when the size of the text object is changed Fit Select this option to automatically adjust the size of the text to fit the size of the object Click this button to close the dialog box and apply the selected settings Font tab Click this tab to display various settings which let you change the font an...

Страница 146: ...115 htm BACK NEXT file E insiders 115 htm 3 of 3 9 26 2007 1 55 34 PM ...

Страница 147: ...he Save As dialog box to appear so that you can assign a name to the file Save As Selecting the Save As command in the File menu displays the Save As dialog box which lets you save the data in the current document under a new file name Refer to the description of the New Database dialog box Click here for details on the settings that appear in the Save As dialog box The Save As dialog box also app...

Страница 148: ...70 htm BACK NEXT file E insiders 70 htm 2 of 2 9 26 2007 1 55 35 PM ...

Страница 149: ... Names Select whether or not the first line of the file will be imported as the field names Table Preview This box shows how the database would appear if it is imported with the selected options Click this button to import the data using the selected options file E insiders 69 htm 1 of 2 9 26 2007 1 55 36 PM ...

Страница 150: ...69 htm Table Select the name of the table that you want to import Click this button to import the data BACK NEXT file E insiders 69 htm 2 of 2 9 26 2007 1 55 36 PM ...

Страница 151: ...atabase dialog box is displayed Database This list box shows the currently open database files Click the name of a database file to select it Click this button to link the selected database file with the current layout If the database file contains more than one table the Select Table dialog box appears Click here for more details on the Select Table dialog box After selecting a table from the Tab...

Страница 152: ... Can Be Merged This list box shows all of the fields which can be merged from the database Click the name of a field to select it Click this button to merge the fields selected in the Database Fields That Can Be Merged list box into the layout BACK NEXT file E insiders 111 htm 2 of 2 9 26 2007 1 55 36 PM ...

Страница 153: ... 4 Click 5 When you are finished making changes click to close the Define Fields dialog box Changing the order of the fields 1 In the Tool menu click the Define Fields command to display the Define Fields dialog box 2 In the Fields list box select the field name that you wish to move 3 Click to move the selected field down in the list or to move it up 4 When you are finished making changes click t...

Страница 154: ...39 htm BACK file E insiders 39 htm 2 of 2 9 26 2007 1 55 37 PM ...

Страница 155: ...d to the main window Register OLE Click this option to select whether or not the object dock will include icons for applications that were used to add OLE objects to the layout Show Icon Names Click this option to select whether or not to display the name of object applications in the object dock For a database document Database tab file E insiders 125 htm 1 of 2 9 26 2007 1 55 37 PM ...

Страница 156: ...s According to Regional Settings Click this option to select whether or not to display exponential values according to the format set on the Number tab of the Regional Setting Properties of the Regional Settings control panel Click this button to close the Options dialog box and apply the selected settings BACK NEXT file E insiders 125 htm 2 of 2 9 26 2007 1 55 37 PM ...

Страница 157: ...rome Display command in the View menu is turned on appears in front of the command Ink Color Select the color that the ink appears in when the Monochrome Display command in the View menu is turned on appears in front of the command Property Dock tab file E insiders 124 htm 1 of 2 9 26 2007 1 55 38 PM ...

Страница 158: ...ther or not to display the property dock attached to the main window Automatically Adjust the Properties That Are Displayed Click this option to select whether or not to close Properties that do not fit in the property dock when a new set of Properties are opened BACK NEXT file E insiders 124 htm 2 of 2 9 26 2007 1 55 38 PM ...

Страница 159: ... draw the new drawing To edit the drawing settings for an object that has already been added to the layout first use the pointer to double click on the object in the layout then change the settings on the Drawing tab Any settings that you specify are only applied to the selected object Drawing tab Fill Select the pattern or texture used to fill in the drawing Effects Select the effects applied to ...

Страница 160: ...ite colors Style Select the line style you want to use An example of the available style is shown below Solid Width Select a line width of between 1 and 20 dots Click this button to close the dialog box and apply the selected settings BACK NEXT file E insiders 116_117 htm 2 of 2 9 26 2007 1 55 38 PM ...

Страница 161: ...m two underline styles Strikeout Select the strikeout style that you want to use You can choose from two strikeout styles Sample This box shows how the text will appear using the selected font and effect settings Click this button to close the dialog box and apply the selected settings Text tab Click this tab to display various settings which allow you to change the position of the text inside the...

Страница 162: ...113 htm BACK NEXT file E insiders 113 htm 2 of 2 9 26 2007 1 55 39 PM ...

Страница 163: ...ing Orientation Select the page orientation that you wish to use Margins Type in the page margins that you wish to use Click this button to enter the selected options and close the Printer Setup dialog box Recently used files file E insiders 82 htm 1 of 2 9 26 2007 1 55 39 PM ...

Страница 164: ...tween layout documents and database documents is the extension given to the file Exit Selecting the Exit command in the File menu closes all currently opened documents and quits Stamp Editor If there are unsaved changes in any document on the display when the Exit command is selected a message appears asking if you want to save the changes BACK NEXT file E insiders 82 htm 2 of 2 9 26 2007 1 55 39 ...

Страница 165: ...box displays the contents of the disk or folder selected above Double click a disk or folder to display its contents in this list box or double click a file to open it 2 Click this button to display the contents of the folder containing the folder selected in the Save in box 3 Click this button to create a new folder in the selected disk or folder 4 Click this button to display the items in the li...

Страница 166: ...e Save as type Select the type of files that you wish to display in the list box The file being exported is automatically exported in the format selected in this box Click this button to save the file in the selected disk or folder with the file name typed into the File name edit box BACK NEXT file E insiders 71 htm 2 of 2 9 26 2007 1 55 40 PM ...

Страница 167: ... Add a Field dialog box 3 In the Field Name edit box type the name of one of your fields 4 In the Field Format box pull down the list of field formats and select the format of the entered field name 5 Click to close the Add a Field dialog box 6 Click to close the Define Fields dialog box BACK NEXT file E insiders 38 htm 9 26 2007 1 55 40 PM ...

Страница 168: ...ted if they have identical data in the Key 1 field Key 3 Select the field that you want to use as the third parameter This parameter determines how records are sorted if they have identical data in the Key 1 and Key 2 fields Ascending Descending Select whether you want the data sorted in ascending order 0 to 9 A to Z a to z or descending order z to a Z to A 9 to 0 Optimize Database only for a data...

Страница 169: ...ected and if the database file is not already linked to a layout file the Select Layout dialog box is displayed Layout This list box shows the currently open layout files Click the name of a layout file to select it Click this button to link the selected layout file with the current database and display the Merge Fields dialog box Click here for more details on the Merge Fields dialog box BACK NEX...

Страница 170: ... On in the Find What box and select this option the word on would not be considered a match Find Entire Fields Only Click this option to select whether or not fields that only contain the Find What characters are found Search Selected Cells Only Click this option to select whether or not only the cells selected in the record view window are searched Click this button to select the records that con...

Страница 171: ...86 htm Click this button to close the Find dialog box BACK NEXT file E insiders 86 htm 2 of 2 9 26 2007 1 55 41 PM ...

Страница 172: ... found on the Font tab of the Text Properties dialog box which appears when you select the Font command on the Format menu Detailed explanations on these settings can be found Click here Layout Properties With the Layout Properties you can easily adjust the size and position of selected objects using the same commands that you find when you pull down the Layout menu Click here for explanations of ...

Страница 173: ...53 htm BACK NEXT file E insiders 53 htm 2 of 2 9 26 2007 1 55 42 PM ...

Страница 174: ...k box the word on the left of the slash in the pair of words selected in the Text Displayed in Fields With Yes No Format box on the Database tab of the Options dialog box Options command is displayed If no appears in the check box the word on the right of the slash in the pair of words selected in the Text Displayed in Fields With Yes No Format box on the Database tab of the Options dialog box is ...

Страница 175: ... in the next record Click this button to display the data in the last record Click this button to create a new record and display its empty form view window 4 This displays the number of records in the current database Click this button to close the form view window BACK NEXT file E insiders 91 htm 2 of 2 9 26 2007 1 55 43 PM ...

Страница 176: ...evious Record command in the Go To submenu selects the previous record in the database file Next Record Selecting the Next Record command in the Go To submenu selects the next record in the database file New Record Selecting the New Record command in the Go To submenu creates a new record at the end of the current table Read only File only for a database document Selecting the Read only File comma...

Страница 177: ...s list box displays the contents of the disk or folder selected in the Look in box Double click a disk or folder to display its contents in this list box or double click a file to display the Import a CSV File dialog box for a CSV file or display the Select Table dialog box for a table or query from another Stamp Editor database file 2 Click this button to display the contents of the folder contai...

Страница 178: ...he name of the file that will be imported Files of type Select the type of files that you wish to display in the list box Click this button to display the Import a CSV File dialog box if a CSV file was selected or display the Select Table dialog box if a table or query from another Stamp Editor database file was selected BACK NEXT file E insiders 68 htm 2 of 2 9 26 2007 1 55 44 PM ...

Страница 179: ...vide it onto different lines in the layout Why use joined fields Joined field names are helpful when you want to align fields that may contain data of varying lengths If you use separate objects that are located next to each other short pieces of data will cause the spaces between the data to be too large as shown below Long pieces of data on the other hand can cause the data to overlap The above ...

Страница 180: ...rames around each object in the layout Display Functional Icons of Objects Click this option to select whether or not to display the functional icons on Numbering fields and Date Time Calendar objects Display Frames Around OLE Objects Click this option to select whether or not to display frames around each OLE object in the layout Display Database Field Names Click this option to select whether or...

Страница 181: ... For example when the field names are displayed a field called Last Name would appear as shown below When the record data is displayed instead of the field names a field containing the first name Jones would appear as shown below Units Select the unit of measurement for the rulers and other settings BACK NEXT file E insiders 122_123 htm 2 of 2 9 26 2007 1 55 45 PM ...

Страница 182: ...the many available pictures To edit a Make Picture object that has already been added to the layout select the object with the pointer then double click the left mouse button to display a Make Picture Properties dialog box which also contains the Position tab Picture tab Category Select the type of picture that you want to add to the layout The name of the currently selected category file E inside...

Страница 183: ... picture Hair Face Head Body Picture Select one of the pictures 1 The number of the currently selected picture is shown on the left and the total number of pictures that are available is shown on the right BACK NEXT file E insiders 99 htm 2 of 2 9 26 2007 1 55 46 PM ...

Страница 184: ...box shows how the image will appear when it is added to the layout Outline Click this option to select whether or not to outline the image Make Transparent Click this option to select whether or not to change the image by making the color selected in the Color list box transparent Click a color in the image shown in the Preview box to select it file E insiders 102 htm 1 of 2 9 26 2007 1 55 47 PM ...

Страница 185: ...lets you add the edited image to the clip art Click here for more details Click this button to display the Monochrome dialog box which lets you select various parameters for changing the image to monochrome BACK NEXT file E insiders 102 htm 2 of 2 9 26 2007 1 55 47 PM ...

Страница 186: ...s equal to 1 printer dot Zoom to Select how much larger or smaller than the actual size you want the layout to appear on the display Monochrome Display only for a layout document Selecting the Monochrome Display command in the View menu specifies whether all of the objects in the current layout area displayed in black and white appears in front of the command or in color no appears BACK NEXT file ...

Страница 187: ...bject Double click the application that you wish to use and open a window that allows you to create the new object Result This box gives a description of the application selected in the Object Type list box Display As Icon Click this option to select whether or not to display the object as an icon instead of displaying its contents Click this button to display the Change Icon dialog box which allo...

Страница 188: ... return to the Stamp Editor layout area When the Create from File option is selected File Type in the path to the file that you wish to insert as an OLE object Click this button to display the Browse dialog box which allows you to search through the files on your computer for the desired file Link Click this option to select whether to link or embed the selected file file E insiders 109_110 htm 2 ...

Страница 189: ...109_110 htm Click this button to close the Insert Object dialog box and enter the selected settings BACK NEXT file E insiders 109_110 htm 3 of 3 9 26 2007 1 55 48 PM ...

Страница 190: ... of the disk or folder selected in the Look in edit box Double click a disk or folder to display its contents in this list box or double click a file to open it 2 Click this button to display the contents of the folder containing the folder selected in the Look in box 3 Click this button to create a new folder in the selected disk or folder 4 Click this button to display the items in the list box ...

Страница 191: ...o display in the list box Click this button to see the contents of the selected disk or folder or to open the selected file Note The commands displayed in the menu bar change according to the type of file that is opened For example if you open a database file the commands for creating editing and using databases automatically appear in the menu bar BACK NEXT file E insiders 67 htm 2 of 2 9 26 2007...

Страница 192: ...f the selected object Size Type in the desired width and height of the selected object Maintain Ratio Click this option to select whether or not to keep the object s original height to width ratio while the size of the object is changed Rotation Angle Select the desired angle that the object is rotated file E insiders 94 htm 1 of 2 9 26 2007 1 55 49 PM ...

Страница 193: ...94 htm BACK NEXT file E insiders 94 htm 2 of 2 9 26 2007 1 55 49 PM ...

Страница 194: ...out Note The settings displayed differ depending on the printer that is selected Output Select whether a stamp or an ID label will be printed Click this button to start printing the layout with the selected options Click this button to display the printer s Properties dialog box which allows you to select various printer settings file E insiders 76 htm 1 of 2 9 26 2007 1 55 49 PM ...

Страница 195: ...76 htm BACK NEXT file E insiders 76 htm 2 of 2 9 26 2007 1 55 49 PM ...

Страница 196: ... what the stamp will look like after it is printed Click this button to display the Print dialog box Click here for a detailed explanation of the Print dialog box Click this button to zoom in on the layout increasing its size on the screen Click this button to zoom out from the layout decreasing its size on the screen file E insiders 80 htm 1 of 2 9 26 2007 1 55 50 PM ...

Страница 197: ...Note You cannot edit the layout that is displayed in the Print Preview dialog box If you wish to edit the layout click to return to the layout area BACK NEXT file E insiders 80 htm 2 of 2 9 26 2007 1 55 50 PM ...

Страница 198: ...nd the page size that will be used Printer Setup tab P touch Stamp Series Printer Click this option to print using the selected P touch printer Other Printer Click this option to print using the selected printer Click this button to display Printer s Properties dialog box which allows you to select various printer settings file E insiders 81 htm 1 of 2 9 26 2007 1 55 51 PM ...

Страница 199: ...81 htm Click this button to set the selected printer as the default printer BACK NEXT file E insiders 81 htm 2 of 2 9 26 2007 1 55 51 PM ...

Страница 200: ...e found characters with Match Case Click this option to select whether or not the search should be case sensitive For example if you type On in the Find What box and select this option the word on would not be considered a match Find Entire Fields Only Click this option to select whether or not fields that only contain the Find What characters are found Search Selected Cells Only Click this option...

Страница 201: ... current record with the characters entered in the Replace With box Click this button to replace the text found in all of the records with the characters entered in the Replace With box Click this button to close the Replace dialog box BACK NEXT file E insiders 87 htm 2 of 2 9 26 2007 1 55 51 PM ...

Страница 202: ...ithin selected text objects using the same settings that are available on the Text tab of the Text Properties dialog box which appears when the Text command on the Format menu is selected For more details on these settings Click here BACK NEXT file E insiders 54 htm 9 26 2007 1 55 52 PM ...

Страница 203: ...e PTCOM port where the SC 2000 is connected and then click A dialog box confirming how the installation will be carried out appears 5 Click to install the printer driver file E insiders 8 htm 1 of 2 9 26 2007 1 55 53 PM ...

Страница 204: ...8 htm BACK NEXT file E insiders 8 htm 2 of 2 9 26 2007 1 55 53 PM ...

Страница 205: ...the font size style and attributes underline shadow etc of the original text in the template 8 Repeat steps 6 and 7 until the text appears as you wish Now we can change the company name to ABC Transport and address to 330 7th Avenue NewYork NY01234 9 Click to advance to the last Auto Format Wizard page Note file E insiders 26_27 htm 1 of 3 9 26 2007 1 55 54 PM ...

Страница 206: ...n the size of the new document created using the Auto Format Wizard is automatically adjusted to the currently selected page size 10 After selecting the desired options click to add the layout to the print area file E insiders 26_27 htm 2 of 3 9 26 2007 1 55 54 PM ...

Страница 207: ...26_27 htm BACK file E insiders 26_27 htm 3 of 3 9 26 2007 1 55 54 PM ...

Страница 208: ...wish to add to your database For this example let s define five more field names First Name Address City State and Zip Code 6 After you are finished defining all of the field names click to close the Define Fields dialog box Maintaining the database for information on how to make changes to existing field names and their formats file E insiders 34 htm 1 of 2 9 26 2007 1 55 55 PM ...

Страница 209: ...ere for a detailed explanation of the database document window and its components Note that the database document window appears similar to the layout document window except for the differences in the menu bar and the standard toolbar BACK NEXT file E insiders 34 htm 2 of 2 9 26 2007 1 55 55 PM ...

Страница 210: ...t into the Data edit box To divide the joined field so that it will be written on different lines type n into the Data edit box at the point where you wish to separate the joined field 5 Select the name of the second field then click For our example select Last Name 6 After the joined field is the way you want it click to close the Add a Joined field dialog box and add the new joined field to the ...

Страница 211: ...41 htm 7 Click to close the Define Joined Fields dialog box BACK NEXT file E insiders 41 htm 2 of 2 9 26 2007 1 55 55 PM ...

Страница 212: ...ps the circle perfectly round 7 Curve button Click this button to change the pointer to when it is moved into the layout area You can now freely draw curves and pictures 8 Polygon button Click this button to change the pointer to when it is moved into the layout area You can now draw polygons by either clicking or holding down the left mouse button then dragging the mouse and clicking the left mou...

Страница 213: ... by selecting the Frame command in the Format menu Holding down the keyboard s shift key while dragging the mouse keeps the frame perfectly square BACK NEXT file E insiders 57 htm 2 of 2 9 26 2007 1 55 56 PM ...

Страница 214: ... the list box with their details File name Type in the name you wish to give to the file Save as type Select the type of files that you wish to display in the list box The file being saved is automatically saved in the format selected in this box Click this button to save the file in the selected disk or folder with the file name typed into the File name edit box After a new database document is g...

Страница 215: ...his button to delete the category of the selected name Category Name Type in the new category name Click this button to change the category names as specified To edit a clip art illustration that has already been added to the layout select the illustration with the pointer then double click the left mouse button to display the Image Properties dialog box Image tab Click this tab to display a setti...

Страница 216: ...96 htm Drawing tab Click this tab to display various settings which let you select special drawing effects Click here for more details BACK NEXT file E insiders 96 htm 2 of 2 9 26 2007 1 55 57 PM ...

Страница 217: ...132 htm Field Name Type in the name of the field Field Format Select the format that you want the field to have 1 file E insiders 132 htm 1 of 2 9 26 2007 1 55 57 PM ...

Страница 218: ...shows a description of the format selected in the Field Format box Click this button to close the Add a Field or Edit a Field dialog box and save any changes BACK NEXT file E insiders 132 htm 2 of 2 9 26 2007 1 55 57 PM ...

Страница 219: ...itioned rotated counterclockwise 6 The text is always positioned upside down and perpendicular to the guidline Spacing Click the button which shows the desired spacing between the characters 1 The spacing between the text is small 2 The spacing between the text is normal 3 The spacing between the text is large Direction Click the button which shows the desired direction of the text 1 The text is a...

Страница 220: ...r not to display the guidelines the lines which show the shape that the entered text will follow Click this button to add the arranged text to the layout Font tab Click this tab to display various settings which let you change the font and effects applied to the text Click here for more details Position tab Click this tab to display various settings which allow you to change the size and position ...

Страница 221: ... how each template will appear Click this button to return to the previous Auto Format dialog box Click this button to advance to the next Auto Format dialog box which lets you change the text in the Auto Format template that you selected file E insiders 73 htm 1 of 3 9 26 2007 1 55 58 PM ...

Страница 222: ...sh to change Click this button to select the next text object Click this button to select the previous text object Click this button to return to the previous Auto Format dialog box Click this button to advance to the next Auto Format dialog box which lets you check the layout and select various options file E insiders 73 htm 2 of 3 9 26 2007 1 55 58 PM ...

Страница 223: ...73 htm BACK NEXT file E insiders 73 htm 3 of 3 9 26 2007 1 55 58 PM ...

Страница 224: ...11 htm 9 To change the settings click If the settings are correct click 10 Click file E insiders 11 htm 1 of 2 9 26 2007 1 55 59 PM ...

Страница 225: ...11 htm 11 Click Note If you installed only the driver be sure to select Yes I want to restart my computer now BACK file E insiders 11 htm 2 of 2 9 26 2007 1 55 59 PM ...

Страница 226: ...log box and select the highlighted picture Click this button to randomly display pictures from the selected category Click this button to close the Make Picture dialog box and add the picture to the layout Position tab Click this tab to display various settings which allow you to change the size and position of the picture Click here for more details file E insiders 100 htm 1 of 2 9 26 2007 1 56 0...

Страница 227: ...100 htm BACK NEXT file E insiders 100 htm 2 of 2 9 26 2007 1 56 00 PM ...

Страница 228: ... is selected as the conversion method Gamma Change this setting to adjust the brightness distribution Click this button to change all of the settings back to their defaults Click this button to enter the selected options Drawing tab Click this tab to display various settings which let you select special drawing effects Click here for more details Position tab Click this tab to display various sett...

Страница 229: ...02 m1 d1 y2 1 2 98 m2 d2 y2 01 02 98 m3 d1 y4 Jan 2 1998 m4 d2 y4 January 02 1998 d2 m4 y2 02 January 98 d2 m3 y2 02 Jan 98 Examples of the formats available when Time is selected are shown below h1 m2 n1 1 00 pm H1 m2 13 00 Examples of the formats available when Calendar is selected are shown below Format 1 Format 2 file E insiders 106 htm 1 of 2 9 26 2007 1 56 01 PM ...

Страница 230: ...rt a date time calendar object for the time day month and year that the layout is printed Note The date and time inputted while the At Printing option is on is updated each time you perform the print operation BACK NEXT file E insiders 106 htm 2 of 2 9 26 2007 1 56 01 PM ...

Страница 231: ...135 htm file E insiders 135 htm 1 of 2 9 26 2007 1 56 01 PM ...

Страница 232: ...nt to end the line and start a new one Fields Select the fields that you wish to include in the joined field Click this button to add the field selected in the Fields list box to the joined field being created in the Data box 1 This box shows a explanation of how to create joined fields Click this button to close the Add a Joined Field or Edit a Joined Field dialog box and save any changes BACK NE...

Страница 233: ... box and save any changes Click this button to display the Add a Joined Field dialog box which allows you to create new joined fields for the current database Click this button to delete the joined field selected in the Define Joined Fields dialog box Click this button to display the Edit a Joined Field dialog box which allows you to edit the joined field selected in the Define Joined Fields dialo...

Страница 234: ...134 htm BACK NEXT file E insiders 134 htm 2 of 2 9 26 2007 1 56 02 PM ...

Страница 235: ...this method to select average error minimization dithering Black and white are defined by comparing a fixed value with the average product of error values and distances Edge Click this method to make areas with rapidly changing densities black and other area white Binary Click this method for binary dithering Pixels whose brightness exceeds a particular value are white and pixels whose brightness ...

Страница 236: ...button to close the Calendar Settings dialog box and apply the selected settings Text Orientation Select the orientation of the date or time object Click this button to insert the selected date time or calendar at the cursor s current position in the layout Font tab file E insiders 108 htm 1 of 2 9 26 2007 1 56 03 PM ...

Страница 237: ...nt and effects applied to the text Click here for more details Position tab Click this tab to display various settings which allow you to change the size and position of the selected object Click here for more details BACK NEXT file E insiders 108 htm 2 of 2 9 26 2007 1 56 03 PM ...

Страница 238: ...splayed or the Database Properties command when a database document is displayed in the File menu displays the document s Properties dialog box which lets you specify and view information about the document For a layout document For a database document file E insiders 75 htm 1 of 2 9 26 2007 1 56 03 PM ...

Страница 239: ...75 htm BACK NEXT file E insiders 75 htm 2 of 2 9 26 2007 1 56 03 PM ...

Страница 240: ... format that will be used Type Select whether a stamp or an ID label will be printed Orientation Select the printing orientation Click this button to return all of the settings to their default settings file E insiders 77 htm 1 of 2 9 26 2007 1 56 04 PM ...

Страница 241: ...ay the Option dialog box Unit Select the unit of measurement for the ruler and other settings Click this button to enter the selected settings and close the Option dialog box BACK NEXT file E insiders 77 htm 2 of 2 9 26 2007 1 56 04 PM ...

Страница 242: ...e selected stamp size and close the Add Stamp Size dialog box Click this button to return all of the settings to their default settings Click this button to enter the selected settings without closing the printer s Properties dialog box Click this button to enter the selected settings and close the printer s Properties dialog box BACK NEXT file E insiders 79a htm 9 26 2007 1 56 04 PM ...

Страница 243: ...r or not to adjust the size of the selected template so that it is the same as the current page size Convert to Monochrome Click this option to select whether or not to display the layout only in black and white Print Immediately After Creating the Layout Click this option to select whether or not to print the layout immediately after displaying it file E insiders 74 htm 1 of 2 9 26 2007 1 56 05 P...

Страница 244: ...74 htm Click this button to return to the previous Auto Format dialog box Click this button to display the template in a layout document BACK NEXT file E insiders 74 htm 2 of 2 9 26 2007 1 56 05 PM ...

Страница 245: ...n Date is selected Time Enter the time when Time is selected Click this button to display the Calendar Settings dialog box which allows you to make a variety of settings when Calendar is selected Weekly Holidays Select the days of the week that are normally specified as holidays weekends file E insiders 107 htm 1 of 2 9 26 2007 1 56 06 PM ...

Страница 246: ... be considered as the first day of the week and displayed on the left end of the calendar Monthly Holidays Select a month then select the days of the month that will be specified as holidays Color Select the color that the monthly holidays will be displayed in BACK NEXT file E insiders 107 htm 2 of 2 9 26 2007 1 56 06 PM ...

Страница 247: ...taining both graphics and text where graphics cover at least 50 of the print surface Graphics For stamps containing only graphics or containing both graphics and text where graphics cover at least 50 of the print surface Tone Select the desired tone file E insiders 78 htm 1 of 2 9 26 2007 1 56 06 PM ...

Страница 248: ...78 htm BACK NEXT file E insiders 78 htm 2 of 2 9 26 2007 1 56 06 PM ...

Страница 249: ...ption to select whether or not the monitor the printer s status Click this button to start up the Change Baud Rate Wizard Click here for more details Click this button to displpay the Time Out dialog box file E insiders 79 htm 1 of 2 9 26 2007 1 56 07 PM ...

Страница 250: ...of time for the transmission timeout Printing Timeout Type in the button length of time for the printing timeout Click this button to enter the selected settings and close the Time Out dialog box BACK NEXT file E insiders 79 htm 2 of 2 9 26 2007 1 56 07 PM ...

Отзывы: