background image

31

 G

E

TTI
N

G

 STA

R

TED

Feeding Tape

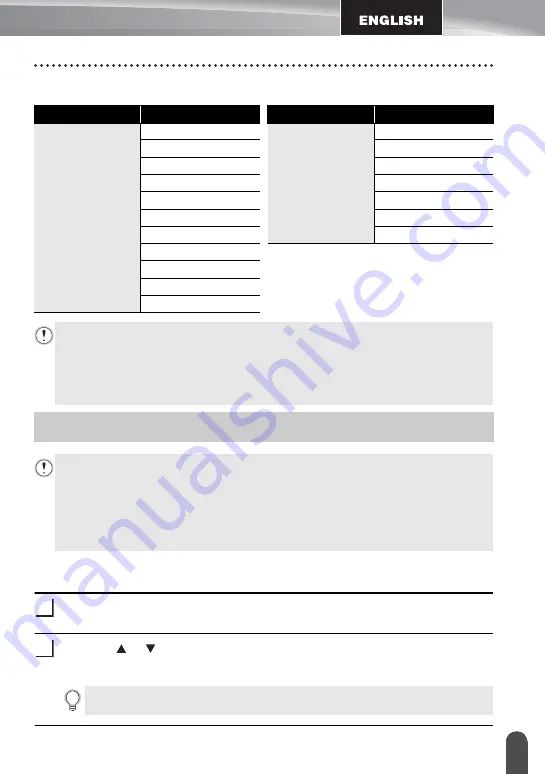
Auto Power-Off Time

Feed & Cut

The Feed & Cut function feeds 0.96" (24.5mm) of blank tape, and then cuts the tape.

Press the 

Feed & Cut

 key.

 "Feed & Cut?" will appear on the LCD display.

Using the   or   key to select the "Feed & Cut", and then press either 

OK

 or 

Enter


key. The message "Feeding Tape... Please Wait" appears while the tape is fed, and 

then the tape is cut.

Attribute

Value

Attribute

Value

AC Adapter

Off

Li-ion Battery

Off

10min.

10min.

20min.

20min.

30min.

30min.

40min.

40min.

50min.

50min.

1hr.

1hr.

2hr.
4hr.
8hr.

12hr.

• If you connect the AC adapter to the P-touch labeler after you specified “Auto Power 

Off”, the setting for “AC Adapter” becomes valid.

• If you disconnect the AC adapter from the P-touch labeler after you specified “Auto Power Off”:

• When alkaline batteries are used, the auto power-off time is fixed to 20 minutes.

• When the Li-ion battery is used, the power turns Off immediately.

• The default value is "1hr." for the AC Adapter and "30min." for the Li-ion battery.

Feeding Tape

• Be sure to feed tape to remove any slack in the tape and ink ribbon after inserting the 

tape cassette.

• Do not pull the label coming out of the tape exit slot. Doing so will cause the ink 

ribbon to be discharged with the tape. The tape may no longer be functional 

after the ink ribbon discharges.

• Do not block the tape exit slot during printing or when feeding tape. Doing so will 

cause the tape to jam.

1

2

To exit or cancel this function press 

Esc

.

Содержание P-Touch PT-H500LI

Страница 1: ...get product support and answers to frequently asked questions FAQs Read this guide before using your P touch labeler Keep this guide in a handy place for future reference ELECTRONIC LABELING SYSTEM ELECTRONIC LABELING SYSTEM ELECTRONIC LABELING SYSTEM PT H500LI ...

Страница 2: ...interference in a residential installation This equipment generates uses and can radiate radio frequency energy and if not installed and used in accordance with the instructions may cause harmful interference to radio communications However there is no guarantee that interference will not occur in a particular installation If this equipment does cause harmful interference to radio or television re...

Страница 3: ...s appearing on Brother products related documents and any other materials are all trademarks or registered trademarks of those respective companies Trademarks and Copyrights The Brother logo is a registered trademark of Brother Industries Ltd Brother is a registered trademark of Brother Industries Ltd 2013 Brother Industries Ltd All rights reserved Microsoft Windows Vista and Windows are registere...

Страница 4: ...0 days from the original purchase date or the rated life of consumable whichever comes first What is NOT covered This warranty does not cover 1 Physical damage to the machine 2 Damage caused by improper installation improper or abnormal use misuse neglect or accident including but not limited to transporting the machine without the proper preparation and or packaging 3 Damage caused by another dev...

Страница 5: ...d by Brother and you have delivered the Machine to an Authorized Service Center the Authorized Service Center will provide you with a replacement Machine after receiving one from Brother If you are dealing directly with Brother Brother will send to you a replacement Machine with the understanding that you will after receipt of the replacement Machine supply the required proof of purchase informati...

Страница 6: ...ING IMPLIED WARRANTIES OF MERCHANTABILITY AND FITNESS FOR A PARTICULAR PURPOSE ARE HEREBY DISCLAIMED This Limited Warranty is the only warranty that Brother is giving for the machine It is the final expression and the exclusive and only statement of Brother s obligations to you It replaces all other agreements and understandings that you may have with Brother or its representatives This warranty g...

Страница 7: ...our proof of purchase bill of sale in case your Product requires service Model __________________________________________________ Serial ___________________________________________________ Date of purchase __________________________________________ Store where purchased ______________________________________ Location of store ___________________________________________ Important We recommend that ...

Страница 8: ...er Supply 25 Battery 25 AC Adapter 26 Using the Rechargeable Li ion Battery 26 Inserting a Tape Cassette 29 Turning Power On Off 30 Auto Power Off Time 30 Feeding Tape 31 Feed Cut 31 Feed Only 32 LCD Display 32 LCD Contrast 32 Back Light 32 Setting Language and Unit 33 Language 33 Unit 33 Using P touch Software 33 Features 34 System Requirements 34 Installing the Software and Printer Driver 34 Uni...

Страница 9: ...ll result in death or serious injuries WARNING Indicates a potentially hazardous situation which if not avoided could result in death or serious injuries CAUTION Indicates a potentially hazardous situation which if not avoided may result in minor or moderate injuries Action NOT allowed DO NOT disassemble the product DO NOT splash the product with or immerse the product in water DO NOT touch a give...

Страница 10: ... charging the rechargeable battery use only a battery charger designed specifically for the rechargeable battery DO NOT allow wires or other metal objects to come into contact with the terminals of the rechargeable battery Do not carry or store the rechargeable battery with metal objects such as necklaces or hairpins This could cause an electrical short and could cause metal objects to overheat su...

Страница 11: ...the rechargeable battery or lead to an electrical short If the P touch labeler can only be used for a short period of time even though the rechargeable battery is fully charged the rechargeable battery may have reached the end of its service life Replace the rechargeable battery with a new one When removing and replacing the rechargeable battery cover the terminals of the old rechargeable battery ...

Страница 12: ...e using or storing the P touch labeler immediately stop using the P touch labeler disconnect the AC adapter and remove the batteries To prevent damage do not drop or hit the P touch labeler Alkaline batteries Ni MH rechargeable batteries Follow these guidelines to avoid liquid leakage heat rupture of the battery and cause personal injury DO NOT throw into fire heat up short circuit recharge or dis...

Страница 13: ...resulting from not using the specified AC adapter and adapter cord DO NOT connect the AC adapter or adapter cord to other products DO NOT touch the AC adapter and the P touch labeler during an thunderstorm There may be a remote risk of electric shock from lightning when the P touch labeler is used during a thunderstorm DO NOT touch the AC adapter or power plug with wet hands DO NOT use the AC adap...

Страница 14: ... sure to use them correctly When using Ni MH rechargeable batteries charge the batteries with the appropriate specialized battery charger DO NOT disassemble or modify the batteries DO NOT expose the batteries to heat or dispose of the batteries in a fire AC Adapter If you do not intend using the P touch labeler for an extended period of time disconnect the AC adapter from the power outlet When dis...

Страница 15: ...g it into an outlet with the specified voltage Failure to do so could result in damage or failure of the P touch labeler DO NOT use the P touch labeler in places with moisture or high humidity such as bathrooms DO NOT allow the P touch labeler to get wet for example by handling it with wet hands or spilling beverages onto it DO NOT disassemble or modify the P touch labeler If you notice heat an ab...

Страница 16: ...g so may result in injury or damage the P touch labeler DO NOT put any foreign objects into the tape exit slot AC adapter connector or any other part of the P touch labeler DO NOT touch the print head refer to page 12 with your fingers Use the optional print head cleaning cassette TZe CL4 the self cleaning function of the P touch labeler or a soft wipe e g a cotton swab when cleaning the print hea...

Страница 17: ...in this model Please check our website for further information You cannot print frames label collections block layouts templates pre set in the P touch labeler and some font settings when using Heat Shrink Tube The printed characters may be smaller than when using TZe tape The P touch is not equipped with a charging feature for Ni MH rechargeable batteries The printed label may differ from the ima...

Страница 18: ...Icons Entering Accented Characters Using Templates and Block Layouts Editing a Label in the User s Guide 3 Before printing you can check the layout of your label using the preview function Create labels like these Printing a Label Setting Tape Cutting Options Printing from the Label collection Label Printing in the User s Guide Remove the labels soon after they are cut so that they do not remain i...

Страница 19: ...LABEL PRINTING Printing from the Label Collection Using the Label Collection function labels can be created easily by selecting and then printing designs already built into the P touch labeler 1 Prepare the P touch labeler Prepare the computer P 33 2 Launch the P touch Editor Software Enter the label text using P touch Editor Editing a Label in the User s Guide Software Help Create labels like the...

Страница 20: ...ck that the package contains the following before using your P touch labeler Unpacking Your P touch labeler PT H500LI P touch labeler AC adapter The plug may differ by countries USB cable Li ion Battery Strap Starter Tape Cassette CD ROM Quick Setup Guide ...

Страница 21: ... Tape cassette compartment 8 Release lever 9 Print head 1 Tape viewer 2 Rear cover 3 AC adapter connector 4 LED lamp 5 Battery compartment General Description 3 5 4 6 7 8 9 1 2 When shipped from the factory the LCD display is covered with a protective sheet to prevent damage Remove this sheet before using the P touch 1 2 3 4 5 ...

Страница 22: ... level It displays only when using the Li ion battery 9 Caps mode Indicates that the Caps mode is on 10 15 Style guidance Indicates the current font 10 character size 11 character style 12 frame 13 character width 14 and alignment 15 settings 16 Tape size Indicates the tape size as follows for the text entered Tape width x Label length Ifthe label lengthhas been specified also appears on the right...

Страница 23: ...Character attributes can be set for each line of the label when the Text menu is opened in combination with the Shift key 7 Label Enables label attributes for the label to be set 8 Frame Use this key to create a label with a frame around the text 9 Symbol Use this key to select and enter a symbol from a list of available symbols 10 Icon Use this key to select and enter an icon from a list of avail...

Страница 24: ...e letter and number keys to type uppercase letters or the symbols indicated on the number keys 20 Caps Turns Caps mode on and off 21 Enter Enters a new line when entering text Enters a new block when used in combination with the Shift key 22 Accent Use this to select and enter an accented character 23 Space Enters a blank space Returns a setting to the default value 24 Template Use this key to sel...

Страница 25: ...he rear cover by inserting the three hooks at the bottom into the slots on the P touch labeler then pushing down firmly until it snaps into place Power Supply Make sure that the power is turned off when replacing batteries 1 Always replace all six batteries at the same time using brand new ones Always replace all six batteries at the same time with fully charged ones Visit us at http solutions bro...

Страница 26: ...g the Rechargeable Li ion Battery Installing the Rechargeable Li ion Battery Open the rear cover by pressing the cover latch 1 Rear cover 2 Cover latch Insert the rechargeable Li ion battery into the battery compartment 1 2 Turn the P touch labeler off before disconnecting the AC adapter Do not pull or bend the AC adapter cord To safeguard and backup the P touch s memory when the AC adapter is unp...

Страница 27: ...ill fill with three bars Stopping Rechargeable Li ion Battery Charging To stop rechargeable Li ion battery from charging disconnect the AC adapter cord If you cannot attach the rear cover check to ensure the white lever is in the up position If not lift the lever and then attach the cover 3 Before using the rechargeable Li ion battery use the following procedure to charge it Up to 360 minutes is n...

Страница 28: ...f the P touch labeler will not be used for longer than one month remove the rechargeable Li ion battery from the P touch labeler and then store the battery in a cool place away from direct sunlight If the rechargeable Li ion battery will not be used for a long period of time we recommend charging it every 6 months If you touch a part of the device while a Li ion battery is charging the device may ...

Страница 29: ...Insert the tape cassette into the tape compartment with the end of the tape facing the P touch labeler s tape exit slot and press firmly until you hear a click 1 Tape exit slot Inserting a Tape Cassette If the new tape cassette has a cardboard stopper be sure to remove the stopper before inserting the cassette 1 2 1 2 When inserting the tape cassette make sure that the tape and ink ribbon do not c...

Страница 30: ...tape cassettes in a cool dark location away from direct sunlight and high temperature high humidity or dusty locations Use the tape cassette as quickly as possible after opening the sealed package Extra Strength Adhesive Tape For textured rough or slipping surface we recommend using Extra Strength Adhesive Tape Although the instruction sheet included with the Extra Strength Adhesive Tape cassette ...

Страница 31: ... Off the setting for AC Adapter becomes valid Ifyou disconnect the AC adapterfrom the P touchlabelerafteryouspecified AutoPowerOff When alkaline batteries are used the auto power off time is fixed to 20 minutes When the Li ion battery is used the power turns Off immediately The default value is 1hr for the AC Adapter and 30min for the Li ion battery Feeding Tape Be sure to feed tape to remove any ...

Страница 32: ... default setting is 0 Press the Adjustment key Select LCD Contrast using or key and set the value using or key Press the OK or Enter key Back Light Press the Backlight key to turn the back light on When the back light is turned on press the Backlight key again to turn the light off The display is easier to see with the back light on The default setting is on 1 2 To exit or cancel this function pre...

Страница 33: ... unit for dimensions shown on the LCD display by using the or key Either inch or mm can be selected Press the OK or Enter key This P touch labeler is equipped with a USB port allowing you to connect it to a computer You will need to install P touch Editor and printer driver to use your P touch labeler with your computer When you use Windows install P touch Editor the printer driver and P touch Upd...

Страница 34: ... Printer Driver Lets you print labels from the connected P touch labeler when using P touch Editor on your computer P touch Update Software Label collections can be downloaded and new label designs added to the P touch labeler or P touch Editor In addition the software can be upgraded to the latest version OS Windows Windows Vista Windows 7 Windows 8 Macintosh Mac OS X v10 6 8 OS X v10 7 x OS X v1...

Страница 35: ...ons Center The installation procedure may change depending on the Operating System on your PC Windows 7 is shown here as an example If you are using Windows 8 use Adobe Reader to open the PDF manuals on the CD ROM If Adobe Reader is installed but cannot open the files change the pdf file association to Adobe Reader from the control panel before using the CD ROM 1 For Windows Vista Windows 7 If the...

Страница 36: ... that application can be installed Wait until a message appears indicating that the installation has finished If no application appears under File list the application currently installed on the computer is the newest version There is no need to update Click Close When the screen for the online user registration appears click OK or Cancel If you clicked OK you will go to the online user registrati...

Страница 37: ...tion window appears click Continue If the User Account Control window appears type in the password and then click OK The Print Server Properties window appears Click the Drivers tab select Brother xx xxxx and then click Remove Select Remove driver and driver package and then click OK Close the Print Server Properties window The printer driver has been uninstalled For Windows 7 If the P touch label...

Страница 38: ...on press and hold the Power button to turn it off Click Control Panel in Apps screen Hardware and Sound Devices and Printers Select Brother xx xxxx and click Remove device or right click the icon and click Remove device If a User Account Control message appears type in the password and then click Yes Select Fax or Microsoft XPS Document Writer in the Devices and Printers window and then click Prin...

Страница 39: ... OS X v10 7 x OS X v10 8 x Choose Brother xx xxxx and click Close the Print Fax Mac OS X v10 6 8 Print Scan OS X v10 7 x OS X v10 8 x window The printer driver has been uninstalled Uninstalling the Software Perform this procedure only if the software is no longer necessary or when reinstalling the software To uninstall the software follow the usual steps for your operating system 1 2 3 4 ...

Страница 40: ...0 Assistance on the Internet For product information www brother usa com For downloading the latest drivers http solutions brother com For purchasing accessories and certain Brother products http www brothermall com Accessories and Supplies To order Brother accessories or supplies by Visa MasterCard Discover or American Express you may call toll free 1 877 552 MALL 6255 or complete the order form ...

Страница 41: ...Printed in China LAD925001 ...

Отзывы: