background image

1

2

3

4

5

6

7

8

9

33

z

 ED
ITING A L

ABEL

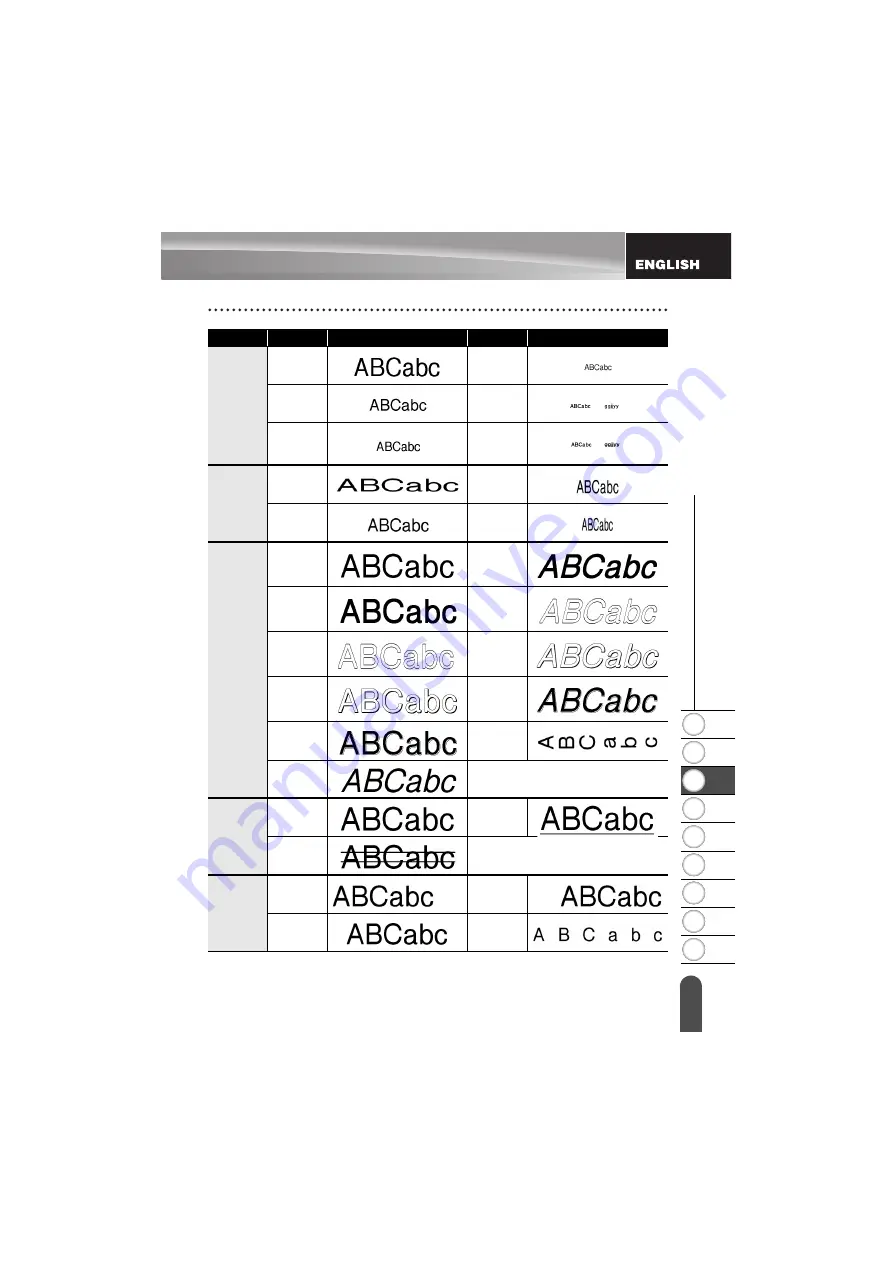
Setting Character Attributes

Size

36pt

12pt

24pt

9pt

18pt

6pt

Width

x2

x2/3

x1

x1/2

Style

Normal

I+BLD

(Italic 
Bold)

BLD

(Bold)

I+OUT

(Italic 

Outline)

OUT

(Outline)

 I+SHD

(Italic 

Shadow)

SHD

(Shadow)

I+SLD

(Italic 

Solid)

SLD

(Solid)

VRT

(Vertical)

ITL

(Italic)

 Line

Off

UND

(Underline)

STR

(Strikeout)

Align

(Alignment)

Left

Right

Center

Just

(Justify)

Attribute

Value

Result

Value

Result

Содержание P-Touch PT-H300

Страница 1: ...ort and answers to frequently asked questions FAQs ELECTRONIC LABELING SYSTEM ELECTRONIC LABELING SYSTEM ELECTRONIC LABELING SYSTEM INTRODUCTION GETTINGSTARTED EDITINGALABEL LABELPRINTING USINGTHEFILEMEMORY TROUBLESHOOTING APPENDIX INDEX RESETTING MAINTAINING YOURP TOUCHLABELER ...

Страница 2: ... with the limits for a Class B digital device pursuant to Part 15 of the FCC Rules These limits are designed to provide reasonable protection against harmful interference in a residential installation This equipment generates uses and can radiate radio frequency energy and if not installed and used in accordance with the instructions may cause harmful interference to radio communications However t...

Страница 3: ...omes first What is NOT covered This warranty does not cover 1 Physical damage to the machine 2 Damage caused by improper installation improper or abnormal use misuse neglect or accident including but not limited to transporting the machine without the proper preparation and or packaging 3 Damage caused by another device or software used with the machine including but not limited to damage resultin...

Страница 4: ...the Authorized Service Center will provide you with a replacement Machine after receiving one from Brother If you are dealing directly with Brother Brother will send to you a replacement Machine with the under standing that you will after receipt of the replacement Machine supply the required proof of purchase information together with the Machine that Brother agreed to replace You are then expect...

Страница 5: ...ING IMPLIED WARRANTIES OF MERCHANTABILITY AND FITNESS FOR A PARTICULAR PURPOSE ARE HEREBY DISCLAIMED This Limited Warranty is the only warranty that Brother is giving for the machine It is the final expression and the exclusive and only statement of Brother s obligations to you It replaces all other agreements and understandings that you may have with Brother or its representatives This warranty g...

Страница 6: ...ur proof of purchase bill of sale in case your Product requires service Model __________________________________________________ Serial ___________________________________________________ Date of purchase __________________________________________ Store where purchased ______________________________________ Location of store ___________________________________________ Important We recommend that y...

Страница 7: ...Cassette 22 Turning Power On Off 23 Feeding Tape 23 Feed function 23 LCD Display 23 LCD Contrast 23 Back Light 24 Setting Language and Unit 24 Language 24 Unit 24 EDITING A LABEL 25 Entering and Editing Text 25 Entering Text from the Keyboard 25 Using Text Reminder 25 Deleting Text Reminder Memory 25 Adding a New Line 26 Adding a New Block 26 Moving the Cursor 26 Inserting Text 26 Deleting Text 26...

Страница 8: ...ng Margin 50 Adjusting the Label Length 51 Attaching Labels 51 Printing from the Label Collection 52 Printing a label from the Label Collection Stored in the Machine 52 USING THE FILE MEMORY 54 Storing a Label into Memory 54 Opening a Stored Label File 54 Printing a Stored Label File 55 Deleting a Stored Label File 55 RESETTING MAINTAINING YOUR P TOUCH LABELER 56 Resetting the P touch Labeler 56 R...

Страница 9: ...uctions will result in death or serious injuries WARNING Indicates a potentially hazardous situation which if not avoided could result in death or serious injuries CAUTION Indicates a potentially hazardous situation which if not avoided may result in minor or moderate injuries Action NOT allowed DO NOT disassemble the product DO NOT splash the product with or immerse the product in water DO NOT to...

Страница 10: ...al chemical reaction within the battery When charging the rechargeable battery use only a battery charger designed specifically for the rechargeable battery DO NOT allow wires or other metal objects to come into contact with the terminals of the rechargeable battery Do not carry or store the rechargeable battery with metal objects such as necklaces or hairpins This could cause an electrical short ...

Страница 11: ... long period of time This could shorten the life of the rechargeable battery or lead to an electrical short If the printer can only be used for a short period of time even though the rechargeable battery is fully charged the rechargeable battery may have reached the end of its service life Replace the rechargeable battery with a new one When removing and replacing the rechargeable battery cover th...

Страница 12: ...eler disconnect the AC adapter and remove batteries and contact the retail outlet where the P touch labeler was purchased or your local authorized service center Alkaline batteries Ni MH rechargeable batteries Follow these guidelines to avoid liquid leakage heat rupture of the battery and cause personal injury DO NOT throw into fire heat up short circuit recharge or disassemble the battery DO NOT ...

Страница 13: ...r damage resulting from not using the specified AC adapter and adapter cord DO NOT connect the AC adapter or adapter cord to other products DO NOT touch the AC adapter and the P touch labeler during an thunderstorm There may be a remote risk of electric shock from lightning when the printer is used during a thunderstorm DO NOT touch the AC adapter or power plug with wet hands DO NOT use the AC ada...

Страница 14: ...hem correctly When using Ni MH rechargeable batteries charge the batteries with the appropriate specialized battery charger Before using the batteries DO NOT disassemble or modify the batteries DO NOT expose the batteries to heat or dispose of the batteries in a fire AC Adapter If you do not intend using the P touch labeler for an extended period of time disconnect the AC adapter from the power ou...

Страница 15: ...r and plug it into an outlet with the specified voltage Failure to do so could result in damage or failure of the P touch labeler DO NOT use the P touch labeler in places with moisture or high humidity such as bathrooms DO NOT allow the P touch labeler to get wet for example by handling it with wet hands or spilling beverages onto them DO NOT disassemble or modify the P touch labeler If you notice...

Страница 16: ...ctor or any other part of the printer DO NOT touch the print head refer to page 6 with your fingers Use the optional print head cleaning cassette TZe CL4 the self cleaning function of the labeler or a soft wipe e g a cotton swab when cleaning the print head refer to Cleaning the Unit on page 57 DO NOT clean any part of the machine with alcohol or other organic solvents Only use a soft dry cloth DO...

Страница 17: ... prior to use You can also use Heat Shrink Tube in this model Please check our website for further information You might not be able to print frame label collection and a part of font setting when using Heat Shrink Tube The P touch is not equipped with a charging feature for Ni MH rechargeable batteries The printed label may differ from the image that appears on the LCD Note that Brother Industrie...

Страница 18: ...machine How to use the P touch labeler 1 Prepare the P touch labeler P 13 2 In addition to entering text the P touch labeler has a large range of formatting options Create labels like these Entering and Editing text Entering Symbols Entering Accented Characters Using Auto Format Layouts P 25 P 27 P 30 P 38 3 Before printing you can check the layout of your label using the preview function Create l...

Страница 19: ...he package contains the following before using your P touch labeler Unpacking Your P touch labeler PT H300 P touch labeler Batteries Strap Starter Tape Cassette User s Guide PT H300LI P touch labeler AC adapter The plug may differ by countries Li ion Battery Strap Starter Tape Cassette User s Guide ...

Страница 20: ...play is covered with a protective sheet to prevent damage Remove this sheet before using the P touch Keyboard Tape cutter lever LCD display Tape cassette compartment Tape cutter Print head Tape exit slot Release lever Cover latch AC adapter connector Rear cover Battery compartment Tape viewer LED lamp ...

Страница 21: ...eturn mark Indicates the end of a line of text 8 Battery Level Indicates remaining battery level It displays only when using Li ion battery 9 Caps mode Indicates that the Caps mode is on 10 13 Style guidance Indicates the current font 10 character size 11 character style 12 and frame 13 settings 14 Tape length Indicates the tape length for the text entered 15 Cursor selection Use the and keys to s...

Страница 22: ...ent label design onto the tape 6 Font Enables character attributes for the label to be set Character attributes can be set for each line of the label when the Text menu is opened in combination with the Shift key 7 Label Enables label attributes for the label to be set 8 Symbol Use this to select and enter a symbol from a list of available symbols 9 Auto Format Enables labels to be created using p...

Страница 23: ...keys to type letters or numbers Uppercase letters and symbols can be entered using these keys in combination with the Caps or Shift key 17 Backspace Deletes the character to the left of the cursor 18 Shift Use this key in combination with the letter and number keys to type uppercase letters or the symbols indicated on the number keys 19 Caps Turns Caps mode on and off 20 Accent Use this to select ...

Страница 24: ...aline batteries 23 Users of Ni MH rechargeable batteries Attach the rear cover by inserting the three hooks at the bottom into the slots on the machine then pushing down firmly until it snaps into place Power Supply Make sure that the power is turned off when replacing batteries 1 Always replace all six batteries at the same time using brand new ones Always replace all six batteries at the same ti...

Страница 25: ...ble batteries HR6 installed into the machine WARNING Use only the adapter which is designed exclusively for your P touch Failure to observe this may result in an accident or damage Brother shall not assume any responsibility for any accident or damage resulting from not using the specified AC adapter Do not connect the AC adapter to a non standard electrical outlet Failure to observe this may resu...

Страница 26: ... be charged while it is inserted in the labeler Perform the following procedure to charge the rechargeable Li ion battery Make sure that the labeler is turned off If the labeler is turned on press the Power button to turn it off Make sure that the rechargeable Li ion battery is installed in the labeler Use the AC adapter and AC power cord to connect the labeler to an AC power outlet The LED next t...

Страница 27: ...sage Using or storing the rechargeable Li ion battery in a location exposed to high or low temperatures may accelerate its deterioration In particular using a rechargeable Li ion battery with a high charge charged 90 or more in a location exposed to high temperatures will considerably accelerate battery deterioration Using the labeler while the rechargeable Li ion battery is installed and charging...

Страница 28: ...e into the tape compartment with the end of the tape facing the machine s tape exit slot and press firmly until you hear a click Close the rear cover Inserting a Tape Cassette If the new tape cassette has a cardboard stopper be sure to remove the stopper before inserting the cassette End of tape Tape guide 1 2 When inserting the tape cassette make sure that the tape and ink ribbon do not catch on ...

Страница 29: ...Press the OK or Enter key Turning Power On Off Your P touch labeler has a power saving function that automatically turns itself off if no key is pressed within a certain time under certain operating conditions Refer to the Auto Power Off Time table below for details If the batteries are installed or the P touch labeler is connected to an electrical outlet by the AC adapter the previous session s i...

Страница 30: ...sch English Español Français Hrvatski Italiano Magyar Nederlands Norsk Polski Português Português Brasil Română Slovenski Slovenský Suomi Svenska or Türkçe Press the OK or Enter key Unit Press the Menu key to display the Setup menu select Unit using the or key and then press the OK or Enter key Select a unit for dimensions shown on the LCD display by using the or key Either inch or mm can be selec...

Страница 31: ... printed beginning with the letter c such as computer Press the OK key to display other word options that match the entered character Press the or key to select the desired word Press the OK or Enter key The selected character word will then appear on the text line Deleting Text Reminder Memory Press the Menu key Press the or key to select Text Reminder and then press the OK or Enter key Press the...

Страница 32: ...d then enter the additional text The new text is inserted to the left of the cursor Deleting Text Deleting one character at a time To delete a character from an existing line of text move the cursor to the character to the right of the position you want to start deleting text and then press the Backspace key The character to the left of the cursor is deleted each time the Backspace key is pressed ...

Страница 33: ...mbol printed on the selected key s upper right corner Entering Symbols Using the Symbol Function Press the Symbol key A list of symbol categories and symbols in that category is displayed Select a symbol category Punctuation Business Mathematics etc using the or key or by pressing the Symbol key repeatedly and then press the OK or Enter key Select a symbol using or key and then press the OK or Ent...

Страница 34: ... then select On to create your personal category by using the or key Press the OK or Enter key to apply the setting The screen returns to the text entry screen Enter the symbol you wish to add to your History Press the Symbol key The History appears including the symbol entered in step 4 1 2 3 Refer to Entering Symbols Using the Symbol Function on page 27 for detail 4 5 Up to 15 symbols can be add...

Страница 35: ...29 z EDITING A LABEL Entering Symbols zSymbol Listz Category Symbols Punctuation Bracket Arrow Mathematics Currency Unit Number Number Sign Electrical Datacom AV Business Professional Event Vehicle Personal Nature Earth ...

Страница 36: ...elected or select it by using the or key Press the OK or Enter key The selected accented character is inserted into the line of text Pictograph Category Symbols The symbols shown in the table may look slightly different on the machine LCD and when printed Entering Accented Characters 1 Caps mode can be used with the Accent function 2 3 The order of accented characters displayed will differ dependi...

Страница 37: ...e or key Press the OK or Enter key to apply the settings Character Accented Characters Character Accented Characters a n A N c o C O d r D R e s E S g t G T i u I U k y K Y l z L Z Setting Character Attributes 1 2 3 New settings are NOT applied if you do not press the OK or Enter key Press the Escape key to return to the previous step Press the Space key to set the selected attribute to the defaul...

Страница 38: ...e now applying the attribute for that specific line only zSetting Optionsz When different value of attribute is set for each line the value will be displayed as when you press the Font key When you change the setting on this screen by using the or key the same change will be applied to all lines of the label Attribute Value Result Value Result Font HEL Helsinki BEL Belgium BRU Brussels ATL Atlanta...

Страница 39: ...t Width x2 x2 3 x1 x1 2 Style Normal I BLD Italic Bold BLD Bold I OUT Italic Outline OUT Outline I SHD Italic Shadow SHD Shadow I SLD Italic Solid SLD Solid VRT Vertical ITL Italic Line Off UND Underline STR Strikeout Align Alignment Left Right Center Just Justify Attribute Value Result Value Result ...

Страница 40: ...ate a label with a frame around the text and specify the label length Refer to Setting Margin on page 50 Press the Label key The current settings are displayed You can select frame by using and key Select an attribute using the or key and then set a value for that attribute using the or key Press the OK or Enter key to apply the settings The actual printed font size depends on the tape width numbe...

Страница 41: ...eturn to the previous step Press the Space key to set the selected attribute to the default value Refer to the Setting Options table for a list of all available settings Attribute Value Result Value Result Frame Off 16 1 17 2 18 3 19 4 20 5 21 6 22 7 23 8 24 9 25 10 26 11 27 12 28 13 29 14 30 15 31 ...

Страница 42: ...EDITING A LABEL 36 Setting Label Attributes Frame 32 50 33 51 34 52 35 53 36 54 37 55 38 56 39 57 40 58 41 59 42 60 43 61 44 62 45 63 46 64 47 65 48 66 49 67 Attribute Value Result Value Result ...

Страница 43: ...72 88 73 89 74 90 75 91 76 92 77 93 78 94 79 95 80 96 81 97 82 98 83 99 Length The length of the label can be set within the range 1 2 30 mm 12 0 300 mm When Auto is selected the length of the label is automatically adjusted based on the amount of text entered Attribute Value Result Value Result ...

Страница 44: ...ng the or key Press the OK or Enter key The Style screen is displayed Select an attribute using the or key and then set a value for that attribute using the or key Press the OK or Enter key The Bar Code Setup screen is displayed Select an attribute using the or key and then set a value for that attribute using the or key Press the OK or Enter key The template text entry screen is displayed Using A...

Страница 45: ... in a file memory Select Cancel to exit the Auto Format function Select Print Options to set the print settings 11 12 Press the Escape key to return to the previous step On the Style and Bar Code Setup screens press the Space key to change the selected attribute to the default value Refer to the Templates table for a list of available templates If the width of the current tape cassette does not ma...

Страница 46: ... x 3 5 12mm x 90mm Cable Wrap Rotate repeat 0 70 x 1 5 18mm x 39mm Faceplate 0 47 x 2 7 12mm x 70mm Binder Spine 0 70 x 8 6 18mm x 219mm File Folder Tab 0 47 x 3 2 12 mm x 82 mm Divider Tab Hanging Folder 0 47 x 1 6 12 mm x 42 mm Asset Tag 0 70 x 2 7 18 mm x 70 mm Bin Box 0 70 x 3 0 18 mm x 76 mm Equipment Label 0 70 x 2 2 18 mm x 58 mm ...

Страница 47: ...ut selected is displayed When the tape width has changed the default layout for the new tape width is displayed Select a block layout using the or key Press the OK or Enter key The Style screen is displayed Select an attribute using the or key and then set a value for that attribute using the or key Template Name Address Label 0 70 x 2 7 18 mm x 70 mm Name Badge 0 70 x 2 8 18 mm x 72 mm CD Case Sp...

Страница 48: ... is displayed while the labels are being printed Caps mode can be used when entering text 7 8 9 Select Edit to change the text data or style settings Select Save to store the label in a file memory Select Cancel to exit the Auto Format function Select Change Layout to use a different layout Select Print Options to set the print settings 10 11 Press the Escape key to return to the previous step Ref...

Страница 49: ...ock Layoutsz Attribute Value Details Block layout 0 70 18 mm tape 2LineA 2LineB 3Line 1 2LineA 1 2LineB 1 3Line 1 4Line 1 5Line Block layout 0 47 12 mm tape 2LineA 2LineB 3Line 1 2Line Block layout 0 35 9 mm tape 2LineA 2LineB 1 2Line Block layout 0 23 6 mm tape 1 2Line ...

Страница 50: ...ilable for the current protocol is displayed Creating a Bar Code Label The P touch labeler is not designed exclusively for creating bar code labels Always check that bar code labels can be read by the bar code reader For best results print bar code labels in black ink on white tape Some bar code readers may not be able to read bar code labels created using colored tape or ink Use the Large setting...

Страница 51: ... is only available for the CODE39 I 2 5 and CODABAR protocols Press the Escape key to return to the previous step Press the Space key to set the selected attribute to the default value Refer to the Bar Code Settings table for a list of all available settings Attribute Value Protocol CODE39 CODE128 EAN 8 EAN 13 GS1 128 UCC EAN 128 UPC A UPC E I 2 5 ITF CODABAR Width Small Large Under characters pri...

Страница 52: ...e a bar code from a label position the cursor to the right of the bar code mark on the data entry screen and press the Backspace key Code Special Character Code Special Character Code Special Character 0 SPACE 24 48 DC3 1 25 49 DC4 2 26 50 NAK 3 27 51 SYN 4 28 NUL 52 ETB 5 29 53 CAN 6 30 SOH 54 EM 7 31 STX 55 SUB 8 32 ETX 56 ESC 9 33 EOT 57 10 34 ENQ 58 FS 11 35 ACK 59 12 36 BEL 60 GS 13 37 BS 61 ...

Страница 53: ...r Enter key to return to the text entry screen To scroll the preview to the left or right end press the Shift key and then press the or key To print the label directly from the preview screen press the Print key or open the print options screen and select a print option Refer to Printing a Label below for details The print preview is a generated image of the label and may differ from the actual la...

Страница 54: ...t screen is displayed Move the cursor to the last character to be incremented in the numbering sequence and press the OK or Enter key The number of labels to be printed is displayed Select the number of labels to be printed using the or key or type the number using the number key Press the OK or Enter key The labels are printed As each label is printed the number of copies printed is shown 3 Press...

Страница 55: ...ault Auto numbering can also be applied to bar codes Whena bar code containsan auto numberingsequence no other fields in the label can contain an auto numbering sequence The auto number portion of the label is incremented after each label is printed Only one auto numbering sequence can be used in a label Any symbols or other non alphanumeric characters in the auto numbering sequence are ignored An...

Страница 56: ...nter key Press the Escape key to return to the previous step Refer to the Tape Cutting table for a list of all available settings Setting Description Example Full Each label is printed leaving a margin of 0 98 25 mm on each end Half A margin of 0 98 25 mm is printed first and then each label is printed leaving a margin of 0 47 12 mm before and after the text Dots are printed in front of the text C...

Страница 57: ...ing when printing several labels with minimum margins Feed the tape before using the cutter Otherwise a part of the text may be cut off Do not try to pull the tape since this may damage the tape cassette After pressing Print OK to Feed appears Press the Escape key to enter more texts or press the OK or Enter key to feed The final label is printed with an 0 37 9 5 mm margin to the right of the char...

Страница 58: ...keys Press the OK or Enter key to print the labels Printing Copies is displayed while the labels are being printed The backing of some types of tapes may be pre cut to make it easier to peel the backing To remove the backing simply fold the label lengthwise with the text facing inward to expose the inside edges of the backing Next peel off the backing one piece at a time Labels may be difficult to...

Страница 59: ...2 3 4 5 6 7 8 9 53 z LABEL PRINTING Printing from the Label Collection zLabel Collection Listz Category Label Files Office Signage Communication Attention Retail Labels are for illustrative purposes only ...

Страница 60: ...g the or key Press the OK or Enter key The file number of a stored label is displayed The label text is also displayed to identify the label Select a file number using the or key and then press the OK or Enter key to open the selected file The file is opened and displayed on the text entry screen When the file memory is full each time you save a file you will need to overwrite one of your stored f...

Страница 61: ...splayed while the labels are being printed Press the File key to display the File screen Select Delete using the or key Press the OK or Enter key The file number of a stored label is displayed The label text is also displayed to identify the label Select a file number using the or key and then press the OK or Enter key The message Delete is displayed Press the OK or Enter key to delete the file Th...

Страница 62: ...ory settings Label collections stored in Favorites is not reset Turn off the machine Press and hold down the Shift and R keys While holding down the Shift and R keys press the Power key once and then release the Shift and R keys Resetting the P touch Labeler Release the Power key before releasing the other key All text format settings option settings and stored label files are cleared when you res...

Страница 63: ...Tape Cutter Tape adhesive can build up on the cutter blade after repeated use taking the edge off the blade which may result in the tape jamming in the cutter Maintenance Always remove the batteries and disconnect the AC adapter before cleaning the P touch labeler Do not use paint thinner benzene alcohol or any other organic solvent These may deform the case or damage the appearance of your P touc...

Страница 64: ...nd thread the tape through the tape exit slot If the tape is jammed remove the tape cassette and then pull out the jammed tape and cut it Check that the end of the tape passes through the tape guide before reinstalling the tape cassette The label is not printed correctly Remove the tape cassette and reinstall it pressing it firmly until it clicks into place If the print head is dirty clean it with...

Страница 65: ...nuing Text Full The maximum number of characters have already been entered Edit the text and use fewer characters No Text There is no text symbols or bar code data entered when you try to print or preview a label Enter data before continuing Line Limit Max 5 Lines There are already five lines of text when you press the Enter key Limit the number of lines to five Incorrect Value The value entered f...

Страница 66: ... 0 35 9 mm tape cassette is not installed when an Auto Format for 0 35 9 mm tape is selected Install a 0 35 9 mm tape cassette Insert 9mm Tape Cassette Insert 0 23 Tape Cassette An 0 23 6 mm tape cassette is not installed when an Auto Format for 0 23 6 mm tape is selected Install a 0 23 6 mm tape cassette Insert 6mm Tape Cassette Insert 0 13 Tape Cassette An 0 13 3 5 mm tape cassette is not instal...

Страница 67: ...he text size is too large Select a different size option Select Other Margin The tape length set using the tape length setting is shorter than the total length of the left and right margins applied for the Full setting Select a different margin setting Installed tape is not compatible with this machine Tape that is incompatible with the machine has been installed Use compatible tape Category Full ...

Страница 68: ...rgin Full Half Narrow Chain Memory Memory buffer size Maximum 2800 characters File storage Maximum 50 files Other Features Templates Label Collections Auto Format Power Supply Power supply Six AA alkaline batteries LR6 Six AA Ni MH rechargeable batteries HR6 3 Li ion Battery BA E001 2 AC adapter AD E001 2 Auto Power off Battery 5 min AC adapter 5 min Size Dimensions Approx 5 2 W x 8 4 D 2 6 H 132 ...

Страница 69: ...tage up to 8 2 V Maximum Surroundings temperature range Charge 104 F Standard discharge current 1 9 A 140 F Maximum discharge current 2 5 A 140 F Shipped battery Less than 1 month 4 F 122 F Less than 3 month 4 F 104 F Less than 1 year 4 F 68 F Charging Parameters Maximum charging voltage 8 2 Vdc Maximum charging current 1330 mA ...

Страница 70: ...27 E entering text 25 F formatting character attributes 31 label attributes 34 Frames 35 K Keyboard 16 L Label Collection 52 length 34 line 31 Line number 15 N new line 26 P Power Supply 18 R Return mark 15 S size 31 Special Character List 45 Specifications 62 style 31 Symbol List 29 symbols 27 T tape cassettes 22 tape length 15 Templates 40 text entering and editing 25 lines 26 W width 31 ...

Страница 71: ...e Internet For product information www brother usa com For downloading the latest drivers http solutions brother com For purchasing accessories and certain Brother products http www brothermall com Accessories and Supplies To order Brother accessories or supplies by Visa MasterCard Discover or American Express you may call toll free 1 877 552 MALL 6255 or complete the order form and fax both sides...

Страница 72: ......

Страница 73: ...Printed in China LAD356001 ...

Отзывы: