background image

1

2

3

4

5

6

7

8

9

31

z

 ÉDIT

ION

 DE L’ÉT

IQUET

T

E

Réglage des attributs de caractères

FRANÇAIS

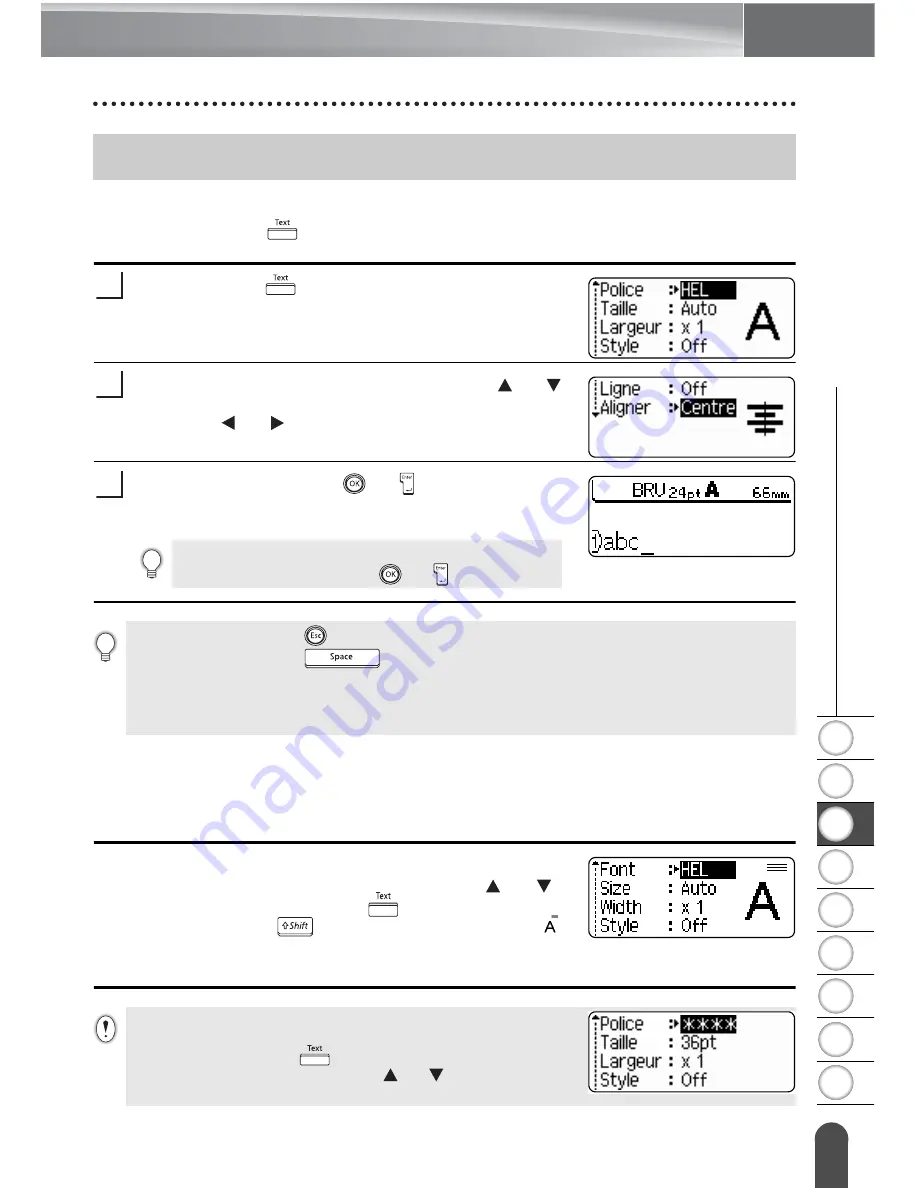
Régler les attributs de caractères par étiquette

À l’aide de la touche 

, il est possible de sélectionner la police et d’appliquer les 

attributs relatifs à la dimension, à la largeur, au style, à la ligne et à l'alignement.

Appuyer sur la 

 touche.

Les réglages courants sont affichés à l’écran.

Sélectionner un attribut à l’aide de la touche   ou  , 

ensuite régler une valeur pour cet attribut à l’aide de 

la touche   ou  .

Appuyer sur les touches 

 ou   pour appliquer les 

paramètres.

Régler les attributs de caractères pour chaque ligne

Quand une étiquette est composée de plus d’une ligne de texte, vous pouvez régler 

différentes valeurs d'attributs de caractères (police, taille, largeur, style, ligne et 

alignement) pour chaque ligne.

Déplacez le curseur vers la ligne où vous voulez modifier 

l’attribut de caractère en utilisant les touches   ou  . 

Appuyez ensuite sur la touche 

 tout en maintenant 

enfoncée la touche 

 pour afficher les attributs. (  

indique que vous appliquez l'attribut uniquement à cette 

ligne particulière.)

Réglage des attributs de caractères

1

2

Les nouveaux réglages NE sont PAS appliqués si l’on 
n’appuie pas sur les touches 


ou


 .

3

• Appuyer sur la touche 

 afin de retourner à l’étape précédente.

• Appuyer sur la touche 

 afin de régler l’attribut sélectionné à sa valeur par défaut.

• Se reporter au tableau Options de réglage pour la liste de tous les réglages disponibles.

• Il peut être difficile de lire les petits caractères lorsque certains styles sont appliqués (ex. 

Ombre + Italique).

Quand une valeur d’attribut différente est paramétrée pour 

chaque ligne, la valeur sera indiquée en tant que **** lorsque 

vous presserez la touche 

. Quand vous changez le paramètre 

sur cet écran en utilisant les touches   ou  , le même 

changement sera appliqué sur toutes les lignes de l’étiquette.

Содержание P-touch PT-2700

Страница 1: ...ELECTRONIC LABELING SYSTEM ELECTRONIC LABELING SYSTEM ELECTRONIC LABELING SYSTEM P 10 ...

Страница 2: ...dows are registered trademarks of Microsoft Corporation USA Macintosh and Mac OS are registered trademarks of Apple Computer Inc The names of other software or products used in this document are trademarks or registered trademarks of the respective companies that developed them ...

Страница 3: ...pter 17 Inserting a Tape Cassette 18 Turning Power On Off 20 Feeding Tape 21 LCD Display 21 LCD Contrast 21 Display Mode 22 Back Light 22 Setting Language and Unit 23 Language 23 Unit 23 EDITING A LABEL 24 Entering and Editing Text 24 Entering Text from the Keyboard 24 Adding a New Line 24 Adding a New Block 24 Moving the Cursor 24 Inserting Text 25 Inserting a Tab 25 Deleting Text 25 Entering Sym...

Страница 4: ...mp Format 52 Forward 53 Creating a Bar Code Label 54 Setting Bar Code Parameters 54 Entering Bar Code Data 55 Editing and Deleting a Bar Code 57 LABEL PRINTING 58 Label Preview 58 Printing a Label 58 Printing a Single Copy 59 Printing Multiple Copies 59 Auto numbering Labels 60 Mirror Printing 61 Tape Cutting Options 62 Manual Cutting 64 Adjusting the Label Length 64 Attaching Labels 65 USING THE ...

Страница 5: ...1 2 3 4 5 6 7 8 9 3 z INTRODUCTION Cleaning the Print Head 70 Cleaning the Tape Cutter 71 TROUBLESHOOTING 72 What to do when 72 Error Messages 75 APPENDIX 79 Specifications 79 Accessories 82 INDEX 86 ...

Страница 6: ...ering functions Create a label with the P touch Prepare the P touch Enter the label text Print the label What You Can Do 1 Install the batteries and or connect the AC adapter Set a tape cassette P 16 P 18 P 20 Turn the P touch on 2 In addition to entering text the P touch has a large range of editing functions Create labels like these Enter the label text from the keyboard P 24 3 You can check the...

Страница 7: ...ion Guide Connect the USB cable Turn the P touch on 3 Start P touch Quick Editor Enter the label text in P touch Quick Editor Software Help Software Help Click on the layout area and then type Brother 4 Click on the Print button The label is printed Software Help Software Help P touch Quick Editor simple label editing software is ideal for creating simple labels To create labels with more complex ...

Страница 8: ...ervice center If the damage is caused by disassembly or modification of the P touch by the customer it may void the customer s warranty and servicing parts and labor may be charged to the customer Do not drop hit or otherwise strike the P touch Do not touch any metal parts near the print head The print head becomes very hot during use and remains very hot immediately after use Do not touch it dire...

Страница 9: ... that the plug is fully inserted to the power outlet Do not use an outlet that is loose CAUTION Battery Please note the following to avoid liquid leakage heat rupture of the battery Do not use old and new batteries together Do not mix alkaline batteries with other type batteries Do not set the positive and negative end in the wrong position Remove the batteries if you do not intend to use the P to...

Страница 10: ...ry expires When power is disconnected for more than two minutes all text and format settings will be cleared Any text files stored in the memory and clock settings will also be cleared Tape Depending on the environmental conditions and the material and condition of the affixing surface the label may peel off or the color of the tape may change When removing labels adhesive may remain the tape s co...

Страница 11: ...igh humidity or dusty locations Standard operating temperature range 10 C to 35 C 50 F to 95 F It is recommended that you use the USB cable supplied with the P touch Should another USB cable need to be used ensure it is of high quality construction Be careful not to scratch the CD ROM Do not place the CD ROM in any location exposed to high or low temperatures Do not place heavy objects on the CD R...

Страница 12: ...le copy auto numbering functions To add time and date to your labels Time Date function To save a label layout File memory function 1 2 3 ABC auto format function ABC ABC ABC Quick Index Quick Index This section provides quick and easy access to information on tasks often needed by users Simply look for your task below and then go to the page indicated If the task you are looking for is not shown ...

Страница 13: ...6 7 8 9 z GETTING STARTED GETTING STARTED Check that the package contains the following before using your P touch Unpacking Your P touch P touch PT 2700 TZ tape cassette CD ROM USB cable AC adapter User s Guide Software Installation Guide ...

Страница 14: ...lay is covered with a protective sheet to prevent damage Remove this sheet before using the P touch Tape compartment cover Tape exit slot Keyboard Tape viewer LCD display Tape cassette compartment Tape cutter Print head Release lever AC adaptor connector USB port Battery compartment cover Battery case ...

Страница 15: ...mark Indicates the end of a line of text 4 Caps mode Indicates that the Caps mode is on 5 8 Style guidance Indicates the current font 5 character size 6 character style 7 and frame 8 settings 9 Tape length Indicates the tape length for the text entered 10 Cursor selection Indicates that you can use the cursor keys to select the items on the screen Use the and keys to select a menu item and the and...

Страница 16: ... menus or when entering symbols or accented characters 4 Escape Cancels the current command and returns the display to the data entry screen or the previous step 5 Prints the current label design onto the tape Opens the Print Options menu when used in combination with the key 6 Displays a preview of the label Feeds 0 92 23 mm of blank tape and then automatically cuts the tape when used in combinat...

Страница 17: ...h the letter and number keys to type uppercase letters or the symbols indicated on the number keys 17 Use this to select and enter a symbol from a list of available symbols 18 Backspace Deletes the character to the left of the cursor Clears all text entered or all text and current label settings when used in combination with the key 19 Enters a new line when entering text Enters a new block when u...

Страница 18: ...3 Attach the battery compartment cover by inserting the three hooks at the bottom into the slots on the machine then pushing down firmly until it snaps into place Power Supply Make sure that the power is turned off when replacing batteries 1 Always replace all eight batteries at the same time using brand new ones 2 3 Remove the batteries if you do not intend to use the P touch for an extended peri...

Страница 19: ...ively for your P touch Failure to observe this may result in an accident or damage Brother shall not assume any responsibility for any accident or damage resulting from not using the specified AC adapter Do not connect the AC adapter to a non standard electrical outlet Failure to observe this may result in an accident or damage Brother shall not assume any responsibility for any accident or damage...

Страница 20: ...ompartment cover If there is already a tape cassette in the machine remove it by pulling it straight up Insert the tape cassette into the tape compartment with the end of the tape facing the machine s tape exit slot and press firmly until you hear a click Inserting a Tape Cassette If the new tape cassette has a cardboard stopper be sure to remove the stopper before inserting the cassette WATNLATIO...

Страница 21: ...n Be sure to feed tape to remove any slack in the tape and ink ribbon after inserting the tape cassette Refer to Feeding Tape on page 21 Do not pull the label coming out of the tape exit slot Doing so will cause the ink ribbon to be discharged with the tape Store tape cassettes in a cool dark location away from direct sunlight and high temperature high humidity or dusty locations Use the tape cass...

Страница 22: ... key is pressed within a certain time under certain operating conditions Refer to the Auto Power Off Time table below for details If the batteries are installed or the P touch is connected to an electrical outlet by the AC adapter the previous session s information is displayed when the power is turned on P touch only Connected to PC With AC adapter 8 hours 8 hours With battery 5 minutes 5 minutes...

Страница 23: ...ey and then press the or key Select a contrast level using the or key The screen contrast changes each time you press the or key allowing you to set the most suitable contrast Press the or key Feeding Tape Be sure to feed tape to remove any slack in the tape and ink ribbon after inserting the tape cassette Do not pull the label coming out of the tape exit slot Doing so will cause the ink ribbon to...

Страница 24: ...ish to see the display more clearly The default setting is ON Text entry screen Clock display guidance 2 lines 3 lines guidance 1 line You can also change the clock display to the text entry screen guidance 2 text lines by pressing any other key on the keyboard besides and key For adjusting the clock to current date and time refer to Clock Setting on page XX For selecting a desired format for disp...

Страница 25: ... the Setup menu select Language using the or key and then press the or key Select a language using the or key Press the or key Unit Select the units inch or mm for dimensions shown on the LCD display The default setting is inch Press the key to display the Setup menu select Unit using the or key and then press the or key Select a unit using the or key Press the or key Setting Language and Unit 1 2...

Страница 26: ... of the block and the cursor moves to the start of the new block Moving the Cursor To move the cursor left right up or down press the or keys Each press of the key moves the cursor one space or line To move the cursor to the beginning or end of the current line hold down the key and then press the or keys To move the cursor to the very beginning or end of the text hold down the key and then press ...

Страница 27: ...ing text and then press the key The character to the left of the cursor is deleted each time the key is pressed Deleting all text at once Use the and key to delete all text at once Press the key while holding down key The Clear options are displayed Using the or keys select Text Only to delete all text while retaining the current format settings or select Text Format to delete all text and format ...

Страница 28: ...symbols hold down the key and then press the desired key Entering Symbols Using the Symbol Function Press the key A list of symbol categories and symbols in that category is displayed Select a symbol category Punctuation Business Mathematics etc using the or key or by pressing the key repeatedly and then select a symbol using the or keys Press the or key The selected symbol is inserted into the li...

Страница 29: ... then select On to create your personal category by using the or keys Press the or key to apply the setting The screen returns to the text entry screen Enter the symbol you wish to add to your personal Category Press the key The Personal category appears including the symbol entered in step 4 1 2 3 Refer to Entering Symbols Using the Symbol Function on page 26 for detail 4 5 Up to 20 symbols can b...

Страница 30: ...e Function on page 27 for detail Punctuation Business Mathematics Bracket Arrow Unit International Number Pictograph Electrical Others The use of the CE mark is strictly governed by one or more European Council directives Ensure that any labels you produce which use this mark conform with the relevant directives ...

Страница 31: ...Press the key repeatedly until the desired accented character is selected or select it by using the or keys Press the or key The selected composite character is inserted into the line of text Entering Accented Characters Caps mode can be used with the Accent function 1 2 The order of composite characters which appear on display differ by the selected LCD language 3 4 Press the key to return to the...

Страница 32: ...EDITING A LABEL 30 Entering Accented Characters zAccented Character Listz Character Accented Characters Character Accented Characters a n A N c o C O d r D R e s E S g t G T i u I U k y K Y l z L Z ...

Страница 33: ...you wish to change the character attribute by using the or keys Next press the key while holding down key to display the attributes on the screen indicates that you are now applying the attribute for that specific line only Setting Character Attributes 1 2 New settings are NOT applied if you do not press the or key 3 Press the key to return to the previous step Press the key to set the selected at...

Страница 34: ...EDITING A LABEL 32 Setting Character Attributes zSetting Optionsz Attribute Value Result Font HEL Helsinki BRU Brussels US USA FLO Florida BEL Belgium SGO San Diego LA Los Angeles CAL Calgary ...

Страница 35: ...etting Character Attributes Size Auto When Auto is selected the text is automatically adjusted to print in the largest size available for each tape width 48pt 42pt 36pt 24pt 18pt 12pt 9pt 6pt Width x2 x3 2 x1 x2 3 x1 2 Attribute Value Result ...

Страница 36: ...racter Attributes Style Off BLD Bold OUT Outline SHD Shadow SLD Solid ITL Italic I BLD Italic Bold I OUT Italic Outline I SHD Italic Shadow I SLD Italic Solid VRT Vertical Line Off UND Underline STR Strikeout Attribute Value Result ...

Страница 37: ...e of x1 2 setting If further size reduction is required to fit the text into the selected label length the total text size will be modified after reducing the text width to x1 2 setting Press the key to display the Setup menu Select Auto Fit Style using the or keys and then press the or key The Auto Fit Style screen is displayed Select the style using the or keys Press the or key to apply the sett...

Страница 38: ...ress the key The current settings are displayed Select an attribute using the or keys and then set a value for that attribute using the or keys Press the or key to apply the settings Setting Label Attributes 1 When setting the label length or tab length hold down the or keys to change the value faster 2 New settings are NOT applied if you do not press the or key 3 Press the key to return to the pr...

Страница 39: ...1 2 3 4 5 6 7 8 9 37 z EDITING A LABEL Setting Label Attributes zSetting Optionsz Attribute Value Result Frame Off 1 2 3 4 5 6 7 8 9 10 11 12 13 14 15 ...

Страница 40: ...play the Auto Format screen and then select Templates using the or keys Press the or key The last template used is displayed Frame 16 17 18 19 20 Length The length of the label can be set within the range 1 2 30mm 12 0 300mm When Auto is selected the length of the label is automatically adjusted based on the amount of text entered Tab Length The length of the tab can be set within the range 0 0 0m...

Страница 41: ...Press the or key The template text entry screen is displayed Enter the text and then press the or key Repeat this for each text field After all text fields are entered the print menu is displayed when the or key is pressed Select Print using the or keys and then press the or key to print the label 3 4 5 6 The C Digit Check Digit attribute is only available for the CODE39 I 2 5 and CODABAR protocol...

Страница 42: ...int menu displayed hold down the key and press the key to display the Print Options menu If the width of the current tape cassette does not match the set width for the selected layout an error message is displayed when you try to print the label Press the key or any other key to clear the error message and insert a tape cassette of the correct width If the number of characters entered exceeds the ...

Страница 43: ...19 mm Binder Spine 2 3 4 x 8 6 18mm x 219mm File Folder Tab 1 2 x 3 2 12 mm x 82 mm Divider Tab Hanging Folder 1 2 x 1 6 12 mm x 42 mm Asset Tag 3 4 x 2 7 18 mm x 70 mm Bin Box 3 4 x 3 0 18 mm x 76 mm Equipment Label 1 x 2 2 24 mm x 58 mm Faceplate VRT 1 2 x 2 7 12 mm x 70 mm Cable Wrap 1 1 x 1 5 24 mm x 39 mm Cable Wrap 2 3 4 x 1 5 18 mm x 39 mm ...

Страница 44: ...1 x 2 8 24 mm x 72 mm Name Badge 2 3 4 x 2 8 18 mm x 72 mm Name Badge 3 1 2 x 2 8 12 mm x 72 mm CD Case Spine 1 1 4 x 4 4 6 mm x 113 mm CD Case Spine 2 9 64 x 4 4 3 5 mm x 113 mm VHS Spine 3 4 x 5 5 18 mm x 140 mm MiniDV Spine 3 8 x 1 7 9 mm x 42 mm Attribute Value Details ...

Страница 45: ...pe width has changed the default layout for the new tape width is displayed Select a block layout using the or keys Press the or key The Style screen is displayed Select an attribute using the or keys and then set a value for that attribute using the or keys Press the or key The block layout text entry screen is displayed Enter text and then press the or key Repeat for each text field After all te...

Страница 46: ...le copies sequentially numbered copies or a mirror image of the label with the print menu displayed hold down the key and press the key to display the Print Options menu If the width of the current tape cassette does not match the set width for the selected layout an error message is displayed when you try to print the label Press the key or any other key to clear the error message and insert a ta...

Страница 47: ...1 2 3 4 5 6 7 8 9 45 z EDITING A LABEL Using Auto Format Layouts zBlock Layoutsz Attribute Value Details Block layout 1 24mm tape 2LineA 2LineB 3 Line 1 2Line A 1 2Line B 1 3Line 1 4Line 1 5Line ...

Страница 48: ...G A LABEL 46 Using Auto Format Layouts Block layout 3 4 18 mm tape 2LineA 2LineB 3Line 1 2LineA 1 2LineB 1 3Line 1 4Line 1 5Line Block layout 1 2 12 mm tape 2LineA 2LineB 3Line 1 2Line Attribute Value Details ...

Страница 49: ...1 2 3 4 5 6 7 8 9 47 z EDITING A LABEL Using Auto Format Layouts Block layout 3 8 9 mm tape 2LineA 2LineB 1 2Line Block layout 1 4 6 mm tape 1 2Line Attribute Value Details ...

Страница 50: ... the Setup menu select Set Clock using the or keys and then press the or key The Set Clock screen is displayed Set the year month date hour and minute to the current figure using the or keys For moving to the next parameter use the or keys Press the or key to apply the settings Using Time Date Function 1 You can also use the Num keys to type in the figure 2 3 Press the key to return to the previou...

Страница 51: ...ou press the key Refer to Display Mode on page 22 for detail Press the key to display the Setup menu select Time Date Format using the or keys and then press the or key The Time Date Format screen is displayed Select date or time using the or keys and then set the format using the or keys Press the or key to apply the settings 1 2 New settings are not applied if you do not press the or key 3 Press...

Страница 52: ... 31 2099 Month Date Year 2099 12 31 Year Month Date 2099 12 31 Year Month Date 31 12 2099 Date Month Year 31 12 2099 Date Month Year 31 12 2099 Date Month Year 31 December 2099 Date Month Year 31 Dec 2099 Date Month Year T Time 11 59 PM analog 23 59 digital The date and time used for the value is a sample setting When a format is selected the date and time set in the clock setting will appear in t...

Страница 53: ...to default setting Refer to the Time Stamp Timing Options for available settings Attribute Value Description Timing Auto Press the key a clock icon will be inserted to where the cursor is positioned on the text input screen When you press the key the latest date time will be printed on the label where the clock icon is positioned on the label layout Fixed Press the key the current date time will b...

Страница 54: ...g the or keys and then select the value for the setting using the or key Press the or key to apply the settings zTime Stamp Format Optionsz 1 2 3 Press the key to return to the previous step Press the key to set the value to default setting Refer to the Time Stamp Format Options for available settings Attribute Value Description Format Date Date only will be printed on the label Date Time The date...

Страница 55: ...displayed Set the amount of year month week day hour and minute to increase from the currently set clock when using the Time Date function using the or Keys For moving to the next parameter use the or keys Press the or key to apply the settings zTime Stamp Forward Optionsz 1 2 You can also use the Num keys to type in the figure 3 4 Press the key to return to the previous step Press the key to set ...

Страница 56: ...ink on white tape Some bar code readers may not be able to read bar code labels created using colored tape or ink Use the Large setting for Width whenever possible Some bar code readers may not be able to read bar code labels created using the Small setting Continuously printing a large number of labels with bar codes can overheat the print head which may effect printing quality Pressing key while...

Страница 57: ...characters available for the current protocol is displayed Select a character using the or keys then press the or key to insert the character in the bar code data Press the or key to insert the bar code in the label Two bar code marks are displayed on the text entry screen Attribute Value Protocol CODE39 CODE128 EAN8 EAN13 EAN128 UPC A UPC E I 2 5 ITF CODABAR Width Large Small Under characters pri...

Страница 58: ... Code Special Character 0 0 1 1 2 SPACE 2 3 3 4 4 5 5 6 Code Special Character Code Special Character Code Special Character 0 SPACE 24 48 DC3 1 25 49 DC4 2 26 50 NAK 3 27 51 SYN 4 28 NUL 52 ETB 5 29 53 CAN 6 30 SOH 54 EM 7 31 STX 55 SUB 8 32 ETX 56 ESC 9 33 EOT 57 10 34 ENQ 58 FS 11 35 ACK 59 12 36 BEL 60 GS 13 37 BS 61 14 38 HT 62 RS 15 39 LF 63 16 40 VT 64 US 17 41 FF 65 DEL 18 42 CR 66 FNC3 19...

Страница 59: ... on page 55 To edit the Width and Under settings on a bar code already placed on the screen position the cursor beneath either of the bar code marks on the data entry screen and then open the Bar Code Setup screen Refer to Setting Bar Code Parameters on page 54 To delete a bar code from a label position the cursor to right of the bar code marks on the data entry screen and press the key 22 46 DC1 ...

Страница 60: ... or key To scroll the preview to the left or right end hold down the key and press the or keys To print the label directly from the preview screen press the key or open the print options screen and select a print option Refer to Printing a Label below for details The print preview is a generated image of the label and may differ from the actual label when printed Printing a Label Do not pull the l...

Страница 61: ...opies to be printed using the or keys or type the number using the number keys Press the or key The message shown on the right is displayed while the labels are being printed 1 2 To stop printing press the key to turn off the P touch There are several other messages that may appear when you press the key Refer to Error Messages on page 75 for further information about error messages 1 2 Hold down ...

Страница 62: ...ted in the numbering sequence and press the or key The numbering end point screen is displayed Move the cursor to the last character to be incremented in the numbering sequence and press the or key The number of labels to be printed is displayed Select the number of labels to be printed using the or keys or type the number using the number keys Press the or key The labels are printed As each label...

Страница 63: ...during printing indicate the count number of copies Pressing the key when selecting the number of copies resets the value to 1 the default Auto numbering can also be applied to bar codes When a bar code contains an auto numbering sequence no other fields in the label can contain an auto numbering sequence The auto number portion of the label is incremented after each label is printed Only one auto...

Страница 64: ...bels Press the key to display the Label menu Select Cut Option using the or keys and then set the value by using the or keys Press the or key to apply the settings 4 Press the key to return to the previous step Text should be printed on clear tape when using the mirror printing function The copy and auto numbering functions cannot be used together with the mirror printing function Tape Cutting Opt...

Страница 65: ...e label is printed When printing several labels continuously Automatically cuts a piece of blank tape before printing the first label and then cuts the tape after each label is printed The labels have a 0 16 4 mm margin on the left and right ends The tape is not fed and cut after the last label is printed No Cut Use this setting to print a strip of labels with no cuts in between Pressing the while...

Страница 66: ...or key to apply the setting You can adjust the length of the printed label in levels of 5 to 5 Press the key The current settings are displayed Select Adjust Length by using the or keys and then set the value by using the or keys Press the or key to apply the setting Manual Cutting 1 2 3 Press the key to return to the previous step Press the key to set the value to default setting Off Adjusting th...

Страница 67: ...our finger to attach the label Attaching Labels 1 2 3 The backing of some types of tapes may be pre cut to make it easier to peel the backing Labels may be difficult to attach to surfaces that are wet dirty or uneven The labels may peel off easily from these surfaces Be sure to read the instructions provided with Fabric Iron On Tapes Extra Strength Adhesive Tapes or other special tapes and observe...

Страница 68: ...the screen returns to the text entry screen When the file memory is full each time you save a file you will need to overwrite one of your stored files You will lose your stored files if the AC adapter is disconnected and the batteries are removed for more than one minute Storing a Label into Memory 1 2 3 When there is already a stored file in the selected number the data will be overwritten by the...

Страница 69: ...ress the or key The file number of a stored label is displayed The label text is also displayed to identify the label Select a file number using the or key and then press the or key to open the selected file The file is opened and displayed on the text entry screen Opening a Stored Label File 1 2 3 4 Press the key to return to the previous step ...

Страница 70: ...tored label is displayed The label text is also displayed to identify the label Select a file number using the or key and then press the or key to print the selected label The label is printed from the machine Printing a Stored Label File 1 2 3 4 Press the key to return to the previous step The message No Text is displayed when you try to print a file with no text ...

Страница 71: ...ed label is displayed The label text is also displayed to identify the label Select a file number using the or key and then press the or key The message Delete is displayed Press the or key to delete the file The file is deleted and the screen returns to the text entry screen Deleting a Stored Label File 1 2 3 4 5 Press the key to cancel deleting the file and return to the previous screen ...

Страница 72: ...ks or poor quality characters on printed labels generally indicates that the print head is dirty Clean the print head using a cotton swab or optional print head cleaning cassette TZ CL4 Resetting the P touch 1 Release the key before releasing the other keys All text format settings option settings and stored label files are cleared when you reset the P touch Language unit and clock settings will a...

Страница 73: ...e adhesive can build up on the cutter blade after repeated use taking the edge off the blade which may result in the tape jamming in the cutter About once every year wipe the cutter blade using a cotton swab moistened with alcohol Do not touch the cutter blade directly with your bare hands ...

Страница 74: ...ies installed correctly Remove and re install the batteries The LCD messages are displayed in a foreign language Is the language set properly Refer to Setting Language and Unit on page 23 and select the desired language for the LCD messages The label is not printed after pressing the key Has text been entered A label will not be printed if there is no text entered Is the tape cassette installed co...

Страница 75: ...the tape The ink ribbon is separated from the ink roller Is the ink ribbon in the tape cassette loose or did you pull on the label coming out of the tape exit slot If the ink ribbon is broken replace the tape cassette If not leave the tape uncut and remove the tape cassette then wind the loose ink ribbon onto the spool as shown in the figure The P touch stops while printing a label Is there enough...

Страница 76: ...ing When using other tapes refer to Manual Cutting on page 64 and set the Manual Cutting to OFF to cut the tape automatically Label files saved previously are now empty Have the batteries and AC adapter been disconnected All files stored in the internal memory is lost if the batteries and AC adapter are disconnected for longer than one minute Is there enough power remaining in the batteries All da...

Страница 77: ...er designed exclusively for your P touch The tape cutter is closed when you try to print or feed tape Turn the P touch off and then on again before continuing When tape is tangled in the cutter remove the tape There is no text symbols or bar code data entered when you try to print or preview a label Enter data before continuing There is no tape cassette installed when you try to print or preview a...

Страница 78: ... tape Limit the number of lines to one or replace with tape cassette of larger tape width There are already five blocks of text Limit the number of blocks to five The maximum number of characters have already been entered Edit the text and use fewer characters The length of the label to be printed using the text entered is longer than 39 37 1 m Edit the text so that the length of the label is less...

Страница 79: ...ected Install an 9 64 3 5mm tape cassette The maximum number of characters for the selected layout have already been entered Edit the text to use fewer characters or use a different layout The value entered for setting the tape length tab length multiple copies numbering function or clock setting is invalid Enter a valid value for the setting The tape length set using the tape length setting is sh...

Страница 80: ...d in the bar code data does not match the number of digits set in the bar code parameters Enter the correct number of digits The bar code data entered does not have the required start stop code A B C or D required at the beginning and end of the bar code data for the CODABAR protocol Enter the bar code data correctly There are already 5 bar codes entered in the text data when you try to enter a ne...

Страница 81: ...8 mm tape 1 5 lines 1 2 12 mm tape 1 3 lines 3 8 9 mm tape 1 2 lines 1 4 6 mm tape 1 2 lines 9 64 3 5mm tape 1 line Print direction Horizontal Vertical Continuous printing 1 99 labels Print preview Yes Cut and feed Large Margin Small Margin Chain No Cut Characters Internal character set Total of 329 characters 62 alphanumeric 120 symbols 147 accented characters note that one character appears in b...

Страница 82: ...2 1 0 1 2 Power Supply Power supply AC adapter AD 24 Eight AA size alkaline batteries LR6 Auto Power off Battery 5 min AC adapter 8 hours When using P touch only When connected to a PC 1 hour Size Dimensions 7 06 W x 9 75 D x 2 82 H 179 5mm W x 247 9mm D x 71 8mm H Weight 1 87lb 850g without tape cassette and batteries Other Operating temperature humidity 10 35 C 50 95 F 20 80 humidity without con...

Страница 83: ...uired Hard disk 70MB or more required Monitor SVGA High Color graphics support or higher Interface USB Port USB specification 1 1 or 2 0 protocol Other CD ROM drive for installation Item Specification OS Mac OS X 10 1 10 4 4 Mac OS X 9 1 9 X For Mac OS 9 1 9 X visit our web site http solutions brother com for software and driver download Memory 32MB or more required Hard disk 100MB or more require...

Страница 84: ...ite on Black 31 99 TZ 451 Black on Red 28 99 TZ 651 Black on Yellow 28 99 TZ B51 Black on Fluorescent Orange 16 4 ft 5 m tape length 35 99 TZ D51 Black on Fluorescent Green 16 4 ft 5 m tape length 35 99 3 4 18mm wide laminated tapes TZ 141 Black on Clear 22 99 TZ 241 Black on White 24 99 TZ 242 Red on White 24 99 TZ 243 Blue on White 24 99 TZ 344 Gold on Black 28 99 TZ 345 White on Black 28 99 TZ ...

Страница 85: ... 16 99 TZ 221 Black on White 19 99 TZ 222 Red on White 19 99 TZ 223 Blue on White 19 99 TZ 325 White on Black 22 99 1 4 6mm wide laminated tapes TZ 111 Black on Clear 14 99 TZ 211 Black on White 16 99 TZ 315 White on Black 20 99 Stock No Description Price Stock No Description Price 3 4 18mm wide non laminated tapes TZ N641 Black on Yellow 21 99 TZ N541 Black on Blue 21 99 TZ NF41 Black on Purple 2...

Страница 86: ... 4 18 mm wide laminated tapes TZ S141 Black on Clear 27 99 TZ S241 Black on White 27 99 TZ S641 Black on Yellow 27 99 TZ SM941 Black on Matt Silver 31 99 1 2 12 mm wide laminated tapes TZ S131 Black on Clear 23 99 TZ S231 Black on White 23 99 TZ S631 Black on Yellow 23 99 3 8 9mm wide laminated tapes TZ S221 Black on White 21 99 1 4 6 mm wide laminated tapes TZ S211 Black on White 19 99 Stock No D...

Страница 87: ...rwise noted Prices and availability of accessories subject to change without notice Stock No Description Price TZ FA3 1 2 12 mm Navy Blue on White Fabric Iron on Tape 9 8ft 3 m tape length 34 95 Stock No Description Price TZ CL4 3 4 18 mm Print head cassette approx 100 uses 20 99 Stock No Description Price AD 60 34 95 AD 24 29 99 ...

Страница 88: ...t only 25 E entering symbols 26 text 24 uppercase letter 24 F Feed Cut function 21 fonts 32 formatting character attributes 31 label attributes 36 K Keyboard 13 L length 36 line 31 Line number 13 M Manual Cutting 64 N new line 24 P Power Supply 16 R Return mark 13 S size 31 style 31 Symbol List 28 symbols 26 T tape cassettes 18 tape length 13 text entering and editing 24 lines 24 U uppercase lette...

Страница 89: ...select the desired items 2 Complete the order form indicating the quantity of each item for your records 3 Enter the total on the Supply Accessory Total line below for your records 4 Add appropriate sales tax and shipping handling costs for your records 5 Have your Visa or MasterCard number and expiration date available G S T R100663764 P S T 100100117TQ0001 Prices subject to change without notice...

Страница 90: ......

Страница 91: ...select the desired items 2 Complete the order form indicating the quantity of each item for your records 3 Enter the total on the Supply Accessory Total line below for your records 4 Add appropriate sales tax and shipping handling costs for your records 5 Have your Visa or MasterCard number and expiration date available G S T R100663764 P S T 100100117TQ0001 Prices subject to change without notice...

Страница 92: ......

Страница 93: ...GUIDEDEL UTILISATEUR RUBAN RUBAN ELECTRONIC LABELING SYSTEM ELECTRONIC LABELING SYSTEM SYSTÈME D ÉTIQUETAGE ÉLECTRONIQUE ENTRETIEN DU P 10 ...

Страница 94: ...ues de commerce de Microsoft Corporation États Unis Macintosh et Mac OS sont des marques de commerce déposées d Apple Computer Inc Les dénominations d autres logiciels ou produits utilisés dans ce document représentent les marques de commerce ou les marques enregistrées des sociétés qui les ont développées ...

Страница 95: ...ise sous hors fonction 20 Avance du ruban 21 Écran à cristaux liquides 21 Contraste de l écran à cristaux liquides 21 Mode d affichage 22 Rétro éclairage 22 Régler les langues et l unité 23 Langue 23 Unité 23 ÉDITION DE L ÉTIQUETTE 24 Saisie et édition de texte 24 Saisie du texte au clavier 24 Ajout d une nouvelle ligne 24 Ajout d un nouveau bloc 24 Déplacement du curseur 24 Insertion de texte 25 ...

Страница 96: ...ancement 53 Création d une étiquette de codes à barres 54 Réglage des paramètres de codes à barres 54 Saisie des données de codes à barres 55 Édition et suppression d un code à barres 57 IMPRESSION D ÉTIQUETTES 58 Prévisualisation de l étiquette 58 Impression d une étiquette 58 Impression d un seul exemplaire 59 Impression de copies multiples 59 Étiquettes à numérotation automatique 60 Impression ...

Страница 97: ... 5 6 7 8 9 3 z INTRODUCTION FRANÇAIS Nettoyage de la tête d impression 70 Nettoyage du coupe ruban 71 DÉPANNAGE 72 Quoi faire quand 72 Messages d erreur 75 ANNEXE 79 Fiche technique 79 Accessoires 82 INDEX 86 ...

Страница 98: ...ctions de numérotation automatique Créer une étiquette avec P touch Préparer le P touch Saisir le texte de l étiquette Imprimer l étiquette Ce que vous pouvez faire 1 Insérer les batteries et ou brancher l adaptateur secteur Placer une cassette P 16 P 18 P 20 Allumer le P touch 2 En plus de la saisie de textes le P touch offre toute une gamme de fonctions d édition Entrez le texte de l étiquette à...

Страница 99: ...e USB Allumer le P touch 3 Démarrer P touch Quick Editor Saisir le texte de l étiquette à l aide du P touch Quick Editor Aide avec le logiciel Aide avec le logiciel Cliquez sur la zone de mise en page puis saisissez le texte 4 Cliquer sur le bouton Imprimer L étiquette est imprimée Aide avec le logiciel Aide avec le logiciel Le P touch Quick Editor logiciel d édition d étiquettes simples est idéal...

Страница 100: ...uch contacter le revendeur ou le centre de service autorisé le plus proche Si l endommagement a été provoqué lors du démontage ou de la réalisation de modifications directement par le consommateur Brother fournira un service au frais de l usager que la garantie soit encore valide ou non Ne pas laisser tomber frapper ou cogner le P touch Ne toucher aucune des pièces métalliques situées près de la t...

Страница 101: ...humidité important comme la salle de bain S assurer que la fiche secteur est complètement insérée dans la prise d alimentation Ne pas utiliser une prise desserrée ATTENTION Pile Veuillez noter les points suivants pour éviter les fuites le réchauffement ou la rupture de la pile Ne pas mélanger des nouvelles piles et des vielles Ne pas mélanger des piles alcalines avec d autres types de piles Ne pas...

Страница 102: ...ché pendant plus de deux minutes tous les paramètres de texte et de format seront perdus Tous les fichiers texte stockés dans la mémoire et les paramètres d heure seront également perdus Ruban En fonction des conditions environnantes du matériau et de la condition de la surface où le collage se fait il arrive que l étiquette se décolle ou que sa couleur se modifie Lorsque vous retirez les étiquett...

Страница 103: ... élevées à une humidité élevée ou à la poussière Plage de température standard de fonctionnement 10 C to 35 C 50 F to 95 F Il est recommandé d utiliser le câble USB fourni avec le P touch En cas d utilisation d un autre câble USB s assurer de la qualité de ce dernier Faire attention à ne pas effacer le CD ROM Ne pas mettre le CD ROM à un endroit exposé à des températures basses ou élevées Ne pas m...

Страница 104: ...tique copies multiples Pour ajouter la date et l heure sur les étiquettes Fonction Heure et date Sauvegarder la mise en page de l étiquette Fonction mémoire des fichiers 1 2 3 ABC auto format function ABC ABC ABC Court index Court index Cette section fournit un accès rapide et facile aux informations sur les tâches souvent exigées par les utilisateurs Il ne faut que chercher votre tâche ci dessous...

Страница 105: ...E FRANÇAIS DÉMARRAGE Vérifier que le paquet contient les articles suivants avant d utiliser votre P touch Déballer votre P touch P touch PT 2700 Cassette à ruban TZ CD ROM Câble USB Adaptateur secteur Guide de l utilisateur Guide d installation du logiciel ...

Страница 106: ...ette feuille avant d utiliser le P touch Couvercle du compartiment de la cassette Fente de sortie du ruban Clavier Visionneuse de ruban Écran à cristaux liquides Compartiment de la cassette Coupe ruban Tête d impression Levier de dégagement Connecteur pour l adaptateur de courant alternatif Port USB Couvercle du compartiment des piles Couvercle des piles ...

Страница 107: ...que que le mode Maj est activé 5 8 Guide de style Indique les réglages courants de la police des caractères 5 de la dimension des caractères du style des caractères 7 et du cadre 8 9 Longueur ruban Indique la longueur du ruban pour le texte saisi 10 Sélection du curseur Indique qu il est possible d utiliser les touches curseur afin de sélectionner les articles présents à l écran Employer les touch...

Страница 108: ...boles ou des caractères accentués 4 Échappement Annule la commande courante et fait retourner l afficheur à l écran de saisie de données ou à l étape précédente 5 Fait imprimer sur le ruban le dessin de l étiquette courante Ouvre le menu Options d impression si elle est utilisée avec la touche 6 Fait afficher un aperçu de l étiquette Fait avancer 0 92 23 mm de ruban vierge puis coupe automatiqueme...

Страница 109: ...des majuscules ou les symboles indiqués sur les touches numériques 17 Utiliser cette touche pour sélectionner et saisir un symbole de la liste de symboles disponibles 18 Effacement arrière Efface le caractère à gauche du curseur Efface tous les textes saisis ou tous les textes et les paramètres actuels d étiquette quand elle est utilisée en combinaison avec la touche 19 Fait entrer une nouvelle li...

Страница 110: ...23 Fermer le couvercle du compartiment des piles en insérant les trois crochets arrière dans les fentes de la machine puis presser fermement jusqu à encliquetage Bloc d alimentation S assurer que l unité est bien éteinte lors de l insertion des piles 1 Toujoursremplacerleshuit batteriesenmême temps 2 3 Retirer les piles si vous ne pensez pas utiliser le P touch pendant une période prolongée Lorsqu...

Страница 111: ...r le P touch Si cette instruction n est pas respectée un accident ou des dommages peuvent se produire Brother ne sera tenue responsable d aucun accident ou endommagement résultant de l utilisation d un autre adaptateur de courant alternatif que celui spécifié Ne pas brancher l adaptateur de courant alternatif à une prise électrique non standard Si cette instruction n est pas respectée un accident ...

Страница 112: ... déjà une cassette dans la machine la retirer en la tirant vers le haut Insérer la cassette dans le compartiment correspondant avec la fin du ruban en face de la fente de sortie du ruban de la machine ensuite appuyer fermement jusqu à encliquetage Insertion de la cassette Si la nouvelle cassette est équipée d une butée s assurer de la retirer avant d insérer la cassette WATNLATION Fin de ruban Gui...

Страница 113: ...vancer le ruban afin d annuler tout écart du ruban et du ruban encreur après avoir effectué la mise en place de la cassette Se reporter à Avance du ruban à la page 21 Ne pas tirer l étiquette qui sort de la fente de sortie du ruban Cette action mènera à la décharge du ruban encreur avec le ruban Stocker les cassettes dans un endroit frais et sombre à l abri de la lumière directe du soleil de la po...

Страница 114: ...endant une période prolongée et dans certaines conditions de fonctionnement Se reporter au tableau Temps de mise hors tension automatique pour plus de détails Si des piles sont insérées ou que le P touch est connecté à une prise électrique à l aide de l adaptateur de courant alternatif les informations de la session précédente seront affichées lors de la mise sous tension P touch uniquement Connec...

Страница 115: ... sur la touche ou Sélectionner le niveau de contraste à l aide de la touche ou Le contraste de l écran change chaque fois que l on appuie sur la touche ou vous permettant de régler le contraste le plus adéquat Appuyer sur les touches ou Avance du ruban S assurer de faire avancer le ruban afin d annuler tout écart du ruban et du ruban encreur après avoir effectué la mise en place de la cassette Ne ...

Страница 116: ...x voir l affichage Par défaut il est allumé Écran de saisie de texte guidage 2 lignes 3 lignes guidage 1 ligne Affichage de l horloge Il est également possible de modifier l affichage de l horloge dans l écran de saisie des textes guidage 2 lignes de texte en pressant n importe quelle touche du clavier sauf et Pour régler l horloge sur la date et l heure actuelles veuillez consulter Réglage de l h...

Страница 117: ...e ou ensuite appuyer sur la touche ou Sélectionner une langue à l aide de la touche ou Appuyer sur les touches ou Unité Sélectionner les unités pouce ou mm pour les dimensions indiquées à l écran ACL Le réglage par défaut est pouce Appuyer sur la touche pour afficher le menu Configuration sélectionner Unité à l aide de la touche ou ensuite appuyer sur la touche ou Sélectionner une unité à l aide d...

Страница 118: ...e curseur se déplace vers le début du nouveau bloc Déplacement du curseur Pour déplacer le curseur à gauche à droite en haut ou en bas appuyer sur les touches ou Chaque appui du curseur lui permet de se déplacer d une espace ou d une ligne Afin de déplacer le curseur au début ou à la fin de la ligne courante maintenir enfoncée la touche ensuite appuyer sur la touche ou Afin de déplacer le curseur ...

Страница 119: ... touche Suppression du texte entier à la fois Utiliser les touches et pour supprimer tout le texte à la fois Presser la touche tout en maintenant la touche enfoncée Les options d effacement sont affichées À l aide des touches ou sélectionner Txt seulement afin de supprimer l ensemble du texte tout en conservant les réglages courants de formatage ou sélectionner Txt Format afin de supprimer l ensem...

Страница 120: ...er ensuite sur la touche souhaitée Saisie de symboles à l aide de la fonction Symbole Appuyer sur la touche Une liste des catégories de symboles et des symboles de cette catégorie s affiche Sélectionnez une catégorie de symbole Ponctuation Affaires Mathématiques etc avec la touche ou en appuyant plusieurs fois sur la touche puis en sélectionnant un symbole avec les touches ou Appuyer sur les touch...

Страница 121: ... à jour du symbole puis sélectionner On pour créer la catégorie personnelle en utilisant les touches ou Appuyer sur les touches ou pour appliquer le paramètre L écran revient vers l écran de saisie de texte Saisir le symbole à ajouter à la catégorie personnelle Appuyer sur la touche La Catégorie personnelle apparaît incluant le symbole saisi à l étape 4 1 2 3 Se reporter à Saisie de symboles à l a...

Страница 122: ...e à jour des symboles à la page 27 pour plus de détails Ponctuation Économique Mathématiques Parenthèse Flèche Unité International Nombre Graphique Électrique Autres L utilisation du marquage CE est strictement gouverné par une ou plusieurs directives du Conseil européen Les étiquettes comprenant cemarquagedoivent êtreconformesauxdirectives en vigueur ...

Страница 123: ...uche jusqu à l obtention du caractère accentué souhaité ou le sélectionner en utilisant les touches ou Appuyer sur les touches ou Le caractère composé sélectionné est inséré dans la ligne de texte Saisie des caractères accentués Le mode Maj peut être utilisé avec la fonction Accent 1 2 L ordre des caractères composés qui apparaissent à l écran dépend de la langue choisie pour l écran ACL 3 4 Appuy...

Страница 124: ... DE L ÉTIQUETTE 30 Saisie des caractères accentués zListe des caractères accentuész Caractère Caractères accentués Caractère Caractères accentués a n A N c o C O d r D R e s E S g t G T i u I U k y K Y l z L Z ...

Страница 125: ...r vers la ligne où vous voulez modifier l attribut de caractère en utilisant les touches ou Appuyez ensuite sur la touche tout en maintenant enfoncée la touche pour afficher les attributs indique que vous appliquez l attribut uniquement à cette ligne particulière Réglage des attributs de caractères 1 2 Les nouveaux réglages NE sont PAS appliqués si l on n appuie pas sur les touches ou 3 Appuyer su...

Страница 126: ...N DE L ÉTIQUETTE 32 Réglage des attributs de caractères zOptions de réglagez Attribut Valeur Résultat Police HEL Helsinki BRU Bruxelles US USA FLO Floride BEL Belgique SGO San Diego LA Los Angeles CAL Calgary ...

Страница 127: ...s de caractères FRANÇAIS Taille Auto Quand le mode Auto est sélectionné le texte est automatiquement adapté à la plus large impression possible pour chaque largeur de la bande 48pt 42pt 36pt 24pt 18pt 12pt 9pt 6pt Largeur x2 x3 2 x1 x2 3 x1 2 Attribut Valeur Résultat ...

Страница 128: ...aractères Style Off Gras Gras Cont Contour Ombr Ombre Solid Solide Italiq Italique I Gras Italique gras I Cont Italique contouré I Omb Italique ombré I Solid Italique solide Vrticl Vertical Ligne Off Soulig Souligné Barré Biffure Attribut Valeur Résultat ...

Страница 129: ...aille du paramètre x1 2 Si une réduction plus importante de la taille est nécessaire afin de mieux adapter le texte à la longueur de l étiquette sélectionnée la taille totale du texte sera modifiée après avoir réduit le texte au paramètre x1 2 Appuyer sur la touche pour afficher le menu Configuration sélectionner Style auto à l aide des touches ou ensuite appuyer sur les touches ou L écran Style a...

Страница 130: ...es réglages courants sont affichés à l écran Sélectionner un attribut à l aide de la touche ou ensuite régler une valeur pour cet attribut à l aide de la touche ou Appuyer sur les touches ou pour appliquer les paramètres Réglage des attributs d étiquette 1 Lors du réglage de la longueur de l étiquette ou de la tabulation maintenir les touches ou enfoncées pour modifier plus rapidement la valeur 2 ...

Страница 131: ...1 2 3 4 5 6 7 8 9 37 z ÉDITION DE L ÉTIQUETTE Réglage des attributs d étiquette FRANÇAIS zOptions de réglagez Attribut Valeur Résultat Cadre Off 1 2 3 4 5 6 7 8 9 10 11 12 13 14 15 ...

Страница 132: ...r afficher l écran de Formatage automatique ensuite sélectionner Modèles à l aide des touches ou Appuyer sur la touche ou Le dernier modèle sélectionné est affiché à l écran Cadre 16 17 18 19 20 Long La longueur de l étiquette peut être réglée dans la plage 1 2 30 mm 12 0 300 mm Quand le mode Auto est sélectionné la longueur de l étiquette est automatiquement adaptée à la quantité de texte saisie ...

Страница 133: ...ée du texte modèle s affiche Saisir le texte puis presser sur les touches ou Répéter cette opération pour chaque champ de texte Après avoir saisi tous les champs de texte le menu d impression s affiche lorsque les touches ou sont pressées Sélectionner Imprimer à l aide des touches ou et appuyer ensuite sur les touches ou afin d imprimer l étiquette 3 4 5 6 L attribut C Chiffre Check Digit est uniq...

Страница 134: ...enu d impression est affiché puis presser la touche pour afficher le menu des options d impression Si la largeur du ruban de la cassette courante ne correspond pas à la largeur réglée pour la mise en page sélectionnée un message d erreur s affichera à l écran si l on essaie d imprimer l étiquette Appuyer sur la touche ou sur toute autre touche afin d effacer le message d erreur et insérer une cass...

Страница 135: ... 6 24 mm x 219 mm Classeur 2 3 4 x 8 6 18 mm x 219 mm Onglet de dossier 1 2 x 3 2 12 mm x 82 mm Onglet de séparation Dossier suspendu 1 2 x 1 6 12 mm x 42 mm Étiquette de suivi 3 4 x 2 7 18 mm x 70 mm Corbeille 3 4 x 3 0 18 mm x 76 mm Étiquette d équipement 1 x 2 2 24 mm x 58 mm Dalle VRT 1 2 x 2 7 12 mm x 70 mm Nappe 1 1 x 1 5 24 mm x 39 mm Nappe 2 3 4 x 1 5 18 mm x 39 mm ...

Страница 136: ... Badge Nom 1 1 x 2 8 24 mm x 72 mm Badge Nom 2 3 4 x 2 8 18 mm x 72 mm Badge Nom 3 1 2 x 2 8 12 mm x 72 mm Tranche boîte CD 1 1 4 x 4 4 6 mm x 113 mm Tranche boîte CD 2 9 64 x 4 4 3 5 mm x 113 mm Tranche VHS 3 4 x 5 5 18 mm x 140 mm Tranche MiniDV 3 8 x 1 7 9 mm x 42 mm Attribut Valeur Détails ...

Страница 137: ... la première mise en page de bloc pour la nouvelle largeur du ruban est affichée à l écran Sélectionner une mise en page de bloc à l aide des touches ou Appuyer sur les touches ou L écran Style s affiche Sélectionner un attribut à l aide de la touche ou ensuite régler une valeur pour cet attribut à l aide de la touche ou Appuyer sur les touches ou L écran d entrée texte de mise ne page de bloc s a...

Страница 138: ... le texte Pour imprimer plusieurs copies des copies numérotées séquentiellement ou une image miroir de l étiquette maintenir la touche enfoncée alors que le menu d impression est affiché puis presser la touche pour afficher le menu des options d impression Si la largeur du ruban de la cassette courante ne correspond pas à la largeur réglée pour la mise en page sélectionnée un message d erreur s af...

Страница 139: ...E L ÉTIQUETTE Utilisation des mises en page à formatage automatique FRANÇAIS zMises en page des blocsz Attribut Valeur Détails Mise en page de bloc ruban de 1 24 mm 2LigneA 2LigneB 3Ligne 1 2LigneA 1 2LigneB 1 3Ligne 1 4Ligne 1 5Ligne ...

Страница 140: ...mises en page à formatage automatique Mise en page de bloc ruban de 3 4 18 mm 2LigneA 2LigneB 3Ligne 1 2LigneA 1 2LigneB 1 3Ligne 1 4Ligne 1 5Ligne Mise en page de bloc ruban de 1 2 12 mm 2LigneA 2LigneB 3Ligne 1 2Ligne Attribut Valeur Détails ...

Страница 141: ...z ÉDITION DE L ÉTIQUETTE Utilisation des mises en page à formatage automatique FRANÇAIS Mise en page de bloc ruban de 3 8 9 mm 2LigneA 2LigneB 1 2Ligne Mise en page de bloc ruban de 1 4 6 mm 1 2Ligne Attribut Valeur Détails ...

Страница 142: ...er Réglages de l horloge à l aide des touches ou puis appuyer sur les touches ou L écran Réglages de l horloge est affiché Régler année mois date heure et minute à l aide des touches ou Pour passer au paramètre suivant utiliser les touches ou Appuyer sur les touches ou pour appliquer les paramètres Utilisation de la fonction Date et heure 1 Il est aussi possible d utiliser les touches numériques p...

Страница 143: ...age 22 pour plus de détails Appuyer sur la touche pour afficher le menu Configuration sélectionner Format date et heure à l aide des touches ou puis appuyer sur les touches ou L écran Format date et heure est affiché Sélectionner la date et l heure à l aide des touches ou puis paramétrer le format à l aide des touches ou Appuyer sur les touches ou pour appliquer les paramètres 1 2 Les nouveaux par...

Страница 144: ...née déc 31 2099 Mois Date Année 2099 12 31 Année Mois Date 2099 12 31 Année Mois Date 31 12 2099 Date Mois Année 31 12 2099 Date Mois Année 31 12 2099 Date Mois Année 31 décembre 2099 Date Mois Année 31 déc 2099 Date Mois Année H Heure 11 59 PM analogique 23 59 numérique L heure et la date utilisées sont un exemple Quand un format est sélectionné la date et l heure réglées dans le réglage de l hor...

Страница 145: ...nte Presser la touche pour rétablir le paramètre de format par défaut Se reporter aux options d horodatage datage pour les paramètres disponibles Attribut Valeur Description Heure Auto Presser la touche une icône d horloge sera insérée où le curseur est placé sur l écran de saisie du texte Quand vous pressez la touche la dernière date heure sera imprimée sur l étiquette où l icône d horloge est po...

Страница 146: ...aide des touches ou puis sélectionner la valeur pour le paramètre en utilisant les touches ou Appuyer sur les touches ou pour appliquer les paramètres zOptions d horodatage formatsz 1 2 3 Appuyer sur la touche afin de retourner à l étape précédente Presser la touche pour rétablir la valeur par défaut Se reporter aux options d horodatage format pour les paramètres disponibles Attribut Valeur Descri...

Страница 147: ...e mois de semaines de jours d heures et de minutes à augmenter à partir de l horloge courante lors de l utilisation de la fonction de Date et Heure à l aide des touches ou Pour passer au paramètre suivant utiliser les touches ou Appuyer sur les touches ou pour appliquer les paramètres zOptions d horodatage avancementz 1 2 Il est aussi possible d utiliser les touches numériques pour ce faire 3 4 Ap...

Страница 148: ...vec de l encre noire sur un ruban blanc Il est possible que certains lecteurs de code à barres ne puissent lire les étiquettes de codes à barres créées à l aide d un ruban ou de l encre de couleur Utiliser le réglage Grand à Largeur si possible Il est possible que certains lecteurs de code à barres ne puissent lire les étiquettes code à barres créées avec le réglage Petit Si l on fait imprimer un ...

Страница 149: ...actères disponibles pour le protocole de courant s affiche Sélectionner un caractère à l aide des touches ou puis appuyer sur les touches ou afin d insérer le caractère dans les données de codes à barres Appuyer sur les touches ou afin d insérer le code à barres sur l étiquette Deux marquages de codes à barres sont affichés dans l écran de saisie de texte Attribut Valeur Protocole CODE39 CODE128 E...

Страница 150: ...églages disponibles Code Caractère spécial Code Caractère spécial 0 0 1 1 2 ESPACE 2 3 3 4 4 5 5 6 Code Caractère spécial Code Caractère spécial Code Caractère spécial 0 ESPACE 24 48 DC3 1 25 49 DC4 2 26 50 NAK 3 27 51 SYN 4 28 NUL 52 ETB 5 29 53 CAN 6 30 SOH 54 EM 7 31 STX 55 SUB 8 32 ETX 56 ESC 9 33 EOT 57 10 34 ENQ 58 FS 11 35 ACK 59 12 36 BEL 60 GS 13 37 BS 61 14 38 HT 62 RS 15 39 LF 63 16 40 ...

Страница 151: ...r les réglages Largeur et Sous pour un code à barres déjà placé sur l écran positionner le curseur sous l un des deux marquages de codes à barres à l écran de saisie de données et ouvrir ensuite l écran de Régl Code barre Se reporter à Réglage des paramètres de codes à barres à la page 54 Afin de supprimer le code à barres d une étiquette positionner le curseur sur la droite des marquages de codes...

Страница 152: ...ler l aperçu à droite ou à gauche maintenir enfoncée la touche et appuyer sur la touche ou Pour imprimer l étiquette directement à partir de l écran de prévisualisation appuyer sur la touche ou ouvrir l écran des options d impression puis sélectionner une option d impression Se reporter au chapitre Impression d une étiquette ci dessous pour des détails L aperçu avant impression est une image génér...

Страница 153: ... à l aide des touches numériques Appuyer sur les touches ou Le message sur la droite est affiché tant et aussi longtemps que les étiquettes sont imprimées 1 2 Pour arrêter l impression appuyer sur la touche pour mettre le P touch hors fonction Il y a aussi d autres messages qui peuvent apparaître à l appui de la touche Veuillez vous reporter à Messages d erreur à la page 75 pour obtenir plus d inf...

Страница 154: ... caractère à augmenter dans la séquence de numérotation et appuyer sur les touches ou L écran du point final de la numérotation s affiche Déplacer le curseur au dernier caractère à augmenter dans la séquence de numérotation et appuyer sur les touches ou Le nombre d étiquettes à imprimer s affiche Sélectionner le nombre d étiquettes à imprimer à l aide des touches ou ou le saisir directement à l ai...

Страница 155: ...ession indiquent le compte nombre de copies Presser la touche lors de la sélection du nombre de copies pour rétablir la valeur par défaut de 1 La numérotation automatique peut également s appliquer aux codes à barres Lorsqu un code à barres contient une séquence de numérotation automatique aucun autre champ de l étiquette ne pourra contenir une autre séquence de numérotation automatique La portion...

Страница 156: ...er le menu Étiquette Sélectionner Couper Option à l aide des touches ou et saisir la valeur à l aide des touches ou Appuyer sur les touches ou pour appliquer les paramètres 4 Appuyer sur la touche afin de retourner à l étape précédente Le texte devrait être imprimé sur un ruban vierge si la fonction d impression en miroir est utilisée Les fonctions de numérotation automatique et de copie ne seront...

Страница 157: ...ors de l impression de plusieurs étiquettes en continu fait automatiquement couper un morceau de ruban vierge avant de couper la première étiquette ensuite fait couper le ruban après l impression de chaque étiquette Les étiquettes ont une marge de 0 16 4 mm aux bouts droit et gauche Le ruban n est pas avancé et coupé après l impression de la dernière étiquette Non coupe Utiliser ce paramètre pour ...

Страница 158: ... ou pour appliquer le paramètre Vous pouvez régler la longueur de l étiquette imprimée à des niveaux 5 à 5 Appuyer sur la touche Les réglages courants sont affichés à l écran Sélectionner Ajstr la longueur à l aide des touches ou et saisir la valeur à l aide des touches ou Appuyer sur les touches ou pour appliquer le paramètre Coupure manuelle 1 2 3 Appuyer sur la touche afin de retourner à l étap...

Страница 159: ...on des étiquettes 1 2 3 L endossure de certains types de rubans peut être pré coupée afin de faciliter son enlèvement Les étiquettes peuvent avoir des difficultés à adhérer aux surfaces humides sales ou irrégulières Les étiquettes peuvent facilement se décoller de ce genre de surfaces S assurer de lire les instructions fournies avec les cassettes à ruban textile thermocollant à ruban adhésif extra...

Страница 160: ...é et l écran revient à l écran d entrée texte Quand la mémoire des fichiers est pleine à chaque fois que vous sauvegarderez un nouveau fichier vous devrez écraser l un des fichiers stockés Vous perdrez vos fichiers stockés si l adaptateur c a est débranché et les piles retirées pendant plus d une minute Stocker une étiquette dans la mémoire 1 2 3 Quand un fichier est déjà stocké sous le numéro sél...

Страница 161: ... Le numéro de fichier d une étiquette stockée s affiche Le texte de l étiquette est également affiché pour identifier l étiquette Sélectionner un numéro de fichier à l aide des touches ou ensuite appuyer sur la touche ou pour ouvrir le fichier sélectionné Le fichier est ouvert et affiché à l écran d entrée texte Ouvrir un fichier d étiquette stocké 1 2 3 4 Appuyer sur la touche afin de retourner à...

Страница 162: ...che Le texte de l étiquette est également affiché pour identifier l étiquette Sélectionner un numéro de fichier à l aide des touches ou ensuite appuyer sur la touche ou pour ouvrir le fichier sélectionné L étiquette est imprimée à partir de la machine Imprimer un fichier d étiquette stocké 1 2 3 4 Appuyer sur la touche afin de retourner à l étape précédente Le message Pas de texte s affiche quand ...

Страница 163: ...e s affiche Le texte de l étiquette est également affiché pour identifier l étiquette Sélectionner un numéro de fichier à l aide de la touche ou ensuite appuyer sur la touche ou Le message Effacer s affiche Appuyer sur la touche ou pour supprimer le fichier Le fichier est supprimé et l écran revient à l écran d entrée texte Supprimer un fichier d étiquette stocké 1 2 3 4 5 Appuyer sur la touche po...

Страница 164: ... de racle ou les caractères mal imprimés des étiquettes indiquent généralement que la tête d impression est sale Nettoyer la tête d impression à l aide d un coton tige ou de la cassette optionnelle de nettoyage de la tête d impression TZ CL4 Réinitialisation du P touch 1 Relâcher la touche avant de relâcher les autres touches À l occasion du réarmement du P touch tous les textes les réglages de fo...

Страница 165: ...u ruban peut s accumuler sur le couteau après plusieurs utilisations usant la lame du couteau ce qui peut entraîner le blocage du ruban dans le coupe ruban Environ une fois par an essuyer le couteau à l aide d un coton tige imbibé d alcool Ne pas toucher le couteau du coupe ruban avec les mains nues ...

Страница 166: ...s installées correctement Retirer et réinstaller les piles Les messages sur l écran ACL sont affichés dans une langue étrangère La langue est elle configurée correctement Se reporter à Régler les langues et l unité à la page 23 et sélectionner la langue souhaitée pour les messages sur l écran ACL L étiquette ne s imprime pas après que vous ayez appuyé sur la touche Est ce que le texte a été saisi ...

Страница 167: ...che et presser la touche pour faire avancer et couper le ruban Le ruban encreur est séparé du rouleau encreur Est ce que le ruban encreur de la cassette est desserré ou avez vous tiré l étiquette sortant de la fente de sortie du ruban Si le ruban encreur est cassé remplacer la cassette Sinon ne pas couper le ruban et retirer la cassette ensuite rouler le ruban encreur desserré sur la bobine comme ...

Страница 168: ...d autres rubans veuillez consulter Coupure manuelle à la page 64 et configurer la Coupure manuelle sur OFF pour couper le ruban automatiquement Les fichiers d étiquettes sauvegardés antérieurement sont maintenant vides Est ce que les piles et l adaptateur de courant alternatif ont été déconnectés Toutes les données stockées dans la mémoire interne sont perdues si les piles et l adaptateur de coura...

Страница 169: ...pe ruban est fermé lorsque vous essayez d imprimer ou de faire avancer le ruban Mettre le P touch hors tension puis le remettre sous tension avant de continuer Lorsque le ruban est emmêlé dans le coupe ruban l enlever Il n y a pas de texte de symboles ou de codes à barres saisis lorsque vous essayez d imprimer ou de prévisualiser l étiquette Saisir les données avant de continuer Il n y a pas de ca...

Страница 170: ...s à une seule ou remplacer avec une cassette plus large Il y a déjà cinq blocs de texte Limiter le nombre de blocs à cinq Le nombre maximal de caractères a été déjà introduit Éditer le texte afin d utiliser moins de caractères La longueur de l étiquette à imprimer à partir du texte saisi est supérieure à 39 37 1 m Éditer le texte pour que la longueur de l étiquette soit inférieure à 39 37 1 m La c...

Страница 171: ... mm Une cassette à ruban de 9 64 3 5 mm n est pas mise en place lorsque le Formatage automatique pour le ruban 9 64 3 5 mm est sélectionné Installer une cassette à ruban de 9 64 3 5 mm Le nombre maximal de caractères pour la mise en page sélectionnée a été déjà introduit Éditer le texte afin d utiliser moins de caractères ou utiliser une mise en page différente La valeur saisie pour configurer la ...

Страница 172: ...ires afin de créer plus de mémoire disponible pour le nouveau fichier d étiquette Le nombre de chiffres saisi dans les données de code à barres ne correspond pas au nombre de chiffres réglé aux paramètres de code à barres Saisir le nombre correct de chiffres Les données de code à barres saisies n ont pas le code de démarrage arrêt exigé A B C ou D exigé au début et à la fin des données de code à b...

Страница 173: ...lignes ruban de 1 2 12 mm 1 3 lignes ruban de 3 8 9 mm 1 2 lignes ruban de 1 4 12 mm 1 2 lignes ruban de 9 64 3 5 mm 1 ligne Direction d impression Horizontale verticale Impression en continu 1 99 étiquettes Aperçu avant impression Oui Coupure et avance Grnd marge Petite marge Chaîne Non coupe Caractères Jeu de caractères internes Total de 329 caractères 62 alphanumériques 120 symboles 147 caractè...

Страница 174: ...2 1 0 1 2 Bloc d alimentation Bloc d alimentation Adaptateur c a AD 24 huit piles alcalines AA LR6 Mise hors tension automatique Pile 5 min adaptateur de courant alternatif 8 heures Uniquement pour le P touch Connecté à un PC 1 heure Dimension Dimensions 7 06 L x 9 75 L x 2 82 H 179 5 mm L x 247 9 mm P x 71 8 mm H Poids 1 87lb 850 g sans K7 ni pile Autres Température humidité de fonctionnement 10 ...

Страница 175: ...o ou plus Disque dur 70 Mo ou plus Moniteur Support graphique SVGA pleine couleur ou supérieur Interface Port USB protocole USB 1 1 ou 2 0 Autres Lecteur de CD ROM pour installation Article Fiche technique OS Mac OS X 10 1 10 4 4 Mac OS X 9 1 9 X Pour Mac OS 9 1 9 X visitez notre site Internet http solutions brother com pour télécharger logiciel et pilote Mémoire 32 Mo ou plus Disque dur 100 Mo ou...

Страница 176: ... 354 Or sur noir 31 99 TZ 355 Blanc sur noir 31 99 TZ 451 Noir sur rouge 28 99 TZ 651 Noir sur jaune 28 99 TZ B51 Noir sur orange fluo ruban de 5 m de longueur 35 99 TZ D51 Noir sur vert fluo ruban de 5 m de longueur 35 99 Rubans laminés de 3 4 18 mm de largeur TZ 141 Noir sur transparent 22 99 TZ 241 Noir sur blanc 24 99 TZ 242 Rouge sur blanc 24 99 TZ 243 Bleu sur blanc 24 99 TZ 344 Or sur noir ...

Страница 177: ...ur transparent 16 99 TZ 221 Noir sur blanc 19 99 TZ 222 Rouge sur blanc 19 99 TZ 223 Bleu sur blanc 19 99 TZ 325 Blanc sur noir 22 99 Rubans laminés de 1 4 6 mm de large TZ 111 Noir sur transparent 14 99 TZ 211 Noir sur blanc 16 99 TZ 315 Blanc sur noir 20 99 No article Description Prix No article Description Prix Rubans laminés de 3 4 18 mm de large TZ N641 Noir sur jaune 21 99 TZ N541 Noir sur b...

Страница 178: ...at 34 95 Rubans laminés de 3 4 18 mm de large TZ S141 Noir sur transparent 27 99 TZ S241 Noir sur blanc 27 99 TZ S641 Noir sur jaune 27 99 TZ SM941 Noir sur argent mat 31 99 Rubans laminés de 1 2 12 mm de large TZ S131 Noir sur transparent 23 99 TZ S231 Noir sur blanc 23 99 TZ S631 Noir sur jaune 23 99 Rubans laminés de 3 8 9 mm de large TZ S221 Noir sur blanc 21 99 Rubans laminés de 1 4 6 mm de l...

Страница 179: ... sauf en cas d indication contraire Disponibilité des prix et accessoires sujets aux modifications sans avis préalable No article Description Prix TZ FA3 Ruban en tissu bleu foncé sur blanc pouvant être apposé au fer 1 2 12 mm Ruban de 3 m de long 34 95 No article Description Prix TZ CL4 Cassette de tête d impression 3 4 18 mm environ 100 utilisations 20 99 No article Description Prix AD 60 34 95 ...

Страница 180: ...uts étiquette 36 L largeur 31 lettre majuscule 24 ligne 31 Liste des caractères accentués 30 Liste des symboles 28 longueur 36 longueur ruban 13 M Marquage de retour 13 Mode Maj 13 24 N nouvelle ligne 24 Numéro de ligne 13 S saisie lettre majuscule 24 symboles 26 texte 24 style 31 suppression texte et formatage 25 uniquement le texte 25 symboles 26 T Temps de mise hors tension automatique 20 texte...

Страница 181: ... ...

Страница 182: ......

Страница 183: ... ...

Страница 184: ......

Отзывы: