


13
Windows
®
Wired Network
Window
s
®
Macintosh
®
Wired Network
15
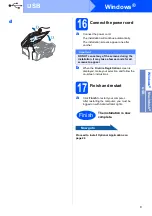
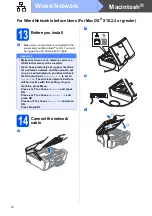
Connect the power cord
a
Connect the power cord.
16
Install MFL-Pro Suite
a
Put the supplied CD-ROM into your CD-ROM
drive. Follow the on-screen instructions.
b
The CD-ROM main menu will appear. Click
Install MFL-Pro Suite
.
c
Follow the on-screen instructions.
d
Choose
Wired Network Connection
, and
then click
Next
.
e
For Windows
®
XP SP2/Windows Vista
®
users,
when
Firewall detected
screen appears,
choose
Change the Firewall port settings to
enable network connection and continue
with the installation. (Recommended)
and
click
Next
.
If you are using a firewall other than Windows
®
Firewall see the instructions provided with your
firewall software for information on how to add
the following network ports.
For network scanning, add UDP port 54925.
For network PC-Fax receiving, add UDP port
54926.
If you still have trouble with your network
connection, add UDP port 137.
f
The installation of the Brother drivers will
automatically start. The installation screens
appear one after another.
g
When the
On-Line Registration
screen is
displayed, make your selection and follow the
on-screen instructions.
17
Finish and restart
a
Click
Finish
to restart your computer. After
restarting the computer, you must be logged on
with Administrator rights.
Now go to
Proceed to Install Optional Applications on
page 22.
Note
• If the machine is configured for your network,
choose the machine from the list, and then click
Next
.
If your machine shows
APIPA
in the
IP
Address
field, click
Configure IP Address
and enter an IP address for your machine that
is suitable for your network.
• If the machine is not yet configured for use on
your network, the screen prompts you to click
OK
, and then the
Configure IP Address
window will appear. Enter an IP address for
your machine that is suitable for your network
by following the on-screen instructions.
Finish
The installation is now
complete.


