


5-44
Confidential
(7) To adjust the left margin in 1,200 dpi, enter the measured value (in units of 0.1 mm)
multiplied by 10.
In this example, the right margin measured in step (1) is 0.9 mm, so press the
0
,
9
, and
OK
keys.
The "RIGHT2: 10" appears on the LCD.
(8) To adjust the right margin in 1,200 dpi, enter the measured value (in units of 0.1 mm)
multiplied by 10.
In this example, the right margin measured in step (1) is 1.2 mm, so press the
1
,
2
, and
OK
keys.
Upon completion of the entry, the machine automatically returns to the initial stage of the
maintenance mode.
(9) Go back to Printing the left, right and bottom margin check pattern, step (3) and print out
the left and right margin check pattern again.
(10) Measure the left and right margins on the printed pattern.
If both of the left and right margins are within the range from 0.9 to 1.1 mm, the adjustment
is completed.
Adjusting the bottom margin
(1) Measure the bottom margin on the "MEDIA CHECK" pattern printed in Printing the left,
right and bottom margin check pattern, step (3) above.
(Example) Bottom margin: 3.2 mm
If it is within the range from 2.9 to 3.1 mm, no adjustment is required. If not, go to step (2).
(2) If the bottom margin is out of the specified range, press the
6
key twice on the machine.
(3) Press the
Black Start
(
Mono Start
) key.
The "MEDIA SENSOR ADJ" appears on the LCD.
(4) Press the
#
key to display "BOTTOM :30."
(5) To adjust the bottom margin, enter the measured value (in units of 0.1 mm) multiplied by
10.
In this example, the bottom margin measured in step (1) is 3.2 mm, so press the
3
,
2
, and
OK
keys.
Upon completion of the entry, the machine automatically returns to the initial stage of the
maintenance mode.
(6)Go back to Printing the left, right and bottom margin check pattern, step (3) and print out the
check pattern again.
(7) Measure the bottom margin on the printed pattern.
If it is within the range from 2.9 to 3.1 mm, the adjustment is completed.
Note:
To reset the correction values newly entered in the above procedure, press the
6
,
6
,
Start
,
8
,
9
,
5
and
4
keys in this order in the initial stage of the maintenance mode. The machine shows
"PARAMETER INIT" on the LCD and returns to the initial stage of the maintenance mode.
Содержание MFC-J6510DW
Страница 11: ...viii Confidential REGULATION Federal Communications Commission FCC Declaration of Conformity USA only ...
Страница 15: ...xii Confidential ...
Страница 16: ...xiii Confidential ...
Страница 17: ...xiv Confidential ...
Страница 18: ...xv Confidential ...
Страница 19: ...xvi Confidential ...
Страница 128: ...3 3 Confidential 3 2 PACKING For models with paper tray 2 ...
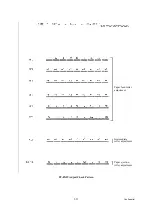
Страница 269: ...4 9 Confidential Head Inclination Test Pattern Upper single row of blocks Center two rows of blocks ...
Страница 273: ...4 13 Confidential EXIT Adjust Check Pattern 1 ...
Страница 274: ...4 14 Confidential EXIT Adjust Check Pattern 2 ...
Страница 275: ...4 15 Confidential EXIT Adjust Check Pattern 3 ...
Страница 276: ...4 16 Confidential KEISEN2 LF300 EXIT ADJUST PATTERN ...
Страница 278: ...4 18 Confidential KEISEN GAP EXIT ADJUST PATTERN Line 1 Line 2 Line 3 ...
Страница 280: ...4 20 Confidential Vertical Alignment Check Patterns ...
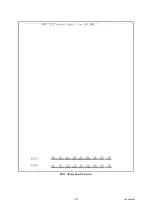
Страница 283: ...4 23 Confidential Left Right and Bottom Margin Check Pattern ...
Страница 286: ...4 26 Confidential Print Pattern for Creating Head Calibration Data ...
Страница 302: ...4 42 Confidential ADF Copy Chart C A B D ...
Страница 312: ...5 8 Confidential Print Pattern for Creating Head Calibration Data ...
Страница 314: ...5 10 Confidential Scanning Compensation Data List ...
Страница 317: ...5 13 Confidential Nozzle Test Pattern ...
Страница 320: ...5 16 Confidential Configuration List ...
Страница 337: ...5 33 Confidential EXIT Adjust Check Pattern 1 ...
Страница 338: ...5 34 Confidential EXIT Adjust Check Pattern 2 ...
Страница 339: ...5 35 Confidential EXIT Adjust Check Pattern 3 ...
Страница 340: ...5 36 Confidential KEISEN2 LF300 EXIT ADJUST PATTERN ...
Страница 346: ...5 42 Confidential Vertical Alignment Check Pattern ...
Страница 349: ...5 45 Confidential Left Right and Bottom Margin Check Pattern ...
Страница 383: ...6 4 Confidential Power supply PCB 100 V series ...
Страница 384: ...6 5 Confidential Power supply PCB 200 V series ...
Страница 385: ...6 6 Confidential Wiring diagrams ...


