Brother MFC-9160 Скачать руководство пользователя страница 83

   Troubleshooting and Maintenance   

77

MAINTENANCE

8

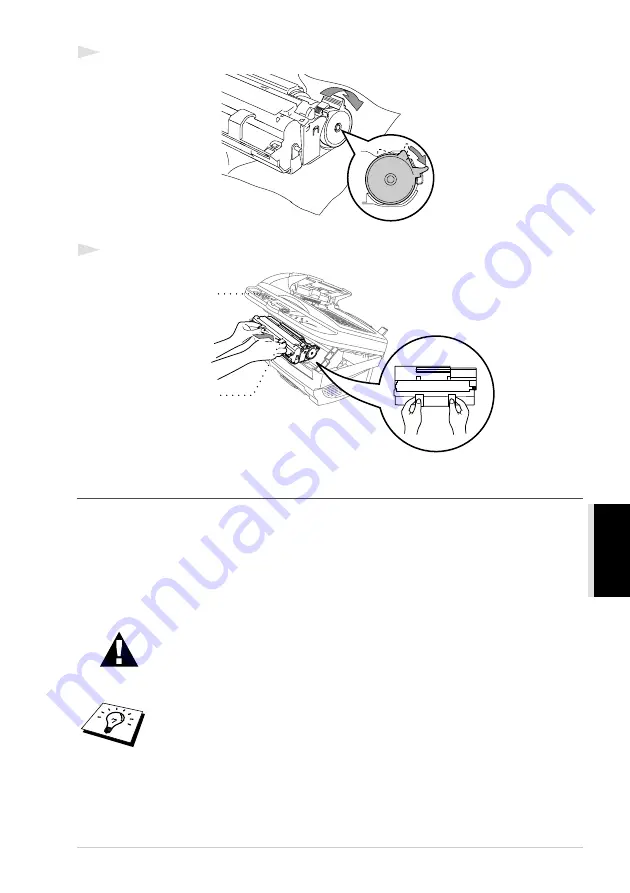
Gently turn the lever on the toner cartridge backward until it stops.

9

Reinstall the drum unit into the machine and close the top cover.

Replacing the Drum Unit

The machine uses a drum unit to create the print images on paper. If the screen displays CHANGE 
DRUM SOON
, the drum unit is nearly at the end of its life. Prepare a new drum unit to replace the 
current one. You may need to order one from your Brother dealer.

Even if the display shows CHANGE DRUM SOON, you may be able to continue to print without 
replacing the drum unit for a while. However, if there is a noticeable deterioration in the output print 
quality even before CHANGE DRUM SOON is shown, then the drum unit should be replaced. You 
should clean the machine when you replace the drum unit.

When removing the drum unit, handle carefully because it contains toner. 
When you replace the drum unit, you should clean the machine.

The drum unit is a consumable, and it is necessary to replace it periodically. There 
are many factors that determine the actual drum life, such as temperature, 
humidity, type of paper and toner that you use and the number of pages per print 
job, etc. The drum life is estimated at approximately 8,000 pages at 1 page per 
job. Because we have no control over the many factors that determine the actual 
drum life, we cannot guarantee a minimum number of pages that will be printed by 
your drum.

Top Cover

Drum Unit

Содержание MFC-9160

Страница 1: ...MFC 9160 OWNER S MANUAL ...

Страница 2: ...i ...

Страница 3: ...In This Manual User Friendly Programming We have designed the machine with on screen programming User friendly programming helps you take full advantage of all the functions the machine has to offer Since your programming is done on the LCD we have created step by step on screen prompts to help you program the machine All you need to do is follow the prompts as they guide you through the function ...

Страница 4: ... Settings Custom Settings 10 Using the Reports Key 11 COPIER Chapter 2 Making Copies Basic Copy Operations 12 Temporary Copy Setting 14 Changing Default Settings 19 PRINTER SCANNER Chapter 3 Using the machine as a Printer Special Printing Features 21 Printing From Your PC 21 Simultaneous Printing 23 Printer Menu Functions 23 Acceptable Paper 24 Chapter 4 Printer Driver Settings For Windows Only Us...

Страница 5: ...ter 7 Using the Brother MFC with a New Power Macintosh G3 G4 or iMac iBook Set up Your USB Equipped Apple Macintosh G3 G4 or iMac with Mac OS 8 5 8 5 1 8 6 9 0 9 0 4 9 1 53 Using Brother Printer Driver with your Apple Macintosh 53 Using Brother TWAIN Scanner Driver with Your Apple Macintosh 55 Chapter 8 For DOS User MAINTENANCE Chapter 9 Troubleshooting and Maintenance Error Messages 62 Document J...

Страница 6: ... APPENDIX Chapter 11 Specifications General Specifications 84 Printer Specifications 84 Computer Requirement 85 Electrical and Environment 86 Compilation and Publication Notice 86 Trademarks 87 Index 88 ...

Страница 7: ...feeder ADF can hold up to 30 pages feeding each one individually through the machine Use standard 75 g m2 paper when using the ADF Always fan the pages well before placing them in the ADF Recommended Environment Temperature 20 30 C 68 86 F Humidity 50 70 DO NOT use curled wrinkled folded or ripped paper or paper with staples paper clips paste or tape attached DO NOT use cardboard newspaper or fabr...

Страница 8: ...You can feed multiple pages To feed special types of originals such as coated paper or glossy paper move the special media lever to the Special Position Feed the original one by one It will allow the original to feed through the ADF without slipping or jamming If the original double feeds try again by inserting a simple sheet of original in the ADF or use glass platen 4 Document Stopper 30 Documen...

Страница 9: ...t slam the cover or press on it as damage to the glass platen may result 3 Making a Single copy Insert the document face up in the ADF or face down on the glass platen Press Copy To stop the copy process and release the original press Stop Exit See Making Copies page 12 4 Multiple Copies Using the ADF Insert the document face up in the ADF Using the numeric keys enter the number of copies you want...

Страница 10: ...isture or dust Do not connect the machine to electrical outlets controlled by wall switches or automatic timers as disruption of power can wipe out information in the unit s memory Do not connect the machine to electrical outlets on the same circuit as large appliances or other equipment that might disrupt the power supply Avoid interference sources such as speakers or the base units of cordless p...

Страница 11: ...ordance with the following code Green and yellow Earth Blue Neutral Brown Live As the wires in the mains lead of this apparatus may not correspond with the coloured markings identifying the terminals in your plug proceed as follows The wire which is coloured green and yellow must be connected to the terminal in the plug which is marked by the letter E or by the safety earth symbol or coloured gree...

Страница 12: ...ress to scroll forward or backward to set a menu selection Press to scroll through the menus and options or 7 Copy Keys For the Next Copy Only Sort Press this key to sort multiple copies Copy Mode Press this key to temporarily change the copy resolution for your type of original document 2in1 4in1 Press this key to copy four pages onto one page or create a booklet by copying two pages onto one pag...

Страница 13: ...A Enlarge Temporary Setting Each key press shows the next pre stored enlargement ratios 100 141 150 200 400 MANUAL For more choices select MANUAL and use the numeric keys to type any percentage between 101 and 400 B Reduce Temporary Setting Each key press shows the next pre stored reduction ratios 100 71 50 25 AUTO MANUAL For more choices select MANUAL and use the numeric keys to type any percenta...

Страница 14: ...vel Press or key to scroll to your next menu selection and then press Menu Set When you finish setting an option the LCD shows ACCEPTED You can program the machine by pressing Menu Set followed by the menu numbers For example to set COPY MODE to PHOTO press Menu Set 2 1 and or to select PHOTO and then press Menu Set Access the Menu Go to next menu level Accept an option Scroll through the current ...

Страница 15: ... the Copy resolution for your type of document 19 2 CONTRAST Adjust the contrast 20 3 PAPER TYPE THIN PLAIN THICK THICKER TRNSPRNCY Identify the type of paper in the multi purpose sheet feeder 20 4 PAPER SIZE LETTER A4 EXECUTIVE A5 A6 B5 B6 Adjust the paper size 20 3 PRINTER 1 PRINT OPTIONS 1 INTERNAL FONT You can print resident fonts to check and confirm font types 23 2 CONFIGURATION Printer sett...

Страница 16: ...e is idle it drops into power save mode automatically 1 Press Menu Set 1 2 2 Press or to select ON or OFF 3 Press Menu Set when the screen displays your selection 4 Press Stop Exit Sleep Mode Setting the Sleep Mode reduces power consumption by turning off the fuser inside the machine while the machine is idle You can choose how long the machine is idle from 00 to 99 minutes before it drops into sl...

Страница 17: ... want press Menu Set 4 Press Stop Exit Toner Save You can conserve toner using this feature When you set Toner Save to ON print appears somewhat lighter The default setting is OFF 1 Press Toner Save 2 Press or to select ON or OFF 3 Press Menu Set Using the Reports Key Two lists are available To Print a Report 1 Press Reports 2 Press or to select the report you want and then press Menu Set OR Enter...

Страница 18: ... in the ADF or face down on the glass platen 2 Press Copy Making Multiple Copies Using the ADF 1 Insert the document face up in the ADF 2 Using the numeric keys enter the number of copies you want up to 99 For example press 3 8 for 38 copies 3 Press Copy Do NOT pull on the paper while copying is in progress To stop the copy process and release the original press Stop Exit To stack or sort the copi...

Страница 19: ...nt up to 99 For example press 3 8 for 38 copies 5 Press Copy Out of Memory Message If the memory becomes full while you re making copies the screen displays If you were scanning the first page to be copied press Stop Exit to cancel the operation and restart to make a single copy If you were scanning a subsequent page you will have the option to press Copy to copy the pages scanned so far OR Press ...

Страница 20: ...If you want to use these temporary settings again place the next original in the ADF or glass platen before the 45 seconds expire Copying Using Multiple Settings You can try different combinations of settings for the best results To clear your settings and start over press Clear Settings The LCD shows current copy setting status you can set multiple settings No of Copies Copy Contrast Stack or Sor...

Страница 21: ... Recomended Ratio Making Enlarged Copies 1 Insert the document face up in the ADF or face down on the glass platen 2 Using the numeric keys enter the number of copies you want up to 99 3 Press Enlarge 4 Press or to choose an enlargement ratio You can enlarge to 141 150 200 or 400 OR You can press or to select MANUAL and then use the numeric keys to enter an enlargement ratio between 101 and 400 Fo...

Страница 22: ...Using the numeric keys enter the number of copies you want up to 99 3 Press Copy Mode continuously to select the right kind of image you re copying TEXT text only AUTO line art graphs or any combination including photograph PHOT photograph only 4 Press Copy Copy Contrast You can adjust copy contrast to make copies darker or lighter 1 Insert the document face up in the ADF or face down on the glass...

Страница 23: ... 1 or 4 IN 1 4 Press Copy Using the glass platen 1 Place the document face down on the glass platen 2 Using the numeric keys enter the number of copies you want up to 99 3 Press 2in1 4in1 continuously to select 2 IN 1 or 4 IN 1 4 Press Copy The LCD shows 5 Place the next document on the glass platen and then press Menu Set After all document have been scanned press Copy 2 in 1 4 in 1 2in1 or 4in1 ...

Страница 24: ...e copy of a photograph 1 Insert the document face down on the glass platen 2 Press Poster 3 Press Copy Poster size copy can be made only by using glass platen Poster is not available with Enlarge or Reduce Poster is not available for multiple copies ...

Страница 25: ...Exit OR Press to select the next setting you want to change Press Menu Set and 2 Copy Mode Type of Original You can select the Copy resolution for your type of original The default setting is AUTO which is used for originals that contain both text and photographs TEXT is used for originals containing only text PHOTO is used for copying photographs 1 Press Menu Set 2 1 2 Press or to choose the type...

Страница 26: ...ze You can use seven sizes of paper for copying 1 Press Menu Set 2 4 2 Press to choose the size LETTER A4 EXECUTIVE A5 A6 B5 or B6 and then press Menu Set 3 Press Stop Exit THIN 64 69 g m2 For thin paper PLAIN 70 95 g m2 For ordinary plain paper THICK 96 120 g m2 For heavy weight paper or rough paper THICKER 121 158 g m2 For heavier weight paper rough paper or bond paper TRANSPARENCY For transpare...

Страница 27: ...anning and to simulate a Parallel port for Windows GDI printing Enhanced Memory Management The machine has its own Data Compression Technology which automatically compresses graphic data and downloads font data efficiently into the MFC s memory You can avoid memory errors and print most full page 600 dpi graphic and text data including larger fonts with the machine s standard memory Printing From ...

Страница 28: ...et a paper jam Very thin or very thick paper is not recommended If the paper double feeds sends two sheets at once hold the stack of paper except for the front sheet while the paper is feeding Loading Envelopes You can load up to 10 envelopes into the Multi purpose sheet feeder Press down and hold the blue lever on the right as you load the envelopes and slide the paper guides to fit Make sure env...

Страница 29: ...Printing the Internal Font List You can print a list of the machine s internal or resident fonts to see how each font looks before you select it 1 Press Menu Set 3 1 1 2 Press Copy The machine prints the list 3 Press Stop Exit Printing the Print Configuration List You can print a list of current setting for the printer 1 Press Menu Set 3 1 2 2 Press Copy The machine prints the list 3 Press Stop Ex...

Страница 30: ...ches Paper Capacity in Feeder Multi purpose Sheet Feeder Up to 22 mm 0 87 inches in height up to the mark Approx 200 sheets of 75 g m2 20 lb or 50 sheets of 158 g m2 42 lb A4 Letter paper or 10 envelopes Output Tray Approx 50 sheets of 75 g m2 20 lb A4 Letter paper Cut Sheet Envelope Basis Weight 64 to 158 g m2 17 to 42 lb 75 to 90 g m2 20 to 24 lb single thickness Caliper 0 08 to 0 2 mm 0 003 to ...

Страница 31: ...guage The printer drivers are on the supplied CD ROM The latest printer driver can also be downloaded from the Brother Solutions Centre at http solutions brother com Features in the Printer Driver For Windows Users Only For more detailed information please see the on line Help in the printer driver Basic Tab 1 Select the Paper size Multiple Page and Orientation 2 Select number of Copies and Media ...

Страница 32: ...ach page on the sheet Orientation Orientation selects the position of how your document will be printed Portrait or Landscape Copies The Copies selection sets the number of copies that will be printed Collate The collate selection is active if more than one copy is selected With the collate check box selected one complete copy of your document will be printed and then repeated for the number of co...

Страница 33: ...per Thicker Paper Bond Paper Transparencies When using ordinary plain paper select Plain Paper When using heavier weight paper envelopes or rough paper select Thick Paper or Thicker Paper For bond paper select Bond Paper and for OHP transparencies select Transparencies Advanced Tab Change the tab settings by selecting one of the following icons 1 Print Quality 2 Duplex Printing 3 Watermark 4 Page ...

Страница 34: ... With the Print Setting set to Manual you can change the Brightness Contrast and Graphics Quality options manually Duplex Printing Choosing the Duplex Printing icon displays the Manual Duplex features available Manual Duplex Check the Manual Duplex box and there are six types of duplex directions available for each orientation In this mode the machine prints all the even numbered pages first Then ...

Страница 35: ...ustom In background With the In background feature checked the Watermark will print behind your document on the page If this feature is not checked then the Watermark will print on top of your document You can change the size and the position of the Watermark on the page by selecting the Watermark and clicking the Edit button If you want to add a new Watermark click the New button and select Text ...

Страница 36: ...ark can be positioned on the page Page Setting You can change the print size of your document with the Scaling feature 1 Check Off if you want to print the document as it appears on your screen 2 Check Fit to Paper Size if your document has an unusual size or if you have only the standard size paper 3 Check the Free box if you want to reduce or enlarge the output You can also use the Mirror Print ...

Страница 37: ...s Quick Print Setup Administrator For Windows 95 98 98SE Me Users Only Print Date Time Quick Print Setup The Quick Print Setup feature allows you to quickly select driver settings To view settings simply click your mouse button on the task tray icon This feature can be set to ON or OFF from the Device Options section ...

Страница 38: ...Users Only The administrator selection permits the Copy Scaling and Watermark features to be locked and Password protected Record your password and keep it in a safe place for future reference If you forget your password these settings can not be accessed ...

Страница 39: ... button to change the Date and Time Format Position and Font To include a background with the Date and Time select Opaque When Opaque is selected you can set the Darkness of the Date and Time background by changing the percentage The Date and Time indicated in the selection box represents the format that will be printed The actual Date and Time printed on your document is automatically retrieved f...

Страница 40: ...s Center The Brother Solutions Center is a Web site offering information about your Brother product including FAQ s User Guides Driver updates and Tips for using the machine Web Update Web Update checks the brother web site for updated drivers and automatically downloads and updates the driver on your computer Check Setting The Check Setting selection displays a list of your current drivers settin...

Страница 41: ...applications The Brother Control Centre provides two categories of functions 1 Scan directly to a file E mail word processor or graphic application of choice 2 Copy functions AutoLoad the Brother Control Centre The Control Centre is initially configured to automatically load each time Windows is started When the Control Centre is loaded the Control Centre icon will appear in the task bar If you do...

Страница 42: ...oLoad Pop Up option Using the Scan Key with Windows PC You can use the Scan to key on the control panel to scan documents from the glass platen or ADF into your word processing graphics or E mail applications The advantage of using the Scan to key is that you avoid the mouse clicks required to scan from your PC If you have connected a Macintosh the Scan to key will not work with your computer See ...

Страница 43: ...rted by ScanSoft TextBridge to an editable text file and then displayed in your word processing application for further editing 1 Insert the document face up in the ADF or face down on the glass platen 2 Press Scan to 3 Press or to select SCAN TO OCR and then press Menu Set The machine will scan the original perform OCR in ScanSoft TextBridge and then display the result in your word processing app...

Страница 44: ...perations Scan to File allows you to scan directly to a disk file with two mouse clicks You can change the file type destination directory and file name as needed Scan to E mail enables you with just two mouse clicks to scan a picture or text document directly into an E mail application as a standard attachment You have the option of selecting the file type and resolution for the attachment Scan t...

Страница 45: ...her MFC printer driver OR You can direct the copy output to any standard Windows printer driver installed on the PC Scanner Settings When the Pop Up screen is displayed you can access the Scanner Settings window Click the Configuration icon at the top right of the Brother Control Centre screen OR Click the Modify Settings button on any of the Configuration screens Global Settings AutoLoad Pop Up C...

Страница 46: ...Click OK to save your changes If you make a mistake or later decide to return to the original default setting just click the Restore Defaults button when the scanning mode is displayed To access the Scanner Configurations screen 1 Insert the document face down in the ADF 2 Right click the appropriate Control Centre button to display Configurations then click it The configuration screen for that Co...

Страница 47: ...er Select this checkbox to scan the document as another file type and or into another directory folder File If you selected Other Folder from the pull down list select the type of file PaperPort Files MAX Self Viewing Files EXE PaperPort 5 0 Files MAX PaperPort 4 0 Files MAX PaperPort 3 0 Files MAX Windows Bitmap BMP PC Paintbrush PCX Multi page PCX DCX JPEG Image Files JPG TIFF Uncompressed TIF T...

Страница 48: ...Text for OCR Photos Photos High Quality Photos Quick Scan Custom Draft Copy or Fine Copy To change any of the settings for that mode click the Modify Settings button E mail Application E mail Application From the pull down list select your E mail application E mail Settings Click the E Mail Settings button to set up links The Link Preferences window will appear ...

Страница 49: ... Click this checkbox to convert all files that have been processed through OCR to colour Show QuickSend Menu Click this checkbox if you want the Select QuickSend Recipient window to be displayed when you choose Scan to E mail This feature works only with MAPI type E mail applications such as Microsoft Exchange Microsoft Outlook and Eudora QuickSend List You can create a list of E mail names and ad...

Страница 50: ...R Photos Photos High Quality Photos Quick Scan Custom Draft Copy or Fine Copy To change any of the settings for that mode click the Modify Settings button Word Processor Word Processor From the pull down list select the word processor you want to use Click the Link Settings button to display a screen to set up a link to the version of OCR and document format that you want to use ...

Страница 51: ... Output Check this checkbox if you want your word processor application to read across the entire page from left to right Document Format From the pull down list select the file format you want to use for your word processor or text documents User Defined Button Scanner Settings From the pull down list select the scanning mode that is appropriate for the type of file Faxing Filing and Copying Text...

Страница 52: ... Text for OCR Photos Photos High Quality Photos Quick Scan Custom Draft Copy or Fine Copy To change any of the settings for that mode click the Modify Settings button Copy Settings Brother MFC9160 Copies Enter the number of copies you want to print To change the copy options click the Copy Options button Click the OK button to save your Copy settings ...

Страница 53: ...it automatically Viewing Items in ScanSoft PaperPort for Brother PaperPort provides several ways to view items Desktop View displays a thumbnail a small graphic that represents each item in a Desktop or folder Items in the selected folder appear on the PaperPort Desktop You can see PaperPort items MAX files and non PaperPort items files created using other applications Non PaperPort items include ...

Страница 54: ...rPort MAX files and other files appear on the Desktop You can also use Windows Explorer to manage the folders and items shown in Desktop View Links to Many Other Applications PaperPort automatically recognizes many other applications on your computer and creates a working link to them The Link Bar at the bottom of Desktop view shows icons of those linked applications To use a link drag an item ont...

Страница 55: ...to scanning items you can bring items into PaperPort in a variety of ways and convert them to PaperPort MAX files in several different ways Print to the Desktop View from another application such as Microsoft Excel Import files saved in other file formats such as Windows Bitmap BMP or Tag Image File Format TIFF Exporting Items in Other Formats You can export or save PaperPort items in several popu...

Страница 56: ...n the glass platen 2 Adjust the following settings if needed in the Scanner Setup window Resolution Scan Type Black White Grey Error Diffusion True Grey 256 Colour 24 bit colour 24 bit colour fast Brightness Contrast Size 3 Select the Start button from the Scanner window When scanning is completed close the scanner window The PaperPort screen will appear showing the image you scanned highlighted i...

Страница 57: ...t setting is adjustable only when you have selected one of the Colour Type settings but it is not available when Black White is selected as the Colour Type Increasing the contrast level by dragging the slidebar to the right emphasizes dark and light areas of the Image while decreasing the contrast level by dragging the slidebar to the left reveals more detail in grey areas Instead of using the sli...

Страница 58: ...appear in the Scanning Area of the Scanner window 3 To crop a portion of the document to be scanned drag any side or corner of the dotted outline in the Scanning Area with the left mouse button Adjust the dotted outline until it surrounds only the portion of the document you wish to scan 4 Insert the document face up in the ADF again if you use the ADF in Step 1 5 Adjust the settings for Resolutio...

Страница 59: ...intosh must be set up with Mac OS 8 5 8 5 1 8 6 9 0 9 0 4 9 1 The Brother Scanner Driver works only with Mac OS 8 6 9 0 9 0 4 9 1 Using Brother Printer Driver with your Apple Macintosh To select the Printer 1 From the Apple menu open the Chooser 2 Click the HL 1200 MFL Pro icon On the right side of the Chooser click the printer to which you want to print Close the Chooser Before you can connect th...

Страница 60: ...e the settings for Paper Size Orientation and Scaling then click OK 4 From your Macintosh scanning application software such as Simple Text click File menu and select Print Click Print to start printing If you want to change Copies Pages Resolution Paper Source and Media Type select your settings before clicking Print Option Setup allows you to change Duplex ...

Страница 61: ...ant application software The first time you use the Brother Twain driver set it as default by choosing the Select Source Afterwards for each document you scan choose Acquire Image or select Scan The scanner setup dialog box will appear Scanning a Document into Your Macintosh G3 G4 or iMac 1 Insert the document face up in the ADF or face down on the glass platen 2 Adjust the following settings if n...

Страница 62: ...c images or graphics Error Diffusion is a method for creating simulated grey images by placing black dots in a specific matrix instead of true grey dots True Grey also is used for documents containing photographic images or graphics This mode is more exact because it uses up to 256 shades of grey It requires the most memory and longest transfer time Colours Choose either 8 Bit Color which scans up...

Страница 63: ...custom size you can adjust the scanning area Click and hold the mouse button as you drag the mouse to crop the image Business Card Size To scan business cards select the Business Card 60 x 90 mm size setting and place the business card at the centre of the scanner glass When scanning photographs or other images for use in a word processor or other graphics application it is a good idea to try diff...

Страница 64: ...s too light set a lower brightness value and scan the document again If the image is too dark set a higher brightness value and scan the document again Contrast The contrast setting is adjustable only when you have selected one of the grey scale settings but it is not available when Black White is selected as the grey scale Increasing the contrast level by dragging the slidebar to the right emphas...

Страница 65: ...nsert the document face up in the ADF or face down on the glass platen 2 Click PreScan The entire document will be scanned into your Macintosh G3 or iMac and will appear in the Scanning Area of the Scanner dialog box 3 To scan a portion of the prescanned image click and drag the mouse to crop it 4 Insert document face up in the ADF again if you use the ADF in Step 1 5 Adjust the settings for Resol...

Страница 66: ...mputer screen Since most DOS applications have a Printer Settings menu that overrides the settings made by the RPC you may not have to use this utility program This utility program is useful for application software that does not control the printer s settings and features Installing the Remote Printer Console Before you install the program make sure you have the following hardware and software to...

Страница 67: ...instructions from the installer Running the Remote Printer Console Main Program Type C RPCX RPCX and press the Enter key to start the Remote Printer Console main program The Main Screen will appear on your computer screen Do not use this program from a DOS window running under Windows X CD DOS X DOS RPCSETUP ...

Страница 68: ... installed Reinstall the drum unit CHECK PAPER The machine is out of paper or paper is not properly loaded in the Multi purpose Sheet Feeder Refill the paper or remove the paper and load it again and then press Copy CHECK PAPER SIZE Paper Size is improper for printing HELP or SYSTEM SETUP Load A4 paper in multi purpose sheet feeder and then press Copy COOLING DOWN WAIT FOR A WHILE The temperature ...

Страница 69: ...VER Top cover is not closed completely Open the top cover then close it PLS OPEN COVER A page piece of paper or paper clip etc may be jammed inside the machine Open the top cover and remove the drum unit If you see any jammed paper or other item gently pull it out Reinstall the drum unit then close the top cover If the error message remains open and close the top cover again If the machine cannot ...

Страница 70: ...hat is not jammed 2 Open the document cover 3 Pull the jammed document out to the right 4 Close the document cover 5 Press Stop Exit Printer Jam or Paper Jam Before you can clear a paper jam error you must find out where the paper is stuck Review the following two types of printer jams and follow the instructions Do not force the jammed paper from the paper tray because you may damage the machine ...

Страница 71: ...he feeder 2 Open the top cover and check that a torn piece of paper does not remain inside the machine 3 Close the top cover Paper is Jammed near the Drum Unit or in the Fuser Unit 1 Open the top cover by pulling the lever toward you 2 Remove the drum unit 3 Gently pull out the jammed paper 4 Reinstall the drum unit 5 Close the top cover Paper is jammed near drum unit ...

Страница 72: ...ot show up when I print them Most laser printers have a restricted area that will not accept print Usually these are the first two lines and last two lines leaves 62 printable lines Adjust the top and bottom margins in your document to allow for this Windows Setup Printing Difficulties I cannot print from my application software Make sure the Windows printer driver is installed and you select it i...

Страница 73: ... white stripes or faint images and the display shows CHANGE DRUM SOON replace the drum unit with a new one Printed pages are stained with toner or have vertical stripes Dark Stripes or Toner Stains Clean the machine s interior and the primary corona wire of drum unit See Regular Maintenance page 71 and Cleaning the Drum Unit page 73 Make sure that the tab of the corona wire is at the home position...

Страница 74: ... unit with a new one Printed pages are blurred at the centre or at either edge Blurred Page Certain environmental conditions such as humidity high temperatures etc may cause this condition to occur Make sure the machine is placed on a flat horizontal surface Remove the drum unit with the toner cartridge installed Try rocking them from side to side You may clear a blurred page by wiping the scanner...

Страница 75: ...the Parallel cable or USB cable from the machine 3 Open the top cover 4 Remove the drum unit assembly 5 Place the drum unit and toner cartridge assembly into the plastic bag and seal the bag completely 6 Close the top cover Remove the paper support and close the paper tray and extension Do not unplug the machine until a print job is finished Remove the drum unit and toner cartridge assembly Leave ...

Страница 76: ...th the original packing material Place documents manual printed material and CD ROM and a paper support into the carton 8 Place the drum unit and toner cartridge assembly filter cores cable ties power cord and printer cable into the carton as shown below 9 Close the carton and tape it shut ...

Страница 77: ...ng thinners or other organic solvents to clean the machine and do not use water Cleaning the Scanner Turn the machine power switch OFF and lift the document cover Clean the glass platen and the white film with isopropyl alcohol on a lint free cloth Open the document cover Clean the white bar and the glass strip under the bar with isopropyl alcohol on a lint free cloth Document Cover White Film Whi...

Страница 78: ...o remove dirt from the control panel It may cause a crack on the panel Do not use isopropyl alcohol to clean the scanner window or the toner sensor Do not touch the scanner window with your finger Handle the drum unit carefully as it contains toner If toner scatters and your hands or clothes get dirty immediately wipe or wash it off with cold water After you have used the machine some internal par...

Страница 79: ...n carefully 2 Clean the primary corona wire inside the drum unit by gently sliding the tab from right to left several times 3 Return the tab to the home position mark position before reinstalling the drum unit 4 Install the drum unit into the machine See Replacing the Drum Unit page 77 5 Close the top cover If you do not position the tab at the home position printed pages may have vertical stripes...

Страница 80: ...er dealer for service Be sure to seal the toner cartridge tightly so toner powder does not spill out of the cartridge When discarding used toner cartridges keep them separate from domestic waste It is recommended that you clean the machine when you replace the toner Toner Empty Indicator When the toner cartridge is running low the display shows CHANGE TONER and the Toner Empty LED on the control p...

Страница 81: ...drop cloth or large piece of disposable paper to avoid spilling and scattering the toner 3 Gently turn the lever on the toner cartridge forward until it stops The toner cartridge cannot be removed unless the shutter is completely closed by turning the lever fully to the front 4 Remove the old toner cartridge from the drum unit by gently pulling it out Handle the toner cartridge carefully If toner ...

Страница 82: ... together correctly make sure that the toner cartridge guide bar is exactly aligned with the guide slot in the drum unit Wait to unpack the toner cartridge until immediately before you install it into the machine If a toner cartridge is left unpacked for a long period of time the toner life is shortened You can use only a genuine Brother toner cartridge TN 8000 series which is specially formulated...

Страница 83: ...able deterioration in the output print quality even before CHANGE DRUM SOON is shown then the drum unit should be replaced You should clean the machine when you replace the drum unit When removing the drum unit handle carefully because it contains toner When you replace the drum unit you should clean the machine The drum unit is a consumable and it is necessary to replace it periodically There are...

Страница 84: ...ver 2 Remove the old drum unit Place the drum unit on an old cloth or large piece of disposable paper to avoid spilling and scattering the toner 3 Remove the toner cartridge from the drum unit and keep it in a safe place See Replacing the Toner Cartridge page 74 After you have just used the machine some internal parts of the machine will be extremely HOT So please be careful Top Cover Drum Unit Dr...

Страница 85: ... from domestic rubbish Do not pull or force the starter sheet from the machine It will be ejected automatically Wait to unpack the drum unit immediately before installing it into the machine If an unpacked drum unit is subjected to excessive direct sunlight or room light the unit may be damaged Handle the toner cartridge and the drum unit carefully because they contain toner If toner scatters and ...

Страница 86: ...placing the Toner Cartridge page 74 6 Holding the new drum unit by the handles install it Close the top cover 7 The machine will automatically eject the starter sheet Do not pull or force the starter sheet from the machine Toner Cartridge Drum Unit Clear Plastic Starter Sheet ...

Страница 87: ...o the outlet contact your electrician to replace your obsolete socket Do not defeat the purpose of an earthed plug 9 Do not allow anything to rest on the power cord Do not locate this product where people can walk on the cord 10 Do not touch a document during printing 11 Never push objects of any kind into this product through cabinet slots since they may touch dangerous voltage points or short ou...

Страница 88: ... LASER RADIATION WHEN OPEN AND INTERLOCK OEFEATED AVOID DIRECT EXPOSURE TO BEAM CLASS 3B LASER PRODUCT USYNLIG LASER STRÅLING NÅR KABINETLÅGET STÅR ÅBENT UNGDÅ DIREKTE UDSÆTTELSE FOR STRÅLING KLASSE 3B LASER OSYNLIG LASERSTRÅLNING HÄR DENNA DEL ÄR ÖPPNAD OCH SPÄRRAR ÄR URKOPPLADE STRÅLEN ÄR FARLIG KLASS 3B LASER APPARAT AVATTAESSA JA SUOJALUKITUS OHITETTAESSA OLET ALTTIINA NÄKYMÄTTÖMÄLLE LASERSÄTE...

Страница 89: ...act that the equipment operates satisfactorily does not imply that the power is grounded and that the installation is completely safe For your safety if in any doubt about the effective grounding of the power consult a qualified electrician Disconnect device This product must be installed near a socket outlet that is easily accessible In case of emergencies you must disconnect the power cord from ...

Страница 90: ... 2 Backlit Dimensions WxDxH 459 x 458 x 354 mm Weight 11 kg Emulation Brother Printing System for Windows emulation mode of HP LaserJet PCL level 5e Printer Driver Windows 95 98 98SE Me 2000 professional and Windows NT Workstation Version 4 0 driver supporting Brother Native Compression mode and bi directional capability Apple Macintosh QuickDraw Driver for OS 8 5 8 5 1 8 6 9 0 9 0 4 9 1 Interface...

Страница 91: ...such as temperature humidity type of paper and toner that you use the number of pages per print job etc For Windows Operating System CPU Pentium RAM Hard Disk Space 95 98 98SE 75 MHz 24 MB 32 MB recommended 50 MB NT Workstation4 0 75 MHz 32 MB 64 MB recommended 2000 Professional 133 MHz 64 MB 128 MB recommended Me 150 MHz 32 MB 64 MB recommended For Macintosh Operating System CPU Pentium RAM Hard ...

Страница 92: ...ges without notice in the specifications and materials contained herein and shall not be responsible for any damages including consequential caused by reliance on the materials presented including but not limited to typographical and other errors relating to the publication Temperature Allowable 10 32 5 C Storage 0 40 C Warm up Approx 12 seconds at 25 C Power source 220 240V AC 50 60Hz Power consu...

Страница 93: ...egistered trademarks of ScanSoft Inc Each company whose software title is mentioned in this manual has a Software License Agreement specific to its proprietary programs IBM and IBM PC are registered trademarks of International Business Machines Corporation All other brand and product names mentioned in this User s Guide are registered trademarks of their respective companies Ordering Accessories a...

Страница 94: ...y Sort 16 Copy Contrast 16 Copy Mode 19 Copy Operations 12 COVER OPEN 62 D Device Options 31 Difficulty 66 Document Jam 64 DOS 60 Drum Unit Replacing 77 Duplex Printing 28 E Error Messages 62 F Function Selection Table 8 H HELP 11 I iMac 53 Important Safety Instructions 81 Importing 49 M Macintosh G3 G4 or iMac 53 Maintenance 62 Menu Mode 8 Menu Selection Table 8 Multi Purpose Sheet Feeder 21 N Na...

Страница 95: ...p 31 R Reports 6 Reset Key 23 S Safety Instructions 81 Scan Image 37 Scan Keys 36 Scan to E mail 37 Scan to File 41 Scan to Word Processor 44 Scan OCR 37 Scanning into PC 50 ScanSoft PaperPort 47 Simultaneous Printing 23 Sleep Mode 10 Specifications 84 SYSTEM SETUP 11 T Toner Cartridge Replacing 74 TONER EMPTY 63 Toner Save 11 Trademarks 87 Troubleshooting 62 W Watermark 29 Word Processor 44 ...

Страница 96: ...UK Version A ...

Отзывы: