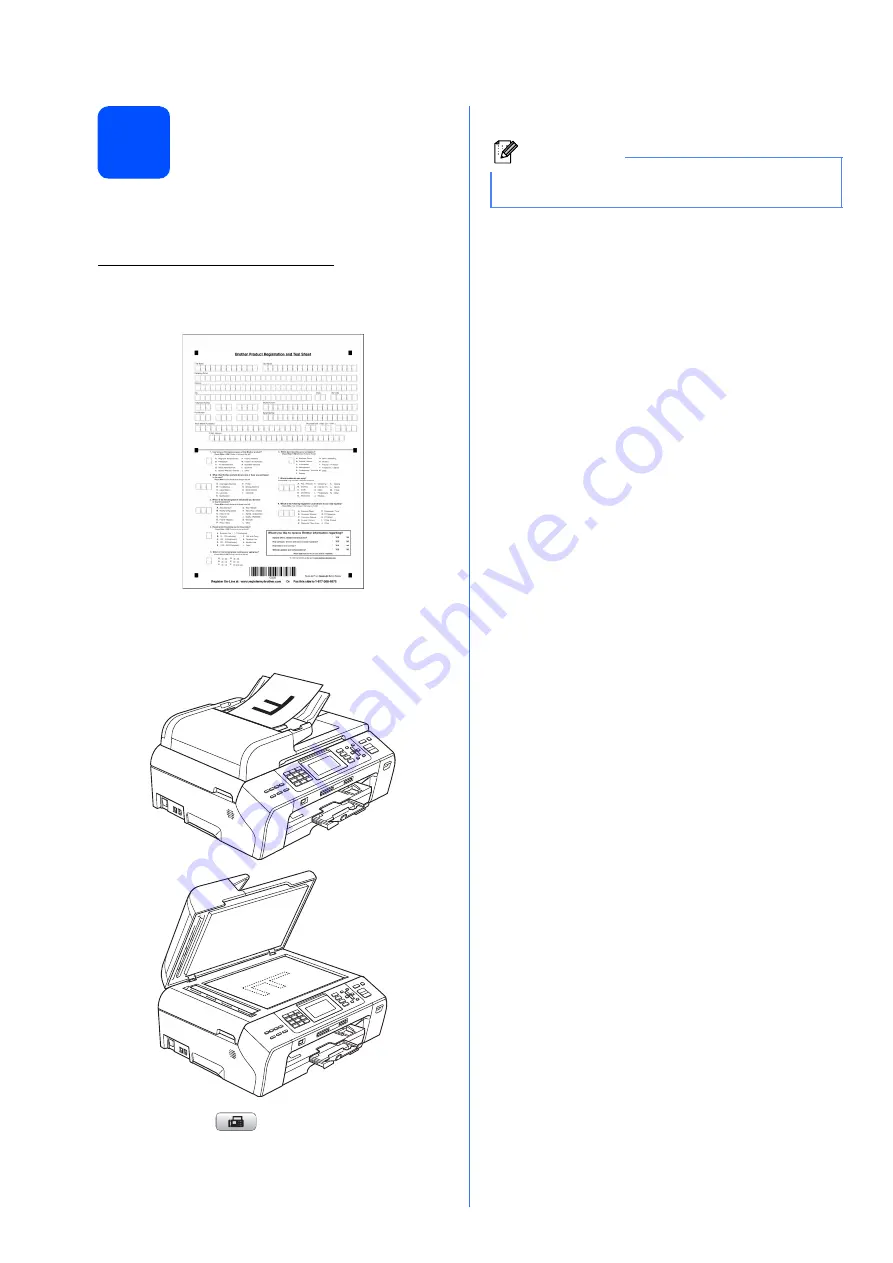
Brother MFC-5895CW Скачать руководство пользователя страница 12

12

14

Send in the Product 

Registration and Test 

Sheet (USA only)

You can also register your product online using the 
On-Line Registration link from the installation 
CD-ROM or visit 
http://www.brother.com/registration/.

a

Fill out the Product Registration and Test 
Sheet.

b

Put the sheet face up in the ADF (Automatic 
Document Feeder) or face down on the 
scanner glass. 

c

Make sure 

(

Fax

) is illuminated in Blue.

d

Enter the toll-free fax number: 1-877-268-9575.

e

Press 

Black Start

.

Note

You will receive a confirmation fax of your Product 
Registration.

Содержание MFC-5895CW

Страница 1: ... the USB cable yet if you are using a USB cable Ink Cartridges x4 Black LC65HY BK Yellow LC65HY Y Cyan LC65HY C Magenta LC65HY M Quick Setup Guide User s Guide CD ROM Accessory Order Form Test Sheet USA only Telephone Line Cord One Touch Labels Note The components included in the box may differ depending on your country Save all packing materials and the box in case for any reason you must ship yo...

Страница 2: ... guides a and then the paper length guide b to fit the paper size Make sure that the triangular marks c on the paper side guides a and paper length guide b line up with the mark for the paper size you are using Note When you use Legal A3 or Ledger size paper press and hold the universal guide release button a as you slide out the front of the paper tray 1 1 1 1 3 2 1 3 ...

Страница 3: ... paper with both hands Make sure that the paper side guides touch the edges of the paper g Close the paper tray cover Check that the paper is flat in the tray and below the maximum paper mark a h Slowly push the paper tray completely into the machine i While holding the paper tray in place pull out the paper support a until it clicks and then unfold the paper support flap b IMPORTANT Do not push t...

Страница 4: ...e connect it as shown below Before you connect the external telephone remove the protective cap a from the EXT jack on the machine 1 Extension telephone 2 External telephone Note If you are sharing one telephone line with an external telephone answering machine connect it as shown below Before you connect the external telephone answering machine remove the protective cap a from the EXT jack on the...

Страница 5: ... Unpack the ink cartridge e Turn the green knob on the protective yellow cap clockwise until it clicks to release the vacuum seal then remove the cap a f Take care to match the color of the lever a with the cartridge color b as shown in the diagram below g Install each ink cartridge in the direction of the arrow on the label Note Do not throw away the green protective part You will need it if you ...

Страница 6: ...Cleaning the print head in Appendix B of the User s Guide Once you open an ink cartridge install it in the machine and use it up within six months of installation Use unopened ink cartridges by the expiration date written on the cartridge package DO NOT dismantle or tamper with the ink cartridge this can cause the ink to leak out of the cartridge Brother strongly recommends that you do not refill ...

Страница 7: ...lor Press 1 Yes or 2 No on the dial pad After pressing 1 Yes or 2 No for both black and color the LCD shows e Press 1 Yes the machine will then start cleaning the colors f After cleaning is finished press Color Start The machine starts printing the Print Quality Check Sheet again Go back to b 6 Choose your language If needed a Press Menu b Press a or b to choose Initial Setup Press OK c Press a or...

Страница 8: ... Mail in Chapter 7 of the User s Guide for instructions on setting up your machine using this service Will you be using a Telephone Answering Device on the same telephone line as your Brother machine Your external telephone answering device TAD will automatically answer every call Voice messages are stored on the external TAD and fax messages are printed Choose External TAD as your receive mode Se...

Страница 9: ...OK d Enter the last two digits of the year on the dial pad and then press OK e g Enter 1 0 for 2010 e Enter the two digits for the month on the dial pad and then press OK e g Enter 0 3 for March f Enter the two digits for the day on the dial pad and then press OK e g Enter 0 1 for the first day of the month g Enter the time in 24 hour format on the dial pad and then press OK e g Enter 1 5 2 5 for ...

Страница 10: ... for entering your name If you need to enter a character that is on the same key as the last character press c to move the cursor to the right If you entered a letter incorrectly and want to change it press d or c to move the cursor to the incorrect character press Clear Back Press key One time Two times Three times Four times 2 A B C 2 3 D E F 3 4 G H I 4 5 J K L 5 6 M N O 6 7 P Q R S 8 T U V 8 9...

Страница 11: ... choose Tone Pulse d Press d or c to choose Pulse or Tone Press OK e Press Stop Exit 13 Automatic Daylight Savings Time You can set the machine to change automatically for daylight savings time It will reset itself forward one hour in the Spring and backward one hour in the Fall a Press Menu b Press a or b to choose General Setup Press OK c Press a or b to choose Auto Daylight d Press d or c to ch...

Страница 12: ...OM or visit http www brother com registration a Fill out the Product Registration and Test Sheet b Put the sheet face up in the ADF Automatic Document Feeder or face down on the scanner glass c Make sure Fax is illuminated in Blue d Enter the toll free fax number 1 877 268 9575 e Press Black Start Note You will receive a confirmation fax of your Product Registration ...

Страница 13: ...d Network Wireless Network 15 Choose your connection type For USB interface cable Windows go to page 14 Macintosh go to page 18 For Wired Network Windows go to page 20 Macintosh go to page 25 For Wireless Network Windows and Macintosh go to page 28 ...

Страница 14: ...itial Installation IMPORTANT DO NOT connect the USB cable yet If there are any programs running close them Make sure there are no memory cards or a USB Flash memory drive inserted into the machine The screens may differ depending on your operating system The supplied CD ROM includes ScanSoft PaperPort 11SE This software supports Windows 2000 SP4 or greater XP SP2 or greater XP Professional x64 Edi...

Страница 15: ...t window appears click Yes if you agree to the Software License Agreement g Choose Local Connection and then click Next The installation continues h When this screen appears go to the next step Note If this screen appears click OK and restart your computer If the installation does not continue automatically open the top menu again by ejecting and then reinserting the CD ROM or double click the sta...

Страница 16: ...down b and close the scanner cover c using both hands e The installation will continue automatically The installation screens appear one after another IMPORTANT DO NOT connect the machine to a USB port on a keyboard or a non powered USB hub Connect the machine directly to your computer LAN USB IMPORTANT Make sure that the cable does not restrict the cover from closing or an error may occur IMPORTA...

Страница 17: ...ick OK Now go to Proceed to Install Optional Applications on page 40 Note If an error message appears during the software installation run the Installation Diagnostics located in Start All Programs Brother MFC XXXX where MFC XXXX is your model name Note Internet access is required for the firmware update Finish The installation is now complete Note XML Paper Specification Printer Driver The XML Pa...

Страница 18: ...nside the machine on the right as shown below c Carefully route the USB cable through the trench and out the back of the machine as shown below and connect the cable to your Macintosh IMPORTANT For the latest drivers and information on the Mac OS X you are using visit http solutions brother com For Mac OS X 10 4 0 to 10 4 10 users upgrade to Mac OS X 10 4 11 10 6 x IMPORTANT DO NOT connect the mac...

Страница 19: ...l After the installation the Brother software will search for the Brother device e Choose the machine from the list and then click OK f When this screen appears click Next g When the Brother Support screen appears click Close to finish the installation or go to step 19 19 Download and install Presto PageManager When Presto PageManager is installed OCR capability is added to Brother ControlCenter2 ...

Страница 20: ... cap and connect the network cable to the LAN socket IMPORTANT If there are any programs running close them Make sure there are no memory cards or a USB Flash memory drive inserted into the machine The screens may differ depending on your operating system The supplied CD ROM includes ScanSoft PaperPort 11SE This software supports Windows 2000 SP4 or greater XP SP2 or greater XP Professional x64 Ed...

Страница 21: ... If both USB and LAN cables are being used guide both cables through the trench with one on top of the other IMPORTANT Make sure that the cable does not restrict the cover from closing or an error may occur IMPORTANT If you have previously set up your machine for a wireless network and then want to set it up on a wired network you should check that the machine s Network I F is set to Wired LAN The...

Страница 22: ...onnection and continue with the installation Recommended and click Next If you are using a firewall other than Windows Firewall or Windows Firewall is off this screen may appear See the instructions provided with your firewall software for information on how to add the following network ports For network scanning add UDP port 54925 For network PC Fax receiving add UDP port 54926 If you still have ...

Страница 23: ...s only one machine connected on the network it will be chosen automatically If your machine is not found over the network the following screen will appear Confirm your settings by following the on screen instructions If the IP address of the machine is not yet configured for use on your network the following screen appears Click OK and then click Configure IP Address Enter an IP address for your m...

Страница 24: ... name Note Internet access is required for the firmware update Note Network license Windows This product includes a PC license for up to 2 Users This license supports the installation of the MFL Pro Suite including ScanSoft PaperPort 11SE on up to 2 PCs on the network If you want to use more than 2 PCs with ScanSoft PaperPort 11SE installed please purchase the Brother NL 5 pack which is a multiple...

Страница 25: ...otective cap and connect the network cable to the LAN socket IMPORTANT For the latest drivers and information on the Mac OS X you are using visit http solutions brother com For Mac OS X 10 4 0 to 10 4 10 users upgrade to Mac OS X 10 4 11 10 6 x If you have previously set up your machine for a wireless network and then want to set it up on a wired network you should check that the machine s Network...

Страница 26: ... Start Here OSX icon to install c Choose Wired Network Connection and then click Next Follow the on screen instructions d Please wait it will take a few seconds for the software to install After the installation the Brother software will search for the Brother device e If the machine is configured for your network choose the machine from the list and then click OK IMPORTANT Make sure that the cabl...

Страница 27: ...machine with multiple computers on the network install MFL Pro Suite on each computer Go to step 18 on page 26 Also see step 16 on page 25 before you install Note If your machine is not found over the network confirm your network settings If this screen appears click OK Enter a name for your Macintosh in Display Name up to 15 characters long and click OK Go to f The name you enter will appear on t...

Страница 28: ...d in both a wired and wireless network only one of the connection methods can be used at a time The following instructions are for infrastructure mode connected to a computer through an access point router Infrastructure Mode a Access point router b Wireless Network machine your machine c Wireless capable computer connected to the access point router d Wired computer connected to the access point ...

Страница 29: ...ettings of your wireless access point router in the area below IMPORTANT If you do not know this information Network Name SSID ESSID and Password you cannot continue the wireless setup You should see the documentation provided with your wireless access point router consult the router manufacturer or your system administrator Item Record the current wireless network settings Network Name SSID ESSID...

Страница 30: ... Wireless Settings on page 45 Press OK when you have entered all the characters then press 1 for Yes to apply your settings Go to d d Your machine will now try to connect to your wireless network using the information you have entered If successful Connected will appear for 60 seconds on the LCD It may take a few minutes to connect to your wireless network e Press OK Wireless setup is now complete...

Страница 31: ...31 For Wireless Network Users Wireless Network To install MFL Pro Suite continue to step 19 For Windows Users Now go to Page 34 For Macintosh Users Now go to Page 38 ...

Страница 32: ...er or access point Try starting from c again If the same message is indicated again reset the machine back to the default factory settings and try again For resetting see Restore the network settings to factory default on page 45 If the LCD shows Setting WLAN then Connection Failed or Incorrect Mode a session overlap or connection failure was detected see the table below the machine has detected 2...

Страница 33: ...33 For Wireless Network Users Wireless Network Wireless setup is now complete To install MFL Pro Suite continue to step 19 For Windows Users Now go to Page 34 For Macintosh Users Now go to Page 38 ...

Страница 34: ...If there are any programs running close them Make sure there are no memory cards or a USB Flash memory drive inserted into the machine The screens may differ depending on your operating system The supplied CD ROM includes ScanSoft PaperPort 11SE This software supports Windows 2000 SP4 or greater XP SP2 or greater XP Professional x64 Edition Windows Vista and Windows 7 Update to the latest Windows ...

Страница 35: ... choose Change the Firewall port settings to enable network connection and continue with the installation Recommended and click Next If you are using a firewall other than Windows Firewall or Windows Firewall is off this screen may appear See the instructions provided with your firewall software for information on how to add the following network ports For network scanning add UDP port 54925 For n...

Страница 36: ...uite and the installation will be terminated Confirm your settings by following the on screen instructions If you encounter this failure go to step 17 a on page 29 and setup the wireless connection again If you are using WEP and the LCD displayed Connected but your machine is not found make sure you entered the WEP key correctly The WEP key is case sensitive If the IP address of the machine is not...

Страница 37: ...Note Internet access is required for the firmware update Note Network license Windows This product includes a PC license for up to 2 Users This license supports the installation of the MFL Pro Suite including ScanSoft PaperPort 11SE on up to 2 PCs on the network If you want to use more than 2 PCs with ScanSoft PaperPort 11SE installed please purchase the Brother NL 5 pack which is a multiple PC li...

Страница 38: ...e to install After the installation this window will appear Choose your machine from the list and then click OK f When this screen appears click Next g When the Brother Support screen appears click Close to finish the installation or go to step 21 IMPORTANT For the latest drivers and information on the Mac OS X you are using visit http solutions brother com For Mac OS X 10 4 0 to 10 4 10 users upg...

Страница 39: ...ager icon to go to the Presto PageManager download site and follow the on screen instructions 22 Install MFL Pro Suite on additional computers if needed If you want to use your machine with multiple computers on the network install MFL Pro Suite on each computer Go to step 19 on page 38 Finish The installation is now complete Note If you specify an IP Address for the machine you must set the Boot ...

Страница 40: ...ons on how to use FaceFilter Studio download and install FaceFilter Studio Help a To run FaceFilter Studio go to Start All Programs Reallusion FaceFilter Studio on your computer b Click the button on the upper right corner of the screen c Click Check for updates to go to the Reallusion update web page d Click the Download button and choose a folder to save the file in e Close FaceFilter Studio bef...

Страница 41: ...ances text and images from photos taken of your whiteboard Internet access required a Open the main menu again by ejecting and then reinserting the CD ROM or by double clicking the start exe program from the root folder b The CD ROM main menu will appear Choose your language and then click Additional Applications c Click the BookScan Whiteboard Suite button to install IMPORTANT The machine must be...

Страница 42: ...e tools folder c Double click the nettool folder d Double click the BrotherNetTool exe file e When this screen appears follow the on screen instructions f When you have completed the instructions click on Print Test Page from the tool The test page will confirm the network connection to the machine is working Note For Windows Vista and Windows 7 when the User Account Control screen appears click C...

Страница 43: ...k and Gateway using BRAdmin Light a Start BRAdmin Light It will search for new devices automatically b Double click the unconfigured device c Choose STATIC for the Boot Method Enter the IP Address Subnet Mask and Gateway and then click OK d The address information will be saved to the machine Note If you require more advanced printer management use the latest Brother BRAdmin Professional utility v...

Страница 44: ...ubnet Mask and Gateway using BRAdmin Light a Double click the Macintosh HD icon on your desktop b Choose Library Printers Brother and then Utilities c Double click the file BRAdmin Light jar and run the software BRAdmin Light will then search for new devices automatically d Double click the unconfigured device e Choose STATIC for the Boot Method Enter the IP Address Subnet Mask and Gateway and the...

Страница 45: ... can access the character you want For configuring wireless network settings Putting spaces To enter a space in a name press c twice between characters Making corrections If you entered a letter incorrectly and want to change it press d or c to move the cursor under the incorrect character press Clear Back Re enter the correct character You can also back up and insert letters Repeating letters If ...

Страница 46: ...tware License Agreement specific to its proprietary programs Any trade names and product names of companies appearing on Brother products related documents and any other materials are all trademarks or registered trademarks of those respective companies Compilation and Publication Under the supervision of Brother Industries Ltd this manual has been compiled and published covering the latest produc...

Отзывы: