background image

12

Feeding paper

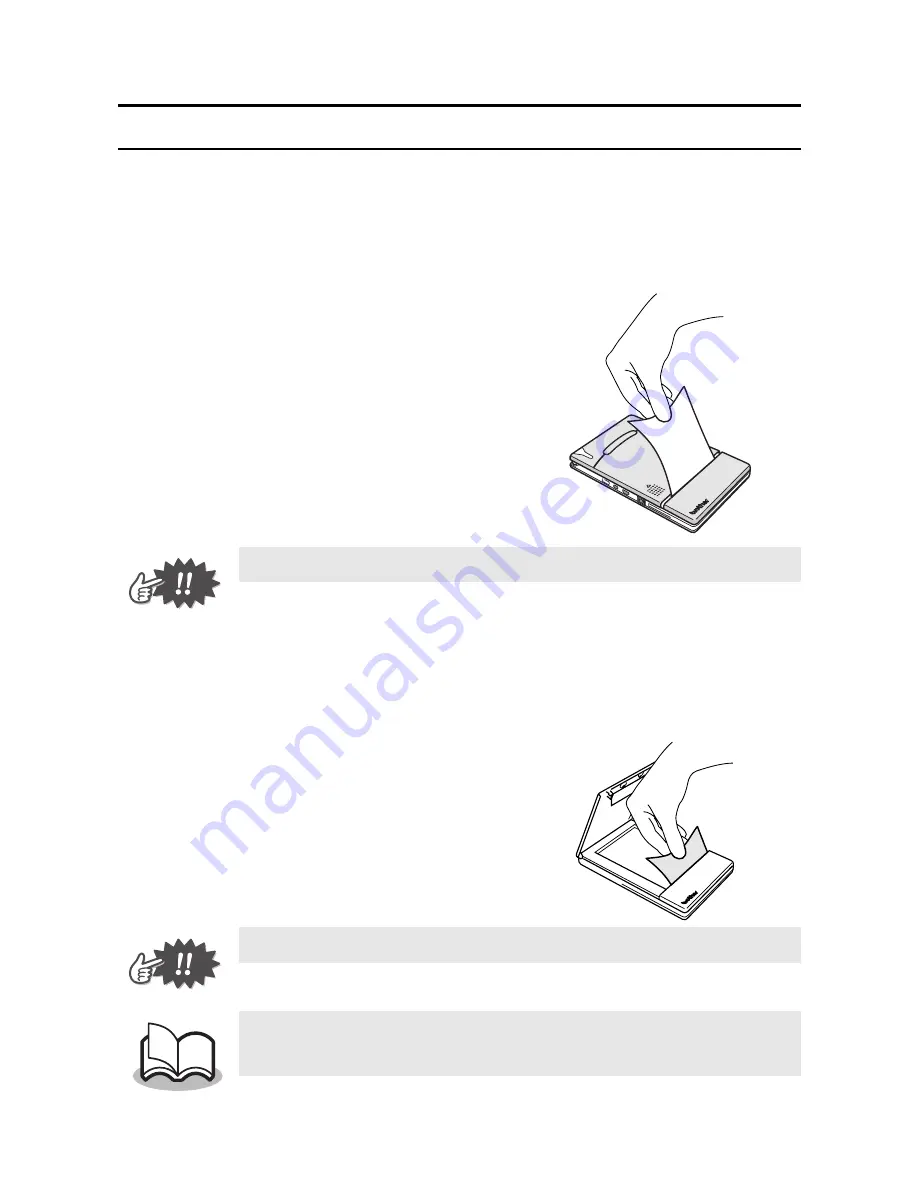
If a paper misfeed occurs, remove the paper according to the fol-
lowing procedure.

If the paper has fed out of the paper output slot:

1

Pull the paper out from the 
paper output slot.

If the paper has not fed out of the paper output slot:

1

Open the paper cassette cover.

2

Remove the paper cas-
sette.

3

Pull out the misfed paper.

When pulling out the paper, be sure not to tear it.

When pulling out the paper, be sure not to tear it.

Pulling out the paper will not affect the operation 
of the printer.

Содержание m-PRINT MW-120

Страница 1: ... reference Owner s Manual Manual del usuario General Description Operating Procedures Appendix etc MW 120 Mobile Printer Impresora móvil z Antes de usar esta impresora asegúrese de leer esta Manual del usuario z Aconsejamos mantener este manual a mano para futuras consultas Descripción general Procedimientos de manejo Apéndice etc ...

Страница 2: ...ce must accept any interference received including interference that may cause undesired operation This equipment has been tested and found to comply with the limits for a Class B digital device pursuant to Part 15 of the FCC Rules These limits are designed to provide reasonable protection against harmful interference in a residential installation This equipment generates uses and can radiate radi...

Страница 3: ...the use or inability to use this printer If this printer should be defective due to faulty manufacturing we shall replace it during the warranty period We assume no responsibility for damages that may result from incorrect operation of this printer by connecting incompatible equipment or using incompatible software Microsoft and Windows are registered trademarks of Microsoft Corporation in the Uni...

Страница 4: ...ions marked with this symbol may result in injuries or property damage Indicates danger Indicates danger of fire under certain circumstances Indicates danger of electric shock under certain circumstances Indicates danger of burns under certain circumstances Indicates an action that must not be performed Indicates danger of combustion if fire is nearby Indicates danger of sustaining injuries if the...

Страница 5: ...iv Indicates an action that must be performed Indicates that the power supply cord must be unplugged from the electrical outlet ...

Страница 6: ...otherwise a fire an electric shock or dam age may result y If foreign objects are dropped into the printer immediately turn it off unplug the AC adapter from the electrical outlet and then contact the sales representative where it was pur chased If you continue to operate the printer a fire an electric shock or damage may result y Do not operate recharge or store the printer in the follow ing loca...

Страница 7: ...e warranty does not cover repairs for damage resulting from disassembly or alter ations performed by the user y The printer may be damaged if it is dropped or subjected to strong shocks for example from being stepped on If you continue to operate a damaged printer a fire or an electric shock may result If the printer is damaged immediately turn it off unplug the AC adapter from the electrical outl...

Страница 8: ... with the AC adapter before the printer is used y Do not leave the printer in a closed car under a hot sun otherwise it may be damaged y If the printer is not to be used for a long period of time be sure to charge the lithium ion battery at least once every six months in order to prevent a reduction in the efficiency and life of the battery y This printer is powered with a built in lithium ion bat...

Страница 9: ... y Do not try to disassemble alter or repair the AC adapter otherwise fire electric shock or injuries may result For servicing adjustments or repairs contact the sales representative where the printer was purchased y Do not spill water or drinks such as coffee or juice on the AC adapter In addition do not use the adapter in a loca tion where it may get wet otherwise combustion or electric shock ma...

Страница 10: ...t it Do not bind it Do not severely bend it Do not allow it to be Do not pull on it pinched y If the AC adapter is damaged request a new one from the sales representative where the printer was purchased y Keep the AC adapter out of the reach of children particu larly infants otherwise injuries may result y Do not use the AC adapter near microwave ovens other wise damage may result y Do not use the...

Страница 11: ...ed for a long period of time be sure to unplug the AC adapter from the unit and the electri cal outlet for safety reasons y Do not wind the AC adapter cable around the adapter or bend the cable otherwise the cable may be damaged Warning ...

Страница 12: ...ter is charging or printing This does not indicate a malfunction When the printer is not used unplug the power supply plug from the electrical outlet Do not block the paper output slot If the AC adapter connector or USB port becomes dirty incor rect connection or incorrect charging may result Periodically clean the connector and port with a dry cotton swab When cleaning the printer use a soft dry ...

Страница 13: ...therwise the paper may become discolored Do not use paper that has been exposed to condensation Do not try to use paper transferred from one paper cas sette to another otherwise a malfunction may result Do not try to reuse paper that has already passed through the printer otherwise a malfunction may result Do not open the paper cassette cover or pull out or push in the paper while the printer is p...

Страница 14: ...e discolored peel off be difficult to remove leave adhesive behind or damage the surface that it was affixed to Before using the adhesive backed paper test it by affix ing a small piece to an inconspicuous area of the intended surface Do not affix the adhesive backed paper to people animals or plants Also do not affix it to public property or other peoples possessions without permission ...

Страница 15: ...xiv ...

Страница 16: ...ing Procedures 3 Charging 3 Turning on the printer 5 Preparing the paper 6 Installing the paper cassette 8 Sending data from a Pocket PC or computer 10 Feeding paper 12 Maintenance 13 Disposing of this printer 15 3 Appendix 16 Product specifications 16 Troubleshooting 17 Indicator lights 20 CONTENTS ...

Страница 17: ...e Left side 1 General Description Paper cassette cover Paper check window Paper output slot IrDA infrared port Status indicator light AC adapter connector Power button USB port Charging indicator light Serial port ...

Страница 18: ...ry fully before using it 1 Plug the AC adapter cable into the AC adapter connector on the printer 2 Plug the AC adapter plug into a household electri cal outlet AC 110 V 120 V Charging of the built in lithium ion battery automatically begins The charging indicator light comes on in orange When charging is finished the charging indicator light goes off 3 After charging is finished disconnect the AC...

Страница 19: ... exposed to extremely high or extremely low temperatures Do not wind the AC adapter cable around the adapter or bend the cable otherwise the cable may be dam aged It takes approximately three hours for the battery to be recharged from completely empty to fully charged with the printer turned off ...

Страница 20: ...revent this printer from accidentally being turned on it will not come on if the power button is lightly pressed Therefore if the printer does not come on hold the power button pressed for a little while In order to conserve the built in lithium ion battery the printer automatically goes off if no operation is performed or if no data is sent to it for five minutes except when the battery is being ...

Страница 21: ...pare the paper cassette before installing it into the printer Be careful not to drop any paper while the paper cassette is being prepared 1 Open the lid of the paper cassette and then tear off the two pieces 1 on the sides 2 Firmly fold the lid back along the fold 2 3 Insert the tab on the lid into the slit 3 at the back of the cassette Lid Paper cassette Front Back ...

Страница 22: ...the cassette according to local regulations Do not use a torn or deformed paper cassette otherwise damage may result Do not prepare the paper cassette in an extremely humid location otherwise a malfunc tion may result Do not touch paper cassettes or paper with wet hands otherwise a malfunction may result Store the paper cassette out of extremely hot extremely humid or extremely dusty locations and...

Страница 23: ... in the direction indicated by 2 2 Insert the paper cassette The paper type indication on the paper cassette should face up The end of the paper should point toward you When loading the paper cassette make sure that it is correctly aligned and that the end of the paper is not folded otherwise a paper misfeed may result Paper type indication ...

Страница 24: ... can be seen through the paper check win dow and the paper cassette cover will be locked Do not remove the paper from the paper cassette and load it directly into the printer To change the paper type install a different paper cassette While the printer is printing do not apply pressure to the paper output slot or place anything on the printer Paper check window Paper type indication Paper output s...

Страница 25: ...rared ports are facing each other and are positioned not more than 7 9 20 cm apart 2 Start printing from the Pocket PC While data is being transmitted through the IrDA infra red port the status indicator light flashes in green During transmission do not move this printer or the Pocket PC Make sure that there are no obstacles between this printer and the Pocket PC If this printer is connected with ...

Страница 26: ...Operating Procedures 11 Sending data through a USB connection Using the enclosed USB cable this printer can be connected to a com puter or a Pocket PC supporting a USB host interface Enclosed USB cable ...

Страница 27: ...ll the paper out from the paper output slot If the paper has not fed out of the paper output slot 1 Open the paper cassette cover 2 Remove the paper cas sette 3 Pull out the misfed paper When pulling out the paper be sure not to tear it When pulling out the paper be sure not to tear it Pulling out the paper will not affect the operation of the printer ...

Страница 28: ...t with a slightly damp cloth Cleaning the paper cassette sensor If the paper cassette sensor is dirty it will not be able to correctly detect the paper cassette and a malfunction may result 1 Clean the paper cassette sensor with a dry cotton swab y Be sure to turn off the printer before cleaning it y Do not use benzene or paint thinners otherwise the printer may become discolored or deformed Paper...

Страница 29: ...y 1 Affix a piece of cellophane tape to the pick up roller 2 Remove the cellophane tape from the pick up roller Any dirt on the pick up roller is removed with the tape Rotate the pick up roller and repeat the procedure to clean the entire surface of the roller Pick up roller Cello phane tape ...

Страница 30: ... remove the lithium ion battery Removing the back cover will void the warranty Do not remove the back cover unless the printer is to be disposed of The lithium ion battery is attached to the printer with adhesive tape When removing the lithium ion battery grasp it and then pull it off of the printer Be careful not to pull on the cable When unplugging the connector do not pull on the cable Risk of ...

Страница 31: ...inuously if the battery is fully charged standard text on thermal paper with 7 cover age at an ambient temperature of 74 6 F 25 C Paper supply method Brother paper cassette automatic paper feed mechanism Paper Brother A7 cut paper 2 9 74 mm 4 1 105 mm Power supply Compact switching AC adapter for charging lithium ion battery built in 7 4 V Interface Serial Interface RS 232C Complies with USB Ver 1...

Страница 32: ...age 3 Symptom Although the print command was issued the printer does not print With an IrDA connection Remedy Make sure that there is no obstacle between this printer and the PDA and check that they are within 7 9 20 cm of each other Refer page 10 Remedy Disconnect the USB cable Refer to page 10 Remedy Disconnect the serial cable With a USB connection Remedy Check that this printer is securely con...

Страница 33: ...paper does not feed Remedy Make sure that the lid of the paper cassette is firmly folded along the fold 2 Refer to page 6 Remedy Make sure that the paper cas sette cover is securely closed Refer to page 9 Remedy The paper may be dirty Pull out the first sheet from the back of the paper cassette and then install the paper cassette again Refer to pages 6 and 8 Remedy Clean the pick up roller Refer t...

Страница 34: ... the illustration below have locked up Refer to the illustration and use the tip of a ball point pen to slide the indicated part in the direction of the arrow to free it Free the part on the opposite side using the same method Paper cassette cover A Push with the tip of a ball point pen to slide it ...

Страница 35: ...ter status Green Constantly lit Waiting to receive data Flashing Receiving data Red Flashing An error has occurred Constantly lit A system error has occurred Error description Remedy There is no paper cassette installed The paper cassette is installed facing the wrong direction There is no more paper Correctly install a paper cas sette containing paper A paper misfeed occurred Remove the misfed pa...

Страница 36: ...or Indicator light status Printer status Orange Constantly lit Charging Off Finished charging Flashing Malfunctioning built in battery Indicator light status Battery level Off More than 60 charged Flashes once Less than 60 charged Flashes twice Less than 30 charged Continues to flash 3 times Almost empty When the battery level is less than 60 charged recharge the battery If the charging indicator ...

Страница 37: ...m x 2 9 74 mm C 41 A7 Cut label sheet 4 Sheet 1 0 26 25 mm x 2 9 74 mm C 42 A7 Cut label sheet 2 Sheet 2 1 52 5 mm x 2 9 74 mm C 51 Carbon Paper 2 ply 2S 100 Two way stand PG 100 Paper guide PCS 100 Carrying Case RC 120 Serial Cable D sub 9pins Count 50 sheets cassette thermal paper 30 sheets cassette all others ...

Страница 38: ...States and does not include shipping outside the United States What is the length of the Warranty Periods Machines one year from the origi nal purchase date Accompanying Consumable and Acces sory Items 90 days from the original pur chase date or the rated life of the Consumable Item whichever occurs first What is NOT covered This warranty does not cover 1 Physical damage to this Product 2 Damage c...

Страница 39: ...nd or accompanying Con sumable and Accessory Items at no charge to you for parts or labor The decision as to whether to repair or replace the Machine and or accom panying Consumable and Accessory Items is made by Brother in its sole discretion Brother reserves the right to supply a refurbished or remanu factured replacement Machine and or accompanying Consumable and Accessory Items and use refur b...

Страница 40: ...expired or has not been sufficiently validated with a copy of the proof of purchase bill of sale The replacement Machine you receive even if refurbished or remanufactured will be covered by the balance of the limited warranty period remaining on the origi nal Product plus an additional thirty 30 days You will keep the replace ment Machine that is sent to you and your original Machine shall become ...

Страница 41: ...e that change Important We recommend that you keep all original packing materials in the event that you ship this product Register your product By registering your product with Brother International Corporation you will be recorded as the original owner of the product Your registra tion with Brother may serve as a confirmation of the purchase date of your product should you lose your receipt may s...

Страница 42: ...m Supplies Accessories www brothermall com or 888 879 3232 BROTHER INTERNATIONAL CORPORATION 100 SOMERSET CORPORATE BLVD BRIDGEWATER NEW JERSEY 08807 0911 Please record your model and serial number and your date and location of Purchase below for your records Keep this information with your proof of purchase bill of sale in case your Product requires service Model Serial Date of purchase Store whe...

Страница 43: ...28 ...

Страница 44: ...Manual del usuario ...

Страница 45: ......

Страница 46: ...iba que incluye interferencias que puedan causar un funcionamiento no deseado Este equipo se ha comprobado y cumple los límites establecidos para un dispositivo digital de clase B conforme a la Parte 15 de la normativa de la FCC Estos límites se han diseñado para proporcionar una protección razonable contra las interferencias indeseables en una instalación doméstica Este equipo genera utiliza y pu...

Страница 47: ... o de la imposibilidad de usarla Si esta impresora presenta fallos debidos a una fabricación defectuosa nos comprometemos a reponerla durante el periodo de garantía No asumimos ninguna responsabilidad por los daños que puedan derivarse de la utilización indebida de software o equipos incompatibles en esta impresora Microsoft Windows Windows NT y Windows Mobile son marcas comerciales registradas o ...

Страница 48: ...ste manual Precauciones Advertencia El incumplimiento de las instrucciones marcadas con este símbolo puede producir lesiones graves e incluso la muerte Precaución El incumplimiento de las instrucciones marcadas con este símbolo puede producir lesiones o daños materiales Indica peligro Indica peligro de incendio en determinadas circunstancias Indica peligro de descarga eléctrica en determinadas cir...

Страница 49: ...pecificada Indica peligro de descarga eléctrica si la operación se realiza con las manos mojadas Indica peligro de descarga eléctrica si la impresora está expuesta al agua Indica una acción que se debe realizar Indica que el cable de alimentación se debe desenchufar de la toma de corriente eléctrica ...

Страница 50: ... debidos a las ondas electromagnéticas No asumimos ninguna responsabilidad por lesiones resultantes de interferencias causadas por las ondas electromagnéticas y No inserte objetos extraños en la impresora o en sus conectores y puertos ya que podría ocasionar un incendio una descarga eléctrica u otros daños y Si algún objeto extraño cae dentro de la impresora apáguela de inmediato desenchufe el ada...

Страница 51: ... indicar que la batería integrada se ha dañado Aparte la impresora de las llamas inmediatamente de lo contrario puede producirse un incendio No toque el líquido derramado Este líquido puede provocar lesiones si entra en contacto con los ojos o la piel Si el líquido entra en contacto con los ojos lávelos inmediatamente con agua y consulte a un médico Si entra en contacto con la piel o la ropa lável...

Страница 52: ... descarga eléctrica u otros daños Apague la impresora inmediatamente desenchufe el adaptador de CA de la toma de corriente y póngase en contacto con el representante de ventas del establecimiento en el que la adquirió para que se lleven a cabo las reparaciones pertinentes y No cargue la impresora con un cargador distinto del especificado y Si la impresora no se carga completamente una vez transcur...

Страница 53: ... de tiempo asegúrese de cargar la batería de ión litio al menos una vez cada seis meses con el fin de impedir que se reduzcan su eficiencia y su vida útil y Esta impresora está alimentada por una batería de ión litio integrada Si la impresora sólo se puede utilizar durante un breve periodo de tiempo a pesar de estar completamente cargada es posible que la batería haya llegado al final de su vida ú...

Страница 54: ...r una descarga eléctrica y No trate de desmontar alterar o reparar el adaptador de CA porque podría provocar un incendio una descarga eléctrica o lesiones Para las tareas de mantenimiento ajuste o reparación póngase en contacto con el representante de ventas del establecimiento en el que adquirió la impresora y No derrame agua ni bebidas como café o zumos sobre el adaptador de CA Asimismo no utili...

Страница 55: ...fique No lo exponga al calor No lo retuerza No lo ate No lo doble No permita que quede excesivamente atrapado entre dos objetos No tire de él y Si el adaptador de CA está dañado pida uno nuevo al representante de ventas del establecimiento en el que adquirió la impresora y Mantenga el adaptador de CA fuera del alcance de los niños especialmente de los más pequeños ya que podrían sufrir lesiones y ...

Страница 56: ...e corriente para evitar que se produzca una descarga eléctrica y Si la impresora no se va a utilizar durante un periodo prolongado de tiempo asegúrese de desenchufar el adaptador de CA de la unidad y de la toma de corriente por razones de seguridad y No enrolle el cable del adaptador de CA en torno al adaptador ni lo doble porque podría dañarse Advertencia ...

Страница 57: ...ra se seque por sí sola antes de utilizarla La caja del adaptador de CA y la impresora pueden llegar a calentarse mientras la impresora está cargándose o imprimiendo Esto no significa que hay un problema de funcionamiento Cuando la impresora no esté en uso desconecte el enchufe de suministro eléctrico de la toma de corriente No obstaculice la ranura de salida del papel Si se ensucia el puerto USB ...

Страница 58: ...a decolorarse y pueden producirse fallos Asegúrese de cerrar la tapa del paquete de papel antes de guardarlo ya que de lo contrario el papel podría decolorarse No deje paquetes de papel en automóviles cerrados expuestos a un sol intenso porque podrían decolorarse Después de abrir la caja de paquetes de papel ciérrela de nuevo lo antes posible porque de lo contrario el papel podría decolorarse No u...

Страница 59: ...iento Dependiendo de las condiciones ambientales del lugar y de la calidad del material al que está pegado el papel adhesivo puede que éste se decolore se despegue sea difícil de separar manche de adhesivo la impresora o dañe la superficie a la que estaba adherido Antes de utilizar papel adhesivo haga una prueba pegando un trozo pequeño a un área poco visible de la superficie que se pretende utili...

Страница 60: ...ga 3 Encendido de la impresora 5 Preparación del papel 6 Instalación del paquete de papel 8 Envío de datos desde un equipo o PC de bolsillo 10 Alimentación del papel 12 Mantenimiento 13 Eliminación de la impresora 15 3 Apéndice 16 Especificaciones del producto 16 Diagnóstico de problemas 18 Luces indicadoras 21 CONTENIDO ...

Страница 61: ...ión general Cubierta del paquete de papel Ventana de comprobación de papel Ranura de salida de Puerto de infrarrojos IrDA Luz indicadora de estado Conector del adaptador de CA Botón de encendido Puerto USB Luz indicadora de carga Puerto serie ...

Страница 62: ...atería 1 Inserte el cable del adaptador de CA en el conectorcorrespondiente de la impresora 2 Inserte el enchufe del adaptador de CA en la toma de corriente de la pared CA 110 V 120 V La carga de la batería de ión litio integrada comienza automáticamente La luz indicadora de carga se enciende con color naranja Cuando se termina de cargar la luz indicadora de carga se apaga 3 Cuando se haya termina...

Страница 63: ...ad está situada en un lugar expuesto a temperaturas extremas No enrolle el cable del adaptador de CA en torno al adaptador ni lo doble porque podría dañarse La batería tarda unas tres horas en recargarse completamente desde un estado de descarga total con la impresora apagada ...

Страница 64: ...impedir el encendido accidental la impresora no se enciende si el botón de encendido se pulsa levemente Por tanto si la impresora no se enciende mantenga pulsado el botón de encendido durante unos segundos A fin de evitar un desgaste innecesario de la batería de ión litio integrada la impresora se apaga automáticamente si no se ejecuta ninguna operación o si no se envían datos durante cinco minuto...

Страница 65: ... paquete de papel antes de instalarlo en la impresora Tenga cuidado de no dejar caer papel mientras prepara el paquete de papel 1 Abra la tapa del paquete de papel y arranque las dos piezas 1 de los lados 2 Con firmeza vuelva a colocar la tapa a lo largo del pliegue 2 3 Inserte la pestaña de la tapa dentro de la ranura 3 situada en la parte trasera del paquete Tapa Paquete de papel Parte delantera...

Страница 66: ...oto deformado o con cualquier otra irregularidad ya que pueden producirse daños No prepare el paquete de papel en una zona con un nivel elevado de humedad porque pueden producirse fallos de funcionamiento No toque los paquetes de papel o el papel con las manos húmedas ya que podrían producirse fallos de funcionamiento Guarde el paquete de papel lejos de lugares con niveles elevados de temperatura ...

Страница 67: ...ción indicada por 2 2 Inserte el paquete de papel La indicación del tipo de papel que aparece en el paquete debe quedar hacia arriba El extremo del papel debe apuntar hacia usted Al cargar el paquete de papel asegúrese de que lo ha alineado correctamente y de que el extremo final del papel no está doblado De lo contrario podría producirse un fallo en la alimentación Indicación del tipo de papel ...

Страница 68: ...e a través de la ventana de comprobación de papel y la cubierta del paquete estará bloqueada No saque el papel del paquete cargue el paquete directamente en la impresora Para cambiar el tipo de papel instale un paquete de papel diferente Mientras la impresora está imprimiendo no aplique presión sobre la ranura de salida de papel ni coloque ningún objeto sobre la impresora Ventana de comprobación d...

Страница 69: ...ada con la impresora Envío de datos a través de la conexión IrDA Un PC de bolsillo se puede comunicar con esta impresora a través de su puerto de infrarrojos IrDA 1 Coloque la impresora y el PC de bolsillo de manera que sus puertos de infrarrojos IrDA estén uno frente al otro a una distancia no superior a 7 9 20 cm 2 Empiece a imprimir desde el PC de bolsillo Mientras los datos se transmiten a tra...

Страница 70: ... bolsillo Asegúrese de que no hay ningún obstáculo entre la impresora y el PC de bolsillo Si la impresora está conectada mediante un cable USB o el PC de bolsillo está conectado a través de una conexión serie no se puede utilizar la transmisión por infrarrojos La transmisión por infrarrojos IrDA no es posible con los equipos personalos Para obtener información detallada consulte el manual de instr...

Страница 71: ...ga el papel tirando de él por la ranura de salida Si el papel no sobresale por la ranura de salida del papel 1 Abra la cubierta del paquete de papel 2 Saque el paquete de papel 3 Saque el papel que ha generado el error de alimentación Al tirar del papel tenga cuidado de que no se rasgue Al tirar del papel tenga cuidado de que no se rasgue Tirar del papel hacia fuera no afectará al funcionamiento d...

Страница 72: ...n un trapo ligeramente humedecido Limpieza del sensor del paquete de papel Si el sensor del paquete de papel está sucio no podrá detectar correctamente el paquete de papel y pueden producirse fallos 1 Limpie el sensor del paquete de papel con una torunda de algodón seca y Asegúrese de apagar la impresora antes de limpiarla y No utilice benceno o disolventes ya que la impresora podría decolorarse o...

Страница 73: ...el 1 Pegue un trozo de cinta adhesiva en el rodillo de captación 2 Quite la cinta adhesiva del rodillo de captación La suciedad que pudiera haber en el rodillo de captación se elimina al despegar la cinta Gire el rodillo de captación y repita el procedimiento hasta limpiar toda su superficie Rodillo de captación Cinta adhesiva ...

Страница 74: ... de ión litio Al abrir la cubierta trasera la garantía quedará invalidada No quite la cubierta trasera a menos que tenga intención de desechar la impresora La batería de ión litio está fijada a la impresora con cinta adhesiva Sujete la batería de ión litio y tire de ella para sacarla de la impresora Tenga cuidado de no tirar del cable No tire del cable para desenchufar el conector Existe riesgo de...

Страница 75: ...tá completamente cargada texto estándar sobre papel térmico con cobertura del 7 a una temperatura ambiente de 74 6 F 25 C Método de suministro de papel Paquete de papel Brother mecanismo automático de alimentación de papel Papel Papel cortado A7 de Brother 2 9 74 mm 4 1 105 mm Suministro eléctrico Adaptador de CA de conmutación compacto para la carga batería de ión litio integrada de 7 4 V Interfa...

Страница 76: ... impresión Tipo normal Tamaño A7 2 9 74 mm 4 1 105 mm 2 7 69 mm 3 9 100 mm Hojas de etiquetas cuatro en vertical 2 9 74 mm 1 0 26 25 mm 2 7 69 mm 0 8 21 25 mm Hojas de etiquetas dos en vertical 2 9 74 mm 2 1 52 5 mm 2 7 69 mm 1 9 47 5 mm ...

Страница 77: ...sten obstáculos entre la impresora y el PDA y compruebe que se encuentran a menos de 7 9 20 cm de distancia Consulte la página 10 Solución Desenchufe el cable USB Consulte la página 10 Solución Desconecte el cable de conexión en serie Con una conexión USB Solución Compruebe que la impresora está bien conectada al equipo mediante el cable USB Consulte la página 11 Con una conexión en serie Solución...

Страница 78: ...toma El papel no entra en la impresora Solución Asegúrese de que la tapa del paquete de papel está bien doblada a lo largo del pliegue 2 Consulte la página 6 Solución Asegúrese de que la cubierta del paquete de papel está firmemente cerrada Consulte la página 9 Solución El papel puede estar sucio Quite la primera hoja de la parte trasera del paquete de papel y vuelva a instalar el paquete Consulte...

Страница 79: ... A en la figura siguiente están bloqueadas Consulte la figura y con la punta de un bolígrafo deslice la pieza indicada en la dirección de la flecha para liberarla Libere la pieza del lado opuesto usando el mismo método Cubierta del paquete de papel A Con la punta de un bolígrafo empuje para deslizarla ...

Страница 80: ...ojo Parpadeando Se ha producido un error Encendida permanentemente Se ha producido un error en el sistema Descripción del error Solución No hay ningún paquete de papel instalado El paquete de papel se ha instalado al revés No queda papel Instale correctamente un paquete de papel que contenga papel Se ha producido un fallo en la alimentación de papel Saque el papel que ha provocado el fallo de alim...

Страница 81: ...a se está agotando Color de la luz indicadora Estado de la luz indicadora Estado de la impresora Naranja Encendida permanentemente En carga Apagada Carga completada Parpadeando Fallo en la batería integrada Estado de la luz indicadora Nivel de la batería Apagada Nivel de carga superior al 60 Parpadea una vez Nivel de carga inferior al 60 Parpadea dos veces Nivel de carga inferior al 30 Continúa pa...

Страница 82: ...mm x 2 9 74 mm C 41 Hoja de etiquetas cortadas A7 4 hoja 1 0 26 25 mm x 2 9 74 mm C 42 Hoja de etiquetas cortadas A7 2 hoja 2 1 52 5 mm x 2 9 74 mm C 51 Papel carbón 2 hojas 2S 100 Soporte de dos posiciones PG 100 Guía de papel PCS 100 Estuche para el transporte Recuento 50 hojas paquete papel térmico 30 hojas paquete todos los demás ...

Страница 83: ......

Отзывы: