Brother HL HL-2230 Скачать руководство пользователя страница 62

Control Panel 

58

3

Service call indications

3

If there is an error that cannot be cleared by the user, the machine will show that a service call is needed by 
lighting up all the LEDs as shown below.


If you see the service call indication shown above, turn off the power switch, and then turn it back on and try 
to print again.
If the error is not cleared after turning the power switch off and then back on, press 

Go

, the LEDs will light up 

as shown in the table below to identify the error.

1

If this error occurs, turn off the machine's power switch, wait a few seconds, and then turn it on again. Leave the machine for approx.15 minutes 
with the power on. If the error occurs again, call your dealer or Brother Customer Service.

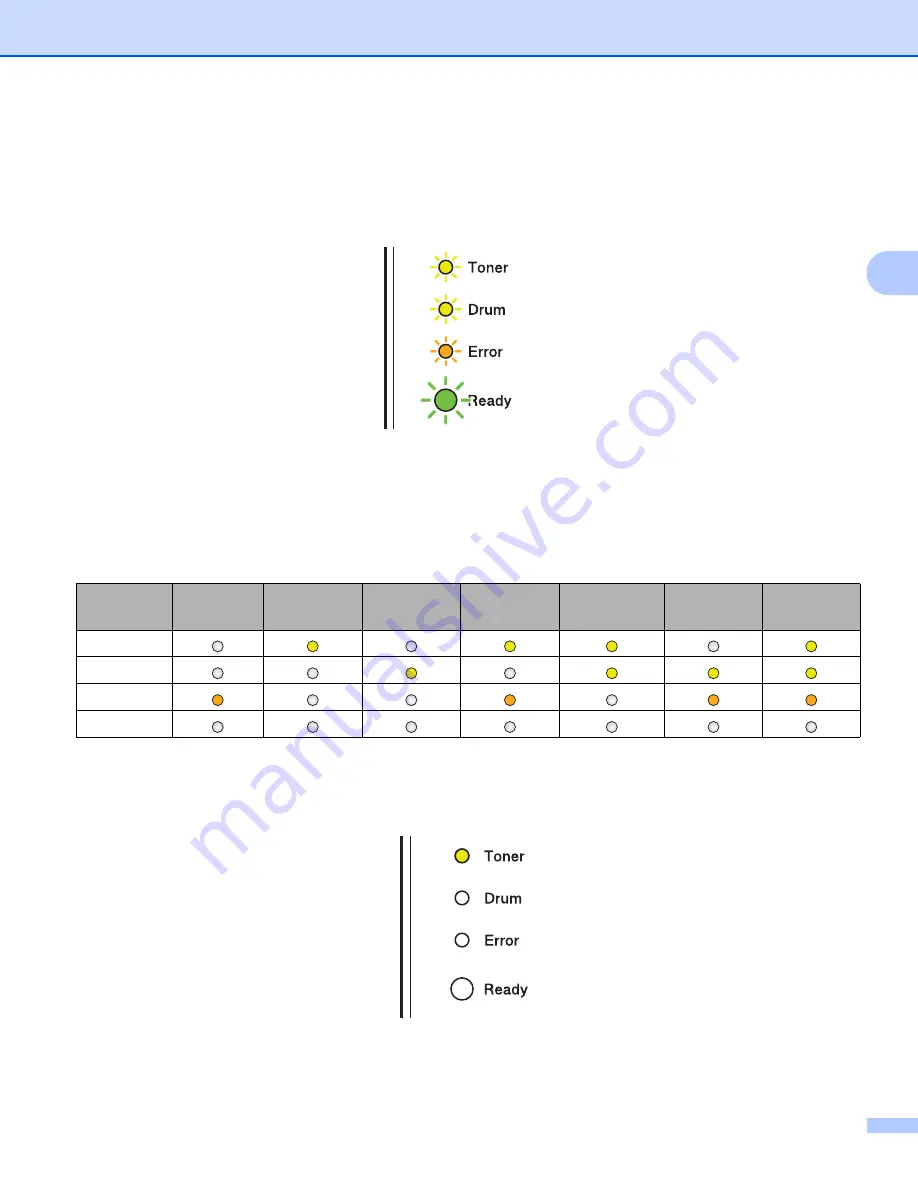
For example, the LED indication below shows a fuser unit failure.


Make a note of the indication, referring to the table on page 58, and report the error status to your dealer or 
Brother Customer Service.

LED error indication

LEDs

Main PCB 

failure

Fuser unit 

failure

1

Laser unit 

failure

Main motor 

failure

High voltage 

failure

FAN Failure Zero Cross 

Error

Toner


Drum


Error


Ready


Содержание HL HL-2230

Страница 1: ...river before you can use the machine Please use the Quick Setup Guide to set up the machine You can find a printed copy in the box Please read this User s Guide thoroughly before you use the machine Please visit us at http solutions brother com where you can get product support the latest driver updates and utilities and answers to frequently asked questions FAQs and technical questions Note Not a...

Страница 2: ... indicates a potentially hazardous situation which if not avoided may result in minor or moderate injuries IMPORTANT indicates a potentially hazardous situation which if not avoided may result in damage to property or loss of product functionality Hot Surface icons warn you not to touch machine parts that are hot Notes tell you how you should respond to a situation that may arise or give tips abou...

Страница 3: ...ex printing 22 2 Driver and Software 23 Printer driver 23 Features in the printer driver for Windows 25 Features in the printer driver for Macintosh 39 Uninstalling the printer driver 51 Printer driver for Windows 51 Printer driver for Macintosh 51 Software 52 Software for networks HL 2250DN HL 2270DW only 52 Remote Printer Console For Windows only 52 3 Control Panel 53 LEDs Light Emitting Diodes ...

Страница 4: ...h with USB 120 A Appendix 121 Machine specifications 121 Engine 121 Controller 122 Software 123 Control panel 123 Paper handling 123 Media specifications 124 Supplies 125 Dimensions weights 125 Other 126 Computer requirements 127 Important information for choosing your paper 128 Symbol and character sets HL 2250DN HL 2270DW only 131 How to use Web Based Management Web browser 131 Symbol and charac...

Страница 5: ... Face down output tray support flap 1 support flap 1 3 Control panel 4 Manual feed paper guide 5 Manual feed slot 6 Manual feed slot cover Not available for HL 2130 HL 2132 HL 2220 7 Paper tray 8 Front cover 9 Power switch 10 Ventilation hole 11 Face down output tray Printing Methods 1 1 2 3 4 6 7 11 9 10 5 8 ...

Страница 6: ...p output tray when open 2 AC power connector 3 HL 2270DW Wireless setup button 4 HL 2270DW Wireless Activity LED 5 USB interface connector 6 HL 2250DN HL 2270DW 10BASE T 100BASE TX port 7 HL 2250DN HL 2270DW Network status LEDs 1 2 7 6 5 3 4 ...

Страница 7: ...r printing you must choose the same paper size from your software application as the paper in the tray Avoid touching the printed surface of the paper immediately after printing Before you buy a lot of paper test a small quantity to make sure that the paper is suitable Recommended paper and print media 1 Europe USA Plain paper Xerox Premier TCF 80 g m2 Xerox Business 80 g m2 Xerox 4200 20 lb Hamme...

Страница 8: ...DX Media type Tray 1 Manual DX Choose the media type from the printer driver Plain paper 75 to 105 g m2 20 to 28 lb p p p Plain Paper Recycled paper p p p Recycled Paper Bond paper Rough paper 60 to 163 g m2 16 to 43 lb p Bond Paper Thin paper 60 to 75 g m2 16 to 20 lb p p p Thin Paper Thick paper 105 to 163 g m2 28 to 43 lb p Thick Paper or Thicker Paper Labels p A4 or Letter Label Envelopes p En...

Страница 9: ... 5 This machine can use recycled paper that meets DIN 19309 specifications To help you choose which paper to use with this machine see Important information for choosing your paper on page 128 Basis weight 75 90 g m2 20 24 lb Thickness 80 110 m Roughness Higher than 20 sec Stiffness 90 150 cm3 100 Grain direction Long grain Volume resistivity 10e9 10e11 ohm Surface resistivity 10e9 10e12 ohm cm Fi...

Страница 10: ...grade 392 degrees Fahrenheit If you use bond paper paper having a rough surface or paper that is wrinkled or creased the paper may exhibit degraded performance Types of paper to avoid 1 IMPORTANT Some types of paper may not perform well or may cause damage to your machine DO NOT use paper that is highly textured that is extremely smooth or shiny that is curled or warped 1 A curl of 2 mm 0 08 in or...

Страница 11: ...re what you want Types of envelopes to avoid 1 IMPORTANT DO NOT use envelopes that are damaged curled wrinkled irregularly shaped extremely shiny or textured envelopes with clasps staples snaps tie strings self adhesive components windows holes cutouts or perforations that are of a baggy construction not sharply creased embossed have raised writing on them or preprinted on the inside that were pre...

Страница 12: ...ve should be exposed between the labels Labels should be arranged so that they cover the entire length and width of the sheet Using labels with spaces may result in labels peeling off and causing serious jams or print problems All labels used in this machine must be able to withstand a temperature of 200 degrees centigrade 392 degrees Fahrenheit for a period of 0 1 seconds Do not feed a label shee...

Страница 13: ... 16 in 4 23 mm 0 16 in 4 23 mm 0 16 in 4 6 01 mm 0 24 in 6 35 mm 0 25 in 6 35 mm 0 25 in 6 01 mm 0 24 in 6 35 mm 0 25 in 6 01 mm 0 24 in 6 01 mm 0 24 in 6 01 mm 0 24 in A4 Letter Legal B5 ISO Executive A5 A6 B6 ISO 1 4 23 mm 0 16 in 4 23 mm 0 16 in 4 23 mm 0 16 in 4 23 mm 0 16 in 4 23 mm 0 16 in 4 23 mm 0 16 in 4 23 mm 0 16 in 4 23 mm 0 16 in 2 5 0 mm 0 19 in 5 08 mm 0 2 in 5 08 mm 0 2 in 5 0 mm 0...

Страница 14: ... the paper tray plain paper recycled paper and thin paper only 1 For the recommended paper to use see Type and size of paper on page 4 a Pull the paper tray completely out of the machine b While pressing the green paper guide release lever slide the paper guides to fit the paper size Make sure that the guides are firmly in the slots ...

Страница 15: ...side to be printed on must be face down The paper guides touch the sides of the paper so it will feed properly d Put the paper tray firmly back in the machine Make sure that it is completely inserted into the machine e Lift up the support flap 1 to prevent paper from sliding off the face down output tray or remove each page as soon as it comes out of the machine ...

Страница 16: ... down list of the printer driver Paper Size Media Type Paper Source For any other settings see Driver and Software in Chapter 2 g Send the print data to the machine A4 Letter Executive A5 B5 B6 A6 JIS B5 A5 Long Edge Plain Paper Thin Paper Recycled Paper Tray 1 ...

Страница 17: ...4 Note The machine automatically turns on the Manual Feed mode when you put paper in the manual feed slot a Lift up the support flap 1 to prevent paper from sliding off the face down output tray or remove each page as soon as it comes out of the machine b Open the manual feed slot cover Not available for HL 2130 HL 2132 HL 2220 ...

Страница 18: ... let go Note Put the paper into the manual feed slot with the side to be printed face up Make sure that the paper is straight and in the correct position on the manual feed slot If it is not the paper may not be fed properly resulting in a skewed printout or a paper jam DO NOT put more than one piece of paper in the manual feed slot at any one time as it may cause a jam If you put any media in the...

Страница 19: ...elopes 1 When the face up output tray is pulled down the machine has a straight paper path from the manual feed slot through to the back of the machine Use this paper feed and output method when you want to print on labels or envelopes For the recommended paper to use see Acceptable paper and other print media on page 3 and Types of envelopes to avoid on page 7 Note The machine automatically turns...

Страница 20: ...For printing envelopes only Pull down the two green levers one on the left hand side and one on the right hand side as shown in the illustration below c Open the manual feed slot cover Not available for HL 2130 HL 2132 HL 2220 ...

Страница 21: ... side to be printed face up Make sure that the full sheet of labels or the envelope is straight and in the proper position on the manual feed slot If it is not it may not be fed properly resulting in a skewed printout or a paper jam DO NOT put more than one full sheet of labels or one envelope in the manual feed slot at any one time as it may cause a jam DO NOT insert a labels sheet that has previ...

Страница 22: ... Envelope C6 choose User Defined for Windows printer driver or Manage Custom Sizes for Macintosh printer driver For more information on envelope sizes see Paper size on page 130 g Send the print data to the machine h After the printed page comes out of the machine put in the next full sheet of labels or envelope as shown in Step e Repeat for each page that you want to print i For printing envelope...

Страница 23: ...ged during printing set the Media Type to Env Thick For Windows users If the DL size double flap envelopes are creased after printing choose DL Long Edge in Paper Size from the Basic tab Put a new DL size double flap envelope in the manual feed slot with the longest edge of the envelope in first then print again Envelope joints that are sealed by the manufacturer should be secure All sides of the ...

Страница 24: ...he manual feed slot If the paper continues to curl replace the paper If the paper is not feeding properly it may be curled Remove the paper and straighten it If the paper continues to curl replace the paper When you use the manual duplex function it is possible that there may be paper jams or poor print quality If there is a paper jam see Paper jams and how to clear them on page 105 If you have a ...

Страница 25: ...driver Paper Size Media Type Paper Source Duplex Booklet Duplex Type in Duplex Settings There are four options for each orientation See Duplex Booklet on page 28 Binding Offset in Duplex Settings You can specify the offset for binding See Duplex Booklet on page 28 For any other settings see Driver and Software in Chapter 2 b Send the print data to the machine The machine will print on both sides o...

Страница 26: ...ex Booklet Duplex Type in Duplex Settings There are four options for each orientation See Duplex Booklet on page 28 Binding Offset in Duplex Settings You can specify the offset for binding See Duplex Booklet on page 28 For any other settings see Driver and Software in Chapter 2 b Send the print data to the machine The machine will print all the even numbered pages on one side of the paper first Th...

Страница 27: ...nloaded from the Brother Solutions Center at http solutions brother com If you want to uninstall the printer driver see Uninstalling the printer driver on page 51 For Windows 2 Windows printer driver For Macintosh 2 Macintosh printer driver For Linux 1 2 2 CUPS printer driver LPD LPRng printer driver 1 Download the printer driver for Linux from http solutions brother com or a link on the supplied ...

Страница 28: ...lex Booklet 1 Paper Source Scaling Reverse Print Use Watermark 1 Header Footer Print 1 Toner Save Mode Administrator 1 Use Reprint 1 Sleep Time Macro 1 2 Density Adjustment 1 Error Message Printout 1 Improve Print Output Skip Blank Page Print Profiles 1 1 These settings are not available with the Macintosh printer driver 2 These settings are only available for the HL 2250DN and HL 2270DW ...

Страница 29: ...ting Preferences dialog box by clicking Printing Preferences in the General tab of the Printer Properties dialog box Basic tab 2 You can also change settings by clicking the illustration on the left side of the Basic tab a Choose Paper Size Orientation Copies Media Type Resolution and Print Settings 1 b Choose Multiple Page and Duplex Booklet setting 2 c Choose Paper Source 3 d Click OK to apply y...

Страница 30: ...cape Copies 2 The copies selection sets the number of copies that will be printed Collate With the Collate check box selected one complete copy of your document will be printed and then will be repeated for the number of copies you selected If the Collate check box is not selected then each page will be printed for all the copies selected before the next page of the document is printed Portrait La...

Страница 31: ...he print setting Graphics This is the best mode for printing documents that contain graphics Text This is the best mode for printing text documents Manual You can change the settings manually by choosing Manual and clicking the Manual Settings button You can set brightness contrast and other settings Multiple Page 2 The Multiple Page selection can reduce the image size of a page allowing multiple ...

Страница 32: ...anual The machine prints all the even numbered pages first Then the printer driver will stop and show the instructions required to re install the paper When you click OK the odd numbered pages will be printed When you choose Duplex or Duplex Manual the Duplex Settings button becomes available to choose You can set following settings in the Duplex Settings dialog box Duplex Type There are four type...

Страница 33: ... set following settings in the Duplex Settings dialog box Duplex Type There are two types of duplex binding direction available for each orientation Booklet Printing Method When Divide into Sets is selected This option allows you to print the whole booklet into smaller individual booklet sets it still allows you to fold at the center of the smaller individual booklet sets without having to change ...

Страница 34: ...f the following icons Scaling 1 Reverse Print 2 Use Watermark 3 Header Footer Print 4 Toner Save Mode 5 Administrator 6 Other Print Options 7 Scaling 2 You can change the print image scaling Reverse Print 2 Check Reverse Print to rotate the print result by 180 degrees 1 2 3 4 5 6 7 ...

Страница 35: ...t If you select Custom and enter the text in the Custom edit box the text you entered will print Toner Save Mode 2 You can conserve toner use with this feature When you set Toner Save Mode to On print appears lighter The default setting is Off Note We do not recommend Toner Save Mode for printing Photo or Gray Scale images Toner Save Mode is not available for HQ 1200 resolution Administrator 2 Adm...

Страница 36: ...leep mode the machine acts as though it were turned off When you choose Printer Default the timeout setting will be reset to the specific time set at the factory this can be altered in the driver Intelligent Sleep Mode automatically adjusts to the most suitable timeout setting depending on the frequency of your machine use While the machine is in sleep mode the Ready LED is dimmed but the machine ...

Страница 37: ...provement change the printer driver setting in Media Type to a thick setting Reduce Ghosting If you are using the machine in a high humidity environment this setting may reduce ghosting on the paper Do not use this setting if the humidity is below 30 or ghosting may increase Note This feature may not reduce ghosting for all types of paper Before you buy a lot of paper test a small quantity to make...

Страница 38: ... desired profile and click OK to configure the desirable print settings easily Edit a profile 2 You can edit and save a new print profile Restore default profiles 3 Click to restore all the default print profiles Always show Print Profile tab first 4 When you always want to show the Print Profiles tab first select this check box 1 3 2 4 ...

Страница 39: ...ee Basic tab on page 25 and Advanced tab on page 30 b Click the Print Profiles tab c Click the Edit a profile button d Choose the icon from the drop down list 1 and enter a profile name 2 e Choose the print profile you want to overwrite and click OK Note You can overwrite the preset print profiles 2 1 ...

Страница 40: ...ite 2 You can visit our website for original Brother supplies by clicking this button Brother CreativeCenter 3 You can visit our website for a free and easy online solution for business and home uses by clicking this button Print Settings 4 This will print the pages that show how the internal settings of the machine have been configured Check Setting 5 You can check the current driver settings Abo...

Страница 41: ...ntifies the paper size defined for each paper tray Paper Size This setting allows you to define which paper size is used for the tray and manual feed slot Highlight the paper source you want to define and then choose the paper size from the drop down list Click Update to apply the setting to the tray Default Source This setting allows you to choose the default paper source that your document will ...

Страница 42: ...ns The machine s power switch is off The machine is in an error mode The machine is in a network shared environment The cable is not connected to the machine correctly Status Monitor 2 This reports the machine status any errors that may happen with the machine when printing If you would like to turn the status monitor on follow these steps Click the Start button All Programs 1 Brother your machine...

Страница 43: ...h will vary depending on your operating system Choosing page setup options 2 a From an application such as Apple TextEdit click File then Page Setup Make sure HL XXXX where XXXX is your model name is chosen in the Format for pop up menu You can change the settings for Paper Size Orientation and Scale then click OK b From an application such as Apple TextEdit click File then Print to start printing...

Страница 44: ...ge setup options click the disclosure triangle beside the Printer pop up menu Choosing printing options 2 To control special printing features choose the options in the Print dialog box For the details of available options see the following descriptions of each option ...

Страница 45: ...s function Cover Page Type Choose a template for the cover page Billing Info If you want to add the billing information to the cover page enter text in the Billing Info box Layout 2 Pages per Sheet Choose how many pages will appear on each side of the paper Layout Direction When you specify the pages per sheet you can also specify the direction of the layout ...

Страница 46: ...Duplex Printing HL 2240D HL 2242D HL 2250DN HL 2270DW only on page 48 Reverse Page Orientation Mac OS X 10 5 x and 10 6 x only Check Reverse Page Orientation to reverse the data from up to down Flip Horizontally Mac OS X 10 6 x only Check Flip Horizontally to print as a reflection flipped left to right ...

Страница 47: ... in the Print Settings list Basic tab Media Type You can change the media type to one of the following Plain Paper Thin Paper Thick Paper Thicker Paper Bond Paper Envelopes Env Thick Env Thin Recycled Paper Label Resolution You can change the resolution as follows 300 dpi 600 dpi HQ 1200 ...

Страница 48: ...nual Reverse Print For Mac OS X 10 4 11 only Check Reverse Print to rotate the data by 180 degrees Advanced tab Graphics Quality You can change the print quality as follows Graphics This is a graphics mode contrast priority Choose this setting for printing text and figures such as business and presentation documents You can represent sharp contrasts between shaded areas Text This is the best mode ...

Страница 49: ...educe ghosting on the paper Do not use this setting if the humidity is below 30 or ghosting may increase Note This feature may not reduce ghosting for all types of paper Before you buy a lot of paper test a small quantity to make sure that the paper is suitable Sleep Time When the machine does not receive data for a certain period of time it enters sleep mode In sleep mode the machine acts as thou...

Страница 50: ...er product including FAQs Frequently Asked Questions User s Guides driver updates and tips for using your machine Visit the Genuine Supplies website You can visit our website for original Brother supplies by clicking this button Brother CreativeCenter You can visit our website for a free and easy online solution for business and home uses by clicking this button ...

Страница 51: ... click Print c Turn the paper over and reload it in the tray and then choose Even numbered pages and click Print For Mac OS X 10 5 x and 10 6 x a Select Paper Handling b Choose Odd only in Pages To Print and click Print c Turn the paper over and reload it in the tray and then choose Even only in Pages To Print and click Print ...

Страница 52: ...240D HL 2242D HL 2250DN HL 2270DW only 2 For Mac OS X 10 4 11 a Select Layout b Choose Long edged binding or Short edged binding in Two Sided c Select Paper Handling d Choose All pages in Print and click Print You can print pages on both sides of the paper ...

Страница 53: ...6 x a Select Layout b Choose Long edge binding or Short edge binding in Two Sided Automatically the Two Sided check box is checked c Select Paper Handling d Choose All pages in Pages To Print and click Print You can print pages on both sides of the paper ...

Страница 54: ...ilities then choose the machine b Click the Utility then the status monitor will start up For Mac OS X 10 5 x a Run the System Preferences select Print Fax then choose the machine b Click the Open Print Queue then click Utility The status monitor will start up For Mac OS X 10 6 x a Run the System Preferences select Print Fax then choose the machine b Click the Open Print Queue then click Printer S...

Страница 55: ...ame b Click UnInstall c Follow the instructions on the screen 1 Programs for Windows 2000 users Printer driver for Macintosh 2 For Mac OS X 10 4 11 2 a Disconnect the USB cable between the Macintosh and your machine b Log on as an Administrator c Run the Printer Setup Utility from Go menu choose Applications Utilities then choose the machine you want to remove and remove it by clicking the Delete ...

Страница 56: ...t and so on These settings are then remembered and used by the machine The application and printer driver settings will take priority over the Remote Printer Console settings How to use and install the Remote Printer Console software 2 To use the Remote Printer Console software follow the steps below a Put the supplied installation CD ROM into your CD ROM drive and close the opening screen when it...

Страница 57: ... the Toner is low 2 Drum LED The Drum LED indicates that the Drum will need to be replaced soon 3 Error LED The Error LED indicates when the machine is in one of the following states No paper Paper jam Cover open 4 Ready LED The Ready LED will flash depending on the machine status 5 Go button Wake up Error recovery Form feed Job Cancel Reprint Enable or Disable the wireless network HL 2270DW only ...

Страница 58: ...s up the machine from Deep Sleep mode to Ready mode HL 2270DW only If a wireless network is enabled the machine does not enter Deep Sleep mode To disable the wireless network see chapter 5 of the Network User s Guide READY The machine is ready to print PRINTING The machine is printing WARMING UP The machine is warming up COOLING DOWN The machine is cooling down Wait for a few seconds until the ins...

Страница 59: ...ge with a new one See REPLACE TONER on page 71 CARTRIDGE ERROR The drum unit assembly is not installed correctly Take the drum unit out of the machine and put it back in NO TONER Open the front cover install the toner cartridge See Toner cartridge on page 70 REPLACE TONER Continue mode The machine continues printing until the LED indicates TONER ENDED TONER ENDED Replace the toner cartridge with a...

Страница 60: ... seconds REPLACE DRUM Replace the drum with a new one See Replacing the drum unit on page 79 NO PAPER T1 Put paper in the paper tray Then press Go See Printing on plain paper recycled paper bond paper thin paper or thick paper on page 10 MANUAL FEED Put paper in the manual feed slot See Printing on plain paper recycled paper bond paper thin paper or thick paper on page 10 or Printing on labels or ...

Страница 61: ...curred and the machine cannot print full pages of a document See Solving print problems on page 119 SIZE ERROR DX HL 2240D HL 2242D HL 2250DN HL 2270DW only Set the correct paper that you want to use or load the same size paper that you selected in the current driver setting Press Go The paper size you can use for automatic duplex printing is A4 Letter Legal or Folio DUPLEX DISABLED HL 2240D HL 22...

Страница 62: ...n the table below to identify the error 1 If this error occurs turn off the machine s power switch wait a few seconds and then turn it on again Leave the machine for approx 15 minutes with the power on If the error occurs again call your dealer or Brother Customer Service For example the LED indication below shows a fuser unit failure Make a note of the indication referring to the table on page 58...

Страница 63: ...Control Panel 59 3 Note Make sure that the front cover is completely closed before you report a service call ...

Страница 64: ...ne Form feed If the Ready LED flashes for a long time press Go The machine will print any data that is left in the machine s memory Reprint To reprint the last document press Go for about 4 seconds until all the LEDs light up and then release it Within 2 seconds press Go the number of times you want to reprint If you don t press Go within 2 seconds a single copy will be printed If you print with t...

Страница 65: ...wer cord is plugged in c Hold down Go as you turn on the power switch Keep Go pressed down until the Toner Drum and Error LEDs light up Release Go Make sure that the Toner Drum and Error LEDs are off d Press Go again The machine will print a test page Using the printer driver 3 If you are using the Windows printer driver click the Print Test Page button in the General tab of the printer driver ...

Страница 66: ...ver is closed and the power cord is plugged in b Turn on the machine and wait until the machine is in Ready mode c Press Go three times within 2 seconds The machine will print the current printer settings page Using the printer driver 3 If you are using the Windows printer driver you can print the current printer settings page by clicking the Print Settings button in the Support dialog ...

Страница 67: ...wer cord is plugged in c Hold down Go as you turn on the power switch Keep Go pressed down until the Toner Drum and Error LEDs light up Release Go Make sure that the Toner Drum and Error LEDs are off d Press Go twice The machine will print a list of the internal fonts Using the printer driver 3 If you are using the Brother s Windows printer driver you can print a list of the internal fonts by clic...

Страница 68: ...until all the LEDs light up and the Ready LED turns off d Release Go Make sure that all the LEDs turn off e Press Go six times Make sure that all the LEDs light up to indicate the print server has been reset to its factory default settings The machine will restart Factory Reset 3 You can partially reset the machine back to its default printer settings The network settings will not be reset a Turn ...

Страница 69: ...ry a Turn off the machine b Make sure that the front cover is closed and the power cord is plugged in c Hold down Go as you turn on the power switch Keep Go pressed down until all the LEDs light up and the Ready LED turns off d Release Go Make sure that all the LEDs turn off e Press Go ten times The machine will automatically restart ...

Страница 70: ...mable items 4 The machine will indicate when it is time to replace the consumable items See LEDs Light Emitting Diodes on page 53 Consumables 4 Routine Maintenance 4 Toner cartridge Drum unit See Toner cartridge on page 70 Model Name TN 2010 TN 2210 TN 2220 See Drum unit on page 77 Model Name DR 2200 ...

Страница 71: ...quids containing alcohol or ammonia to clean the inside or outside of the machine Doing this may cause a fire or electrical shock See Cleaning on page 83 for how to clean the machine Be careful not to inhale toner CAUTION HOT SURFACE After you have just used the printer some internal parts will be extremely hot Wait at least 10 minutes for the printer to cool down before continuing to the next ste...

Страница 72: ...using other manufacturer s products with this machine any repairs required as a result may not be covered by the warranty We recommend that you place the drum unit and toner cartridge assembly on a clean flat surface with a piece of disposable paper underneath it in case you accidentally spill or scatter toner Handle the toner cartridge carefully If toner scatters on your hands or clothes immediat...

Страница 73: ...er Note Be sure to seal up the used toner cartridge tightly in a suitable bag so that toner powder does not spill out of the cartridge Go to http www brother eu recycle for instructions on how to return the used toner cartridge to the Brother collection program If you choose not to return your used toner cartridge please discard the used toner cartridge according to local regulations keeping it se...

Страница 74: ...ing for lighter or darker printing the amount of toner used will change TONER LOW 4 The Toner LED will turn on for 2 seconds and off for 3 seconds and repeats this pattern If the LEDs show this indication the toner is low Buy a new toner cartridge and have it ready before you get a Replace Toner indication To replace the toner cartridge see Replacing the toner cartridge on page 71 Note The Toner L...

Страница 75: ...d unused original Brother toner cartridge will reset the REPLACE TONER mode Replacing the toner cartridge 4 Before you replace the toner cartridges see Before replacing the consumable items on page 67 a Make sure that the machine is turned on Leave the machine for at least 10 minutes to cool down b Open the front cover ...

Страница 76: ...y IMPORTANT We recommend that you put the drum unit and toner cartridge assembly on a piece of disposable paper or cloth in case you accidentally spill or scatter toner To prevent damage to the machine from static electricity DO NOT touch the electrodes shown in the illustration ...

Страница 77: ... green lock lever and take the toner cartridge out of the drum unit e Unpack the new toner cartridge Hold the cartridge level with both hands and gently shake it from side to side several times to spread the toner evenly inside the cartridge ...

Страница 78: ...Maintenance 74 4 f Pull off the protective cover g Put the new toner cartridge firmly into the drum unit until you hear it lock into place If you put it in properly the green lock lever will lift automatically ...

Страница 79: ...left to right several times Note Be sure to return the tab to the home position a 1 If you do not printed pages may have a vertical stripe i Put the drum unit and toner cartridge assembly back into the machine Close the front cover Note DO NOT turn off the machine s power switch or open the front cover until the Ready LED lights up 1 ...

Страница 80: ...ontinue printing until the LEDs indicate TONER ENDED To return to the default setting Stop mode press Go seven times all the LEDs flash once Note Make sure that the front cover is closed before you change the mode When the LEDs indicate an error mode you cannot change the mode If you continue printing in the Continue mode we cannot guarantee the print quality While using Continue mode the print ma...

Страница 81: ...ol over the many factors that determine the actual drum life we cannot guarantee a minimum number of pages that will be printed by your drum For best performance use only genuine Brother toner The machine should be used only in a clean dust free environment with adequate ventilation Printing with a non Brother drum unit may reduce not only the print quality but also the quality and life of the mac...

Страница 82: ... 4 If the Drum LED is on it means the drum unit should be replaced Please replace it with a new Brother drum unit DRUM STOP 4 If the Drum and Error LEDs are on it means the drum unit must be replaced Replace it with a new Brother drum unit ...

Страница 83: ...on page 67 When you replace the drum unit with a new one you need to reset the drum counter by completing the following steps a Make sure that the machine is turned on and the Drum LED is flashing Leave the machine for at least 10 minutes to cool down b Open the front cover c Take out the drum unit and toner cartridge assembly ...

Страница 84: ...n a piece of disposable paper or cloth in case you accidentally spill or scatter toner To prevent damage to the machine from static electricity DO NOT touch the electrodes shown in the illustration d Push down the green lock lever and take the toner cartridge out of the drum unit e Unpack the new drum unit ...

Страница 85: ...e firmly into the new drum unit until you hear it lock into place If you put the cartridge in properly the green lock lever will lift automatically g Put the drum unit and toner cartridge assembly back into the machine Do not close the front cover yet ...

Страница 86: ...d down Go for about 4 seconds until all the LEDs light up Once all four LEDs are lit release Go IMPORTANT Do not reset the drum counter when you only replace the toner cartridge i Close the front cover j Make sure that the Drum LED is now off ...

Страница 87: ...ned with toner clean the inside of the machine with a dry lint free cloth WARNING DO NOT use flammable substances any type of spray or any organic solvent liquid that contains alcohol or ammonia to clean the inside or outside of the machine Doing this may cause a fire or electrical shock Be careful not to inhale toner IMPORTANT Use neutral detergents Cleaning with volatile liquids such as thinner ...

Страница 88: ...e the outside of the machine with a dry lint free cloth to remove dust d Remove all the paper and anything that is stuck inside from the paper tray e Wipe the inside of the paper tray with a dry lint free cloth to remove dust f Put the paper back in the paper tray g Put the paper tray back in the machine h Plug the machine s power cord back into the AC power outlet first and then reconnect all cab...

Страница 89: ...or at least 10 minutes to cool down b Take out the drum unit and toner cartridge assembly IMPORTANT We recommend that you put the drum unit and toner cartridge assembly on a piece of disposable paper or cloth in case you accidentally spill or scatter toner To prevent damage to the machine from static electricity DO NOT touch the electrodes shown in the illustration ...

Страница 90: ...ently sliding the green tab from right to left and left to right several times Note Be sure to return the tab to the home position a 1 If you do not printed pages may have a vertical stripe d Put the drum unit and toner cartridge assembly back into the machine Close the front cover 1 ...

Страница 91: ... your printout has white or black spots at 94 mm 3 71 in intervals follow the steps below to solve the problem a Prepare blank A4 or Letter size paper b Make sure the machine is in Ready mode c Open the front cover and the back cover face up output tray ...

Страница 92: ... right hand sides are in the up position d Press Go five times e Close the front cover The machine will prepare the Drum Cleaning process When the machine is ready for the Drum Cleaning process the Ready LED turns on f Open the manual feed slot cover Not available for HL 2130 HL 2132 HL 2220 ...

Страница 93: ...e to a malfunction of the machine DO NOT put more than one sheet of paper in the manual feed slot at any one time as it may cause a jam If the paper in the manual feed slot is other than A4 or Letter size the machine will stop the Drum Cleaning process and eject the paper Make sure that the paper is straight and in the proper position on the manual feed slot If it is not it may not be fed properly...

Страница 94: ...ime Upon completion please discard the used paper If the problem is not solved yet follow the steps below a Turn off the machine s power switch Disconnect all the cables and then unplug the power cord from the AC power outlet Leave the machine turned off for at least 10 minutes to cool down b Open the front cover c Take out the drum unit and toner cartridge assembly ...

Страница 95: ...ge assembly on a piece of disposable paper or cloth in case you accidentally spill or scatter toner To prevent damage to the machine from static electricity DO NOT touch the electrodes shown in the illustration d Push down the green lock lever and take the toner cartridge out of the drum unit ...

Страница 96: ...quality problems DO NOT touch the shaded parts shown in the illustrations e Put the print sample in front of the drum unit and find the exact position of the poor print f Turn the drum unit gear by hand while looking at the surface of the OPC drum 1 1 ...

Страница 97: ...C drum with a dry cotton swab until the dust or glue on the surface comes off IMPORTANT DO NOT clean the surface of the photosensitive drum with a sharp object h Put the toner cartridge back into the drum unit until you hear it lock into place If you put the cartridge in properly the green lock lever will lift automatically ...

Страница 98: ... and then reconnect all cables Turn on the machine s power switch Cleaning the paper pick up roller 4 If the paper pick up roller is dirty the machine may not feed paper In that case clean the paper pick up roller as follows a Turn off the machine s power switch Disconnect all cables and then unplug the power cord from the AC power outlet b Pull the paper tray out of the machine c Remove all the p...

Страница 99: ...ipe the separator pad 1 to remove any dust e Wipe the two paper pick up rollers 1 inside the machine f Put the paper back in the paper tray g Put the paper tray back in the machine h Plug the machine s power cord back into the AC power outlet first and then reconnect all cables Turn on the machine s power switch 1 1 ...

Страница 100: ...sconnect all the cables and then unplug the power cord from the AC power outlet Leave the machine turned off for at least 10 minutes to cool down b Open the front cover c Take out the drum unit and toner cartridge assembly IMPORTANT We recommend that you put the drum unit and toner cartridge assembly on a piece of disposable paper or cloth in case you accidentally spill or scatter toner To prevent...

Страница 101: ...MOVE text to the left as shown in the illustration e Put the drum unit and toner cartridge assembly back into the machine f Put the elastic band over the handle of the drum unit as shown in the illustration g Close the front cover h Put the machine into the bag it originally came in ...

Страница 102: ...Maintenance 98 4 i Put the styrofoam piece marked RIGHT on the right side of the machine Put the styrofoam piece marked LEFT on the left side of the machine j Put the machine into the original carton RIGHT LEFT ...

Страница 103: ...Routine Maintenance 99 4 k Put the AC power cord and printed materials in the original carton as shown in the illustration l Close the carton and tape it shut ...

Страница 104: ...achine and the computer The correct driver for the machine has been chosen and is installed The computer is set up to connect to the correct machine port Machine does not print 5 If you did not solve your problem with the above checks identify your problem and then go to the page suggested below Machine s LEDs are flashing See LEDs Light Emitting Diodes on page 53 Status Monitor Error Message appe...

Страница 105: ...ISABLED 1 Close the back cover of the printer and put the duplex tray back in FRONT COVER OPEN Close the front cover of the machine FUSER COVER OPEN Close the fuser cover located behind the back cover of the machine FUSER ERROR If the FUSER ERROR pop up message appears on your computer turn the machine s power switch off wait a few seconds and then turn it on again Leave the machine for 15 minutes...

Страница 106: ...t the remaining data in the machine memory Cancel the print job if you want to delete the remaining data in the machine memory See Go button on page 60 If this does not clear the error reduce the complexity of your document or lower the print resolution HL 2250DN HL 2270DW only Change the following settings in the supplied Windows driver and try again The best combination of these settings will va...

Страница 107: ...n page 94 The machine does not feed paper from the manual feed slot Put only one sheet of paper in the manual feed slot Make sure that you have chosen Manual in Paper Source of the printer driver The machine does not feed envelopes The machine feeds envelopes from the manual feed slot You must set up your application to print on the size of envelopes you are using This is usually done in the page ...

Страница 108: ...Troubleshooting 104 5 The paper slides off the top output tray Lift up the output tray support flap 1 If the paper curls and slides off lift up the output tray support flap 2 Problem Recommendation ...

Страница 109: ...ion to the print quality DO NOT touch the shaded parts shown in the illustrations Clear the jammed paper as follows If the jammed paper is removed completely by following the steps below you can install the paper tray first and then close the front cover The machine will resume printing automatically If the machine does not start printing automatically press Go If the machine still does not start ...

Страница 110: ...alled a drum unit or have installed the drum unit improperly then this may cause a paper jam in your Brother machine a Open the front cover and leave the machine turned on for at least 10 minutes to cool down b Slowly take out the drum unit and toner cartridge assembly The jammed paper may be pulled out with the drum unit and toner cartridge assembly or this may release the paper so you can pull i...

Страница 111: ...identally spill or scatter toner To prevent damage to the machine caused by static electricity DO NOT touch the electrodes shown in the illustration c Close the front cover Note Do not put the drum unit and toner cartridge assembly back in at this point d Pull the paper tray completely out of the machine e Use both hands to slowly pull out the jammed paper ...

Страница 112: ...cover face up output tray g Pull down the tabs at the left and right hand sides to open the fuser cover 1 h Using both hands gently pull the jammed paper out of the fuser unit i Close the fuser cover and the back cover face up output tray 1 ...

Страница 113: ...uplex tray completely out of the machine k Pull the jammed paper out of the machine or the duplex tray l Make sure that the jammed paper does not remain under the machine from static electricity m Put the duplex tray back in the machine ...

Страница 114: ...an go to step p p Push down the green lock lever and take the toner cartridge out of the drum unit Clear the jammed paper if there is any inside the drum unit IMPORTANT Handle the toner cartridge carefully If toner scatters on your hands or clothes immediately wipe or wash it off with cold water To avoid print quality problems DO NOT touch the shaded parts shown in the illustrations ...

Страница 115: ...he cartridge in properly the green lock lever will lift automatically r Open the front cover Put the drum unit and toner cartridge assembly back into the machine s Close the front cover t Make sure that the Error LED is off and that the Ready LED light is on If the machine does not start printing automatically press Go ...

Страница 116: ...lacing the toner cartridge on page 71 Check the machine s environment Conditions such as humidity high temperatures and so on may cause this print fault See Safety and Legal booklet If the whole page is too light Toner Save Mode may be on Turn off Toner Save Mode in Advanced tab For Windows or Basic tab of Print Settings For Macintosh of the driver Put in a new toner cartridge See Replacing the to...

Страница 117: ...paper may cause the problem See Acceptable paper and other print media on page 3 The drum unit may be damaged Put in a new drum unit See Replacing the drum unit on page 79 The fuser unit may be contaminated Call Brother Customer Service Hollow print Make sure that you use paper that meets our specifications See Acceptable paper and other print media on page 3 Choose Thick Paper mode in the printer...

Страница 118: ... damaged Put in a new drum unit See Replacing the drum unit on page 79 Lines across the page Clean the primary corona wire in the drum unit See Cleaning the corona wire on page 85 The drum unit may be damaged Put in a new drum unit See Replacing the drum unit on page 79 White lines bands or ribbing across the page Check the machine s environment Conditions such as high humidity and high temperatur...

Страница 119: ...sheets may sometimes stick to the OPC drum surface Clean the drum unit See Cleaning the drum unit on page 87 Do not use paper that has clips or staples because they will scratch the surface of the drum If the unpacked drum unit is in direct sunlight or room light the unit may be damaged Black lines down the page Printed pages have toner stains down the page Clean the primary corona wire inside the...

Страница 120: ...or wavy Check the paper type and quality High temperatures and high humidity will cause paper to curl See Acceptable paper and other print media on page 3 If you do not use the machine often the paper may have been in the paper tray too long Turn over the stack of paper in the paper tray Also fan the paper stack and then rotate the paper 180 in the paper tray Open the back cover face up output tra...

Страница 121: ...n the up position Choose Improve Toner Fixing mode in the printer driver See Improve Print Output in Other Print Options on page 32 For Windows or Print Settings on page 43 For Macintosh If this selection does not provide enough improvement select Thicker Paper in Media Type settings Examples of poor print quality Recommendation ABCDEFGHIJKLMNOPQRSTUVWXYZ 0123456789 abcdefghijklmnopqrstuvwxyz ABCD...

Страница 122: ...s on page 32 For Windows or Print Settings on page 43 For Macintosh Turn the paper over in the paper tray and print again Excluding letterhead paper If the problems remains switch the Anti Curl Levers as follows a Open the back cover b Lift the lever 1 and slide the two gray levers 2 in the direction of the arrow Examples of poor print quality Recommendation 1 2 2 1 2 ...

Страница 123: ...g data in the machine s memory Cancel the print job if you want to delete the remaining data in the machine memory See Go button on page 60 Reduce the complexity of your document or reduce the print resolution The machine cannot print full pages of a document An error message PRINT OVERRUN appears Press Go to print the remaining data in the machine memory Cancel the print job if you want to delete...

Страница 124: ...in Print Setup Utility Mac OS X 10 4 11 or Print Fax in System Preferences Mac OS X 10 5 x and 10 6 x Make sure that the machine is turned on Make sure that the USB interface cable is connected directly to the Macintosh and that it is connected to the USB port of the machine Make sure the printer driver is installed correctly Unable to print from the application Make sure that the supplied Macinto...

Страница 125: ... Model HL 2130 HL 2132 HL 2240 HL 2240D HL 2250DN HL 2270DW Technology Electrophotographic Print speed 1 2 A4 size Letter size Single sided Print Up to 20 ppm A4 size 3 Up to 21 ppm Letter size 3 Up to 24 ppm 3 Up to 26 ppm A4 size 3 Up to 27 ppm Letter size 3 Duplex Print N A Up to 10 sides per minute 5 sheets per minute A4 or Letter size 3 First print time 4 From Ready mode Less than 10 secs Les...

Страница 126: ...b browser 6 Code39 Interleaved 2 of 5 FIM US PostNet Post Net US PostNet EAN 8 EAN 13 UPC A UPC E Codabar ISBN EAN ISBN UPC E Code128 set A set B set C EAN 128 set A set B set C Model HL 2130 HL 2132 HL 2240 HL 2240D HL 2250DN HL 2270DW Processor ARM9 200MHz Memory 8 MB 32 MB Interface Hi speed USB 2 0 Hi speed USB 2 0 10BASE T 100BASE TX Ethernet Hi speed USB 2 0 10BASE T 100BASE TX Ethernet IEEE...

Страница 127: ...al Edition XP Professional x64 Edition Windows Server 2003 Windows Server 2003 x64 Edition Windows Vista Windows Server 2008 Windows Server 2008 R2 Windows 7 Macintosh Brother Laser Driver for Mac OS X 10 4 11 10 5 x 10 6 x Linux 2 3 Linux driver for CUPS printing system x86 and x64 environments Linux driver for LPD LPRng printing system x86 and x64 environments Utilities N A Driver Deployment Wiz...

Страница 128: ...ecycled paper Automatic duplex printing N A Plain paper Thin paper Recycled paper Media weights Manual feed slot 60 to 163 g m2 16 to 43 lb Paper tray 60 to 105 g m2 16 to 28 lb Automatic duplex printing N A 60 to 105 g m2 16 to 28 lb Media sizes Manual feed slot Width 76 2 to 216 mm 3 0 to 8 5 in Length 116 to 406 4 mm 4 6 to 16 in Paper tray Standard A4 Letter B5 ISO JIS A5 A5 Long Edge B6 ISO A...

Страница 129: ... or Letter pages 1 page job 2 DR 2200 HL 2240 HL 2240D HL 2250DN HL 2270DW Model HL 2240 HL 2240D HL 2250DN HL 2270DW Order No Toner Cartridge Starter cartridge Approx 700 pages A4 or Letter pages 1 Approx 1 200 pages A4 or Letter pages 1 N A Standard cartridge Approx 1 200 pages A4 or Letter pages 1 TN 2210 High yield cartridge Approx 2 600 pages A4 or Letter pages 1 TN 2220 Drum Unit Approx 12 0...

Страница 130: ...0DN HL 2270DW Power source 220 240 V AC 50 60 Hz Power consumption 1 Average Instantaneous Peak Approx 1 056 W Printing Approx 421 W at 25 C 77 F Approx 495 W at 25 C 77 F Ready Approx 62 W at 25 C 77 F Approx 65 W at 25 C 77 F Sleep Wireless On N A Approx 2 8 W Deep Sleep Approx 0 8 W Approx 0 9 W Noise level Sound Pressure Printing LpAm 53 dB A Ready LpAm 31 dB A Sound power Printing LWAd 6 40 B...

Страница 131: ...it Intel 64 or AMD64 supported CPU 256 MB 512 MB Windows Vista Intel Pentium 4 or equivalent 64 bit Intel 64 or AMD64 supported CPU 512 MB 1 GB Windows 7 Intel Pentium 4 or equivalent 64 bit Intel 64 or AMD64 supported CPU 1 GB 32 bit 2 GB 64 bit 1 GB 32 bit 2 GB 64 bit Windows Server 2003 Intel Pentium III or equivalent 256 MB 512 MB Windows Server 2003 x64 Edition 64 bit Intel 64 or AMD64 suppor...

Страница 132: ...hese weights Long grain and short grain A The pulp fiber of the paper is aligned during paper manufacturing Paper can be classified into two types long grain and short grain Long grain paper fibers run in the same direction as the long edge of the paper Short grain paper fibers run perpendicular to the long edge of the paper Though most plain paper for copying is long grain some is short grain We ...

Страница 133: ...characteristics of the paper This can change greatly depending on the storage environment although usually paper contains about 5 water by weight Because paper often absorbs water the amount of water can sometimes be about 10 in a high humidity environment When the amount of water increases the characteristics of the paper changes greatly The fixing of the toner may become worse For storage of the...

Страница 134: ...in A4 210 297 mm A5 148 210 mm A5 Long Edge 210 148 mm A6 105 148 mm Envelope Monarch 3 875 7 5 in Envelope Com 10 4 12 9 5 in Envelope DL 110 220 mm Envelope C5 162 229 mm B5 JIS 182 257 mm B5 ISO 176 250 mm B6 ISO 125 176 mm Folio 8 5 13 in Post Card 100 148 mm Envelope DL L 220 110 mm 3 5 3 5 in ...

Страница 135: ...mple http 192 168 1 2 if the machine s IP address is 192 168 1 2 Note If you have edited the hosts file on your computer or are using a Domain Name System you can also enter the DNS name of the print server For Windows users as the print server supports TCP IP and NetBIOS you can also enter the NetBIOS name of the print server The NetBIOS name can be seen on the printer settings page The NetBIOS n...

Страница 136: ... Italian 0I ISO16 Portuguese 4S ISO17 Spanish 2S ISO2 IRV 2U ISO21 German 1G ISO25 French 0F ISO4 UK 1E ISO57 Chinese 2K ISO6 ASCII 0U ISO60 Norwegian1 0D ISO61 Norwegian2 1D ISO69 French 1F ISO84 Portuguese 5S ISO85 Spanish 6S Legal 1U Math 8 8M MC Text 12J MS Publishing 6J OCR A 0O OCR B 1O PC 1004 9J PC 775 26U PC 8 10U PC 8 Bulgarian 13R PC 8 D N 11U PC 8 Greek Alternate 437G 14G PC 8 Latin Gr...

Страница 137: ...n9 4U Roman Extension 0E Russian GOST 12R Symbol 19M Turkish8 8T UKRAINIAN 14R Ventura Intl 13J Ventura Math 6M Ventura US 14J Windings 579R Windows 3 0 9U Windows Baltic 19L Windows Cyrillic 9R Windows Greek 9G Windows Latin1 19U Windows Latin2 9E Windows Latin5 5T HP LaserJet mode ...

Страница 138: ... i n n they do not apply in the bar code commands If certain parameters are not given they take the preset settings The last parameter must be the bar code data start b or B or the expanded character data start l or L Other parameters can be given in any sequence Each parameter can start with a lower case or upper case character for example t0 or T0 s3 or S3 and so one Bar code mode A Code ESC i D...

Страница 139: ...this bar code style parameter is ignored Expanded Character S 0 White 1 Black 2 Vertical stripes 3 Horizontal stripes 4 Cross hatch For example S n1 n2 n1 Background fill pattern n2 Foreground fill pattern If S is followed by only one parameter the parameter is a foreground fill pattern Line block drawing box drawing S 1 Black 2 Vertical stripes 3 Horizontal stripes 4 Cross hatch Bar code A n mnnn...

Страница 140: ...rameter see the next section The default setting of the quiet zone width is 1 inch Bar code expanded character unit line block drawing and box drawing A This parameter shows the measurement units of X axis offset Y axis offset and bar code height Bar code expanded character line block drawing and box drawing offset in X axis A n xnnn or Xnnn This parameter shows the offset from the left margin in ...

Страница 141: ...wnnn or Wnnn Expanded character i 1 2 mm Line block drawing and box drawing i 1 dot This parameter shows the width of expanded characters as shown above Expanded character rotation A Bar code data start A n b or B Data that follows b or B is read in as bar code data Bar code data must end with the code 5CH which also ends this command The acceptable bar code data is determined by the bar code mode...

Страница 142: ... code data will be printed When EAN13 is selected adding and a two digit or five digit number after the data can create an add on code When UPC E is selected with the parameter t6 or T6 The numbers 0 to 9 can be accepted as bar code data 1 can be used instead of a check digit 2 Adding and two digit or five digit number after the data creates an add on code When Codebar is chosen with the parameter...

Страница 143: ...3 or T133 or t134 or T134 The same rules apply as for t12 or T12 t13 or T13 or t14 or T14 Box drawing A ESC i E or e E or e is a terminator Line block drawing A ESC i V or v V or v is a terminator Expanded character data start A n l or L Data that follows l or L is read as expanded character data or labeling data Expanded character data must end with the code 5CH which also ends this command ...

Страница 144: ...0x45 18 18 DC2 0x12 70 70 F 0x46 19 19 DC3 0x13 71 71 G 0x47 20 20 DC4 0x14 72 72 H 0x48 21 21 NAK 0x15 73 73 I 0x49 22 22 SYN 0x16 74 74 J 0x4a 23 23 ETB 0x17 75 75 K 0x4b 24 24 CAN 0x18 76 76 L 0x4c 25 25 EM 0x19 77 77 M 0x4d 26 26 SUB 0x1a 78 78 N 0x4e 27 27 ESC 0x1b 79 79 O 0x4f 28 28 FS 0x1c 80 80 P 0x50 29 29 GS 0x1d 81 81 Q 0x51 30 30 RS 0x1e 82 82 R 0x52 31 31 US 0x1f 83 83 S 0x53 32 32 SP...

Страница 145: ... and utilities read FAQs and troubleshooting tips to learn how to get the most from your Brother product http solutions brother com You can check here for Brother driver updates Customer Service B Visit http www brother com for contact information on your local Brother office Service center locations B For service centres in Europe contact your local Brother Office Address and telephone contact in...

Страница 146: ...y you in the event of product loss covered by insurance and will help us notify you of enhancements to your product and special offers Please complete the Brother Warranty Registration or for your convenience and most efficient way to register your new product register on line at http www brother com registration FAQs frequently asked questions C The Brother Solutions Center is our one stop resour...

Страница 147: ...USA 1 877 BROTHER 1 877 276 8437 In Canada 1 877 BROTHER In USA Printer Customer Support Brother International Corporation 7905 North Brother Boulevard Bartlett TN 38133 In Canada Brother International Corporation Canada Ltd Marketing Dept 1 rue Hotel de Ville Dollard des Ormeaux PQ Canada H9B 3H6 Internet addresses Brother Global Web Site http www brother com For Frequently Asked Questions FAQs P...

Страница 148: ...ther You can visit us online for a complete selection of the Brother accessories and supplies that are available for purchase Note In Canada only Visa and MasterCard are accepted 1 Approx cartridge yield is declared in accordance with ISO IEC 19752 In USA 1 877 552 MALL 1 877 552 6255 1 800 947 1445 fax http www brothermall com In Canada 1 877 BROTHER http www brother ca Description Item Toner Car...

Страница 149: ...ex printing 20 E Emulation 122 Envelopes 7 15 27 Error indications machine s LEDs 53 54 Error messages Status Monitor 101 F Fonts 63 122 G Go button 53 60 I Interface 122 J Job cancel 60 L Labels 3 8 15 LEDs 53 Linux 23 M Macintosh 39 120 Manual feed slot 13 Media specifications 124 Media type 4 Memory 122 MEMORY FULL 57 119 N Network 52 Network connectivity 122 NO PAPER T1 56 NO TONER 55 71 O OPC...

Страница 150: ...ervice centers USA Canada 143 Service centres Europe and other countries 141 SIZE ERROR DX 57 Sleep mode 54 Software 52 Specifications 121 Status Monitor 38 50 101 Symbol and character sets 131 T Toner cartridge 70 TONER ENDED 55 76 TONER LOW 55 70 Troubleshooting 100 U Unprintable area 9 Utilities 123 W Watermark 31 Weights 125 Windows 25 ...

Отзывы: