Brother HL-5470DW Скачать руководство пользователя страница 115

109

Routine Maintenance 

5

i

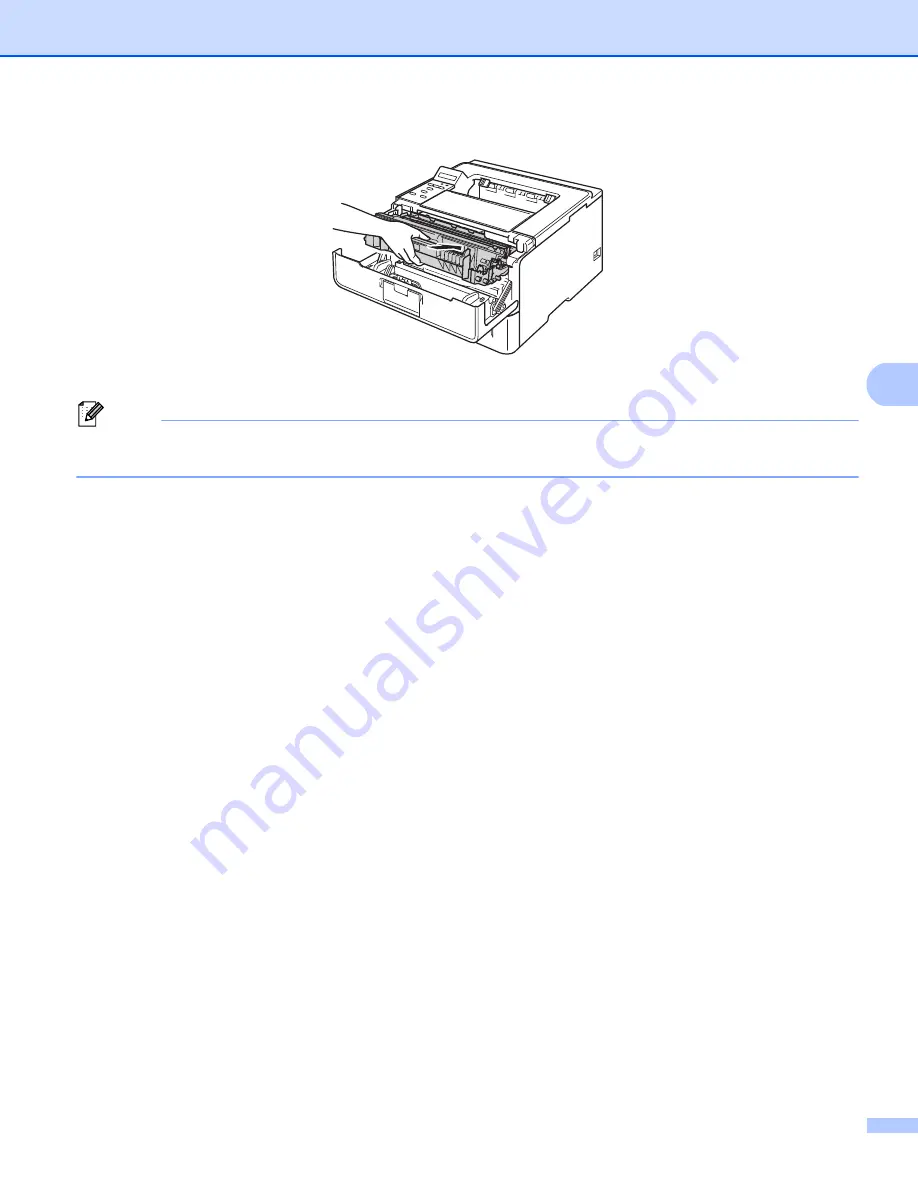
Put the drum unit and toner cartridge assembly back into the machine.


j

Close the front cover of the machine.

Note

After replacing the toner cartridge, DO NOT turn off the machine’s power switch or open the front cover 
until the LCD shows 

Ready

.


Содержание HL-5470DW

Страница 1: ...n find a printed copy in the box Please read this User s Guide thoroughly before you use the machine Please visit us at http solutions brother com where you can get product support the latest driver updates and utilities and answers to frequently asked questions FAQs and technical questions Note Not all models are available in all countries HL 6180DW T in USA Please go to the Brother Solutions Cen...

Страница 2: ...eful information about wired and wireless network settings and security settings using the Brother machine You can also find supported protocol information for your machine and detailed troubleshooting tips Wi Fi Direct Guide This Guide provides details on how to configure and use your Brother machine for wireless printing directly from a mobile device supporting the Wi Fi Direct standard PDF file...

Страница 3: ...or loss of product functionality Prohibition icons indicate actions that must not be performed Electrical Hazard icons alert you to possible electrical shock Fire Hazard icons alert you to the possibility of fire Hot Surface icons warn you not to touch machine parts that are hot Note Notes tell you how you should respond to a situation that may arise or give tips about how the operation works with...

Страница 4: ...atic duplex printing 19 Manual duplex printing 21 2 Driver and Software 22 Printer driver 22 Printing a document 23 Printer driver settings 24 Windows 25 Accessing the printer driver settings 25 Features in the Windows printer driver 26 Basic tab 26 Advanced tab 31 Print Profiles tab 39 Accessories tab 41 Support 43 Features in the BR Script3 printer driver PostScript 3 language emulation 45 Unins...

Страница 5: ...ons 96 Lower tray LT 5400 97 SO DIMM 98 SO DIMM types 98 Installing extra memory 99 5 Routine Maintenance 101 Replacing consumable items 101 Replacing the toner cartridge 103 Replacing the drum unit 110 Cleaning and Checking the machine 116 Cleaning the outside of the machine 116 Cleaning the corona wire 118 Cleaning the drum unit 120 Cleaning the paper pick up roller 125 Packing and shipping the ...

Страница 6: ...hine specifications 160 General 160 Print media 162 Printer 163 Interface 163 Computer requirements 164 Important information for choosing your paper 165 Consumable Items 166 Network LAN 166 Brother numbers 167 B Index 170 ...

Страница 7: ...t flap 4 Front cover 5 Paper tray 6 Power switch 7 Face down output tray 8 Multi purpose tray MP tray 9 Back cover Face up output tray when open 10 AC power connector 11 USB port 12 10BASE T 100BASE TX 1000BASE T port 1 1 1000BASE T is available for HL 6180DW T Note Most of the illustrations in this User s Guide show the HL 5470DW Printing Methods 1 1 2 3 4 5 6 7 8 10 9 11 12 ...

Страница 8: ...ng the printed surface of the paper immediately after printing Before you buy a lot of paper test a small quantity to make sure that the paper is suitable Recommended paper and print media 1 Type and size of paper 1 The machine feeds paper from the installed standard paper tray multi purpose tray or optional lower tray The names for the paper trays in the printer driver and this Guide are as follo...

Страница 9: ...s No of sheets Paper Tray Tray 1 Letter A4 Legal B5 ISO JIS Executive A5 A5 Long Edge A6 B6 ISO Folio 1 Plain paper Thin paper and Recycled paper up to 250 sheets 20 lb 80 g m2 2 up to 500 sheets 20 lb 80 g m2 2 Multi purpose Tray MP Tray Width 3 to 8 5 in 76 2 to 215 9 mm Length 5 to 14 in 127 to 355 6 mm Plain paper Thin paper Thick paper Thicker paper Bond paper Recycled paper Envelopes and Lab...

Страница 10: ...392 F 200 C If you use bond paper paper having a rough surface or paper that is wrinkled or creased the paper may exhibit degraded performance Types of paper to avoid 1 Important Some types of paper may not perform well or may cause damage to your machine DO NOT use paper that is highly textured that is extremely smooth or shiny that is curled or warped 1 A curl of 0 08 in 2 mm or greater may caus...

Страница 11: ...elopes to avoid 1 Important DO NOT use envelopes that are damaged curled wrinkled or an unusual shape that are extremely shiny or textured with clasps staples snaps or tie strings with self adhesive closures that are of a baggy construction that are not sharply creased that are embossed have raised writing on them that were previously printed by a laser machine that are pre printed on the inside t...

Страница 12: ...etween the labels Labels should be arranged so that they cover the entire length and width of the sheet Using labels with spaces may result in labels peeling off and causing serious jams or print problems All labels used in this machine must be able to withstand a temperature of 392 F 200 C for a period of 0 1 seconds Types of labels to avoid 1 Do not use labels that are damaged curled wrinkled or...

Страница 13: ...pending on the paper size or settings in the application you are using Note When using BR Script3 emulation the unprintable area around the edges of the paper is 0 16 in 4 23 mm Usage Document Size Top 1 Bottom 3 Left 2 Right 4 Print Letter 0 16 in 4 23 mm 0 25 in 6 35 mm A4 0 16 in 4 23 mm 0 24 in 6 01 mm Legal 0 16 in 4 23 mm 0 25 in 6 35 mm 1 3 2 4 ...

Страница 14: ...ng the control panel keys Loading paper in the standard paper tray and the optional lower tray 1 You can load up to 250 sheets of paper HL 5470DW T or up to 500 sheets of paper HL 6180DW T in the standard paper tray Tray 1 You can also load up to 500 sheets in the optional lower tray Tray 2 1 Paper can be loaded up to the maximum paper mark on the right hand side of the paper tray For the recommen...

Страница 15: ...g in the tray Make sure that the guides are firmly in the slots Note For Legal or Folio size paper press the release button 1 in the bottom of the paper tray and then pull out the back of the paper tray Legal and Folio size paper are not available in some regions c Fan the stack of paper well to avoid paper jams and misfeeds 1 1 1 ...

Страница 16: ... to be printed on must be face down The paper guides touch the sides of the paper so it will feed properly e Put the paper tray firmly back in the machine Make sure that it is completely inserted into the machine f Lift up the support flap 1 to prevent paper from sliding off the face down output tray or remove each page as soon as it comes out of the machine 1 1 ...

Страница 17: ...ge 2 Media Type Paper Source For any other settings see Driver and Software in Chapter 2 Note The name of options in the drop down lists may vary depending on your operating system and its version h Send the print data to the machine A4 Letter Legal Executive A5 B5 B6 Folio A5 Long Edge Tray 1 only A6 Tray 1 only Plain Paper Thin Paper Recycled Paper Tray1 Tray2 if available ...

Страница 18: ...eets of plain paper Use this tray to print on thick paper bond paper labels or envelopes For the recommended paper to use see Acceptable paper and other print media uu page 2 Printing on plain paper thin paper recycled paper and bond paper from the MP tray 1 a Open the MP tray and lower it gently b Pull out the MP tray support 1 and unfold the flap 2 2 1 ...

Страница 19: ...1 The side to be printed on must be face up with the leading edge top of the paper in first The paper guides touch the sides of the paper so it will feed properly d Lift up the support flap to prevent paper from sliding off the face down output tray or remove each page as soon as it comes out of the machine 1 ...

Страница 20: ...m Page Sizes in Macintosh printer drivers For the acceptable paper sizes see Type and size of paper uu page 2 Media Type Paper Source For any other settings see Driver and Software in Chapter 2 Note The name of options in the drop down lists may vary depending on your operating system and its version f Send the print data to the machine A4 Letter Legal Executive A5 A5 Long Edge A6 B5 B6 3 x 5 Foli...

Страница 21: ...nvelopes from the MP tray 1 Before loading press the corners and sides of the envelopes to make them as flat as possible a Open the back cover face up output tray b Open the MP tray and lower it gently c Pull out the MP tray support 1 and unfold the flap 2 1 2 ...

Страница 22: ...of the printer driver Paper Size For printing thick paper or labels For Printing envelopes 1 You can define your original paper size by choosing User Defined in Windows printer driver PostScript Custom Page Size in BR Script printer driver for Windows or Custom Page Sizes in Macintosh printer drivers For the acceptable paper sizes see Type and size of paper uu page 2 A4 Letter Legal Executive A5 A...

Страница 23: ...ver for Windows or Custom Page Sizes for Macintosh printer driver f Send the print data to the machine Note Remove each envelope as soon as it has been printed Stacking the envelopes may cause them to jam or curl If envelopes or thick paper get smudged during printing set the Media Type to Env Thick or Thicker Paper to increase the fixing temperature If the envelopes are creased after they are pri...

Страница 24: ...put it back in the paper tray If the paper continues to curl replace the paper If the paper is not feeding properly it may be curled Remove the paper and straighten it If the paper continues to curl replace the paper When you use the manual duplex function it is possible that there may be paper jams or poor print quality If there is a paper jam see Paper jams uu page 134 If you have a print qualit...

Страница 25: ...tation See Duplex Booklet uu page 29 Binding Offset in Duplex Settings You can specify the offset for binding See Duplex Booklet uu page 29 Note You should use plain paper recycled paper or thin paper Do not use bond paper The name of options in the drop down lists may vary depending on your operating system and its version For any other settings see Driver and Software in Chapter 2 b Send the pri...

Страница 26: ...cycled paper or thin paper Do not use bond paper The name of options in the drop down lists may vary depending on your operating system and its version For any other settings see Driver and Software in Chapter 2 b Send the print data to the machine The machine will print on both sides of the paper automatically Letter Legal Folio Plain Paper Recycled Paper Thin Paper Tray1 MP Tray Tray2 if availab...

Страница 27: ... labels which have only one print side Paper Source Duplex Booklet Duplex Type in Duplex Settings There are four options for each orientation See Duplex Booklet uu page 29 Binding Offset in Duplex Settings You can specify the offset for binding See Duplex Booklet uu page 29 For any other settings see Driver and Software in Chapter 2 b Send the print data to the machine The machine will print all t...

Страница 28: ...rinter driver the most suitable printer driver for this product BR Script printer driver PostScript 3 language emulation 1 1 Install the driver using the Custom Install from the CD ROM For Macintosh 2 Macintosh printer driver the most suitable printer driver for this product BR Script printer driver PostScript 3 language emulation 1 1 For the installation instruction of the driver visit us at http...

Страница 29: ...is your model name as your printer driver from the Print or Print Settings menu in your software application and then click OK or Print to begin printing b Your computer sends the data to the machine The Data LED will blink and the LCD will show Printing c When the machine finishes printing all the data the Data LED finishes blinking Note You can choose the paper size and orientation in your appli...

Страница 30: ...nistrator 1 2 User Authentication 1 2 Use Reprint 1 2 Sleep Time Macro 1 2 Density Adjustment Improve Print Output Skip Blank Page 1 3 Print Profile 1 2 1 These settings are not available with the BR script printer driver for Windows 2 These settings are not available with the Macintosh printer driver and the BR Script printer driver for Macintosh 3 These settings are not available with the BR Scr...

Страница 31: ...and Sound and then Printers For Windows 7 and Windows Server 2008R2 Click the button and Devices and Printers b Right click the Brother HL XXXX series icon where XXXX is your model name and select Properties Printer properties and Brother HL XXXX series if necessary The printer properties dialog box appears c Choose the General tab and then click Printing Preferences Preferences To configure the t...

Страница 32: ...s see Accessing the printer driver settings uu page 25 Basic tab 2 You can also change the Page Layout settings by clicking the illustration on the left side of the Basic tab a Choose the Paper Size Orientation Copies Media Type Resolution and Print Settings 1 b Choose Multiple Page and Duplex Booklet 2 c Choose the Paper Source 3 d Confirm your current settings in the window 4 e Click OK to apply...

Страница 33: ...cument will be printed and then repeated for the number of copies you selected If the Collate check box is not selected then each page will be printed for all the copies selected before the next page of the document is printed Media Type 2 You can use the following types of media in your machine For the best print quality select the type of media that you wish to use Plain Paper Thin Paper Thick P...

Страница 34: ...an change the print settings as follows Graphics This is the best mode for printing documents that contain graphics Text This is the best mode for printing text documents Manual You can change the settings manually by choosing Manual and clicking the Manual Settings button You can set brightness contrast and other settings Multiple Page 2 The Multiple Page selection can reduce the image size of a ...

Страница 35: ...tions required to re install the paper When you click OK the odd numbered pages will be printed When you choose Duplex or Duplex Manual the Duplex Settings button becomes available to choose You can set following settings in the Duplex Settings dialog box Duplex Type There are four types of duplex binding directions available for each orientation Binding Offset When you check Binding Offset you ca...

Страница 36: ... two types of duplex binding directions available for each orientation Booklet Printing Method When Divide into Sets is selected This option allows you to print the whole booklet into smaller individual booklet sets it still allows you to fold at the center of the smaller individual booklet sets without having to change the order of the page number You can specify the number of sheets in each smal...

Страница 37: ...ctions Scaling 1 Reverse Print 2 Use Watermark 3 Header Footer Print 4 Toner Save Mode 5 Secure Print 6 Administrator 7 User Authentication 8 Other Print Options 9 Scaling 2 You can change the print image scaling Reverse Print 2 Check Reverse Print to reverse the data from up to down 1 2 3 4 5 6 7 8 9 ...

Страница 38: ...eck Use Watermark and then click the Settings button Watermark Settings 2 Transparent Check Transparent to print the watermarked image in the background of your document If this feature is not checked then the watermark will be printed on top of your document In Outline Text Check In Outline Text if you only want to print an outline of the watermark It is available when you choose a text watermark...

Страница 39: ...map File in Watermark Style Title Enter a suitable title into the field Text Enter your Watermark Text into the Text box and then choose the Font Style Size and Darkness Bitmap Enter the file name and location of your bitmap image in the File box or click Browse to search for the file You can also set the scaling size of the image Position Use this setting if you want to control the position of th...

Страница 40: ...ve Mode for printing photo or Gray Scale images Toner Save Mode is not available for HQ 1200 and 1200 dpi resolutions Secure Print 2 Secure documents are documents that are password protected when they are sent to the machine Only the people who know the password will be able to print them Since the documents are secured at the machine you must enter the password using the control panel of the mac...

Страница 41: ... need to set your ID and PIN in the User Authentication Settings dialog Click Settings of the User Authentication and enter your ID and PIN If your PC login name is registered to Secure Function Lock 2 0 you can check the Use PC Login Name box instead of entering your ID and PIN More information about Secure Function Lock 2 0 uu Network User s Guide Note When you use the machine through a network ...

Страница 42: ... Blank Page Use Reprint 2 The machine keeps the print job sent to it in memory You can reprint the last job without sending the data again from your computer For more information about the Reprint function see Reprinting documents uu page 90 Note If you want to prevent other people from printing your data using the reprint function uncheck the Use Reprint check box ...

Страница 43: ...ices Density Adjustment 2 Increase or decrease the print density Improve Print Output 2 This feature allows you to improve a print quality problem Reduce Paper Curl If you choose this setting the paper curl may be reduced If you are printing only a few pages you do not need to choose this setting We recommend that you change the printer driver setting in Media Type to a thin setting Note This oper...

Страница 44: ...tomatically detects blank pages and excludes them from printing Note This option does not work when you choose the following options Use Watermark Header Footer Print N in 1 and 1 in NxN Pages in Multiple Page Duplex Manual Booklet Booklet Manual and Duplex with Binding Offset in Duplex Booklet ...

Страница 45: ...file list box b If you want to display the Print Profiles tab at the front of the window from the next time you print check Always show Print Profiles tab first c Click OK to apply your chosen profile Add Profile 2 The Add Profile dialog appears by clicking Add Profile You can add 20 new profiles with your preferred settings a Enter the desired title in Name b Choose an icon you want to use from t...

Страница 46: ...te Profile 2 The Delete Profile dialog appears by clicking Delete Profile You can delete any of the profiles you have added a Choose your profile from the print profile list box b Click Delete c The selected profile will be deleted ...

Страница 47: ...Installed Options 1 You can manually add and remove the options that are installed on the machine Tray settings will match the installed options Paper Source Setting 2 This feature recognizes the paper size set from the control panel menu for each paper tray when you click Auto Detect 4 Serial No 3 By clicking Auto Detect 4 the printer driver will probe the machine and display its serial number If...

Страница 48: ...n Available Options 1 You can manually add or remove the options by choosing an optional device you want to add or remove and then clicking Add or Remove Note The Auto Detect 4 function is not available under the following machine conditions The machine power switch is off The machine is in an error state The machine is connected to the print server using a USB cable in a shared network environmen...

Страница 49: ...es dialog box Brother Solutions Center 1 The Brother Solutions Center http solutions brother com is a Web site offering information about your Brother product including FAQs Frequently Asked Questions User s Guides driver updates and tips for using your machine 1 2 3 4 7 5 6 ...

Страница 50: ...tions for business and home users by clicking this button Print Settings 4 This button will print the pages that show how the internal settings of the machine have been configured Check Setting 5 You can check the current driver settings About 6 This button will show the list of the printer driver files and version information Print Fonts 7 This button will print the pages that show all the intern...

Страница 51: ... box Layout tab You can change the layout setting by choosing the settings for Orientation Print on Both Sides Duplex Page Order and Pages Per Sheet Orientation Orientation selects the position of how your document will be printed Portrait Landscape or Rotated Landscape Print on Both Sides If you want to do duplex printing choose Flip on Short Edge or Flip on Long Edge Page Order Specifies the ord...

Страница 52: ...etting will automatically pull paper from any paper source that has a paper size defined in the printer driver that matches your document Auto Select This setting will automatically pull paper from any paper source that has a paper size defined in the machine that matches your document Tray1 This setting will pull paper from Tray 1 Tray2 This setting will pull paper from Tray 2 Available if the op...

Страница 53: ...ne you must enter the password using the control panel of the machine to print them To send a secured document a Check Secure Print b Enter your password and click OK c To print the secured document you must enter your password using the control panel of the machine See Printing Secure data uu page 91 To delete a secured document You need to use the control panel of the machine to delete a secured...

Страница 54: ... be printed b Set the Scaling and TrueType Font settings 2 Scaling Specifies whether to reduce or enlarge documents and by what percentage TrueType Font Specifies the TrueType font options Click Substitute with Device Font the default to use equivalent printer fonts for printing documents that contain TrueType fonts This will permit faster printing however you might lose special characters not sup...

Страница 55: ...hoose the following print quality settings 300 dpi 600 dpi HQ 1200 1200 dpi Media Type You can use the following types of media in your machine For the best print quality select the type of media that you wish to use Plain Paper Thin Paper Thick Paper Thicker Paper Bond Paper Envelopes Env Thick Env Thin Recycled Paper Label 3 ...

Страница 56: ...Receiving a print job will automatically wake up the machine to start printing Halftone Screen Lock Stops other applications from modifying the Halftone settings The default setting is On High Quality Image Printing You can get high quality image printing If you set High Quality Image Printing to On the print speed will be slower Improve Print Output This feature allows you to improve a print qual...

Страница 57: ...low 30 or ghosting may increase Note This feature may not reduce ghosting for all types of paper Before you buy a lot of paper test a small quantity to make sure that the paper is suitable Density Adjustment Increase or decrease the print density Ports tab 2 If you want to change the port where your machine is connected or the path to the network machine you are using choose or add the port you wa...

Страница 58: ...not available if you originally installed the printer driver from the Windows Add a printer function After uninstalling we recommend that you restart your computer to remove files that were in use during the uninstall a Click the Start button point to All Programs Brother and then to your machine name b Click UnInstall c Follow the instructions on the screen ...

Страница 59: ...le Status Monitor on startup during installation you will find the button or Status Monitor icon on the taskbar To show the Status Monitor icon on your taskbar click the button The Status Monitor icon will appear in the small window Then drag the icon to the taskbar There is also a link to the Troubleshooting and Brother Genuine Supplies Web site Click Visit the Genuine Supplies website button for...

Страница 60: ...hange color depending on the machine status A green icon indicates the normal stand by condition A yellow icon indicates a warning A red icon indicates a printing error has occurred There are two locations where you can display the Status Monitor on your PC in the tasktray or on the desktop ...

Страница 61: ...reens on your Macintosh will vary depending on your operating system version Choosing page setup options 2 You can set the Paper Size Orientation and Scale a From an application such as TextEdit click File then Page Setup Make sure Brother HL XXXX where XXXX is your model name is chosen in the Format for pop up menu You can change the settings for Paper Size Orientation and Scale then click OK ...

Страница 62: ...t click File then Print to start printing For Mac OS X 10 5 8 and 10 6 x For more page setup options click the disclosure triangle beside the Printer pop up menu Note You can save the current settings as a preset by choosing Save As from the Presets drop down list ...

Страница 63: ...Software 2 For Mac OS X 10 7 x For more page setup options click the Show Details button Note You can save the current settings as a preset by choosing Save Current Settings as Preset from the Presets drop down list ...

Страница 64: ...ble options see the following descriptions of each option Cover Page 2 You can choose the following cover page settings Print Cover Page If you want to add a cover page to your document use this function Cover Page Type Choose a template for the cover page Billing Info If you want to add the billing information to the cover page enter text in the Billing Info box ...

Страница 65: ... When you specify the pages per sheet you can also specify the direction of the layout Border If you want to add a border use this function Two Sided See Duplex 2 sided Printing uu page 64 Reverse Page Orientation Check Reverse Page Orientation to reverse the data from up to down Flip horizontally Mac OS X 10 6 x and 10 7 x Check Flip horizontally to print as a reflection flipped left to right ...

Страница 66: ...must enter the password using the control panel of the machine to print them To send a secured document a Check Secure Print b Enter your password user name and job name and click Print c To print the secured document you must enter your password using the control panel of the machine See Printing Secure data uu page 91 To delete a secured document You need to use the control panel of the machine ...

Страница 67: ...ollowing Plain Paper Thin Paper Thick Paper Thicker Paper Bond Paper Envelopes Env Thick Env Thin Recycled Paper Label Resolution You can change the resolution as follows 300 dpi 600 dpi HQ 1200 1200 dpi Paper Source You can choose Auto Select Tray1 Tray2 1 2 MP Tray or Manual 1 Available if the optional tray is installed 2 Tray 2 is standard on HL 5470DWT and HL 6180DWT ...

Страница 68: ... is Off Note We do not recommend Toner Save Mode for printing Photo or Gray Scale images Toner Save Mode is not available for HQ 1200 and 1200 dpi resolutions Graphics Quality You can change the print quality as follows Graphics This is a graphics mode contrast priority Choose this setting for printing text and figures such as business and presentation documents You can represent sharp contrasts b...

Страница 69: ...he paper Do not use this setting if the ambient humidity is below 30 or ghosting may increase Note This feature may not reduce ghosting for all types of paper Before you buy a lot of paper test a small quantity to make sure that the paper is suitable Density Adjustment Increase or decrease the print density Sleep Time When the machine does not receive data for a certain period of time it enters sl...

Страница 70: ...ect Layout Choose Long edge binding or Short edge binding in Two Sided Manual Duplex Printing Select Paper Handling Choose Even Only and Print Reload the printed paper into the tray blank side face down in Tray 1 or Tray 2 or blank side face up in MP tray Choose Odd Only and Print ...

Страница 71: ...3 printer driver see Features in the printer driver Macintosh uu page 55 for Page Setup Cover Page Paper Source and Layout Note If you want to setup the PS driver BR Script3 printer driver please go to the Brother Solutions Center at http solutions brother com and visit FAQ s on your model page for instructions Choosing printing options 2 To control special printing features choose Printer Feature...

Страница 72: ...resolution as follows 300 dpi 600 dpi HQ 1200 1200 dpi Media Type You can change the media type to one of the following Plain Paper Thin Paper Thick Paper Thicker Paper Bond Paper Envelopes Env Thick Env Thin Recycled Paper Label Hagaki 1 1 Postcard with the size specified by Japan Post Service Co LTD ...

Страница 73: ...it were turned off When you choose Printer Default the timeout setting will be reset to the specific time set at the factory this can be altered in the driver If you want to change the Sleep Time choose 2 10 or 30 While the machine is in Sleep Mode the LCD shows Sleep but the machine can still receive data Receiving a print job will automatically wake up the machine to start printing Halftone Scre...

Страница 74: ...s setting the toner fixing capabilities may be improved If this selection does not provide enough improvement change the printer driver setting in Media Type to a thick setting Note This operation will increase the temperature of the machine s fusing process Ghost Reduction Setting If you are using the machine in a high humidity environment this setting may reduce ghosting on the paper Do not use ...

Страница 75: ...ill be able to print them Since the documents are secured at the machine you must enter the password using the control panel of the machine to print them If you want to create a secure print job click Secure Print and check the Secure Print box Enter a password in the Password box and click Print For more information about Secure Print See Printing Secure data uu page 91 ...

Страница 76: ...an Administrator b From the Apple menu choose System Preferences Click Print Fax 1 then choose the printer you want to remove and remove it by clicking the button c Click OK 2 1 Print Scan for Mac OS X 10 7 x users 2 Delete Printer for Mac OS X 10 6 x and 10 7 x users ...

Страница 77: ...Mac OS X 10 6 x a Run the System Preferences select Print Fax then choose the machine b Click the Open Print Queue then click Printer Setup Select the Utility tab then click Open Printer Utility Status Monitor will start up For Mac OS X 10 7 x a Run the System Preferences select Print Scan then choose the machine b Click the Open Print Queue then click Printer Setup Select the Utility tab then cli...

Страница 78: ...e dock Quitting the window 2 Click Brother Status Monitor in the menu bar and then choose Quit Status Monitor from the pop up menu Web Based Management Network Connection only 2 You can access the Web Based Management System by clicking the machine icon on the Status Monitor screen A standard Web Browser can be used to manage your machine using HTTP Hyper Text Transfer Protocol More information on...

Страница 79: ...73 Driver and Software 2 Software 2 Software for networks 2 For the information about network utility software uu Network User s Guide Network features ...

Страница 80: ...70DW 1 LCD Displays messages to help you set up and use your machine A four level indicator shows the current wireless signal strength if you are using a wireless connection 2 Data LED The LED will blink depending on the machine status For details see LED indications uu page 76 3 Error LED Blinks in orange when the LCD displays an error or an important status message For details see LED indication...

Страница 81: ...hen you enter your four digit password For details see Printing Secure data uu page 91 6 Go You can clear some error messages by pressing Go To clear all other errors follow the control panel instructions or see Error and maintenance messages uu page 130 Pause and continue printing Lets you print any data remaining in the machine s memory Lets you choose the displayed option in the last menu level...

Страница 82: ...hine Status Message Meaning Cooling Down The machine is cooling down Cancel Printing Cancel All Jobs The machine is canceling the job Ignore Data The machine is ignoring data processed using the PS driver Pause The machine has suspended its operations Press Go to start the machine again Please Wait The machine is warming up The machine is carrying out the calibration process Printing The machine i...

Страница 83: ...to your next menu selection e Press OK or Go When you have finished setting an option the LCD will show Accepted Menu table 3 There are six menus For more information about the selections available in each menu see the following tables If no control panel operations are performed for 30 seconds the LCD automatically returns to Ready Note The control panel LCD names for the paper trays are as follo...

Страница 84: ...ont list and samples of BR Script Serial No Shows the machine serial number Version Main Version Shows the main firmware version Sub Version Shows the sub firmware version RAM Size Shows the size of memory in this machine Page Count Shows the current total printed pages Drum Count Shows the current total pages printed for the drum unit Parts Life Drum Life Shows the remaining life for the drum uni...

Страница 85: ... Chooses whether to automatically print on both sides of the paper MP Size Any Letter Legal A4 Executive Com 10 DL JIS B5 B5 A5 A5 L JIS B6 B6 A6 Monarch C5 Folio 3X5 User Defined Chooses the size of paper you put in the MP tray MP Media Fix Plain Paper Thick Paper Thicker Paper Thin Paper Recycled Paper Bond Paper Envelopes Env Thick Env Thin Label Off Chooses the media type of paper you put in t...

Страница 86: ...vel10 Sets the time in seconds that an LCD message will scroll across the LCD From Level 1 0 2 sec to Level 10 2 0 sec LCD Contrast nnonn Adjusts the contrast of the LCD Auto Online On Off Sets the machine to automatically return to Ready mode Setting Lock Turns the lock panel settings On or Off using the password Reprint On Off Turns the reprint settings On or Off Interface Select Auto USB Networ...

Страница 87: ... or Auto IBM each emulation mode will be fixed Auto Continue On Off If this setting is enabled the machine will automatically clear a paper size error and will use any compatible paper from other paper trays Media Type Plain Paper Thick Paper Thicker Paper Thin Paper Recycled Paper Bond Paper Envelopes Env Thick Env Thin Label Sets the type of paper Paper Letter Legal A4 Executive Com 10 DL JIS B5...

Страница 88: ... appear when you choose I000 to I058 in Font No setting Symbol Set PC 8 PC 8 D N Sets the symbol set or the character set Table Print Prints code table If Change Emulation appears on the LCD choose Auto EPSON Auto IBM or HP LaserJet in Emulation of the Print Menu See page 81 Auto LF On Off ON CR i CR LF OFF CR i CR Auto CR On Off ON LF i LF CR FF i FF CR or VT i VT CR OFF LF i LF FF i FF or VT i V...

Страница 89: ...u choose I059 to I071 in Font No setting Font Point 4 00 12 00 999 75 Sets the font size Font Point menu will appear when you choose I000 to I058 in Font No setting Character Set US ASCII GERMAN Sets the symbol set or the character set Table Print Prints code table If Change Emulation appears on the LCD choose Auto EPSON Auto IBM or HP LaserJet in Emulation of the Print Menu See page 81 Auto LF On...

Страница 90: ...Point menu will appear when you choose I000 to I058 in Font No setting Character Set PC 8 PC 8 D N Sets the symbol set or the character set Table Print Prints code table If Change Emulation appears on the LCD choose Auto EPSON Auto IBM or HP LaserJet in Emulation of the Print Menu See page 81 Auto LF On Off ON CR i CR LF OFF CR i CR Auto CR On Off ON LF i LF CR FF i FF CR or VT i VT CR OFF LF i LF...

Страница 91: ...ance from the bottom edge of the paper 0 00 0 33 0 50 1 00 1 50 or 2 00 inches The default setting is 0 33 inches Lines Sets the number of lines on each page from 5 to 128 lines The default setting is 62 lines Letter BR Script 3 Error Print On Off Chooses whether to automatically print the error information when errors occur Print Menu continued Submenu Menu Selections Options Descriptions The fac...

Страница 92: ...an IP address when the Boot Method is set to any setting except Static APIPA On Off Automatically allocates the IP address from the link local address range 1 IPv6 On Off Sets use of IPv6 protocol Ethernet Auto 100B FD 100B HD 10B FD 10B HD Chooses Ethernet link mode Wired Status Active 1000B FD 2 Active 100B FD Active 100B HD Active 10B FD Active 10B HD Inactive Wired OFF Shows Ethernet link stat...

Страница 93: ... IP address when the Boot Method is set to any setting except Static APIPA On Off Automatically allocates the IP address from the link local address range 1 IPv6 On Off Enables or Disables the IPv6 protocol Setup Wizard Configures the wireless network settings using the setup wizard WPS AOSS Configures the wireless network settings using WPS or AOSS method WPS w PIN Code Configures the wireless ne...

Страница 94: ...res wireless network settings of the internal print server to the factory default WLAN Enable On Off Turns the wireless interface on or off Wi Fi Direct Push Button You can easily configure your Wi Fi Direct network settings using the one button push method PIN Code You can easily configure your Wi Fi Direct network settings using WPS with a PIN code Manual You can manually configure your Wi Fi Di...

Страница 95: ...tus Signal You can see the current Wi Fi Direct network signal strength When your machine acts as the Group Owner the LCD always shows Strong Channel Shows the channel in use when the Status is G O Active or Client Active Speed Shows the connecting speed when the Status is G O Active or Client Active I F Enable On Off Enable or Disable the Wi Fi Direct connection Network Reset Restores all network...

Страница 96: ...ted How to reprint the last job 3 a Make sure that the Reprint setting is On by using the keys on the control panel to enter the General Setup menu Note If you print with the Windows printer driver we have supplied with the machine the settings for Use Reprint in the printer driver will take priority over the settings made on the control panel Check the Use Reprint check box in the printer driver ...

Страница 97: ...he LCD leaves the Secure Print setting automatically For more information about the settings in the printer driver and how to create secure data see Secure Print uu page 34 For Windows printer driver Advanced options uu page 48 For Windows BR Script printer driver Secure Print uu page 60 For Macintosh printer driver or Secure Print uu page 69 For Macintosh BR Script printer driver How to print Sec...

Страница 98: ...the password stored in the machine For information about how to reset the password call Brother Customer Service Only administrators can set limitations and make changes for each user Setting Lock 3 Setting Lock lets you set a password to stop other people from accidentally changing your machine settings Make a careful note of your password If you forget it you will have to reset the passwords sto...

Страница 99: ...nter the password when the LCD shows Verify Turning Setting Lock on off 3 If you enter the wrong password when following the instructions below the LCD will show Wrong Password Re enter the correct password Turning Setting Lock on a Press a or b to choose General Setup Press OK b Press a or b to choose Setting Lock Press OK c Press OK when the LCD shows On d Enter the registered four digit passwor...

Страница 100: ...the machine receives a print file or document the timer will be reset The default setting is 3 minutes While the machine is in Sleep mode the LCD will show Sleep a Press a or b to choose General Setup Press OK b Press a or b to choose Ecology Press OK c Press a or b to choose Sleep Time Press OK d Press a or b to enter the length of time the machine will remain idle before entering Sleep mode Pres...

Страница 101: ...duce printing noise When Quiet Mode is turned on the print speed becomes slower The default setting is Off Turning Quiet mode on off 3 a Press a or b to choose General Setup Press OK b Press a or b to choose Quiet Mode Press OK c Press a or b to choose On or Off Press OK or Go ...

Страница 102: ...ries You can increase the capabilities of the machine with these items 1 HL 5470DWT and HL 6180DWT are equipped with the lower tray as standard equipment Options 4 Lower tray 1 SO DIMM memory LT 5400 See Lower tray LT 5400 uu page 97 See SO DIMM uu page 98 ...

Страница 103: ...g m2 paper for HL 5470DW and 1 050 sheets for HL 6180DW If you want to buy the optional lower tray unit call the dealer you bought the machine from or Brother Customer Service 1 Tray 2 is standard on HL 5470DWT and HL 6180DWT For setup see the User s Guide that we have supplied with the lower tray unit WARNING If you use a Lower Tray DO NOT carry the machine with the Lower Tray as you may be injur...

Страница 104: ...ing memory for your Brother machine please visit us at http www brother usa com support memory In general the SO DIMM must have the following specifications Type 144 pin and 16 bit output CAS latency 4 Clock frequency 267 MHz 533 Mb S Pin or more Capacity 256 MB Height 30 0 mm 1 18 in DRAM type DDR2 SDRAM Note There might be some SO DIMMs that will not work with the machine For more information ca...

Страница 105: ...power cord from the AC power outlet Note Always turn off the machine power switch before installing or removing the SO DIMM c Remove the plastic 1 and then the metal 2 SO DIMM covers d Unpack the SO DIMM and hold it by its edges Important To prevent damage to the machine from static electricity DO NOT touch the memory chips or the board surface 2 1 ...

Страница 106: ...licks into place 2 f Put the metal 2 and then the plastic 1 SO DIMM covers back on g Plug the machine s power cord back into the AC power outlet first and then connect the interface cables h Turn on the machine s power switch Note To make sure that you have installed the SO DIMM properly you can print the printer settings page that shows the current memory size See Machine Info uu page 78 1 2 1 2 ...

Страница 107: ...an replace the following consumable items by yourself Note The drum unit and toner cartridge are two separate parts 1 TN 780 is available for HL 6180DW T Routine Maintenance 5 Toner cartridge Drum unit See Replacing the toner cartridge uu page 103 Order No TN 720 TN 750 TN 780 1 See Replacing the drum unit uu page 111 Order No DR 720 TN 720 TN 750 TN 780 ...

Страница 108: ...ridge according to local regulations keeping it separate from domestic waste If you have questions call your local waste disposal office We recommend placing used consumable items on a piece of paper to prevent accidentally spilling or scattering the material inside If you use paper that is not a direct equivalent for the recommended paper the life of consumable items and machine parts may be redu...

Страница 109: ...ommend that you use only Genuine Brother Brand toner cartridges When you want to buy toner cartridges please call Brother Customer Service If you print graphics bold text charts Web pages with borders or other types of printouts that consist of more than simple text the amount of toner used will increase We recommend that you clean the machine when you replace the toner cartridge See Cleaning and ...

Страница 110: ...10 minutes to cool down b Press the front cover release button and then open the front cover c Take out the drum unit and toner cartridge assembly WARNING After you have just used the machine some internal parts of the machine will be extremely hot Wait for the machine to cool down before you touch the internal parts of the machine ...

Страница 111: ...he illustration d Push down the green lock lever and take the toner cartridge out of the drum unit WARNING DO NOT put a toner cartridge or a toner cartridge and drum unit assembly into a fire It could explode resulting in injuries DO NOT use flammable substances any type of spray or an organic solvent liquid containing alcohol or ammonia to clean the inside or outside of the machine Doing so could...

Страница 112: ...p the used toner cartridge tightly in a suitable bag so that toner powder does not spill out of the cartridge Go to http www brother com original index html for instructions on how to return your used consumable items to the Brother collection program If you choose not to return your used consumable please discard the used consumable according to local regulations keeping it separate from domestic...

Страница 113: ...in the Brother machine may cause damage to the machine and or may result in unsatisfactory print quality In addition use of third party toner and or cartridges may trigger incorrect status messages cause the printer to stop prematurely or otherwise malfunction Our limited warranty coverage does not apply to any problem that is caused by the use of third party toner and or cartridges To protect you...

Страница 114: ...drum unit will lift automatically Note Make sure that you put in the toner cartridge properly or it may separate from the drum unit h Clean the corona wire inside the drum unit by gently sliding the green tab from left to right and right to left several times Note Be sure to return the tab to the home position a 1 If you do not printed pages may have a vertical stripe 1 ...

Страница 115: ...e drum unit and toner cartridge assembly back into the machine j Close the front cover of the machine Note After replacing the toner cartridge DO NOT turn off the machine s power switch or open the front cover until the LCD shows Ready ...

Страница 116: ...quality but also the quality and life of the machine itself Warranty coverage does not apply to problems caused by the use of a non Brother drum unit Drum Error 5 Drum Error The corona wire has become dirty Clean the corona wire in the drum unit See Cleaning the corona wire uu page 118 If you cleaned the corona wire and Drum Error was not cleared then the drum unit is at the end of its life Replac...

Страница 117: ...efully because it may contain toner If toner scatters on your hands or clothes immediately wipe or wash it off with cold water Every time you replace the drum unit clean the inside of the machine See Cleaning and Checking the machine uu page 116 When you replace the drum unit with a new one you need to reset the drum counter by completing the following steps a Make sure that the machine is turned ...

Страница 118: ...he machine Important We recommend that you place the drum unit and toner cartridge assembly on a clean flat surface with a piece of disposable paper underneath it in case you accidentally spill or scatter toner To prevent damage to the machine from static electricity DO NOT touch the electrodes shown in the illustration d Push down the green lock lever and take the toner cartridge out of the drum ...

Страница 119: ...nt quality problems DO NOT touch the shaded parts shown in the illustrations We recommend that you place the toner cartridge on a clean flat level stable surface with a sheet of disposable paper or cloth underneath it in case you accidentally spill or scatter toner Note Be sure to seal up the used drum unit tightly in a suitable bag so that toner powder does not spill out of the drum unit Go to ht...

Страница 120: ... hear it lock into place If you put the cartridge in properly the green lock lever on the drum unit will lift automatically Note Make sure that you put in the toner cartridge properly or it may separate from the drum unit g Put the drum unit and toner cartridge assembly back into the machine ...

Страница 121: ...nit with a new one you need to reset the drum counter Hold down Go until the Drum Clear message is displayed on the LCD then release Go Important Do not reset the drum counter when you only replace the toner cartridge i Close the front cover of the machine ...

Страница 122: ...DO NOT use flammable substances any type of spray or an organic solvent liquid containing alcohol or ammonia to clean the inside or outside of the machine Doing so could cause a fire or electrical shock Instead use only a dry lint free cloth uu Product Safety Guide To use the product safely Important Use neutral detergents Cleaning with volatile liquids such as thinner or benzine will damage the s...

Страница 123: ...g that is stuck inside the paper tray g Wipe the inside and the outside of the paper tray with a dry lint free cloth to remove dust h Re load the paper and put the paper tray firmly back in the machine i Plug the machine s power cord back into the AC power outlet first and then connect the interface cables j Turn on the machine s power switch ...

Страница 124: ... internal fan to cool the extremely hot parts inside the machine b Press the front cover release button and then open the front cover c Take out the drum unit and toner cartridge assembly WARNING After you have just used the machine some internal parts of the machine will be extremely hot Wait for the machine to cool down before you touch the internal parts of the machine ...

Страница 125: ...ately wipe or wash it off with cold water To prevent damage to the machine from static electricity DO NOT touch the electrodes shown in the illustration d Clean the corona wire inside the drum unit by gently sliding the green tab from left to right and right to left several times Note Be sure to return the tab to the home position a 1 If you do not printed pages may have a vertical stripe e Put th...

Страница 126: ... a Make sure the machine is in Ready mode b Press a or b to choose Machine Info Press OK c Press a or b to choose Drum Dot Print Press OK to print the drum dot check sheet d Leave the machine turned on for 10 minutes for the internal fan to cool the extremely hot parts inside the machine e Turn off the machine s power switch f Press the front cover release button and then open the front cover g Ta...

Страница 127: ...t and toner cartridge assembly on a piece of disposable paper or cloth in case you accidentally spill or scatter toner Handle the drum unit and toner cartridge assembly carefully If toner scatters on your hands or clothes immediately wipe or wash it off with cold water To prevent damage to the machine from static electricity DO NOT touch the electrodes shown in the illustration h Push down the gre...

Страница 128: ...n the illustration Make sure that the drum unit gear 1 is on the left hand side j Use the numbered markers next to the drum roller to find the mark For example a dot in column 2 on the check sheet would mean that there is a mark in the 2 region of the drum 1 ...

Страница 129: ...e of the suspected area l When you have found the mark on the drum that matches the drum dot check sheet wipe the surface of the drum gently with a cotton swab until the mark on the surface comes off Important DO NOT clean the surface of the photosensitive drum with a sharp object or any liquids ...

Страница 130: ...artridge in properly the green lock lever on the drum unit will lift automatically Note Make sure that you put in the toner cartridge properly or it may separate from the drum unit n Put the drum unit and toner cartridge assembly back into the machine o Close the front cover of the machine p Turn on the machine s power switch ...

Страница 131: ...power cord from the AC power outlet c Pull the paper tray completely out of the machine d Tightly wring out a lint free cloth soaked in lukewarm water and then wipe the separator pad 1 of the paper tray with it to remove dust e Wipe the two pick up rollers 1 inside of the machine to remove dust f Put the paper tray back in the machine g Plug the machine s power cord back into the AC power outlet f...

Страница 132: ...inal packaging to avoid any damage during transit The machine should be adequately insured with the carrier For HL 5470DWT and HL 6180DWT users the lower tray and the machine should be packed separately into each original packing box and then pack them into the largest original box a Turn off the machine s power switch Leave the machine turned off for at least 10 minutes to cool down b Disconnect ...

Страница 133: ...e machine in a plastic bag then put it on the bottom packing material 1 e Put the packing material 2 marked FRONT on the front of the machine Put the packing material 3 marked REAR on the back of the machine REAR 1 FRONT 1 REAR FRONT 2 3 ...

Страница 134: ... Routine Maintenance 5 f Put the cardboard tray 1 on the top and put the power cord in it g Close the carton and tape it shut h If you have a Lower Tray Repack the lower tray as shown in the illustration 1 ...

Страница 135: ... All of the protective parts have been removed Paper is inserted properly in the paper tray The interface cables are securely connected to the machine and the computer or wireless connection is set up on both the machine and your computer LCD Messages See Error and maintenance messages uu page 130 If you did not solve your problem with the above checks identify your problem and then go to the page...

Страница 136: ...etely or paper was jammed in the back of the machine when you turned on the power Close the fuser cover of the machine Make sure paper is not jammed inside the back of the machine and then close the fuser cover and press Go See Paper is jammed at the back of the machine uu page 139 DIMM Error The DIMM is not installed correctly The DIMM is broken The DIMM does not meet the required specifications ...

Страница 137: ...ge 134 Limit Exceeded The printing limit set by Secure Function Lock 2 0 was reached Contact your administrator to check your Secure Function Lock Settings Log Access Error The machine could not access the print log file in the server Contact your administrator to check the Store Print Log to Network settings For detailed information uu Network User s Guide Store Print Log to Network Manual Feed M...

Страница 138: ...r a Brother Authorized Service Center to replace the fuser unit To replace Fuser Unit call Brother Customer Service at 1 877 BROTHER 1 877 276 8437 in USA 1 877 BROTHER in Canada or to locate a Brother Authorized Service Center visit us at http www brother usa com service Replace Laser It is time to replace the laser unit Call Brother Customer Service or a Brother Authorized Service Center to repl...

Страница 139: ...n the tray and set the size of paper to the tray See Paper Tray uu page 79 The paper size you can use for automatic duplex printing is Letter Legal or Folio Size Mismatch The paper in the indicated tray is not the correct size Put the same size paper in the paper tray that is selected in the printer driver and then press Go or select the size of paper that you loaded in the indicated paper tray St...

Страница 140: ... follow these steps a Remove the paper from the MP tray b Remove any jammed paper from in and around the MP tray c Fan the paper stack and then put it back in the MP tray d When loading paper in the MP tray make sure that the paper stays under the maximum paper height guides on both sides of the tray e Press Go to resume printing Paper is jammed in Paper Tray 1 or Tray 2 6 If the LCD shows Jam Tra...

Страница 141: ...downward allows you to remove the paper more easily c Make sure that the paper is below the maximum paper mark in the paper tray While pressing the green paper guide release lever slide the paper guides to fit the paper size Make sure that the guides are firmly in the slots d Put the paper tray firmly back in the machine ...

Страница 142: ...0 minutes for the internal fan to cool the extremely hot parts inside the machine b Pull the paper tray completely out of the machine c Open the back cover WARNING After you have just used the machine some internal parts of the machine will be extremely hot Wait for the machine to cool down before you touch the internal parts of the machine ...

Страница 143: ...d Using both hands gently pull the jammed paper out of the back of the machine e Close the back cover f Pull the duplex tray completely out of the machine g Pull the jammed paper out of the machine or out of the duplex tray ...

Страница 144: ...8 Troubleshooting 6 h Make sure that the jammed paper does not remain under the machine from static electricity i Put the duplex tray back into the machine j Put the paper tray firmly back in the machine ...

Страница 145: ...ress the front cover release button and then open the front cover c Slowly take out the drum unit and toner cartridge assembly The jammed paper may be pulled out with the drum unit and toner cartridge assembly or this may release the paper so you can pull it out from inside of the machine WARNING After you have just used the machine some internal parts of the machine will be extremely hot Wait for...

Страница 146: ... assembly carefully If toner scatters on your hands or clothes immediately wipe or wash it off with cold water To prevent damage to the machine from static electricity DO NOT touch the electrodes shown in the illustration d Open the back cover WARNING After you have just used the machine some internal parts of the machine will be extremely hot Wait for the machine to cool down before you touch the...

Страница 147: ...g 6 e Pull the green tabs at the left and right hand sides toward you and fold down the fuser cover 1 f Using both hands gently pull the jammed paper out of the fuser unit g Close the fuser cover h Close the back cover 1 ...

Страница 148: ...142 Troubleshooting 6 i Put the drum unit and toner cartridge assembly back into the machine j Close the front cover of the machine ...

Страница 149: ...s a Leave the machine turned on for 10 minutes for the internal fan to cool the extremely hot parts inside the machine b Pull the paper tray completely out of the machine c Use both hands to slowly pull out the jammed paper Note Pulling the jammed paper downward allows you to remove the paper more easily ...

Страница 150: ...y The jammed paper may be pulled out with the drum unit and toner cartridge assembly or this may release the paper so you can pull it out from inside of the machine WARNING After you have just used the machine some internal parts of the machine will be extremely hot Wait for the machine to cool down before you touch the internal parts of the machine ...

Страница 151: ...wash it off with cold water To prevent damage to the machine from static electricity DO NOT touch the electrodes shown in the illustration Note The drum unit and toner cartridge are two separate parts Make sure both are installed as an assembly If the toner cartridge is placed in the machine without the drum unit the messages Drum Error or Jam Inside may be displayed f Push down the green lock lev...

Страница 152: ...hat you put in the toner cartridge properly or it may separate from the drum unit h Put the drum unit and toner cartridge assembly back into the machine i Close the front cover of the machine j Put the paper tray firmly back in the machine Note If you turn off the machine during Jam Inside the machine will print incomplete data from your computer Before you turn on the machine delete the print spo...

Страница 153: ...Hardware and Sound and then Printers Right click Brother HL XXXX series Make sure that Use Printer Offline is unchecked Windows XP and Windows Server 2003 Click the Start button and choose Printers and Faxes Right click Brother HL XXXX series Make sure that Use Printer Offline is unchecked Contact your administrator to check your Secure Function Lock settings The machine is not printing or has sto...

Страница 154: ...not feed paper If there is no paper load a new stack of paper into the paper tray If there is paper in the paper tray make sure it is straight If the paper is curled you should straighten it Sometimes it is helpful to remove the paper turn the stack over and put it back into the paper tray Reduce the amount of paper in the paper tray and then try again Make sure that manual feed mode is not chosen...

Страница 155: ... cable You can check the current wired network status from the Network control panel menu See Network Menu uu page 86 The Brother software cannot be installed Windows If the Security Software warning appears on the PC screen during the installation change the Security Software settings to permit the Brother product setup program or other program to run Macintosh If you are using a firewall functio...

Страница 156: ...of the problem The machine cannot print EPS data that includes binary with the BR Script3 printer driver Windows You need the following settings to print EPS data a For Windows 7 and Windows Server 2008 R2 Click the Start button and Devices and Printers For Windows Vista and Windows Server 2008 Click Start button Control Panel Hardware and Sound and then Printers For Windows XP and Windows Server ...

Страница 157: ...CD shows Replace Toner put in a new toner cartridge uu Replacing the toner cartridge uu page 104 Check the machine s environment Conditions such as humidity high temperatures and so on may cause this print fault uu Product Safety Guide Choosing a location If the whole page is too light Toner Save may be turned on Turn off Toner Save in the machine s menu settings or Toner Save Mode in the Advanced...

Страница 158: ...that meets our specifications Rough surfaced paper may cause the problem uu Acceptable paper and other print media uu page 2 Clean the corona wire of the drum unit uu Cleaning the corona wire uu page 118 The drum unit may be damaged Put in a new drum unit uu Replacing the drum unit uu page 111 The fuser unit may be contaminated Call Brother Customer Service at In USA 1 877 BROTHER 1 877 276 8437 I...

Страница 159: ...multiple blank pages to clear this problem especially if the machine has not been used for a long time The drum unit may be damaged Put in a new drum unit uu Replacing the drum unit uu page 111 Line across the page Clean the corona wire inside the drum unit uu Cleaning the corona wire uu page 118 The drum unit may be damaged Put in a new drum unit uu Replacing the drum unit uu page 111 White lines...

Страница 160: ...e from the sheets may sometimes stick to the OPC drum surface Clean the drum unit uu Cleaning the drum unit uu page 120 Make sure that you use paper that meets our specifications uu Acceptable paper and other print media uu page 2 Do not use paper that has clips or staples because they will scratch the surface of the drum If the unpacked drum unit is in direct sunlight or room light the unit may b...

Страница 161: ... unit may be damaged Put in a new drum unit uu Replacing the drum unit uu page 111 Image skewed Make sure that the paper or other print media is loaded properly in the paper tray and that the guides are not too tight or too loose against the paper stack Set the paper guides correctly uu Printing on plain paper thin paper or recycled paper from Tray 1 and Tray 2 uu page 8 If you are using the MP tr...

Страница 162: ...ther print media uu page 2 Turn over the stack of paper in the tray or rotate the paper 180 in the input tray Envelope Creases Make sure that envelopes are printed with the back cover face up output tray opened uu Printing on thick paper labels and envelopes from the MP tray uu page 15 Check the envelope type and quality uu Acceptable paper and other print media uu page 2 Make sure envelopes are f...

Страница 163: ...de in the printer driver uu Other Print Options uu page 36 For Windows uu Print Settings uu page 61 For Macintosh Open the back cover face up output tray to let the printed paper exit onto the face up output tray Examples of poor print quality Recommendation ...

Страница 164: ...anged Network default settings 6 If you want to reset only the print server back to its default settings by resetting all network information such as the password and IP address follow these steps a Press a or b to choose Reset Menu Press OK b Press a or b to choose Network Press OK c Press a to choose Yes The machine will restart automatically Factory Reset 6 You can partially reset the machine b...

Страница 165: ...the factory a Disconnect the network cable from the machine otherwise the network settings such as IP address will not be reset b Press a or b to choose Reset Menu Press OK c Press a and Cancel at the same time Press OK after Settings Reset appears d Press OK after Restart Printer appears e The machine will restart automatically ...

Страница 166: ...V AC 50 60 Hz Power Consumption 1 Average Peak Approx 1200 W Printing Approx 716 W at 77 F 25 C Approx 727 W at 77 F 25 C Printing Quiet Mode Approx 348 W at 77 F 25 C Approx 342 W at 77 F 25 C Ready Approx 5 0 W at 77 F 25 C Approx 4 9 W at 77 F 25 C Sleep WLAN On Approx 2 9 W Deep Sleep Approx 0 6 W Approx 0 7 W Dimensions Weights with consumables 23 1 lb 10 5 kg 30 0 lb 13 6 kg 25 4 lb 11 5 kg ...

Страница 167: ...eady LPAm 34 dB A Printing Quiet Mode LPAm 54 dB A Sound Power 1 Printing LWAd 6 79 B A LWAd 6 83 B A LWAd 6 80 B A Ready LWAd 4 70 B A LWAd 4 63 B A LWAd 4 56 B A LWAd 4 50 B A Printing Quiet Mode LWAd 6 4 B A Temperature Operating 50 F to 90 5 F 10 to 32 5 C Storage 32 F to 104 F 0 to 40 C Humidity Operating 20 to 80 without condensation Storage 10 to 90 without condensation ...

Страница 168: ...er Thicker Paper Recycled Paper Bond Paper Label Envelope Env Thin Env Thick Paper Size Width 3 to 8 5 in 76 2 to 215 9 mm Length 5 to 14 in 127 0 to 355 6 mm Paper Weight 16 to 43 lb 60 to 163 g m2 Maximum Paper Capacity Up to 50 sheets of 20 lb 80 g m2 Plain paper Paper Tray 2 Optional 2 Paper Type Plain Paper Thin Paper Recycled Paper Paper Size Letter A4 B5 ISO JIS A5 B6 ISO Executive Legal Fo...

Страница 169: ...ex Print Yes Emulation PCL6 BR Script3 PostScript 3 IBM ProPrinter XL EPSON FX 850 Resolution 1200 1200 dpi HQ1200 2400 600 dpi quality 600 600 dpi Print Speed 1 2 Single side print Up to 40 ppm Letter size Up to 38 ppm A4 size Up to 42 ppm Letter size Up to 40 ppm A4 size Duplex Print Up to 18 sides per minute 9 sheets per minute Letter or A4 size First Print Time 3 Less than 8 5 seconds at 73 4 ...

Страница 170: ...essional x64 Edition 64 bit Intel 64 or AMD64 supported CPU 256 MB 512 MB Windows Vista Intel Pentium 4 or equivalent 64 bit Intel 64 or AMD64 supported CPU 512 MB 1 GB Windows 7 Intel Pentium 4 or equivalent 64 bit Intel 64 or AMD64 supported CPU 1 GB 32 bit 2 GB 64 bit 1 GB 32 bit 2 GB 64 bit Windows Server 2003 Intel Pentium III or equivalent 256 MB 512 MB Windows Server 2003 x64 Edition 64 bit...

Страница 171: ... paper can be classified into two types long grain and short grain Long grain paper fibers run in the same direction as the long edge of the paper Short grain paper fibers run perpendicular to the long edge of the paper Though most plain paper for copying is long grain some is short grain We recommend that you use long grain paper for this machine Short grain paper is too weak for the paper transp...

Страница 172: ... DR 720 Model HL 5470DW HL 5470DWT HL 6180DW HL 6180DWT LAN You can connect your machine to a network for Network Printing Also included is Brother BRAdmin Light 1 2 Network Management software Protocols IPv4 ARP RARP BOOTP DHCP APIPA Auto IP WINS NetBIOS name resolution DNS Resolver mDNS LLMNR responder LPR LPD Custom Raw Port Port9100 IPP IPPS FTP Server TELNET Server HTTP HTTPS server TFTP clie...

Страница 173: ...n insurance claim by you in the event of product loss covered by insurance and will help us notify you of enhancements to your product and special offers Please complete the Brother Warranty Registration or for your convenience and most efficient way to register your new product register on line at http www brother com registration FAQs frequently asked questions A The Brother Solutions Center is ...

Страница 174: ... 1 877 BROTHER 1 877 276 8437 In Canada 1 877 BROTHER In USA Printer Customer Support Brother International Corporation 7905 North Brother Boulevard Bartlett TN 38133 In Canada Brother International Corporation Canada Ltd Marketing Dept 1 rue Hotel de Ville Dollard des Ormeaux PQ Canada H9B 3H6 Internet addresses Brother Global Web Site http www brother com For Frequently Asked Questions FAQs Prod...

Страница 175: ...purchase Note In Canada only Visa and MasterCard are accepted 1 Letter or A4 size single sided pages 2 Approx cartridge yield is declared in accordance with ISO IEC 19752 3 1 page per job 4 Drum life is approximate and may vary by type of use 5 TN 780 is available for HL 6180DW T In USA 1 877 552 MALL 1 877 552 6255 1 800 947 1445 fax http www brothermall com In Canada 1 877 BROTHER http www broth...

Страница 176: ...rror messages 130 F FAQs Frequently Asked Questions 167 Folio 3 G General Setup 80 Go key 75 I Interface 163 J Jam duplex 136 Jam in MP tray 134 Jam Inside 143 Jam Rear 139 Jam Tray 1 134 Jam Tray 2 134 K Keys 74 L Labels 3 6 15 LCD liquid crystal display 74 LED light emitting diode 76 Linux 22 Lower tray 97 M Machine information 78 Macintosh 22 Maintenance messages 101 102 Manual duplex printing ...

Страница 177: ...et mode 95 R Register your product 167 Reprint 90 Reset Menu 89 S Secure data 91 Service centers USA Canada 168 Sleep mode 76 94 SO DIMM 98 Specifications 160 Status Monitor Macintosh 71 Windows 53 Supplies USA Canada 169 T TCP IP 86 87 Thick paper 15 Toner cartridge 103 104 Troubleshooting 129 147 if you are having difficulty network 149 paper handling 148 printing 147 U Unprintable area 7 Utilit...

Отзывы: