Brother HL-4070CDW Скачать руководство пользователя страница 5

Safety Precautions

3

DO NOT use a vacuum cleaner to clean up scattered toner. Doing this might cause the toner dust to ignite 
inside the vacuum cleaner, potentially starting a fire. Please carefully clean the toner dust with a dry, lint-free 
cloth and dispose of it according to local regulations.

If the printer becomes hot, blows smoke, or generates obscure odor, immediately turn off the power switch and 
unplug the printer from the AC power outlet. Call your Brother dealer or Brother Customer Service.

If metal objects, water or other liquids get inside the printer, immediately turn off the power switch and unplug 
the printer from the AC power outlet. Call your Brother dealer or Brother Customer Service.

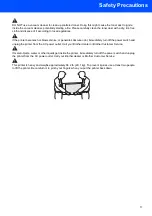
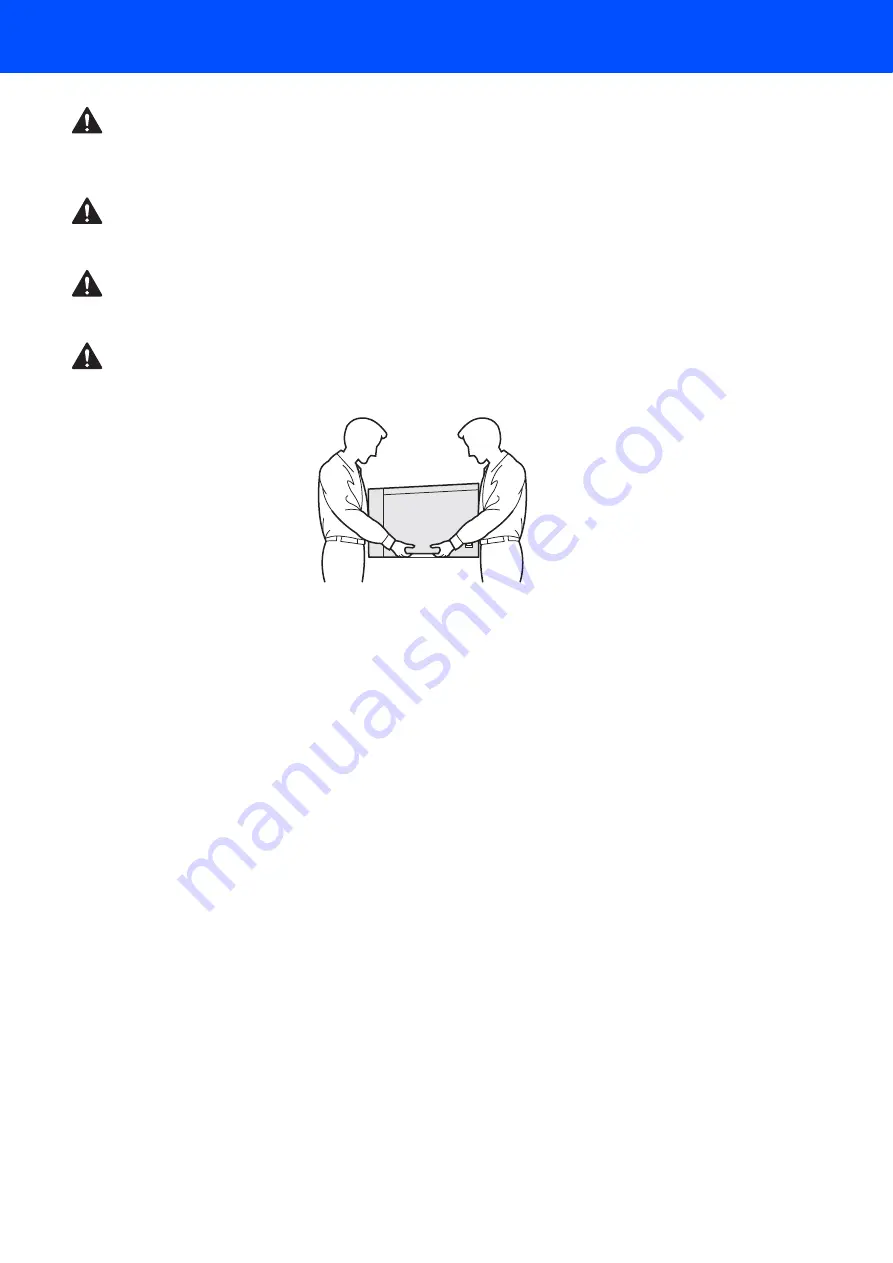
This printer is heavy and weighs approximately 64.2 lb. (29.1 kg). To prevent injuries use at least two people 
to lift the printer. Be careful not to pinch your fingers when you put the printer back down.


Содержание HL-4070CDW

Страница 1: ...ing the Printer Driver Laser Printer HL 4070CDW Before you can use the printer you must set up the hardware and install the driver Please read this Quick Setup Guide for proper set up and installation instructions Keep this Quick Setup Guide and the supplied CD ROM in a convenient place for quick and easy reference at all times Version 1 ...

Страница 2: ... procedures you must follow or avoid to prevent possible damage to the printer or other objects Improper Setup Note User s Guide Network User s Guide Improper Setup icons alert you to devices and operations that are not compatible with the printer Notes tell you how you should respond to a situation that may arise or give tips about how the current operation works with other features Indicates ref...

Страница 3: ... For USB interface cable users 16 For parallel interface cable users 18 For wired network interface cable users 20 For wireless network users 24 Macintosh For USB interface cable users 39 For wired network interface cable users 41 For wireless network users 43 For Network Users BRAdmin Light utility For Windows users 59 BRAdmin Light utility For Mac OS X users 60 Web Based Management web browser 6...

Страница 4: ...e plug with wet hands Doing this might cause an electrical shock The fuser unit becomes extremely hot during operation Wait until it has cooled down sufficiently before replacing consumable items DO NOT remove or damage the caution labels located on or around the fuser DO NOT use flammable substances or any type of spray to clean the inside or outside of the machine Doing this may cause a fire or ...

Страница 5: ...cure odor immediately turn off the power switch and unplug the printer from the AC power outlet Call your Brother dealer or Brother Customer Service If metal objects water or other liquids get inside the printer immediately turn off the power switch and unplug the printer from the AC power outlet Call your Brother dealer or Brother Customer Service This printer is heavy and weighs approximately 64...

Страница 6: ...asures Reorient or relocate the receiving antenna Increase the separation between the equipment and receiver Connect the equipment into an outlet on a circuit different from that to which the receiver is connected Consult the dealer or an experienced radio TV technician for help Important A shielded interface cable should be used in order to ensure compliance with the limits for a Class B digital ...

Страница 7: ...laser beam cannot escape from the machine during any phase of user operation FDA Regulations 110 to 120 volt Model Only The U S Food and Drug Administration FDA has implemented regulations for laser products manufactured on and after August 2 1976 Compliance is mandatory for products marketed in the United States The following label on the back of the printer indicates compliance with the FDA regu...

Страница 8: ...ension cords may cause personal injury and equipment damage The fact that the equipment operates satisfactorily does not imply that the power is grounded and that the installation is completely safe For your safety if in any doubt about the effective grounding of the power call a qualified electrician This product should be connected to an AC power source within the range indicated on the rating l...

Страница 9: ...ce you are going to use USB cable Do not use a USB interface cable that is longer than 6 feet 2 0 meters Do not connect the USB cable to a non powered hub or a Macintosh keyboard Make sure that you connect it to the USB connector of your computer Parallel cable Do not use a parallel interface cable that is longer than 6 feet 2 0 meters Use a shielded interface cable that is IEEE 1284 compliant Net...

Страница 10: ... USB direct interface Direct Print button Switch to Direct Print mode when USB flash memory is inserted into the USB direct interface 6 LCD back light Off The printer is off or in sleep status Green General Ready to print Printing Warming up Red Error There is a problem with the printer Orange Setting Choose a menu control panel menu reprint menu or Direct Print menu or Pause LCD messages The mess...

Страница 11: ...ions brother com is a one stop resource for all your printer support needs Download the latest drivers and utilities for your printers read FAQs and troubleshooting tips or learn about printer solutions Supplies Information Visit our web site for original genuine Brother supplies at http www brother com original Macintosh Initial Setup Instructional movie for printer setup Install Printer Driver I...

Страница 12: ...ge 2 Click Initial Setup on the menu screen 3 You can view the initial setup instructions and follow along with the steps on the next page For Macintosh users Improper Setup DO NOT connect the interface cable Connecting the interface cable is done when installing the driver 1 Turn on your Macintosh Put the supplied CD ROM into your CD ROM drive and then double click the HL4040_4050_4070 icon on yo...

Страница 13: ...proper Setup DO NOT plug in the AC power cord yet 1 Press the front cover release button and open the front cover 2 Remove the 4 pieces of orange packing material as shown in the illustration below 3 Hold the green handle of the drum unit Lift the drum unit up and then pull it out until it stops 4 Remove the orange packing material as shown in the illustration below ...

Страница 14: ...t and make sure that you fold down the toner cartridge handle 1 once the toner cartridge is in place 1 C Cyan 2 M Magenta 3 Y Yellow 4 K Black 4 Repeat steps 1 through 3 for the remaining toner cartridges 5 Put the drum unit back into the printer 6 Close the front cover of the printer 4 Loading paper in the paper tray 1 Pull the paper tray completely out of the printer 2 While pressing the green p...

Страница 15: ...the paper tray firmly back into the printer Make sure that it is completely inserted into the printer 5 Printing a test page Improper Setup DO NOT connect the interface cable yet 1 Lift the LCD display and adjust it for the best viewing angle 2 Unfold the support flap 3 Make sure that the printer power switch is off Remove the label covering the AC power inlet 4 Connect the AC power cord to the pr...

Страница 16: ...as printed correctly Note If you press Reprint the printer prints a duplex test page This function will not be available after the first print job you send from your computer 6 Setting your language on the control panel 1 Press the or button until the LCD shows General Setup Press OK Select ab or OK General Setup 2 Press OK again General Setup Local Language 3 Press the or button to choose your la...

Страница 17: ...y from the CD ROM Driver or visit http solutions brother com The screens for Windows in this Quick Setup Guide are based on Windows XP The screens for Mac OS X in this Quick Setup Guide are based on Mac OS X 10 4 For USB interface cable users 16 For parallel interface cable users 18 For wired network interface cable users 20 For wireless network users 24 For USB interface cable users 39 For wired ...

Страница 18: ...e remove it 2 Click Install Printer Driver on the menu screen Note Choose the Install Printer Driver icon for your region 3 Click USB cable users Note For Windows Vista when the User Account Control screen appears click Continue If you want to install the PS driver Brother s BR Script Driver choose Custom setup and then follow the on screen instructions When the Select Components screen appears ch...

Страница 19: ...switch is on Connect the USB interface cable to your computer and then connect it to the printer Click Next 6 Click Finish Note If you want to register your product on line check On Line Registration If you do not want to set your printer as Default printer uncheck Set as Default Printer Setup is now complete ...

Страница 20: ...er Account Control screen appears click Continue If you want to install the PS driver Brother s BR Script Driver choose Custom setup and then follow the on screen instructions When the Select Components screen appears check PS PostScript Emulation Driver and then continue following the on screen instructions 3 When the License Agreement window appears click Yes if you agree to the License Agreemen...

Страница 21: ...stalling the Printer Driver 19 Windows Windows Parallel 6 Connect the parallel interface cable to your computer and then connect it to your printer 7 Turn on the printer power switch Setup is now complete ...

Страница 22: ...ter to your network and installing the driver 1 Click Install Printer Driver on the menu screen Note Choose the Install Printer Driver icon for your region 2 Click Network cable users Note For Windows Vista when the User Account Control screen appears click Continue If you want to install the PS driver Brother s BR Script Driver choose Custom setup and then follow the on screen instructions When t...

Страница 23: ...ces and choose from a list of discovered devices Recommended Or enter your printer s IP address or its node name Click Next Note Contact your administrator if you do not know the printer s IP address or node name 9 Choose your printer and then click Next 10 Click Finish Note If you want to register your product on line check On Line Registration If you do not want to set your printer as Default pr...

Страница 24: ...lick Install Printer Driver on the menu screen Note Choose the Install Printer Driver icon for your region 2 Click Network cable users Note For Windows Vista when the User Account Control screen appears click Continue If you want to install the PS driver Brother s BR Script Driver choose Custom setup and then follow the on screen instructions When the Select Components screen appears check PS Post...

Страница 25: ...K Note Contact your administrator if you do not know the location or the name of the printer in the network 6 Click Finish Note If you want to register your product on line check On Line Registration If you do not want to set your printer as Default printer uncheck Set as Default Printer Setup is now complete ...

Страница 26: ... Brother machine in a wireless network environment Both methods are for infrastructure mode using a wireless router or access point that uses DHCP to assign IP addresses If your wireless router access point supports SecureEasySetup follow the steps Using the SecureEasySetup software to configure your printer for a wireless network on page 26 If your wireless router access point does not support Se...

Страница 27: ...s point of your printer you can temporarily connect the Hub or Router to the printer using an Ethernet cable B this is an easy way to configure the printer You can then remotely configure the printer from a computer on the network For instructions go to Configuration in Infrastructure mode using a network cable temporarily on page 30 Installation using a wireless computer If a computer of yours ha...

Страница 28: ...less network Note Routers or access points that support SecureEasySetup have the SecureEasySetup symbol as shown below 1 Make sure that the printer power switch is on 2 Click Install Printer Driver Note Choose the Install Printer Driver icon for your region 3 Click Wireless Network users Note For Windows Vista when the User Account Control screen appears click Allow If you want to install the PS d...

Страница 29: ...K to move to the next level Setup WLAN Setup Wizard 8 Press the or button to select SecureEasySetup Setup WLAN SecureEasySetup 9 Press OK If the following message appears press OK again WLAN Enable On Note The message above only appears when the wireless setting is disabled 10 The wireless network connection status using the SecureEasySetup software will be displayed on the control panel Connectin...

Страница 30: ...you encounter this failure please go to step 2 and setup the wireless connection again 12 The driver installation starts When the License Agreement window appears click Yes if you agree to the License Agreement 13 Choose Standard Installation and then click Next 14 Choose Search the network for devices and choose from a list of discovered devices Recommended Or enter your printer s IP address or i...

Страница 31: ...eless Network 16 Click Finish Note If you want to register your product on line check On Line Registration If you do not want to set your printer as Default printer uncheck Set as Default Printer Turn your Personal Firewall back on Setup is now complete ...

Страница 32: ...itch is on 2 Press any of the Menu buttons OK or Back to take the printer off line Ready h Select ab or OK Machine Info 3 Press the or button to select LAN Select ab or OK LAN 4 Press OK to move to the next menu level LAN Wired 5 Press the or button to select WLAN LAN WLAN 6 Press OK to move to select the next level WLAN TCP IP 7 Press the or button to select WLAN Enable WLAN WLAN Enable 8 Press O...

Страница 33: ...en click Next 6 Choose I m able to temporarily connect my device to my access point with a network cable and then click Next 7 For configuration you must temporarily connect your Brother wireless device your printer directly to a free port on your access point hub or router using a network cable When the following screen appears insert the network cable to the access point and then to the printer ...

Страница 34: ...inue configuration click OK and go to 12 11 If your network is configured for Authentication and Encryption the following screen will appear When configuring your Brother wireless printer you must ensure that it is configured to match the Authentication and Encryption settings of your existing wireless network Choose the Authentication Method and Encryption Mode from the pull downs in each setting...

Страница 35: ...he License Agreement window appears click Yes if you agree to the License Agreement 15 Choose Standard Installation and then click Next 16 Choose Search the network for devices and choose from a list of discovered devices Recommended Or enter your printer s IP address or its node name Click Next Note Contact your administrator if you do not know the printer s IP address or node name 17 Choose your...

Страница 36: ... is on 2 Press any of the Menu buttons OK or Back to take the printer off line Ready h Select ab or OK Machine Info 3 Press the or button to select LAN Select ab or OK LAN 4 Press OK to move to the next menu level LAN Wired 5 Press the or button to select WLAN LAN WLAN 6 Press OK to move to select the next level WLAN TCP IP 7 Press the or button to select WLAN Enable WLAN WLAN Enable 8 Press OK to...

Страница 37: ... click Next 5 Choose Manual and then click Next 6 Choose I m not able to connect my device to my access point with a network cable and then click Next 7 If you choose This computer has wireless capability check I am using an access point in infrastructure mode and then click Next Go to 9 If you are using a wired computer choose This computer uses a network cable to connect to the wireless network ...

Страница 38: ...ct SETUP and click Connect 5 Click Connect Anyway and then Close 6 Click View status of Wireless Network Connection SETUP 7 Click Details and check the Network Connection Details It may take a few minutes to change from 0 0 0 0 to 169 254 x x IP address to be shown on screen where x x are numbers between 1 and 254 For Windows XP SP2 users You can temporarily change the wireless settings on your co...

Страница 39: ...If your network is not configured for Authentication and Encryption the following screen will appear To continue configuration click OK and go to 15 14 If your network is configured for Authentication and Encryption the following screen will appear When configuring your Brother wireless printer you must ensure that it is configured to match the Authentication and Encryption settings of your existi...

Страница 40: ...n 17 The driver installation starts When the License Agreement window appears click Yes if you agree to the License Agreement 18 Choose Standard Installation and then click Next 19 Choose Search the network for devices and choose from a list of discovered devices Recommended Or enter your printer s IP address or its node name Click Next Note Contact your administrator if you do not know the printe...

Страница 41: ...SB cable users and follow the on screen instructions Then restart your Macintosh For Mac OS X 10 2 4 to 10 2 8 users Go to step 7 For Mac OS X 10 3 or greater users Go to step 5 Note Please see the User s Guide on the CD ROM to install the PS driver Brother s BR Script Driver 5 The Brother software will search for the Brother printer During this time the following screen will appear Note If more t...

Страница 42: ...g the Printer Driver 40 STEP 2 Macintosh Macintosh USB 8 Choose USB 9 Choose your printer and then click Add 10 Click Print Center then Quit Print Center For Mac OS X 10 2 4 to 10 2 8 users Setup is now complete ...

Страница 43: ...sers Go to step 7 For Mac OS X 10 3 or greater users Go to step 5 Note Please see the Network User s Guide on the CD ROM to install the PS driver Brother s BR Script Driver 5 The Brother software will search for the Brother printer During this time the following screen will appear Note If more than one printer is available the following list appears Choose the printer you wish to connect and then ...

Страница 44: ...ion 9 Choose your printer and then click Add Note If there is more than one of the same printer model connected on your network the Ethernet address MAC address will be displayed after the model name 10 Click Print Center then Quit Print Center For Mac OS X 10 2 4 to 10 2 8 users Setup is now complete ...

Страница 45: ...lowing instructions will offer two methods for installing your Brother machine in a wireless network environment Both methods are for infrastructure mode using a wireless router or access point that uses DHCP to assign IP addresses If your wireless router access point supports SecureEasySetup follow the steps Using the SecureEasySetup software to configure your printer for a wireless network on pa...

Страница 46: ...ccess point of your printer you can temporarily connect the Hub or Router to the printer using an Ethernet cable B this is an easy way to configure the printer You can then remotely configure the printer from a computer on the network For instructions see Configuration in Infrastructure mode using a network cable temporarily on page 49 Installation using a wireless computer If a computer of yours ...

Страница 47: ...ss point for instructions to configure your printer for a wireless network Note Routers or access points that support SecureEasySetup have the SecureEasySetup symbol as shown below 1 Make sure that the printer power switch is on 2 Click Install Printer Driver 3 Click Wireless Network users Note Please see the Network User s Guide on the CD ROM to install the PS driver Brother s BR Script Driver 4 ...

Страница 48: ...ecureEasySetup Setup WLAN SecureEasySetup 9 Press OK If the following message appears press OK again WLAN Enable On Note The message above only appears when the wireless setting is disabled 10 The wireless network connection status using the SecureEasySetup software will be displayed on the control panel Connecting WLAN Connected or Connection NG Connecting WLAN is displayed when the print server ...

Страница 49: ... For Mac OS X 10 2 4 to 10 2 8 users Go to step 15 13 The Brother software will search for the Brother printer During this time the following screen will appear Note If more than one printer is available the following list appears Choose the printer you wish to connect and then click OK If there is more than one of the same printer model connected on your network the Ethernet address MAC address w...

Страница 50: ...Installing the Printer Driver 48 STEP 2 Macintosh Macintosh Wireless Network 18 Click Print Center then Quit Print Center For Mac OS X 10 2 4 to 10 2 8 users Setup is now complete ...

Страница 51: ...f the Menu buttons OK or Back to take the printer off line Ready h Select ab or OK Machine Info 3 Press the or button to select LAN Select ab or OK LAN 4 Press OK to move to the next menu level LAN Wired 5 Press the or button to select WLAN LAN WLAN 6 Press OK to move to select the next level WLAN TCP IP 7 Press the or button to select WLAN Enable WLAN WLAN Enable 8 Press OK to move to select the ...

Страница 52: ...g a network cable When the following screen appears insert the network cable to the access point and then to the printer Click Next 8 Choose the printer you wish to configure and click Next If the list is blank check if the access point and the printer are powered on and then click Refresh Note The default Node name is BRNxxxxxx for the users that temporarily connect with a network cable or BRWxxx...

Страница 53: ...en enter the Network key and click Next Note If you want to setup more than WEP key1 click Advanced If you do not know the Authentication or Encryption settings for network contact your network administrator 12 Click Next The settings will be sent to your printer The settings will remain unchanged if you click Cancel Note If you want to manually enter the IP address settings of your printer click ...

Страница 54: ...el connected on your network the Ethernet address MAC address will be displayed after the model name 16 When this screen appears click OK For Mac OS X 10 3 or greater users Setup is now complete 17 When this screen appears click Add 18 Make the following selection 19 Choose your printer and then click Add Note If there is more than one of the same printer model connected on your network the Ethern...

Страница 55: ...e Menu buttons OK or Back to take the printer off line Ready h Select ab or OK Machine Info 3 Press the or button to select LAN Select ab or OK LAN 4 Press OK to move to the next menu level LAN Wired 5 Press the or button to select WLAN LAN WLAN 6 Press OK to move to select the next level WLAN TCP IP 7 Press the or button to select WLAN Enable WLAN WLAN Enable 8 Press OK to move to select the next...

Страница 56: ...This computer has wireless capability check I am using an access point in infrastructure mode and then click Next Go to 9 If you are using a wired computer choose This computer uses a network cable to connect to the wireless network you must configure the wireless settings from the control panel Click Next and see chapter 3 in the Network User s Guide on the CD ROM If you have already completed th...

Страница 57: ...ult settings shown on this screen Check the box after you confirm these settings and then click Next Note You can temporarily change the wireless settings on your computer following the steps below 1 Click the AirPort status icon and select Open Internet Connect 2 Click the Network tab to see the available wireless devices You can see the Brother wireless print server in the Network option Select ...

Страница 58: ...er and the access point are within range for wireless communication Then click Refresh If your access point is set to not broadcast the SSID you can manually add it by clicking the Add button Follow the on screen instructions for entering the Name SSID and the Channel number 13 If your network is not configured for Authentication and Encryption the following screen will appear To continue configur...

Страница 59: ...reens during this installation If your wireless settings fail and error message will appear during the installation of the printer driver and the installation will be terminated If you encounter this failure please go to step 1 and setup the wireless connection again 17 The driver installation starts For Mac OS X 10 3 or greater users Go to step 18 For Mac OS X 10 2 4 to 10 2 8 users Go to step 20...

Страница 60: ...ction 22 Choose your printer and then click Add Note If there is more than one of the same printer model connected on your network the Ethernet address MAC address will be displayed after the model name 23 Click Print Center then Quit Print Center For Mac OS X 10 2 4 to 10 2 8 users Setup is now complete ...

Страница 61: ...rewall software Installing the BRAdmin Light configuration utility Note The default password for the print server is access You can use BRAdmin Light to change this password 1 Click Install Other Drivers or Utilities on the menu screen 2 Click BRAdmin Light and follow the on screen instructions Note For Windows Vista when the User Account Control screen appears click Allow Setting your IP address ...

Страница 62: ...ask and Gateway using BRAdmin Light Note If you have a DHCP BOOTP RARP server in your network you don t have to do the following operation The print server will automatically obtain its own IP address Make sure that version 1 4 1_07 or later of Java client software is installed on your computer The default password for the print server is access You can use BRAdmin Light to change this password 1 ...

Страница 63: ...ress of the print server 1 Type http printer_ip_address into your browser Where printer_ip_address is the IP address or the print server name For example http 192 168 1 2 if the printer s IP address is 192 168 1 2 See Chapter 2 of the Network User s Guide 4 Network default settings To restore all network settings of the internal print server to default follow the steps below 1 Press the or button ...

Страница 64: ...r more information about the consumables for your printer visit us at http solutions brother com or contact your local Brother reseller See Chapter 6 of the User s Guide on the CD ROM Lower tray unit DIMM memory LT 100CL The lower paper tray unit can hold up to 500 sheets of paper When the lower tray unit is installed the printer expands total input capacity up to 800 sheets You can expand the mem...

Страница 65: ...refully re pack the printer in the original packing material to avoid any damage during transport The printer should also be adequately insured with the shipping company you choose Repacking Instructions Make sure that you have the following parts for repacking 1 Insertion sheet for repacking 2 Plastic bag for the waste toner box 3 Orange protective cover Plastic bag that the toner cartridge origi...

Страница 66: ... the green handles of the drum unit when you carry it DO NOT hold the sides of the drum unit We recommend that you place the drum unit on a clean flat surface with a piece of disposable paper underneath it in case you accidentally spill or scatter toner To prevent damage to the printer from static electricity DO NOT touch the electrodes shown in the illustration 5 Hold the handle of the toner cart...

Страница 67: ...into the plastic bag included in the carton 7 Hold the green parts of the belt unit with both hands and lift the belt unit up then pull it out Note We recommend that you put the belt unit on a clean flat surface with a piece of disposable paper underneath it in case you accidentally spill or scatter toner 8 Remove the waste toner box from the printer using the green handle and place it into the pl...

Страница 68: ... it in place 10 Insert the original orange packing material for locking the belt unit as shown in the illustration 11 Put a piece of paper letter or A4 on the belt unit to prevent damage to the belt unit 12 Make sure that the gray lock lever 1 is in the up position and put the drum unit in the printer Push down the gray lock lever 1 13 Push the drum unit in until it stops 1 1 ...

Страница 69: ...er and the Styrofoam pieces into the carton Match the front side of the printer to the FRONT mark 1 on the Styrofoam pieces Put the Styrofoam piece for the toner cartridges 2 on top of the printer 16 Put the toner cartridges into the Styrofoam piece 17 Put the two carton trays 1 2 on the top and put the waste toner box in the tray placed towards the front side of the printer 1 18 Close the carton ...

Страница 70: ...f their respective companies Compilation and Publication This manual has been compiled and published under the supervision of Brother Industries Ltd covering the latest product descriptions and specifications The contents of this manual and the specifications of this product are subject to change without notice Brother reserves the right to make changes without notice in the specifications and mat...

Страница 71: ...ENG ...

Отзывы: