background image

Appendix

75

A

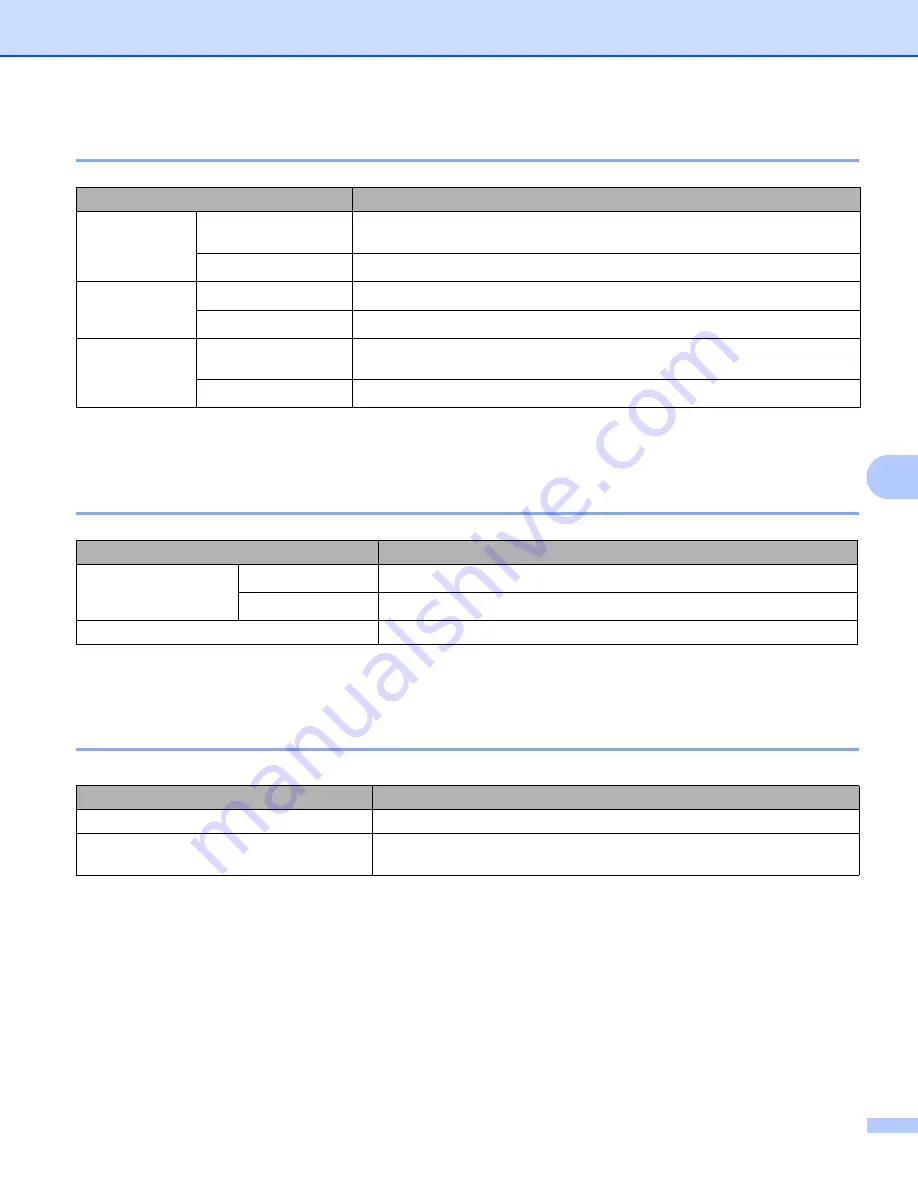
Media specifications

A

1

Up to 10 sheets

2

Legal paper is not available in some regions.

Supplies

A

1

Depends on the model and country you bought the printer in.

2

Approx. cartridge yield is declared in accordance with ISO/IEC 19752.

Dimensions / weights

A

Model

HL-2035

Media types

Manual feed slot

Plain paper, Bond paper, Recycled paper, Envelope, Labels, and 
Transparencies

Paper tray

Plain paper, Bond paper, Recycled paper, and Transparencies

1

Media weights

Manual feed slot

60 to 161 g/m

2

 (16 to 43 lb)

Paper tray

60 to 105 g/m

2

 (16 to 28 lb)

Media sizes

Manual feed slot

Width: 69.9 to 215.9mm (2.75 to 8.5 in.)
Length: 116 to 406.4 mm (4.57 to 16 in.)

Paper tray

A4, Letter, Legal

2

, B5(JIS), B5(ISO), Executive, A5, A6, B6(ISO)

Model

HL-2035

Toner

Starter

1

Approx. 1,000 pages A4/Letter pages

2

Standard

Approx. 1,500 pages A4/Letter pages

2

Drum

12,000 A4/Letter pages (1 page / job)

Model

HL-2035

Dimensions (W 

×

 D 

×

 H)

371 

×

 361 

×

 165.5 mm (14.6 

×

 14.2 

×

 6.5 in.)

Weights

Approx.5.4 kg (12.0 lb) not including the drum unit and toner cartridge 
Approx.6.5 kg (14.3 lb) including the drum unit and toner cartridge

Содержание HL-2035

Страница 1: ...set up the printer You can find a printed copy in the box Please read this User s Guide thoroughly before you use the printer Keep the CD ROM in a convenient place so you can use it quickly if you need to Please visit us at http solutions brother com where you can get product support the latest driver updates and utilities and answers to frequently asked questions FAQs and technical questions Note...

Страница 2: ...trical shock Hot Surface icons warn you not to touch machine parts that are hot Cautions specify procedures you must follow or avoid to prevent possible damage to the printer or other objects Improper Setup icons alert you to devices and operations that are not compatible with the printer Notes tell you how you should respond to a situation that may arise or give tips about how the operation works...

Страница 3: ...printer make sure you have turned off the power switch and unplugged the printer from the AC power outlet Do not handle the plug with wet hands Doing this might cause an electrical shock After you have just used the printer some internal parts of the printer are extremely hot When you open the front or back cover of the printer never touch the shaded parts shown in the illustration Inside the prin...

Страница 4: ...oner Doing this might cause the toner dust to ignite inside the vacuum cleaner potentially starting a fire Please carefully clean the toner dust with a dry lint free cloth and dispose of it according to local regulations CAUTION Cleaning the outside of the printer Make sure you have turned off the power switch and unplugged the printer from the AC power outlet Use neutral detergents Cleaning with ...

Страница 5: ...es Compilation and Publication Notice Under the supervision of Brother Industries Ltd this manual has been compiled and published covering the latest product s descriptions and specifications The contents of this manual and the specifications of this product are subject to change without notice Brother reserves the right to make changes without notice in the specifications and materials contained ...

Страница 6: ...17 Guidelines for printing on both sides of the paper 17 Printing on both sides of the paper manual duplex printing 17 3 Driver and software 20 Printer driver 20 For Windows 22 For Macintosh 29 Uninstalling the printer driver 31 4 Control panel 33 LEDs Light Emitting Diodes 33 Service call indications 37 Control panel button Go button 39 Print a test page 40 Print a Printer Settings page 41 5 Rout...

Страница 7: ... 73 Software 74 Control panel 74 Paper handling 74 Media specifications 75 Supplies 75 Dimensions weights 75 Other 76 System Requirements 76 Important information for choosing your paper 77 B Appendix For Europe and Other Countries 80 Brother Numbers 80 Important information Regulations 81 Radio interference 220 to 240 volt model only 81 IEC 60825 1 specification 220 to 240 volt model only 81 Inte...

Страница 8: ...sory Please purchase the appropriate interface cable for the interface you intend to use USB Parallel or Network USB cable Do not use a USB interface cable that is longer than 6 feet 2 0 meters Do not connect the USB cable to a non powered hub or a Mac keyboard When you use a USB cable make sure you connect it to the USB connector of your PC USB is not supported under Windows 95 or Windows NT 4 0 ...

Страница 9: ...Support Flap Support Flap 2 Control Panel 3 Manual Feed slot 4 Manual Feed Paper Guides 5 Paper Tray 6 Power Switch 7 Front Cover 8 Face down Output Tray Back view 1 1 Back Cover 2 AC Power Connector 3 Side Cover 4 USB Interface Connector 1 2 3 4 6 7 5 8 1 2 3 4 ...

Страница 10: ...umidity Temperature 10 C to 32 5 C 50 F to 90 5 F Humidity 20 to 80 without condensation You should use the printer in a well ventilated room Put the printer on a flat horizontal surface Keep the printer clean Do not put the printer in a dusty place Do not put the printer where the ventilation hole of the printer is blocked Keep a gap of approximately 100 mm 4 in between the ventilation hole and t...

Страница 11: ...ot Manual Media type Tray 1 Manual Select the Media type from the printer driver Plain paper 60 g m2 to 105 g m2 16 to 28 lb p p Plain Paper Recycled paper p p Recycled Paper Bond paper p p Bond Paper Thick paper 105 g m2 to 161 g m2 28 to 43 lb p Thick Paper or Thicker Paper Transparency p Up to 10 sheets A4 or Letter p A4 or Letter Transparencies Labels p A4 or Letter Thicker Paper Envelopes p E...

Страница 12: ...cification CAUTION Do not use ink jet paper because it might cause a paper jam or damage your printer Note If you use paper other than the ones recommended a paper jam or misfeeding may occur in the printer To help you choose which paper to use with this printer see Important information for choosing your paper on page 77 Europe USA Plain paper Xerox Premier 80 g m2 Xerox Business 80 g m2 Modo DAT...

Страница 13: ...n 4 23 mm 0 16 in 4 23 mm 0 16 in 4 6 01 mm 0 24 in 6 35 mm 0 25 in 6 35 mm 0 25 in 6 01 mm 0 24 in 6 35 mm 0 25 in 6 01 mm 0 24 in 6 01 mm 0 24 in 6 01 mm 0 24 in A4 Letter Legal B5 ISO Executive A5 A6 B6 1 4 23 mm 0 16 in 4 23 mm 0 16 in 4 23 mm 0 16 in 4 23 mm 0 16 in 4 23 mm 0 16 in 4 23 mm 0 16 in 4 23 mm 0 16 in 4 23 mm 0 16 in 2 5 0 mm 0 19 in 5 08 mm 0 2 in 5 08 mm 0 2 in 5 0 mm 0 19 in 5 ...

Страница 14: ...ed slot For the paper you want to use see What kind of paper can I use on page 4 Printing on plain paper bond paper or transparencies from the paper tray 2 Note Do not put more than 10 transparencies in the paper tray if you print on transparencies a Choose the following from the printer driver Paper Size 1 Media Type 2 Paper Source 3 and any other settings Windows printer driver 2 1 3 ...

Страница 15: ...2 b Pull the paper tray completely out of the printer c While pressing the blue paper guide release lever slide the paper guides to fit the paper size Check that the guides are firmly in the slots d Put paper in the tray ...

Страница 16: ...e face down with the top of the paper at the front of the tray f Put the paper tray firmly back in the printer Check that it is completely in the printer g Lift up the support flap to prevent paper from sliding off the face down output tray Note If you choose not to lift up the output tray support flap we recommend that you remove printed pages immediately after they come out of the printer h Send...

Страница 17: ...n you put paper in the manual feed slot a Choose the following from the printer driver Paper Size 1 Media Type 2 Paper Source 3 and any other settings Windows printer driver b Send the print data to the printer Note A No paper fed manual feed slot status is shown by the control panel LEDs until you put a sheet of paper or a transparency in the manual feed slot 2 1 3 ...

Страница 18: ...of the paper or envelope touches the paper feed roller When you feel the machine pull in the paper let go Note Put the paper into the manual feed slot with the side to be printed face up Make sure that the paper or transparency is straight and in the proper position on the manual feed slot If it is not the paper or the transparency may not be fed properly resulting in a skewed printout or a paper ...

Страница 19: ...the next sheet of paper or the transparency as in Step 5 above Repeat for each page that you want to print Note If you print on transparencies remove each transparency immediately after printing Stacking the printed transparencies may cause a paper jam or the transparency to curl ...

Страница 20: ... page 16 Printing on thick paper labels and envelopes from the manual feed slot 2 a Choose the following from the printer driver Paper Size 1 Media Type 2 Paper Source 3 and any other settings Windows printer driver Note For envelope users When you use Envelope 10 select Com 10 from Paper Size in the printer driver For other envelopes which are not in the selection of the printer driver such as En...

Страница 21: ...envelope in the manual feed slot c Lift up the support flap to prevent paper from sliding off the face down output tray Note If you choose not to lift up the output tray support flap we recommend that you remove printed pages as soon as they come out of the printer d Using both hands slide the manual feed slot paper guides to the width of the paper that you are going to use ...

Страница 22: ...am Do not put more than one piece of paper or one envelope in the manual feed slot at any one time as it may cause a jam If you put any Media paper envelope and so on in the manual feed slot before the printer is in the Ready state the media may be ejected without being printed on f After the printed page comes out of the printer put in the next sheet of paper or the envelope as in Step 5 above Re...

Страница 23: ...aper in the paper tray at the same time because it may cause paper jams or misfeeds Do not print envelopes using duplex printing For proper printing you must choose the same paper size from your software application as the paper in the tray See What kind of paper can I use on page 4 Most envelopes will be suitable for your printer However some envelopes will have feed and print quality problems be...

Страница 24: ...ssible that there may be paper jams or poor print quality If there is a paper jam see Paper jams and how to clear them on page 61 Printing on both sides of the paper manual duplex printing 2 Note You should use plain paper and recycled paper Do not use bond paper Manual duplex printing from the paper tray 2 a From the Advanced tab choose the Manual Duplex printing mode and from the Basic tab choos...

Страница 25: ...ex printing mode and from the Basic tab choose the Paper Source to be Manual feed b Using both hands put the paper in the manual feed slot with the side that is going to be printed on first facing up Follow the instructions on the computer screen Repeat this step until you have printed all the even numbered pages c Remove the printed even numbered pages from the output tray and put them back into ...

Страница 26: ...eading edge top of the paper in first To print the second side put the paper face down with the leading edge top of the paper in first If letterhead paper is used this would be put in with the heading face down and in first To print the second side put the heading face up and in first For the paper tray Put the side to be printed on first face down with the leading edge top of the paper at the fro...

Страница 27: ...on instructions for installing the printer driver for Windows and Macintosh are in the Quick Setup Guide If you want to uninstall the printer driver see Uninstalling the printer driver on page 31 For Windows 98 Me Windows 2000 XP and Windows Vista 3 Brother GDI printer driver for Windows For Macintosh 3 Brother Laser driver for Macintosh For Linux 3 GDI printer driver Note For more infomation abou...

Страница 28: ...esolution Toner Save Mode Manual Duplex printing 1 Watermark 1 Job Spooling 1 Quick Print Setup 1 Sleep Time 1 Status Monitor 1 Administrator 1 2 Page Protection 1 Print Date Time 1 Density adjustment 1 Error Message Printout 1 1 These settings are not available with Brother Laser driver for Macintosh 2 These settings are not available with Windows 2000 XP and Windows Vista ...

Страница 29: ... the Help text in the printer driver Note The screens in this section are from Windows XP The screens on your PC will vary depending on your Operating System Basic tab 3 Note If you are using Windows 2000 XP or Windows Vista you can access the Basic tab by clicking Printing Preferences in the General tab of the Printer Properties screen You can also change settings by clicking the illustration on ...

Страница 30: ... the tab settings by clicking one following icons Print Quality 1 Duplex Printing 2 Watermark 3 Page Setting 4 Device Options 5 Print Quality 3 Select the resolution toner save mode and print settings or gray printing setting Resolution You can change the resolution as follows HQ 1200 600 dpi 300 dpi Toner Save Mode You can save running costs by turning on the toner save mode which reduces the pri...

Страница 31: ...Manual Duplex If you select Manual Duplex the dialog box for the manual duplex settings will appear There are six types of manual duplex binding directions available for each orientation Binding Offset If you check the Binding Offset option you can also specify the offset for binding in inches or millimeters Watermark 3 You can put a watermarked logo or text into your documents When you use a bitm...

Страница 32: ...the page for each Printer Function by clicking the function name in the list below Job Spooling Quick Print Setup Sleep Time Status Monitor Administrator For Windows 98 Me users only Page Protection Print Date Time Density adjustment Error Message Printout Note The Printer Function list may differ depending on the model ...

Страница 33: ... Intelligent Sleep Mode is selected it is automatically adjusted to the most suitable time out setting depending on how often you use your printer While the printer is in sleep mode all the LEDs are off but the printer can still receive data from the computer Receiving a print file or document automatically wakes up the printer to start printing Pressing the Go button will also wake up the printer...

Страница 34: ...setting that reserves additional memory for the creation of full page images Selections are AUTO OFF and Printer Default The page protection feature allows the printer to create the full page image to be printed in memory before physically moving the paper through the printer When the image is very complicated and the printer has to wait to process the image before printing use this function Print...

Страница 35: ...ws Vista you can access the Support tab by clicking Printing Preferences in the General tab of the Printer Properties screen You can download the latest driver or get other product information by accessing the Brother Solutions Center at http solutions brother com You can see the printer driver version You can check the current driver settings You can print the printer settings page 1 ...

Страница 36: ... are from Mac OS X 10 3 The screens on your Macintosh will vary depending on your Operating System Page Setup 3 You can set the Paper Size Orientation and Scale Print 3 Layout 3 Set the Pages per Sheet Layout direction and Border Pages per sheet Select how many pages will appear on each side of the paper Layout direction When you specify the Pages per sheet you can also specify the direction of th...

Страница 37: ...ettings list Quality You can change the resolution as follows 300 dpi 600 dpi HQ 1200 Media Type You can change the media type as follows Plain Paper Recycled Paper Thick Paper Transparencies Thicker Paper Thin Paper Bond Paper Envelopes Env Thin Env Thick Toner Save Mode You can save running costs by turning on the Toner Save setting which reduces the print density ...

Страница 38: ...c Follow the instructions on the screen For Windows XP and Windows Vista 3 a Click Start and select your appropriate printer from ALL Programs b Select UnInstall c Follow the instructions on the screen Brother Laser driver for Macintosh 3 For Mac OS 9 1 to 9 2 3 a Open the Extensions folder located in the System Folder on the Macintosh HD b Drag all these following files in the Extensions folder t...

Страница 39: ...er from the Go menu Applications Utilities Print Center folder then choose the printer you want to remove and remove it by clicking the Delete button e Click on the name of your printer in the printer list From the Finder menu delete the Printer f Drag the HL MFLPro folder from the Mac OS X 10 X Library Printers Brother into the Trash bin and then empty the trash bin g Restart the Macintosh ...

Страница 40: ... Error Ready and a control panel button Go on the control panel The LED indications shown in the table below are used in the illustrations in this chapter Note When the power switch is off or the printer is in Sleep mode all the LEDs are off Control panel 4 LED is off or or LED is on or or LED is blinking ...

Страница 41: ...ther receiving data from the computer processing data in memory or printing the data Data remaining in memory Print data is left in the printer memory If the Ready LED blinks for a long time and nothing has printed press the Go button to print the data that is still in memory Toner low Indicates that the toner cartridge is nearly empty Purchase a new toner cartridge and have it ready for when Tone...

Страница 42: ...ck into the printer again Drum life end soon The drum unit is near the end of its life We recommend that you get a new drum unit to replace the current one See Replacing the drum unit on page 49 The Drum LED alternates turning on for 2 seconds and off for 3 seconds No paper fed tray1 Put paper in the tray See Printing on plain paper bond paper or transparencies from the paper tray on page 7 Then p...

Страница 43: ...aper labels and envelopes from the manual feed slot on page 13 Memory full The printer memory is full and the printer cannot print full pages of a document See Solving print problems on page 72 Print overrun A print overrun occurred and the printer cannot print full pages of a document See Solving print problems on page 72 Drum error The corona wire needs to be cleaned See Cleaning the corona wire...

Страница 44: ...ower switch wait a few seconds and then turn it back on and try to print again If you cannot clear the error and see the same service call indication after turning the printer back on call your dealer or a Brother authorized service representative When you press the Go button the LEDs will light up as shown in Table 1 LED indications while pressing Go button on page 38 to identify the error For ex...

Страница 45: ...d before you report a service call 1 If this error occurs turn the power switch off wait a few seconds and then turn it on again Leave the printer for 10 minutes with the power on If the error occurs again consult your dealer or Brother authorized service representative Table 1 LED indications while pressing Go button LEDs fuser unit failure 1 Laser unit failure Main motor failure Main PCB failure...

Страница 46: ... is not automatically cleared press the Go button to clear the error and then continue to use the printer Form feed If the green Ready LED blinks for a long time press the Go button The printer will print any data that is left in the printer memory Cancel printing While printing press the Go button for about 4 seconds until all the LEDs light up The Ready and Error LEDs will flash as the job is be...

Страница 47: ...c Hold down the Go button as you turn on the power switch Keep the Go button pressed down until the Toner Drum and Error LEDs light up Release the Go button Make sure that the Toner Drum and Error LEDs are off d Press the Go button again The printer will print a test page Using the printer driver 4 If you are using Brother s Windows printer driver click the Print Test Page button It is in the Gene...

Страница 48: ...is closed and the power cord is plugged in b Turn on the printer and wait until the printer is in the Ready state c Press the Go button three times within 2 seconds The printer will print the current printer settings page Using the printer driver 4 If you are using Brother s Windows printer driver you can print the current printer settings page by clicking the Print Settings button in the Support ...

Страница 49: ...careful not to inhale the toner After you have just used the printer some parts inside the printer are extremely hot When you open the front cover or back cover of the printer never touch the shaded parts shown in the illustrations Replacing the consumable items 5 You will need to replace the consumable items regularly Note These instructions are also included in Improving the print quality on pag...

Страница 50: ...h ISO IEC 19752 Letter A4 Note The amount of toner used varies according to what is printed on the page and the print density setting If you change the print density setting for lighter or darker printing the amount of toner that is used will change Wait to unpack the toner cartridge until immediately before you install it in the printer Toner Low message 5 The Toner LED alternates turning on for ...

Страница 51: ...artridge 5 Note To ensure high quality printing make sure you use quality Brother toner cartridges When you want to buy toner cartridges call the dealer you bought the printer from or Brother Customer Service We recommend that you clean the printer when you replace the toner cartridge See Cleaning on page 52 a Open the front cover of the printer b Pull out the drum unit and toner cartridge assembl...

Страница 52: ...ns c Push down the blue lock lever and take the toner cartridge out of the drum unit CAUTION Handle the toner cartridge carefully If toner scatters on your hands or clothes immediately wipe or wash it off with cold water Note Be sure to seal up the toner cartridge tightly in a bag so that toner powder does not spill out of the cartridge Discard the used toner cartridge according to local regulatio...

Страница 53: ...tridges in your printer may cause damage to the printer itself and or it may result in unsatisfactory print quality Our warranty coverage does not apply to any problem that was caused by the use of unauthorized third party toner and toner cartridges To protect your investment and guarantee your print quality please continue to replace consumed toner cartridges with only Genuine Brother Branded Sup...

Страница 54: ...lift automatically CAUTION Make sure you insert the toner cartridge properly or it may separate from the drum unit g Clean the primary corona wire inside the drum unit by gently sliding the blue tab from right to left and left to right several times Return the tab to the home position a 1 before you put the drum unit back in the printer If you do not printed pages may have a vertical stripe 1 ...

Страница 55: ...l over the many factors that determine the actual drum life we cannot guarantee a minimum number of pages that will be printed by your drum For best performance use only genuine Brother toner The printer should be used only in a clean dust free environment with adequate ventilation Printing with a third party drum unit may reduce not only the print quality but also the quality and life of the prin...

Страница 56: ...um unit a Make sure that the printer is turned on and the Drum LED is blinking Open the front cover of the printer b Press and hold down the Go button for about 4 seconds until all the LEDs light up Once all four LEDs are lit release the Go button Improper Setup Do not reset the drum counter when you replace only the toner cartridge c Pull out the drum unit and toner cartridge assembly ...

Страница 57: ...lustrations d Push down the blue lock lever and take the toner cartridge out of the drum unit CAUTION Handle the toner cartridge carefully If toner scatters on your hands or clothes immediately wipe or wash it off with cold water Note Be sure to seal up the drum unit tightly in a bag so that toner powder does not spill out of the unit Discard the used drum unit according to local regulations keepi...

Страница 58: ... unit f Put the toner cartridge firmly into the new drum unit until you hear it lock into place If you put the cartridge in properly the blue lock lever will lift automatically CAUTION Make sure you insert the toner cartridge properly or it may separate from the drum unit g Put the drum unit and toner cartridge assembly in the printer h Close the front cover i Make sure that the Drum LED is now of...

Страница 59: ...r clean the inside of the printer with a dry lint free cloth Cleaning the outside of the printer 5 CAUTION Use neutral detergents Cleaning with volatile liquids such as thinner or benzine will damage the surface of the printer Do not use cleaning materials that contain ammonia Clean the outside of the printer as follows a Turn off the printer power switch and unplug the printer from the AC power o...

Страница 60: ...y e Wipe the inside of the paper tray with a soft cloth to remove dust f Put the paper tray firmly back in the printer g Plug the printer back in and turn on the printer power switch Cleaning the inside of the printer 5 Clean the inside of the printer as follows a Turn off the printer power switch and unplug the printer from the AC power outlet ...

Страница 61: ...the printer c Pull out the drum unit and toner cartridge assembly HOT SURFACE After you have just used the printer some internal parts of the printer are extremely hot Wait for the printer to cool down before you touch the internal parts of the printer ...

Страница 62: ...nce 55 5 d Wipe the scanner window with a dry lint free cloth e Put the drum unit and toner cartridge assembly back in the printer f Close the front cover g Plug the printer back in and turn on the printer power switch ...

Страница 63: ...t cover of the printer b Pull out the drum unit and toner cartridge assembly CAUTION We recommend that you place the drum unit and toner cartridge assembly on a piece of disposable paper or cloth in case you accidentally spill or scatter toner To prevent damage to the printer from static electricity do not touch the electrodes shown in the illustrations ...

Страница 64: ...tab from right to left and left to right several times Return the tab to the home position a 1 before you put the drum unit back in the printer If you do not printed pages may have a vertical stripe d Put the drum unit and toner cartridge assembly back in the printer Close the front cover of the printer 1 ...

Страница 65: ...r the printer is installed and selected The PC is set up to connect to the correct printer port Printer does not print 6 If you did not solve your problem with the above checks please identify your problem and then go to the section listed Printer LED is blinking See LEDs Light Emitting Diodes on page 33 Status Monitor Error Message appears See Error messages in the Status Monitor on page 59 Print...

Страница 66: ...per Fed Manual slot The paper tray may be out of paper or not properly installed If it is empty put a new stack of paper in the paper tray and then press the Go button If there is paper in the paper tray make sure it is straight If the paper is curled straighten it before printing Sometimes it is helpful to remove the paper turn the stack over and put it back in the paper tray Reduce the amount of...

Страница 67: ...ram RESOLUTION REDUCED TO ENABLE PRINTING The printer has printed the document at a reduced resolution Reduce the complexity of your document before you print to prevent automatic reduction in the resolution Problem Recommendation The printer does not feed paper If there is paper in the paper tray make sure it is straight If the paper is curled you should straighten it before printing Sometimes it...

Страница 68: ...aper is removed completely by following the steps below you can install the paper tray first and then close the front cover and the printer will resume printing automatically If the printer does not start printing automatically press the Go button If the printer still does not start printing please check that all the remaining jammed paper has been removed from the printer Then try printing again ...

Страница 69: ...Troubleshooting 62 6 a Pull the paper tray completely out of the printer b Pull the jammed paper up and out of the printer c Open the front cover ...

Страница 70: ... cartridge assembly slowly The jammed paper will be pulled out with the drum unit and toner cartridge assembly CAUTION To prevent damage to the printer caused by static electricity do not touch the electrodes shown in the illustrations e Open the back cover ...

Страница 71: ...ull the tab toward you to open the rear chute cover 1 g Pull the jammed paper out of the fuser unit If the jammed paper cannot be pulled out easily push down the tab with one hand as you gently pull the paper out with other 1 ...

Страница 72: ...parts of the printer are extremely hot Wait for the printer to cool down before you touch the internal parts of the printer h Close the back cover i Push the lock lever down and take the toner cartridge out of the drum unit Take out the jammed paper if there is any inside the drum unit ...

Страница 73: ... lock into place If you put it in properly the lock lever will lift automatically k Put the drum unit and toner cartridge assembly back in the printer l Put the paper tray firmly back in the printer m Close the front cover n Make sure that the Error LED is now off and the printer is ready ...

Страница 74: ... 10 2 4 or greater Check that the printer is turned on Check that the USB interface cable is connected correctly Check the printer driver is installed correctly Unable to print from application software Make sure that the supplied Macintosh printer driver is installed in the Hard Disk and that it is selected with Chooser Mac OS 9 1 to 9 2 or Print Center Mac OS X 10 2 4 or greater Examples of poor...

Страница 75: ...ecks Make sure that you use paper that meets our specifications Rough surfaced paper may cause the problem See What kind of paper can I use on page 4 The drum unit may be damaged Put in a new drum unit See Replacing the drum unit on page 49 Hollow print Make sure that you use paper that meets our specifications See What kind of paper can I use on page 4 Choose Thick paper mode in the printer drive...

Страница 76: ...tion of the poor print b Turn the drum unit gear by hand while looking at the surface of the OPC drum c When you have located the mark on the drum that matches the print sample wipe the surface of the OPC drum with a dry cotton swab until the dust or paper powder on the surface comes off Note Do not try to clean the surface of the photosensitive drum with a sharp object The drum unit may be damage...

Страница 77: ... long time The drum unit may be damaged Put in a new drum unit See Replacing the drum unit on page 49 Lines across the page Clean the inside of the printer and the primary corona wire in the drum unit See Cleaning on page 52 The drum unit may be damaged Put in a new drum unit See Replacing the drum unit on page 49 Black lines down the page Printed pages have toner stains down the page Clean the pr...

Страница 78: ... the paper tray on page 7 Check the paper type and quality See What kind of paper can I use on page 4 Curl or wave Check the paper type and quality High temperatures and high humidity will cause paper to curl See What kind of paper can I use on page 4 If you don t use the printer very often the paper may have been in the paper tray too long Turn over the stack of paper in the paper tray Also try f...

Страница 79: ...he printer driver The printer cannot print full pages of a document An error message MEMORY FULL is printed out Press the Go button to print the data left in the printer Cancel the print job if you want to delete the data remaining in the printer see Cancel printing on page 39 Reduce the print resolution or reduce the complexity of your document The printer cannot print full pages of a document An...

Страница 80: ...5 Technology Electrophotographic Print speed Up to 18 ppm A4 size First print time Less than 10 sec 1 Resolution Windows 98 Me Windows 2000 XP Windows Vista HQ1200 600 dpi 300 dpi Mac OS HQ1200 600 dpi 300 dpi Linux 600 dpi 300 dpi Model HL 2035 Processor Fujitsu SPARClite 96MHz Memory Standard 8 MB Interface Standard Full Speed USB 2 0 1 Emulation GDI ...

Страница 81: ...iver GDI Driver for Windows 98 Me Windows 2000 XP Windows Vista Brother Laser Driver for Mac OS 9 1 to 9 2 and Mac OS X 10 2 4 or greater GDI Printer Driver for Linux Utilities Interactive Help 1 Model HL 2035 LED 4 LEDs Button 1 button Model HL 2035 Paper Input 1 Manual feed slot 1 sheet Paper tray 250 sheets Paper Output 1 Face down 100 sheets Duplex Manual Duplex ...

Страница 82: ...nsparencies 1 Media weights Manual feed slot 60 to 161 g m2 16 to 43 lb Paper tray 60 to 105 g m2 16 to 28 lb Media sizes Manual feed slot Width 69 9 to 215 9mm 2 75 to 8 5 in Length 116 to 406 4 mm 4 57 to 16 in Paper tray A4 Letter Legal 2 B5 JIS B5 ISO Executive A5 A6 B6 ISO Model HL 2035 Toner Starter 1 Approx 1 000 pages A4 Letter pages 2 Standard Approx 1 500 pages A4 Letter pages 2 Drum 12 ...

Страница 83: ... Due to their noise emissions these devices should be set up in separate rooms Standby 4 3 Bell A Ecology Power save Yes Toner save Yes Computer Platform Operating System Version Processor Speed Minimum RAM Recommen ded RAM Available Hard Disk Space Windows Operating System 98 98SE 486 66 MHz 8 MB 16 MB 40 MB 2000 Professional Pentium 133 MHz 64 MB 128 MB 50 MB Me Pentium 150 MHz 32 MB 64 MB 50 MB...

Страница 84: ... the paper is aligned during paper manufacturing What we call long grain paper is paper where the fiber is parallel to the paper carriage direction of the paper Paper can be classified into two types long grain and short grain Long grain paper s fiber direction is parallel to the carriage direction of the paper in the printer Short grain paper s fiber direction is vertical to the carriage directio...

Страница 85: ...er left in the paper after manufacture It is one of the important characteristics of the paper This can change greatly depending on the storage environment although usually paper contains about 5 water by weight Because paper often absorbs water the amount of water can sometimes be about 10 in a high humidity environment When the amount of water increases the characteristic of the paper changes gr...

Страница 86: ...er size mm in Letter 8 5 11 in Legal 8 5 14 in Executive 7 25 10 5 in A4 210 297 mm A5 148 210 mm A6 105 148 mm Envelope Monarch 3 875 7 5 in Envelope 9 3 875 7 9 in Envelope 10 4 12 9 5 in Envelope 11 4 5 10 375 in Envelope DL 110 220 mm Envelope C5 162 229 mm Envelope C6 114 162 mm B5 JIS 182 257 mm B5 ISO 176 250 mm B6 125 176 mm Folio 8 5 13 in ...

Страница 87: ...http www brother com registration Frequently asked questions FAQs B The Brother Solutions Center is our one stop resource for all your Printer needs You can download the latest drivers software and utilities read FAQs and troubleshooting tips to learn how to get the most from your Brother product http solutions brother com You can check here for the Brother driver updates Customer Service B Visit ...

Страница 88: ...not open the scanner unit under any circumstances Caution B Use of controls or adjustments or performance of procedures other than those specified in this User s Guide may result in hazardous radiation exposure For Finland and Sweden B LUOKAN 1 LASERLAITE KLASS 1 LASER APPARAT Varoitus B Laitteen käyttäminen muulla kuin tässä käyttöohjeessa mainitulla tavalla saattaa altistaa käyttäjän turvallisuu...

Страница 89: ...ed with the above recycling symbol It means that at the end of the life of the equipment you must dispose of it separately at an appropriate collection point and not place it in the normal domestic unsorted waste stream This will benefit the environment for all European Union only Maximum radiation power 5 mW Wave length 770 810 nm Laser class Class 3B ...

Страница 90: ...cian Disconnect device B You must install this printer near a power outlet that is easily accessible In case of an emergency you must disconnect the power cord from the power outlet to shut off the power completely IT power system For Norway only B This product is also designed for an IT power system with phase to phase voltage 230V Wiring information for UK B Important B If you need to replace th...

Страница 91: ...Appendix For Europe and Other Countries 84 B EC Declaration of Conformity B ...

Страница 92: ...0 M Macintosh 29 Manual duplex printing 17 Manual feed slot 10 13 18 Media specifications 75 Memory 73 Memory full 36 N No paper 35 36 O OPC drum 69 P Paper 4 77 Paper handling 74 Paper jams 36 61 Plain paper 5 Power supply 3 Print media 4 Print overrun 36 Print quality 67 Print test page 40 Printable area 6 Printer driver 22 31 74 Printer settings 41 Processor 73 R Register your product 80 Reprin...

Страница 93: ...Index 86 C Trademarks iv Tray settings tab 28 U Utilities 74 W Weights 75 ...

Отзывы: