


94
Consumable items
D
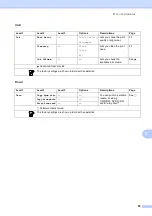
Ink
The machine uses individual Black, Yellow, Cyan and Magenta ink
cartridges that are separate from the print head assembly.
Service Life of Ink
Cartridge
The first time you install a set of ink cartridges the machine will use
an amount of ink to fill the ink delivery tubes for high quality
printouts. This process will only happen once. After this process is
complete the cartridges provided with your machine will have a
lower yield than standard cartridges (80%). With all following ink
cartridges you can print the specified number of pages.
Replacement
Consumables
<Standard Yield Black> LC1220BK
<Standard Yield Yellow> LC1220Y
<Standard Yield Cyan> LC1220C
<Standard Yield Magenta> LC1220M
Black, Yellow, Cyan and Magenta - Approximately 300 pages
<High Yield Black> LC1240BK
<High Yield Yellow> LC1240Y
<High Yield Cyan> LC1240C
<High Yield Magenta> LC1240M
Black, Yellow, Cyan and Magenta - Approximately 600 pages
1
Approx. cartridge yield is declared in accordance with ISO/IEC 24711.
For more information about the replacement consumables, visit us
at http://www.brother.com/pageyield/.
What is Innobella™?
Innobella™ is a range of genuine consumables offered by Brother.
The name "Innobella™" derives from the words "Innovation" and
"Bella" (meaning "Beautiful" in Italian) and is a representation of the
"innovative" technology providing you with "beautiful" and "long
lasting" print results.
When you print photo images, Brother recommends Innobella™
glossy photo paper (BP71 series) for high quality. Brilliant prints are
made easier with Innobella™ Ink and paper.
Содержание DCP-J925DW
Страница 1: ...BASIC USER S GUIDE DCP J925DW Version 0 UK IRE GEN ...
Страница 8: ...vi ...