background image

CONTENTS

Accessories ................................................................................. 5
Machine Features ........................................................................ 6
Before You Begin (1) .................................................................... 7

Power Cord and Foot Controller ................................7
Power Switch .............................................................7
Thread Tension Dial ...................................................7
Hand Wheel ...............................................................7
Stitch Length Regulator .............................................7
Reverse Stitch Lever .................................................7
Presser Foot Lift Lever ..............................................8
Knee Lift ....................................................................8
Presser Foot Pressure Adjustment Dial ....................8
Fabric Extension Table ..............................................8

Before You Begin (2) .................................................................... 9

Thread Cutter Button .................................................9
Needle Stop Position Button......................................9
Light Switch ...............................................................9
Feed Dog Adjustment Knob ......................................9

Changing Needles and Light Bulb ........................................... 10

Changing the Needle ...............................................10
Changing the Feed Pin ............................................10
Changing Light Bulbs ..............................................10

Threading (1) .............................................................................. 11

Bobbin Winding .......................................................11
Bobbin Insertion ......................................................13

Threading (2) .............................................................................. 14

Upper Threading......................................................14
Using the Automatic Needle Threader ....................15
Using the Spool Net ................................................15

Stitch Samples and Needle Chart ............................................ 16

Stitch Samples ........................................................16

Thread Tension ........................................................16

Changing Presser Feet ............................................................. 17

Changing Presser Feet (Zipper Foot) ......................17
Presser Feet ............................................................17

Basic Sewing (1) ........................................................................ 18

Basic Sewing ...........................................................18
Pin Feeding (for hard-to-handle fabrics) ..................18
Pin Feeding Mechanism ..........................................18

Basic Sewing (2) ........................................................................ 19

Rolled Hem Foot .....................................................19

Basic Sewing (3) ........................................................................ 20

Zipper Foot ..............................................................20
Invisible Zipper Foot ................................................21
1/4” Foot ..................................................................21
Quilting Foot ............................................................22
Walking Foot ............................................................22
Fabric Separator (for joining lining to fabric)   ..........23
Seam Guide ............................................................23

Caring for Your Machine ............................................................ 24

Cleaning the Machine ..............................................24
Lubrication Points ....................................................24

Trouble Shooting ....................................................................... 25

Содержание 884-639

Страница 1: ...by for future reference Veillez à lire ce document avant d utiliser la machine Nous vous conseillons de conserver ce document à portée de la main pour vous y référer ultérieurement Operation Manual Sewing machine Product Code 884 639 Manuel d instructions Machine à coudre Référence du produit 884 639 ...

Страница 2: ......

Страница 3: ...y object into any opening Do not use outdoors Do not operate where aerosol spray products are being used or where oxygen is being administered To disconnect turn the main switch to the symbol O position which represents off then remove plug from outlet Do not unplug by pulling on cord To unplug grasp the plug not the cord Keep fingers away from all moving parts Special care is required around the ...

Страница 4: ...on responsible for their safety Children should be supervised to ensure that they do not play with the appliance FOR USERS IN THE UK EIRE MALTA AND CYPRUS ONLY IMPORTANT In the event of replacing the plug fuse use a fuse approved by ASTA to BS 1362 i e carrying the mark rating as marked on plug Always replace the fuse cover Never use plugs with the fuse cover omitted If the available electrical ou...

Страница 5: ...ll outlet Do not use extension cords For a longer service life When storing your sewing machine avoid direct sunlight and high humidity locations Do not store the sewing machine beside a space heater iron or other hot objects Use only neutral soaps or detergents to clean the case Benzene thinner and scouring powders can damage the case and machine and should never be used Do not drop or hit the ma...

Страница 6: ...ight Bulbs 10 Threading 1 11 Bobbin Winding 11 Bobbin Insertion 13 Threading 2 14 Upper Threading 14 Using the Automatic Needle Threader 15 Using the Spool Net 15 Stitch Samples and Needle Chart 16 Stitch Samples 16 Thread Tension 16 Changing Presser Feet 17 Changing Presser Feet Zipper Foot 17 Presser Feet 17 Basic Sewing 1 18 Basic Sewing 18 Pin Feeding for hard to handle fabrics 18 Pin Feeding ...

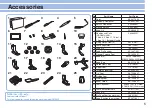
Страница 7: ...n 5 SA159 Americas MBN XA8284 202 Others 13 Spool Cap XA2111 050 14 Rolled Hem Foot X57138 101 15 Zipper Foot 112797 001 16 Invisible Zipper Foot XC0093 001 17 1 4 Foot XA7258 001 18 Quilting Foot XA7255 301 19 Walking Foot XA7253 001 20 Seam Guide XA7256 001 21 Foot Controller XD0501 151 EU area XC8816 051 Other areas 22 Fabric Extension Table XC3117 051 23 Spool Net XA5523 050 24 Pin Feed Foot o...

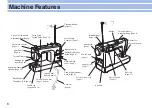
Страница 8: ...e Stitch Lever Page 7 Feed Dog Adjustment Knob Page 9 Knee Lift Page 8 Bobbin Winder Page 11 Hand Wheel Page 7 Power Switch Page 7 Foot Controller Jack Page 7 Power Socket Page 7 Spool Cushion Page 11 Spool Pin Page 11 Presser Foot Lift Lever Page 8 Thread Guide for Bobbin Winding Page 11 Handle Air Vents Thread Cutter Button Page 9 Thread Tension Dial Page 7 and 16 Indicator Lamp Automatic Needle...

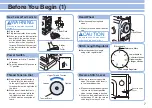
Страница 9: ...nd Wheel Position needle using hand wheel Always turn hand wheel towards you CAUTION Be sure to keep the area under and around the needle clear Stitch Length Regulator Adjust desired stitch length using stitch regulator dial Reverse Stitch Lever Sewing in reverse is possible when the reverse stitch lever is in the lowered position Make sure to continuously press the lever to its lowest position wh...

Страница 10: ...e pressure adjustment dial raises and lowers the pressure indicator needle as the amount of pressure on the presser foot changes See also Feed Dog Adjustment Knob on page 9 See Thread Tension on page 16 Presser Foot Lift Lever Knee Lift Setting up the knee lift Presser Foot Pressure Adjustment Dial Pressure Indicator Needle Push the knee lift bar all the way into the socket When knee lift is not i...

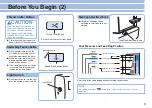
Страница 11: ... be random If the safety mechanism is activated for example if the thread becomes tangled the red lamp flashes Light Switch Push light switch to turn the light over the sewing area on and off Feed Dog Adjustment Knob Height of feed dogs can be adjusted to coincide with fabric weights Foot Pressure and Feed Dog Position Thread Cutter Button Indicator Lamp Needle Stop Position Button Light Switch Fe...

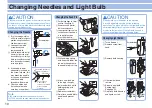
Страница 12: ...ver Schmetz 130 705H may also be used under normal circumstances Screwdriver Flat surface Lay needle on a flat surface such as the needle plate or a plate of glass The needle should lay parallel to a surface While holding spring 5 with fingertip lower the feed pin changer onto the needle to pick it up Attach new feed pin 6 to feed pin changer lower and attach while holding spring with fingertip Re...

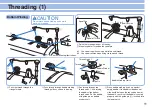
Страница 13: ...ular hole Pass thread through bobbin winding 4 thread guide as shown in drawing Run thread through top 5 thread notch 1 and turning the bobbin align bottom thread notch 2 of the bobbin with guide pin on bobbin winder shaft Press bobbin winding clutch up against 6 empty bobbin If the bobbin stop does not slide easily between the top and bottom of the bobbin check that the bobbin is seated properly ...

Страница 14: ...onds Once enough thread has wound itself around the bobbin to hold itself in place release the foot controller and trim the excess thread Cut thread and remove bobbin A Start winding the bobbin again by 8 pressing down on the foot controller Place the thread end so that it does not protrude from the bobbin Bobbin Winding Clutch Controller Pedal Press down Pressing down on the controller harder inc...

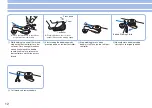
Страница 15: ... cut the thread Quick Bobbin Thread Device This device cuts the bobbin thread end to an appropriate length after the bobbin has been replaced and holds it at that length Following this process eliminates the need to manually pull the bobbin thread through the hole in the needle plate Simply close the bobbin case and continue the upper threading process Bobbin Insertion Bobbin should be positioned ...

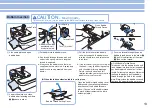
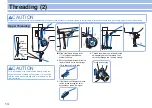
Страница 16: ... through the holes backwards as shown in diagram CAUTION Please turn off the power to the machine before using the automatic needle threader Accidentally stepping on the foot controller during this operation could cause bodily injury or damage to the machine CAUTION Turn off the power to the machine before using the automatic needle threader Otherwise it may cause injuries when you unintentionally...

Страница 17: ...est position Turn the needle threader lever all the 4 way in the direction of 1 and when the hook extends from the needle hole pull the thread in the direction of 2 to catch it on the hook While holding the thread gently return 5 the needle threader lever to the right As you do this the hook that has caught the thread will move as well pulling a loop of thread through the eye of the needle Using t...

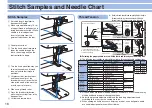
Страница 18: ... results as messy stitches puckered seams and thread breakage Upper Thread Lower Thread Right side of Fabric Upper Thread Lower Thread Right side of Fabric Wrong side of fabric Bobbin tension Proper When it is week Bobbin tension Proper When it is strong Wrong side of fabric Adjust the upper thread to match the bobbin thread Selecting the proper needle for use with the fabric and thread you are wo...

Страница 19: ... presser feet Walking Foot For sewing or quilting on fabrics which stick or tend to slip Useful for sewing multiple layers as in quilting 1 4 Foot For quilt and patchwork piecing with 1 4 or 1 8 seam allowance Zipper Foot Use to attach fasteners other than concealed fasteners The zipper foot can also be used to secure piping in place as you sew Use the side of the foot closest to the needle to res...

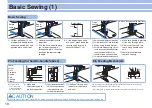
Страница 20: ...eam press down the reverse stitch lever and backstitch about 1 cm Before sewing Begin sewing Finish sewing When changing sewing directions Backstitches 1 cm 1 cm Pin Feeding for hard to handle fabrics The fabrics shown above can be joined evenly by activating the pin feed mechanism Pin Feeding Mechanism The feed pin passes up through all layers of fabric moving with the feed dog s motion to feed a...

Страница 21: ...re the threads come out Insert the edge so that it lies directly under the needle Lower the presser foot Pull gently on threads in left 6 hand while sewing the first 3 4 stitches to hold them in place Fold hem over about 0 5 cm and 7 continue feeding folded hem under foot while sewing towards the curved guide on the foot Turn the hand wheel towards 3 you to raise the needle raise the presser foot ...

Страница 22: ...cm below zip stop Sew from below the base of the opening Divide the seam margin Fold 4 the seam margin with the overlap of the zipper position facing down 0 2 cm on the outside of the mark A 0 5 cm Slide Base of Opening Stop 0 2 cm Change position of zipper foot 7 Turn the hand wheel to lower the 8 needle and position the presser foot With the fabric right side up 9 baste the zipper onto the fabri...

Страница 23: ...ove guide them to prevent them from falling over and sew to the base of the opening When sewing with the teeth to the right the left side of the foot should line up with the left teeth of the zipper Baste 2 cm Base of Opening Slide Teeth Basting Basting 1 4 Foot Sewing machine settings Stitch length 2 2 5 mm Sew a consistent seam allowance 1 4 6 4 mm when piecing together a quilt Use guides mark t...

Страница 24: ...sewing speed low 500 r p m or less The fabric may not feed if you sew at high speeds The feed dog for feeding the cloth may not move if the foot pressure on the fabric is too strong Use the presser foot pressure adjustment dial to achieve the desired results It is not advisable or necessary to use the Pin Feed mode with the walking foot Insert the forked part of the 1 operation lever while raised ...

Страница 25: ...t of the separator without hitting the plate itself Secure liner plate in place with 4 lining plate screws Set pressure of sewing feet 5 and feed position to pin feeding position Pull thread until lower needle 6 catches fabric Sew 2 3 reinforcement stitches When not using separator it 7 can be swung off to the side as illustrated in drawing Fabric Separator Needle Separator Needle Separator Lining...

Страница 26: ...ry dirty wipe with a cloth soaked in warm water or in warm water containing a neutral detergent Then wipe off any detergent residue and wipe off water with a dry cloth Precautions Please keep sewing machine away from heat sources such as irons and space heaters Do not use chemicals like benzine or thinner to clean your machine When machine is not in use please keep machine out of direct sunlight I...

Страница 27: ...s dulled Change needles Clean feed dog and bobbin case Oil the machine Area under needle plate needs to be cleaned Upper thread tension is too high Reduce tension Reduce tension Bobbin tension is too high You re sewing a lightweight fabric with feed dogs in heavyweight position Adjust feed dogs Sewing heavyweight fabric with feed dogs in lightweight fabric position Adjust feed dogs Rethread machin...

Страница 28: ...ic Upper threading is not threaded correctly Re thread machine properly Bobbin case is scratched Remove needle plate and check bobbin case If you still cannot find the problem please take your sewing machine into the shop where you purchased it or your nearest authorized Brother dealer for repair Upper thread tension is too low Increase tension 10 14 10 16 If you find it difficult to turn the hand...

Страница 29: ...nt bouchées Ne laissez pas les peluches la poussière et les tissus s accumuler car ils pourraient boucher les ouvertures de ventilation de la machine et de la pédale du rhéostat N insérez jamais et ne laissez jamais tomber aucun objet dans ces ouvertures N utilisez pas la machine à l extérieur Ne faites pas fonctionner la machine en cas d utilisation de produits aérosols vaporisateurs ou d adminis...

Страница 30: ...nts pour s assurer qu ils ne jouent pas avec cet appareil POUR LES UTILISATEURS AU ROYAUME UNI EN IRLANDE À MALTE ET À CHYPRE UNIQUEMENT IMPORTANT En cas de remplacement du fusible de la fiche utilisez un fusible certifié ASTA à BS 1362 c est à dire portant la marque d une capacité correspondant à celle indiquée sur la fiche Remettez toujours le couvercle du fusible Ne branchez jamais la machine l...

Страница 31: ...Ne pas utiliser de rallonge électrique Pour une vie prolongée de votre machine Ne pas ranger votre machine dans des endroits exposés au soleil et très humides Ne pas ranger votre machine à coudre à proximité d un appareil de chauffage d un fer à repasser ou de tout autre appareil dégageant de la chaleur Utiliser seulement des savons ou des détergents neutres pour nettoyer le coffret de la machine ...

Страница 32: ... Remplissage de la canette 37 Insertion de la canette 39 Enfilage 2 40 Mise en place du fil supérieur 40 Utilisation de l enfileur automatique 41 Utilisation du filet de la bobine 41 Points d essai et tableau d aiguilles 42 Points d essai 42 Tension des fils 42 Changement du pied de biche 43 Changement du pied de biche Pied pour fermeture à glissière 43 Les différents pied de biche 43 Couture de b...

Страница 33: ...nette 5 SA159 Continent americain MBN XA8284 202 Autres 13 Capuchon de bobine XA2111 050 14 Pied pour ourlet rouleauté X57138 101 15 Pied pour fermeture à glissière 112797 001 16 Pied pour fermeture à glissière invisible XC0093 001 17 Pied 1 4 XA7258 001 18 Pied transparent pour ouatinage matelassage XA7255 301 19 Pied double entrainement XA7253 001 20 Guide de couture XA7256 001 21 Pédale du rhéo...

Страница 34: ...e Page 33 Bouton de réglage des griffes d entraînement Page 35 Levier de levage au genou Page 34 Dévidoir Page 37 Volant Page 33 Interrupteur d alimentation Page 33 Prise de pédale du rhéostat Page 33 Prise de courant Page 33 Coussinet de bobine Page 37 Porte bobine Page 37 Levier du pied de biche Page 34 Guide fils du dévidoir Page 37 Poignée Orifices de ventilation Bouton de ciseaux Page 35 Disq...

Страница 35: ...r de point arrière Pour coudre en marche arrière abaisser le levier de point arrière Abaissez en continu et au maximum le levier pour coudre en marche arrière Lorsque le sélecteur de réglage de l entraînement est réglé entre 5 7 mm la longueur du point arrière est toujours de 5 mm Cordon d alimentation et pédale AVERTISSEMENT Utiliser un courant secteur domestique ordinaire Brancher le cordon Bran...

Страница 36: ...ession à mesure que la pression du pied de biche change Voir également Bouton de réglage des griffes d entraînement page 35 Voir Tension des fils à la page 42 Enfoncer la barre du levier de levage au genou à fond dans la prise Lorsqu on ne se sert pas du levier de levage au genou on pourra le laisser sur I envers de la table de rallonge pour tissu Table de rallonge pour tissu Abaissez les pieds de...

Страница 37: ... le fil est emmêlé le voyant rouge clignote Interrupteur de la lampe Appuyer sur l interrupteur pour allumer et éteindre la lampe sur la section de couture Bouton de réglage des griffes d entraînement Il est possible de régler la hauteur des griffes d entraînement en fonction du poids du tissu Pression du pied de biche et position des griffes d entraînement Sélectionner l une des quatre positions ...

Страница 38: ...5 toutefois on pourra également utiliser des aiguilles Schmetz 130 705H dans des circonstances normales d utilisation Tout en tenant le ressort 5 du bout des doigts abaisser le changeur d ergot d entraînement sur l aiguille pour relever la tige Fixer un nouvel ergot 6 d entraînement au changeur d ergot d entraînement abaisser et fixer tout en tenant le ressort du bout des doigts Retirer le tournev...

Страница 39: ...e illustré sur le schéma Faites passer le fil dans 5 l encoche supérieure 1 puis tournez la canette de façon à aligner l encoche inférieure 2 de la canette sur la tige de guidage de l arbre du dévidoir Pousser la butée de canette contre la canette 6 vide Si la butée de canette ne glisse pas facilement entre le côté supérieur et le côté inférieur de la canette vérifier si la canette est installée c...

Страница 40: ... Quand il s est enroulé suffisamment de fil sur la canette pour que le fil reste en place relâcher la pédale et couper l excédent de fil Couper le fil et enlever la canette A Recommencez à bobiner la canette 8 en appuyant sur la pédale de rhéostat Placer l extrémité du fil de façon qu il ne ressorte pas de la canette Rhéostat Pédale Appuyer Si vous appuyez plus fort sur le rhéostat la vitesse de b...

Страница 41: ...per le fil Dispositif de remontée rapide du fil de la canette Ce dispositif coupe le fil de la canette à une longueur appropriée après le remplacement de la canette et le garde à cette longueur Il est alors inutile de tirer manuellement le fil de la canette par l orifice de la plaque à aiguille Fermez simplement le boîtier de la canette et poursuivez le processus de mise en place du fil supérieur ...

Страница 42: ... les orifices arrière comme indiqué sur le schéma ATTENTION Toujours mettre la machine hors tension avant d utiliser l enfileur automatique Une pression accidentelle sur la pédale du rhéostat pendant cette opération pourrait provoquer des blessures ou endommager la machine ATTENTION Mettez la machine hors tension avant d utiliser l enfileur automatique Sinon vous risquez de vous blesser si vous ap...

Страница 43: ...aximum Tourner le levier de l enfileur à 4 fond dans le sens 1 et lorsque le crochet passe par l orifice de l aiguille tirer le fil dans le sens 2 pour l attraper sur le crochet Tenir doucement le fil et replacer le 5 levier de l enfileur vers la droite Pendant cette opération le crochet qui a attrapé le fil se déplace également et tire une boucle de fil par le chas de l aiguille Utilisation de l ...

Страница 44: ...il inférieur Bon côté du tissu Mauvais côté du tissu Tension de canette Correcte Trop forte pour augmenter la tension du fil pour réduire la tension de canette Régler le fil supérieur pour qu il corresponde au fil de la canette pour réduire la tension de la canette pour réduire la tension du fil d aiguille Fil supérieur Fil inférieur Bon côté du tissu Mauvais côté du tissu Tension de canette Corre...

Страница 45: ... double entrainement Entraîne le tissu fin ou épais pour éviter le froncage Très utile pour le quilting courtepointe Pied 1 4 Pour la couture de quilting courtepointe et de patchwork avec un déplacement de 1 4 pouce et 1 8 pouce Pied pour fermeture à glissière Permetdefixerdesfermeturesà glissièreautresquelesfermetures dissimulées Vouspouvez égalementutiliserlepied de biche pourmaintenirlepassepoi...

Страница 46: ...la couture Pour modifier le sens de la couture 1 cm 1 cm Points arrière Entraînement par ergot pour les tissus difficiles à manipuler Les tissus illustrés ci dessus peuvent être cousus ensemble de manière égale en activant le mécanisme d entraînement par ergot Mécanisme d entraînement par ergot L ergot d entraînement remonte de façon à traverser toutes les épaisseurs de tissu et il se déplace sous...

Страница 47: ...bord de façon qu il se trouve juste sous l aiguille Abaisser le pied de biche Tirer délicatement sur les fils de 6 la main gauche pendant que l on coud les 3 ou 4 premiers points de façon qu ils restent en place Replier l ourlet sur environ 0 5 7 cm et continuer à faire avancer l ourlet replié sous le pied tout en cousant vers le guide recourbé du pied Tourner le volant à main vers soi 3 pour rele...

Страница 48: ...à ce que l aiguille ne heurte pas la section métallique de la fermeture à glissière pendant la couture L aiguille pourrait se casser et provoquer des blessures Aligner l ourlet replié à l envers 6 sur les points A 0 5 cm Fermeture à glissière Base de l ouverture Arrêt 0 2 cm Changer la position du pied pour 7 fermeture à glissière Tourner le volant à main pour 8 abaisser l aiguille et mettre le pi...

Страница 49: ...la rainure du pied de biche les guider pour éviter qu elles ne tombent puis coudre jusqu à la base de l ouverture Si l on effectue la couture avec les dents de la fermeture sur la droite le côté gauche du pied devra être aligné sur les dents gauches de la fermeture à glissière Faufiler 2 cm Base de l ouverture Languette Dents Faufile Faufile Pied 1 4 Réglages de la machine à coudre Longueur de poi...

Страница 50: ...ne pas être entraîné si la vitesse de couture est trop élevée Les griffes d entraînement qui font avancer le tissu risquent de ne pas avancer si la pression du pied sur le tissu est trop forte Utiliser le sélecteur de pression du pied de biche pour obtenir les résultats souhaités Il n est pas recommandé ni nécessaire d utiliser le mode d entraînement par ergots avec le pied double entrainement Lor...

Страница 51: ...e le séparateur est 3 placé de façon que l aiguille traverse la fente du séparateur sans heurter la plaque Fixer la plaque de doublure à l aide 4 des vis de la plaque de doublure Régler la pression du pied de 5 biche et avancer le tissu sur la position d entraînement par ergot Tirer sur le fil jusqu à ce que 6 l aiguille inférieure attrape le tissu Coudre 2 ou 3 points de renfort Lorsqu on ne se s...

Страница 52: ...la machine est très sale l essuyer avec un chiffon trempé dans de l eau tiède ou de l eau tiède contenant un détergent neutre Puis enlever tout reste de détergent et essuyer avec un chiffon sec Précautions Eloigner la machine à coudre des sources de chaleur telles que fer à repasser et appareil de chauffage Ne pas utiliser de produits chimiques tels que benzine ou diluant pour nettoyer la machine ...

Страница 53: ...lle Nettoyer les griffes d entraînement et le boîtier de la canette Graisser la machine La section sous la plaque à aiguille a besoin d être nettoyée La tension du fil supérieur est excessive Réduire la tension Réduire la tension La tension de la canette est excessive Couture d un tissu lourd avec les griffes d entraînement sur la position de tissu léger Régler les griffes d entraînement Couture d...

Страница 54: ...est pas bien enfilé Réenfiler la machine correctement Le boîtier de la canette est rayé Retirer la plaque à aiguille et vérifier le boîtier de canette La tension du fil supérieur est trop faible Augmentez la tension 36 40 36 Si vous ne parvenez toujours pas à résoudre le problème rapportez la machine au magasin où vous l avez achetée ou confiez la au service technique Brother agréé le plus proche ...

Страница 55: ......

Страница 56: ...e visit us at http solutions brother com where you can get product support and answers to frequently asked questions FAQs Visitez notre site http solutions brother com pour obtenir les coordonnées du service après vente et consulter la Foire aux questions FAQ ...

Отзывы: