


7
FAX-2850 Control Panel Overview
11
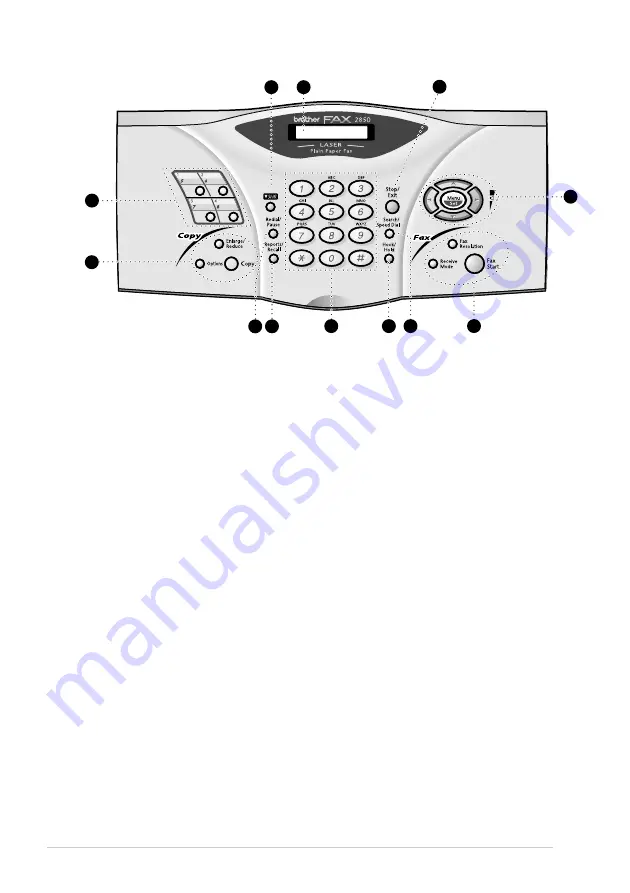
4
3
5
9
8
10
6
7
2
12
1
1
Liquid Crystal Display
Displays messages to help you set up and
operate the machine.
2
Shift
This key is used to access the “5”
through “8” One Touch keys.
3
One Touch Dial Keys
These 4 keys give you access to 8
previously stored phone numbers.
4
Copy Keys:
Options
You can quickly and easily select
temporary settings (for the next copy
only).
Enlarge/Reduce
Lets you select an enlargement or
reduction ratio: 50%, 71%, 100%, 141%,
150%, 200%. For more choices, select
MANUAL
and use dial pad to type any
percentage between 50% and 200%.
Copy
Makes a copy.
5
Redial/Pause
Re-dials the last number called. Also
inserts a pause in autodial numbers.
6
Reports/Recall
You can access the Reports menu so you
can select a report to print: Help, Quick
Dial, Journal, Xmit Verify and System
Setup List and Order Form.
7
Dial Pad
Dials phone and fax numbers and can be
used as a keyboard for entering
information into the machine.
#
key lets you switch the dialling type
during a telephone call from “
PULSE
”
to “
TONE
”. (Not available in New
Zealand.)
8
Hook/Hold
Lets you dial telephone and fax numbers
without lifting the handset.
—
OR
—
Lets you place telephone calls on hold.
9
Search/Speed Dial
Lets you look up numbers stored in the
dialling memory. Also, lets you dial
stored phone numbers by pressing
#
and
two-digit number.
Содержание 2850
Страница 1: ...FAX 2850 MFC 4800 OWNER S MANUAL ...
Страница 2: ......
Страница 6: ...iv ...
Страница 173: ......


