background image

ControlCenter3

52

3

E-mail

3

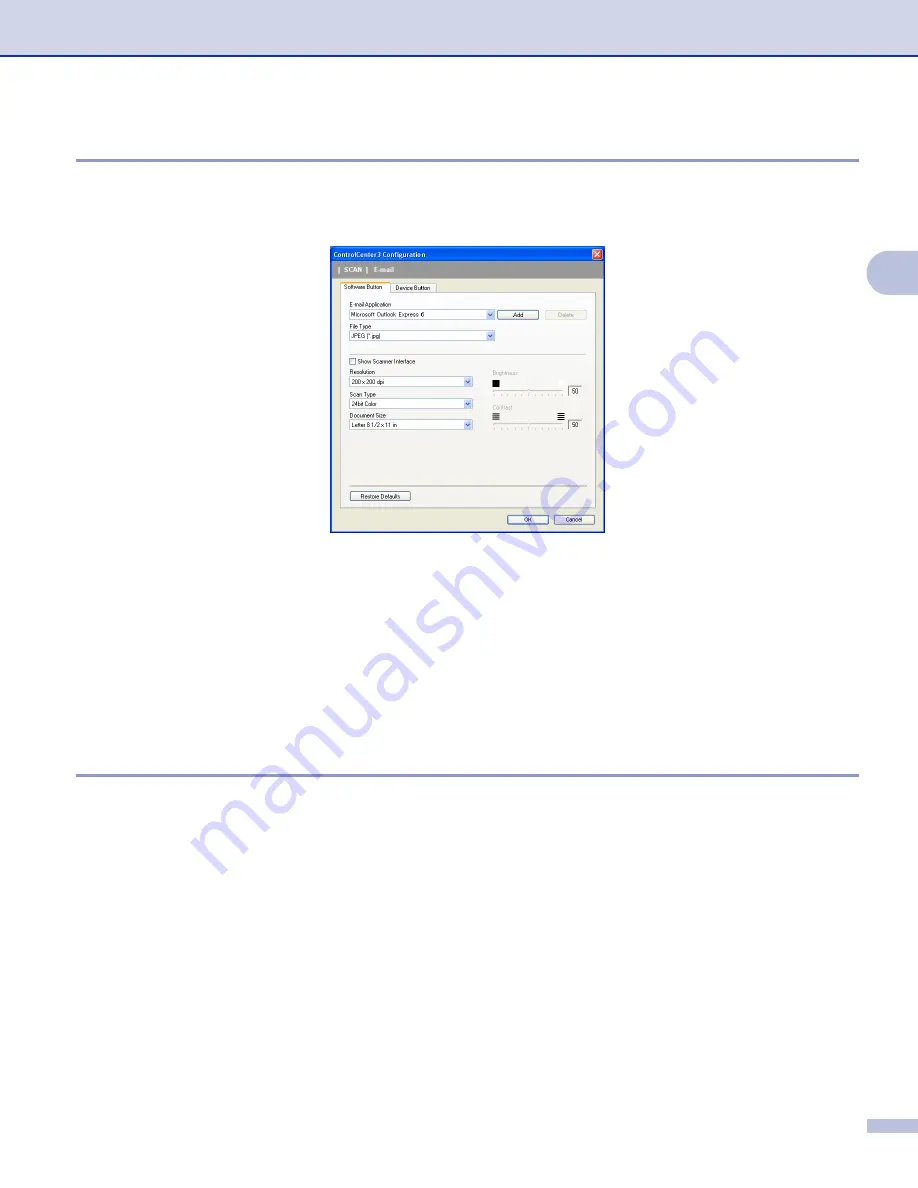
Scan to E-mail

 lets you scan a document to your default E-mail application, so you can send the scanned 

job as an attachment. To change the default E-mail application or attachment file type, right-click the 

E-mail


button, click 

ControlCenter Configuration

 and click the 

Software Button

 tab.


To change the E-mail application, choose your preferred E-mail application from the 

E-mail Application


drop-down list. You can add an application to the list by clicking the 

Add

 button

1

. To delete an application, 

click the 

Delete

 button.

1

When you first start ControlCenter3 a default list of compatible E-mail applications will appear in the drop-down list. If you are having trouble using 
a custom application with ControlCenter3 you should choose an application from the list.

You can also change the other settings used to create the file attachments.
If you want to scan and then crop a portion of a page after pre-scanning the document, check the 

Show 

Scanner Interface

 box.

File attachments

3

You can choose from the following list of file types when saving to a folder. 

File Type

3

Choose from the drop-down list the type of file you want the scanned images to be saved in.

„

Windows Bitmap (*.bmp)

„

JPEG (*.jpg)

„

TIFF - Uncompressed (*.tif)

„

TIFF - Compressed (*.tif)

„

TIFF Multi-Page - Uncompressed (*.tif)

„

TIFF Multi-Page - Compressed (*.tif)

„

Portable Network Graphics (*.png)

„

PDF (*.pdf)

Содержание 1960C - IntelliFAX Color Inkjet

Страница 1: ...SOFTWARE USER S GUIDE For DCP users This documentation is for both MFC and DCP models Where it says MFC in this user s guide please read MFC as DCP Version A ...

Страница 2: ... 8 Improve Pattern Printing Windows 2000 XP only 10 Paper Size 10 Page Layout 11 Orientation 11 Copies 12 Paper Source MFC 5860CN only 12 Advanced tab 13 Color 14 Scaling 16 Watermark 17 Device Options 19 Support tab 21 2 Scanning Scanning a document using the TWAIN driver 22 TWAIN compliant 22 Accessing the Scanner 23 Scanning a document into the PC 24 Settings in the Scanner Setup dialog box 25 ...

Страница 3: ...MFC models only 48 DEVICE SETTING 48 SCAN 49 Image example Microsoft Paint 49 OCR Word Processing program 51 E mail 52 File attachments 52 File 53 CUSTOM SCAN 54 Customizing a user defined button 55 PHOTOCAPTURE USB only Not available for MFC 3360C 59 Open PCC Folder PCC PhotoCapture Center 59 Copy From PCC 59 Copy To Application 60 COPY 61 PC FAX MFC models only 63 Send 63 Receive View Received N...

Страница 4: ...formation 83 Deleting a member or group 83 Exporting the Address Book 84 Importing to the Address Book 85 Sending a file as a PC FAX using the Facsimile style user interface 86 Sending a file as a PC FAX using the Simple style user interface 87 PC FAX receiving Not available for MFC 240C and MFC 3360C 89 Enabling the PC FAX Receiving software on your machine 90 Running the PC FAX Receiving softwar...

Страница 5: ... Accessing the scanner 107 Scanning an image into your Macintosh 108 Pre Scanning an image 108 Settings in the Scanner window 109 Using the Scan key For USB cable users 113 Scan to E mail 113 Scan to Image 114 Scan to OCR 114 Scan to File 115 Scan to Card Not available for MFC 240C and MFC 3360C 115 Using Presto PageManager 119 Features 119 System requirements for Presto PageManager 119 Technical ...

Страница 6: ...vel 137 11 Network Scanning For models with built in network support Before using Network Scanning 138 Configuring network scanning 138 Using the Scan key 140 Scan to E mail 140 Scan to Image 141 Scan to OCR 141 Scan to File 142 12 Remote Setup PhotoCapture Center Remote Setup Not available for DCP models and MFC 240C 143 PhotoCapture Center Not available for MFC 3360C 145 For USB cable users 145 ...

Страница 7: ...ing 22 ControlCenter3 44 Network Scanning For models with built in network support 68 Remote Setup Not available for DCP models and MFC 240C 74 Brother PC FAX Software MFC models only 76 PhotoCapture Center Not available for MFC 3360C 94 ...

Страница 8: ... high quality ink jet printer Fast Printing Speed See the User s Guide for the rated print speeds of the model you are using Brilliant High Quality Output Printing at up to 1200 6000 dpi on glossy paper to get the highest possible resolution See Resolution in Specifications in the User s Guide The printer driver supports N in 1 Watermark printing Color Enhancement technology and many other feature...

Страница 9: ...into the PC Fax sending will not be stopped during PC printing However when the machine is copying or receiving a fax on paper it pauses the PC printing operation and then continues printing when copying or fax receiving has finished Clearing data from the memory 1 If the LCD shows Data Remaining you can clear the data that is left in the memory by pressing the Stop Exit key on the control panel C...

Страница 10: ...ing Status Monitor located in Start All Programs Brother MFC XXXX on your PC Note For more information about using the Status Monitor software right click the Status Monitor icon and choose Help Monitoring the machine s status 1 Once you start up your PC the Status Monitor icon appears on the tasktray A green icon indicates the normal stand by condition A yellow icon indicates a warning A red icon...

Страница 11: ...e by clicking Status Monitor from the Start menu on your PC Printer driver settings 1 You can change the following printer settings when you print from your PC Media Type Quality Speed Paper Size Page Layout Color Matching Halftone Color Enhancement Scaling Watermark Print Date Time Quick Print Setup Accessing the printer driver settings 1 a Click File then Print in your application b Choose Broth...

Страница 12: ... if any Orientation number of Copies and the page order 2 c Select the Paper Source MFC 5860CN only Note If you choose Auto Select the machine will pull paper from Tray 1 and when Tray 1 is empty paper will automatically be pulled from Tray 2 d Click OK 3 to apply your chosen settings To return to the default settings click Default 4 then OK 3 Note This area 5 shows the current settings of Quality...

Страница 13: ...rinting photographs Since the print data is much larger than a normal document the processing time data transfer time and print time will be longer Fine 1200 1200 dpi Better print quality than Normal mode and faster print speed than Photo Normal 600 600 dpi Good print quality with typical print speed Fast Normal 600 300 dpi Better print quality than Fast mode and faster print speed than Normal Fas...

Страница 14: ...rint speeds When unchecked the print head will only print in one direction giving higher quality printouts but slower printing speeds Color Enhancement True2Life 1 Checking Color Enhancement True2Life option enables the True2Life feature This feature analyzes your image to improve its sharpness white balance and color density This process may take several minutes depending on the size of the image...

Страница 15: ...see the fine details of the picture then adjust the sharpness Auto Image Enhance Allows alteration of individual picture settings to improve the printed image and analyzes data from surrounding or neighboring pixels in the document Brightness Adjusts the brightness of the whole image To lighten or darken the image move the scroll bar to the left or right Contrast Adjusts the contrast of an image T...

Страница 16: ...ng from 3 5 5 in 88 9 127 0 mm to 8 5 14 in 215 9 355 6 mm You can also choose the borderless setting for specific paper sizes From the drop down list choose the Paper Size you are using You can create a custom size by choosing User Defined Size Specify the Width and Height values and enter any name you want for this custom size Choose the correct paper thickness to improve the quality of your out...

Страница 17: ...lable Page Order Windows 2000 XP only 1 When N in 1 option is selected the Page Order can be selected from the drop down menu Border Line 1 When printing multiple pages on one sheet with the Page Layout feature you can choose to have a solid border dashed border or no border around each page on the sheet Orientation 1 Orientation chooses the position your document will be printed in Portrait or La...

Страница 18: ...printed Reverse Order 1 Reverse Order prints the pages of your document in the opposite order Paper Source MFC 5860CN only 1 The Paper Source selection sets the paper tray from which the machine will feed the paper when printing If you choose Auto Select the machine will take paper from Tray 1 When Tray 1 is empty Auto Select allows the machine take paper from Tray 2 if both trays are using paper ...

Страница 19: ...Printing 13 1 Advanced tab 1 Change the tab settings by clicking one of the following icons Color 1 Scaling 2 Watermark 3 Device Options 4 Note To return to the default settings click Default 1 2 3 4 ...

Страница 20: ...half tone method depending on your image type Generally text and business graphics are printed vividly and photographic images are printed softly Auto The printer driver automatically chooses the image type Photo Use for photographic images Graphics Use for documents that contain text or business graphics charts or clip art Custom If you want to choose the color matching and halftone method choose...

Страница 21: ...e for your document Match Monitor Color is adjusted to get the closest color match with the PC monitor Natural Use for photographic images The color is adjusted to print more natural colors Vivid Use for business graphics such as charts graphics and text The color is adjusted to print more vivid colors ...

Страница 22: ... have definite color boundaries or for printing charts such as business charts Note Some halftone settings cannot be chosen with certain combinations of Media Type and Quality settings Scaling 1 You can change the print size of your document with the Scaling feature Choose Off if you want to print the document as it appears on your screen Choose Fit to Paper Size if your document has an unusual si...

Страница 23: ...k you want to use In background 1 Check In background to print the watermark image in the background of your document If this feature is unchecked the Watermark will be printed on top of your document In Outline Text Windows 2000 XP only 1 Check In Outline Text if you only want to print an outline of the watermark Print Watermark 1 You can print the watermark in any of the following ways On all pa...

Страница 24: ...Title Choose CONFIDENTIAL COPY or DRAFT as the title or enter a title you like in the field Watermark Text Enter your watermark text into the Text Box and then choose Font Size Color and Style Watermark Bitmap Enter the file name and location of your bitmap image in the File box or click Browse to search for the file You can also set the scaling size of the image Position Use this setting if you w...

Страница 25: ...k Click the Setting button to change the Date Time Position and Font To include a background with the Date and Time choose Opaque When Opaque is chosen you can click the Color button to change the color of the Date and Time background Note The selection box shows the format of Date and Time to be printed The actual Date and Time printed on your document is automatically retrieved from the settings...

Страница 26: ... 1 The Quick Print Setup feature lets you quickly choose driver settings Set Quick Print Setup to On and choose the function which should be displayed in the Quick Print Setup icon To view and change settings click the tasktray icon ...

Страница 27: ...lay the following screen Brother Solutions Center The Brother Solutions Center is a web site offering information about your Brother product including FAQs Frequently Asked Questions User s Guides driver updates and tips for using your machine Web Update You can check the Brother web site for automatic downloads to update the printer driver on your PC Check Setting You can check current driver set...

Страница 28: ...a firewall and is unable to scan you may need to configure the firewall settings to allow communication through port number 137 and 54925 Visit the Brother Solutions Center http solutions brother com for more information Scanning a document using the TWAIN driver 2 TWAIN compliant 2 The Brother MFL Pro Suite software includes a TWAIN compliant scanner driver TWAIN drivers meet the standard univers...

Страница 29: ...g steps may vary when using other software applications b Click File then Scan Or click the Scan button The Scan panel appears in the left side of the screen c Choose the scanner you are using from the Scanner drop down list Note For Windows XP Choose TW Brother MFC XXXX USB or TW Brother MFC XXXX LAN For other operating systems Choose Brother MFC XXXX USB or Brother MFC XXXX LAN Where XXXX is you...

Страница 30: ...ote After you select a document size you can adjust the scanning area further by clicking the left mouse button and dragging it This is required when you want to crop an image when scanning Pre Scanning an image to crop a portion you want to scan 2 The PreScan button is used to preview an image and also lets you crop any unwanted areas from the image When you are satisfied you are scanning the cor...

Страница 31: ...s time only the chosen area of the document appears in the PaperPort SE window or your application window g In the PaperPort SE window use the options available to refine the image Settings in the Scanner Setup dialog box 2 Image Type 2 Choose the output image type from Photo Web or Text Resolution and Scan Type will be automatically altered for each of the default settings The default settings ar...

Страница 32: ...or graphics This mode is more exact because it uses up to 256 shades of gray 256 Color Uses up to 256 colors to scan the image 24 bit Color Uses up to 16 8 million colors to scan the image Although using 24 bit Color creates an image with the most accurate color reproduction the image file size will be about three times larger than a file created using the 256 Color option It requires the most mem...

Страница 33: ...An increase emphasizes dark and light areas of the image while a decrease reveals more detail in gray areas You can also enter a value in the box to set the Contrast Note The Contrast setting is only available when you set Scan Type to Gray or True Gray When scanning photographs or other images for use in a word processor or other graphics application try different settings for the Resolution Colo...

Страница 34: ...e Name Width and Height of the document You can choose mm or inch as the unit for Width and Height Note You can see the actual paper size you chose on the screen Width shows the width of scanning area Height shows the height of scanning area Data Size shows the approximate data size in Bitmap format The size will vary depending on the type of file resolution and number of colors used ...

Страница 35: ...e scanner 2 a Open your software application to scan the document Note The instructions for scanning in this Guide are based on ScanSoft PaperPort SE The process will vary when scanning from other applications b Click File then Scan Or click the Scan button The Scan panel appears on the left side of the screen c Choose the scanner you are using from the Scanner drop down list Note Choose WIA Broth...

Страница 36: ...he document you must scan using the scanner glass Flatbed See Pre Scanning an image to crop a portion you want to scan on page 24 Scanning a document using the ADF Available for ADF model 2 a Load your document 1 Paper source 2 Picture type 3 Adjust the quality of the scanned picture 4 Page size b Choose Document Feeder from the Paper source drop down list 1 c Choose the picture type 2 d Choose th...

Страница 37: ... and Picture Type from Advanced Properties Click OK after you choose the settings Note By default the scanner resolution can be set to a maximum of 1200 dpi If you want to scan at higher resolutions use the Brother Scanner Utility See Brother Scanner Utility on page 33 f Click the Scan button in the Scan dialog box The machine starts scanning the document ...

Страница 38: ...ment face down on the scanner glass b Choose Flatbed in the Paper source drop down list 1 Note If your machine has no Auto Document Feeder ADF you do not need to specify the Paper source 1 Paper source 2 Picture type 3 Adjust the quality of the scanned picture 4 Scanning area c Choose the picture type 2 d Click Preview The whole image is scanned into the PC and appears in the scanning area 4 e Pre...

Страница 39: ...solutions greater than 1200 dpi and for changing the paper size If you want to set Legal size as the default size use this utility to change the setting You must restart your PC for the new settings to take effect Running the utility You can run the utility by choosing Scanner Utility located in Start All Programs Brother MFC XXXX menu where XXXX is your model name Scanner Settings Note If you sca...

Страница 40: ...e are installed Scanning using the Scan key uses the configuration of the Device Button tab of the ControlCenter3 software See SCAN on page 49 For details about how to configure the scan settings and to launch the application of your choice using the Scan key see Using ControlCenter3 on page 44 Scan to E mail 2 You can scan either a black and white or color document into your E mail application as...

Страница 41: ...art or Color Start The machine starts the scanning process Scan to OCR 2 If your original document is text you can use ScanSoft PaperPort SE to scan the document and convert it into a text file which can then be edited in your favorite word processing software You can change the Scan key configuration See OCR Word Processing program on page 51 a Load your document b Press the Scan key c Press a or...

Страница 42: ... card Black and white documents will be stored in the PDF PDF or TIFF file formats TIF Color documents may be stored in PDF PDF or JPEG JPG file formats File names are based on the current date For example the fifth image scanned on July 1 2006 would be named 07010605 PDF You can change the color quality and file name a Put a CompactFlash 1 Memory Stick 2 Memory Stick Pro MultiMediaCard SecureDigi...

Страница 43: ... any settings press Black Start or Color Start e Press a or b to choose the quality you want Press OK Do one of the following To change the file type go to f To start scanning without changing any settings press Black Start or Color Start f Press a or b to choose the file type you want Press OK Do one of the following To change the file name go to g To start scanning without changing any settings ...

Страница 44: ...r b to choose 1 Quality Press OK e Press a or b to choose B W 200x100 dpi B W 200 dpi Color 150 dpi Color 300 dpi or Color 600 dpi Press OK f Press Stop Exit Changing the default black white file format 2 For MFC 5460CN and 5860CN 2 a Press Menu 4 9 2 b Press a or b to choose TIFF or PDF Press OK c Press Stop Eixt For DCP 130C 2 a Press Menu b Press a or b to choose 2 PhotoCapture Press OK c Press...

Страница 45: ... Press a or b to choose PDF or JPEG Press OK c Press Stop Eixt For DCP 130C 2 a Press Menu b Press a or b to choose 2 PhotoCapture Press OK c Press a or b to choose 0 Scan to Card Press OK d Press a or b to choose 3 Color File Type Press OK e Press a or b to choose PDF or JPEG Press OK f Press Stop Exit ...

Страница 46: ...stack documents of different formats for printing faxing or filing This chapter only introduces the basic functions of the software For more details see the ScanSoft user s guide To view the complete ScanSoft PaperPort SE User s Guide choose Help from PaperPort SE menu bar and click User s Guide When you install MFL Pro Suite ScanSoft PaperPort SE for Brother is installed automatically You can acc...

Страница 47: ...es and non PaperPort SE items files created using other applications Non PaperPort SE items include an icon that indicates the application that was used to create the item Page View displays a close up of a single page You can open a PaperPort SE item by double clicking its icon or thumbnail in Desktop View As long as you have the proper application on your PC to display it you can also open a non...

Страница 48: ... The Send To Bar at the bottom of the Desktop view shows icons for those linked applications To use a link drag an item onto one of the icons to start that application A typical use of the Send To Bar is to choose an item and then fax it This sample Send To Bar shows several applications with links to PaperPort SE If PaperPort SE does not automatically recognize one of the applications on your PC ...

Страница 49: ...t SE window The Save XXXXX as dialog box is displayed b Choose the drive and folder where you want to store the file c Enter the new file name and choose the file type d Click Save to save your file or Cancel to return to PaperPort SE without saving it Uninstalling ScanSoft PaperPort SE with OCR 2 For Windows 98 98SE and Windows Me 2 a Click the Start button Settings Control Panel Add Remove Progr...

Страница 50: ...lication of your choice 1 b Access to the Custom Scan settings Custom Scan buttons let you configure a button to meet your own application needs 2 c Access to the advanced features of PhotoCapture Center 3 d Access the Copy features available via your PC 4 e Access the PC FAX applications available for your device 5 f Access the settings available to configure your device 6 g You can choose which ...

Страница 51: ...oftware installed on your PC for that model For the Modern user interface you need to install Macromedia Flash Player 8 or greater If you do not have Flash Player 8 or greater you will be prompted so you can download the latest Flash Player The Modern user interface is not supported in Windows XP Professional x64 Edition 7 1 8 2 3 4 5 6 7 1 8 2 3 4 5 6 ...

Страница 52: ...terface Turning the AutoLoad feature off 3 Once you start ControlCenter3 from the Start menu the icon will appear on the tasktray You can open the ControlCenter3 window by double clicking the icon If you do not want ControlCenter3 to run automatically each time you start your PC a Right click the ControlCenter3 icon in the tasktray and choose Preferences The ControlCenter3 preference window appear...

Страница 53: ...d destination folder as needed ControlCenter3 gives you the ability to configure the hardware Scan key on your machine and the ControlCenter3 Software button for each scan feature To configure the hardware Scan key on your machine choose the Device Button tab in the configuration menu for each of the SCAN buttons To configure the Software button in ControlCenter3 choose the Software Button tab in ...

Страница 54: ...om your Brother machine After activating PC FAX option the icon name changes to View Received which when clicked will open an application and display the received faxes Before using the PC FAX Receive option you must select the PC FAX Receive option from the control panel menu of the Brother machine See PC FAX receiving Not available for MFC 240C and MFC 3360C on page 89 Address Book Lets you open...

Страница 55: ...he Device Button tab Image example Microsoft Paint 3 The Scan to Image feature lets you scan an image directly into your graphics application for image editing To change the default settings right click the Image button click ControlCenter Configuration and click the Software Button tab If you want to scan and then crop a portion of a page after pre scanning the document check the Show Scanner Int...

Страница 56: ...the Add button Enter the Application Name up to 30 characters and the Application Location You can also find the application location by clicking the icon Choose File Type from the drop down list You can delete an application that you have added by clicking the Delete button in the Software Button tab Note This function is also available for Scan to E mail and Scan to OCR The window may vary depen...

Страница 57: ...oftware Button tab To change the word processing application choose the destination word processing application from the Target Application drop down list You can add an application to the list by clicking the Add button To delete an application click the Delete button in the Software Button tab If you want to scan and then crop a portion of a page after pre scanning the document check the Show Sc...

Страница 58: ...lCenter3 a default list of compatible E mail applications will appear in the drop down list If you are having trouble using a custom application with ControlCenter3 you should choose an application from the list You can also change the other settings used to create the file attachments If you want to scan and then crop a portion of a page after pre scanning the document check the Show Scanner Inte...

Страница 59: ...ype for the saved image from the File Type drop down list You can save the file to the default folder shown in the Destination Folder or choose your preferred folder by clicking the icon To display where the scanned image is saved when scanning is finished check the Show Folder box To let you specify the destination of the scanned image every time you scan check the Show Save as Window box If you ...

Страница 60: ...iewer editor software You can choose any image editor application on your PC Scan to OCR Converts scanned documents into editable text files You can choose the destination application for the editable text Scan to E mail Attaches the scanned images to an E mail message You can choose any E mail application installed on your PC You can also choose the file attachment type and create a quick send li...

Страница 61: ... configuration window Scan to Image 3 General tab To create the button name enter a name in the Please enter a name for the Custom Button text field up to 30 characters Choose the type of scan from the Scan Action field Settings tab Choose the Target Application File Type Resolution Scan Type Document Size Show Scanner Interface Brightness and Contrast settings ...

Страница 62: ...Please enter a name for the Custom Button text field up to 30 characters Choose the type of scan from the Scan Action field Settings tab Choose the Target Application File Type OCR Software OCR Language Resolution Scan Type Document Size Show Scanner Interface Brightness and Contrast settings ...

Страница 63: ... a name in the Please enter a name for the Custom Button text field up to 30 characters Choose the type of scan from the Scan Action field Settings tab Choose the E mail Application File Type Resolution Scan Type Document Size Show Scanner Interface Brightness and Contrast settings ...

Страница 64: ...le format from the File Type drop down list Save the file to the default folder which is shown in the Destination Folder box or choose your preferred folder by clicking the icon Check Show Folder to show where the scanned image is saved after scanning Check Show Save As Window to specify the destination of the scanned image after every scan Choose the Resolution Scan Type Document Size Show Scanne...

Страница 65: ...PCC PhotoCapture Center 3 The Open PCC Folder button starts Windows Explorer and displays files and folders on the media card Copy From PCC 3 The Copy From PCC button lets you copy files on a media card to a folder on your hard disk To change the destination folder or other settings right click the button click ControlCenter Configuration and choose your preferred settings for file copying ...

Страница 66: ...3 The Copy To Application button lets you open files from a specific application after copying to the folder of that application To change the folder settings right click the button and choose your preferred settings for file copying Setting the Copy Folder 3 Create a new folder based on the PCC files Date or Month The default setting is Date A copy folder is created with a name based on the date ...

Страница 67: ...tton and choosing the ControlCenter Configuration Enter a name in Please enter a name for the Copy Button text field up to 30 characters and choose Copy Ratio Choose the Resolution Scan Type Document Size Show Scanner Interface Brightness and Contrast settings to be used Before finishing the Copy button configuration set the Printer Name and click the Print Options button to display the printer dr...

Страница 68: ...ControlCenter3 62 3 Note You must configure each of the copy buttons before they can be used The Print Options screen will vary depending on the model of printer you have chosen ...

Страница 69: ...ngs Send 3 The Send button lets you scan a document and automatically send the image as a fax from the PC using the Brother PC FAX software See PC FAX sending on page 76 To change the Send settings right click the Send button and click ControlCenter Configuration You can change the Resolution Scan Type Document Size Show Scanner Interface Brightness and Contrast settings ...

Страница 70: ...her machine Before you use the PC FAX Receive function you must select the PC FAX Receive option from the control panel menu of the Brother machine See Running the PC FAX Receiving software on your PC on page 91 To configure the PC FAX Receive software see Setting up your PC on page 91 When the PC FAX receiving software is running you can open the viewer application with the View Received button P...

Страница 71: ...ete contacts from your address book To edit this button click the Address Book button to open the dialog box See Brother Address Book on page 82 Setup 3 By clicking the Setup button you can configure the user settings of the PC FAX application See Setting up user information on page 77 ...

Страница 72: ...you can configure the machine settings or check ink levels Remote Setup Not available for DCP models and MFC 240C 3 The Remote Setup button lets you open the Remote Setup Program window to configure the machine setting menus Note For details see Remote Setup on page 74 ...

Страница 73: ...in the Remote Setup Program You can then easily register or change the Quick Dial numbers from your PC Ink Level 3 The Ink Level button opens the Status Monitor window which displays the ink level for each cartridge User s Guide 3 The User s Guide button lets you view the Software User s Guide and the Network User s Guide in HTML format ...

Страница 74: ...l not be shown on the LCD If your PC is protected by a firewall and is unable to scan you may need to configure the firewall settings to allow communication through port number 137 and 54925 Visit the Brother Solutions Center http solutions brother com for more information Before using Network Scanning 4 Network license 4 This product includes a PC license for up to 2 Users This license supports t...

Страница 75: ...P click the Start button Control Panel Printers and Other Hardware then Scanners and Cameras or Control Panel Scanners and Cameras For Windows 98 Me 2000 click the Start button Control Panel then Scanners and Cameras b Right click the Scanner Device icon and choose Properties The Network Scanner Properties dialog box appears c Click the Network Setting tab and choose the appropriate connection met...

Страница 76: ...C name in the Display Name field The machine s LCD displays the name you enter The default setting is your PC name You can enter any name that you like e If you want to avoid receiving unwanted documents enter a 4 digit PIN number in the Pin number and Retype Pin number field To send data to a PC protected by a PIN number the LCD prompts you to enter the PIN number before the document can be scann...

Страница 77: ...ail application on the designated PC You can scan and send a black and white or color document from the PC as an attachment You can change the Scan configuration See E mail on page 52 a Load your document b Press the Scan key c Press a or b to choose Scan to E mail Press OK d Press a or b to choose the destination PC you want to use for E mailing your document Press OK If the LCD prompts you to en...

Страница 78: ...ss OK e Press Black Start or Color Start The machine starts the scanning process Scan to OCR 4 When you choose Scan to OCR your document will be scanned and sent directly to the PC you designated on your network The ControlCenter3 software will launch the ScanSoft PaperPort SE with OCR software and convert your document into text that can be viewed and edited from a word processing application on ...

Страница 79: ...Press a or b to choose Scan to File Press OK d Press a or b to choose the destination PC you want to send to Press OK If the LCD prompts you to enter a PIN number enter the 4 digit PIN number for the destination PC on the control panel Press OK e Press Black Start or Color Start The machine starts the scanning process Note If you want the scanned data in color choose color in scan type on the Devi...

Страница 80: ...ng the MFC 5460CN or MFC 5860CN with a network connection you will be prompted to enter a password The default password is access For other models or if you are connected using USB no password is required by default OK Lets you start uploading data to the machine and exit the Remote Setup application If an error message is displayed enter the correct data again and then click OK Cancel Lets you ex...

Страница 81: ...roup of settings highlight each setting or function heading for example to choose all fax settings highlight Fax from the setting list then click Export If you are using a different machine to the one that was originally registered to your PC during the installation of MFL Pro Suite see the Quick Setup Guide need to specify the new machine Open the properties of the Remote Setup Program and choose...

Страница 82: ...Address Book Search feature to quickly find members to send to The Brother PC FAX feature lets you use your PC to send a fax from within your Windows application The PC FAX software includes a convenient address book allowing you to quickly find and enter new fax numbers For the latest information and updates on the Brother PC FAX feature visit http solutions brother com Note The PC FAX software c...

Страница 83: ...le style user interface on page 86 a Click the Start button All Programs Brother MFC XXXX where XXXX is your model name PC FAX Sending then PC FAX Setup The Brother PC FAX Setup dialog box appears b Enter this information to create the fax header and cover page c Click OK to save the User Information Note If you are using Windows 2000 and XP you can set up the User Information separately for each ...

Страница 84: ...ter a number to access an outside line here This is sometimes required by local PBX telephone systems for example dialling 9 to get an outside line in your office Include header To add header information to the top of the fax pages check Include header User interface Choose the user interface from two choices Simple style or Facsimile style Simple style 6 Facsimile style 6 ...

Страница 85: ...he sender information you want to add to the cover page From Choose the recipient information you want to add to the cover page Comment Enter the comment you want to add to the cover page Form Choose the cover page format you want to use Cover page title You can put a bitmap file such as your company logo on the cover page Use the browse button to choose the BMP file and then choose the alignment ...

Страница 86: ...address book information Click the Browse button to choose the database file If you choose Outlook or Outlook Express you can use the Outlook or Outlook Express Address Book by clicking the Address Book button in the FAX Sending dialog box Outlook Express Address Book 6 Note To use your Outlook Address Book you must select Microsoft Outlook 2000 2002 or 2003 as your default e mail application If y...

Страница 87: ...simile style user interface You can register a member or group on each of the ten Speed Dial buttons Registering an address in a Speed Dial button 6 a Click the Speed Dial button you want to program b Click the member or group you want to store on the Speed Dial button c Click Add Clearing a Speed Dial button 6 a Click the Speed Dial button you want to clear b Click Clear ...

Страница 88: ...r Address Book dialog box appears Setting up a member in the Address Book 6 In the Brother Address Book dialog box you can add edit and delete members and groups a In the Address Book dialog box click the icon to add a member The Brother Address Book Member Setup dialog box appears b In the Member Setup dialog box enter the member s information Name is a required field Click OK to save the informa...

Страница 89: ...n the Available Names box choose each member to be included in the group and then click Add Members added to the group appear in the Group Members box d After all the members you want have been added click OK Note You can have up to 50 members in a group Editing member information 6 a Choose the member or group you want to edit b Click the edit icon c Change the member or group information d Click...

Страница 90: ...re creating a Vcard you must first choose the member If you choose Vcard in a Save as type will be Vcard vcf a Do one of the following From the Address Book click File Export then Text Click Vcard and go to e b From the Available Items column choose the data fields you want to export and then click Add Note Choose the items in the order you want them listed c If you are exporting to an ASCII file ...

Страница 91: ...then Text Click Vcard and go to e b From the Available Items column choose the data fields you want to import and click Add Note From the Available Items list choose the fields in the same order they are listed in the import text file c Choose Tab or Comma based on the file format you are importing from Divide Character d Click OK to import the data e Enter the name of the file and then click Open...

Страница 92: ...Note If the Simple style user interface appears change the user interface selection setting See Sending setup on page 78 d Enter a fax number using any of the following methods Use the dial pad to enter the number Click any of the 10 Speed Dial buttons Click the Address Book button and then choose a member or group from the Address Book If you make a mistake click Clear to delete all the entries e...

Страница 93: ...application on your PC b Click File then Print The Print dialog box appears c Choose Brother PC FAX as your printer and then click Print The Simple style user interface appears Note If the Facsimile style user interface appears change the user interface selection setting See Sending setup on page 78 d Enter the fax number using any of the following methods Enter the fax number in the To field Clic...

Страница 94: ...ware MFC models only 88 6 e To send a cover page and note check Cover Page On Note You can also click the icon to create or edit a cover page f Click the send icon Note If you want to cancel the fax click the cancel icon ...

Страница 95: ...ity Alert message when you start the PC FAX receiving feature To enable PC FAX receiving you must unblock the program The Brother PC FAX Receive Software lets you view and store faxes on your PC It is automatically installed when you install the MFL Pro Suite and works on locally or network connected machines When enabled your machine will receive faxes in its memory Once it has received the fax i...

Страница 96: ...s a or b to choose USB or your PC name if connected on a network Press OK d Press a or b to choose Backup Print On or Backup Print Off Press OK e Press Stop Exit Note If you select Backup Print On the machine will print the fax so you will have a copy if there is a power failure before it is sent to the PC The fax messages are automatically erased from your machine s memory when they have been suc...

Страница 97: ...ppears b In Save file to click the Browse button if you want to change the path where PC FAX files are saved c In File Format choose tif or max as the received document format The default format is tif d To play wave files wav sound files when receiving a fax check Play wave file when receiving FAX and enter the path of the wave file e To automatically start the PC FAX receiving software when you ...

Страница 98: ...the PC FAX RX Setup dialogue box click the Network Settings button The Network Settings dialog box appears b You must specify the IP address or name of your machine Choose the appropriate connection method Specify your machine by address Enter the IP address of the machine in IP Address Specify your machine by name Enter the machine node name in Node Name or click the Browse button and choose the ...

Страница 99: ... received the icon will change to The icon will change to once the received fax has been viewed a Run PaperPort b Open the Fax Received folder c Double click any new faxes to open and view them Note The name title of your unread PC message will be based on the date and time that the messages were received until you assign a file name For example Fax 2 20 2006 16 40 21 tif ...

Страница 100: ...on instructions a Put a CompactFlash 1 Memory Stick 2 Memory Stick Pro MultiMediaCard SecureDigital or xD Picture Card 3 into your machine 1 This product also supports CompactFlash type1 2 MagicGate Memory Stick and Memory Stick Pro can be used but any music data that is stored on the stick cannot be read 3 This product supports xD Picture Card Type M Type H Large Capacity b In Windows Explorer cl...

Страница 101: ... DO NOT unplug the power cord USB cable or remove a CompactFlash Memory Stick Memory Stick Pro MultiMediaCard SecureDigital or xD Picture Card from the machine while it is reading the card when the PhotoCapture key is flashing You could lose your data or damage the card If you take out the media card while the PhotoCapture key is flashing you must restart your PC at once before putting the same me...

Страница 102: ...ame of the machine You can also access the media card by entering ftp XXX XXX XXX XXX where XXX XXX XXX XXX is the IP address of your Brother machine from your web browser c Click the name of the file you want to see When you take out a media card do the following to prevent damage to the media card 7 a Close the browser b Wait until the PhotoCapture key stops blinking before taking out the media ...

Страница 103: ...Section II Apple Macintosh II Printing and Faxing 98 Scanning 107 ControlCenter2 122 Network Scanning For models with built in network support 138 Remote Setup PhotoCapture Center 143 ...

Страница 104: ... print from your Macintosh while sending or receiving a fax in memory or while scanning a document into the Macintosh Fax sending will not be stopped during Macintosh printing However when the machine is copying or receiving a fax on paper it pauses the Macintosh printing operation and then continues printing when copying or fax receiving has finished Clearing data from the memory 8 If the LCD sho...

Страница 105: ...f you want the latest machine status while the Status Monitor window is open click the update button 1 You can set at what interval the software will update the machine status information Go to the menu bar Brother Status Monitor and choose Preferences Hiding or showing the window After starting the Status Monitor you can hide or show the window To hide the window go to the menu bar Brother Status...

Страница 106: ...MFC XXXX where XXXX is your model name is chosen in the Format for pop up menu You can change the settings for Paper Size Orientation and Scale then click OK b From an application such as Apple TextEdit click File then Print to start printing To do borderless printing 8 From the Paper Size pop up menu choose the size of paper you want to print such as Letter borderless ...

Страница 107: ...l Printing and Mirror Printing settings Note Check Slow Drying Paper when printing with plain paper on which ink dries slowly This setting may cause some slight blurring of text See Resolution in Specifications in the User s Guide Media Type 8 For the best print results choose the print media in the driver The machine changes the way it prints depending on the media type Plain Paper Inkjet Paper B...

Страница 108: ...data transfer time and print time will be longer Fine 1200 1200 dpi Better print quality than Normal mode and faster print speed than Photo Normal 600 600 dpi Good print quality with typical print speed Fast Normal 600 300 dpi Faster print speed than Normal Fast 600 150 dpi The fastest print mode and the lowest amount of ink used Use for printing large volume documents or documents for proofing No...

Страница 109: ...g If you choose Auto Select the machine will take paper from Tray 1 When Tray 1 is empty Auto Select allows the machine take paper from Tray 2 if both trays are using paper that is the same type and size Note You can only use Plain Paper for Media Type and Letter Legal A4 Executive or B5 for Paper Size in Tray 2 Tray 2 does not support Borderless printing ...

Страница 110: ... only 8 You can send a fax directly from a Macintosh application a Create a document in a Macintosh application b Click File then Print The Printer dialog box appears c Choose Send Fax from the pop up menu d Choose Facsimile from the Output pop up menu ...

Страница 111: ...fax number in the Input Fax Number box and then click Print to send the fax Note If you want to send a fax to more than one number click Add after entering the first fax number The destination fax numbers will be listed in the dialog box ...

Страница 112: ...lick Address Book b Drag a vCard from the Mac OS X Address Book application to the Destination Fax Numbers field Note If both work and home fax numbers are stored in the Mac OS X Address Book choose work fax or home fax from the Stored Fax Numbers pop up menu and then drag a vCard c When you are finished addressing your fax click Print Note The vCard used must contain a work fax or home fax number...

Страница 113: ...Library Printers Brother Utilities or from the Model pop up menu of ControlCenter2 Accessing the scanner 9 Run your Macintosh TWAIN compliant application The first time you use the Brother TWAIN driver set it as the default driver by choosing Select Source or the another menu name for choosing the default driver For each document you scan after this choose Acquire Image Data or Start The scanner s...

Страница 114: ...e Scanning Area Document Size Brightness Contrast c Click Start When scanning has finished the image appears in your graphics application Pre Scanning an image 9 The PreScan button is used to preview and also lets you crop any unwanted areas from the image When you are satisfied you are scanning the correct area click the Start button in the Scanner Setup dialog box to scan the image a Load your d...

Страница 115: ...tings in the Scanner window 9 Resolution 9 You can change the scanning resolution from the Resolution pop up menu Higher resolutions take more memory and transfer time but produce a finer scanned image The following table shows the resolutions you can choose and the available colors Resolution Black White Gray Error Diffusion 8 bit color True Gray 24 bit color 100 100 dpi Yes Yes Yes 150 150 dpi Y...

Страница 116: ...earance True Gray Use for photographic images or graphics This mode is more exact because it uses up to 256 shades of gray 8 Bit Color Uses up to 256 colors to scan the image 24 Bit Color Uses up to 16 8 million colors to scan the image Although using 24 Bit Color creates an image with the most accurate color reproduction the image file size will be about three times larger than a file created usi...

Страница 117: ...card face down at the center of the scanner glass Photo 4 6 in Index Card 5 8 in Photo L 89 127 mm Photo 2L 127 178 mm Post Card 1 100 148 mm Post Card 2 148 200 mm Custom User adjustable from 0 35 0 35 in to 8 5 14 in or 8 9 8 9 mm to 215 355 mm After you choose a custom size you can adjust the scanning area Click and hold the mouse button as you drag the mouse to crop the image Width Enter the w...

Страница 118: ...an the document again Note The Brightness setting is only available if you have set Scan Type to Black White Gray or True Gray Contrast You can increase or decrease the contrast level by moving the slide bar to the left or right An increase emphasizes dark and light areas of the image while a decrease reveals more detail in gray areas You can also enter a value in the box to set the Contrast Note ...

Страница 119: ...lCenter2 are installed Scanning by the Scan key follows the configuration on the Device Button tab See SCAN on page 125 For details about how to configure the ControlCenter2 buttons to launch the application of your choice using the Scan key see Using ControlCenter2 on page 122 Scan to E mail 9 You can scan either a black and white or color document into your E mail application as a file attachmen...

Страница 120: ...is text you can have it converted by Presto PageManager to an editable text file and then have the result displayed in your word processing application for viewing and editing You can change the Scan configuration See OCR word processing application on page 127 a Load your document b Press the Scan key c Press a or b to choose Scan to OCR Press OK d Press Black Start or Color Start The machine sta...

Страница 121: ...ack and white and color documents directly to a media card Black and white documents will be stored in the PDF PDF or TIFF file formats TIF Color documents may be stored in PDF PDF or JPEG JPG file formats File names are based on the current date For example the fifth image scanned on July 1 2006 would be named 07010605 PDF You can change the color quality and file name a Put a CompactFlash 1 Memo...

Страница 122: ...g any settings press Black Start or Color Start e Press a or b to choose the quality you want Press OK Do one of the following To change the file type go to f To start scanning without changing any settings press Black Start or Color Start f Press a or b to choose the file type you want Press OK Do one of the following To change the file name go to g To start scanning without changing any settings...

Страница 123: ...or b to choose 1 Quality Press OK e Press a or b to choose B W 200x100 dpi B W 200 dpi Color 150 dpi Color 300 dpi or Color 600 dpi Press OK f Press Stop Exit Changing the default black white file format 9 For MFC 5460CN and 5860CN 9 a Press Menu 4 9 2 b Press a or b to choose TIFF or PDF Press OK c Press Stop Eixt For DCP 130C 9 a Press Menu b Press a or b to choose 2 PhotoCapture Press OK c Pres...

Страница 124: ...b Press a or b to choose PDF or JPEG Press OK c Press Stop Eixt For MFC 130C 9 a Press Menu b Press a or b to choose 2 PhotoCapture Press OK c Press a or b to choose 0 Scan to Card Press OK d Press a or b to choose 3 ColorFile Type Press OK e Press a or b to choose PDF or JPEG Press OK f Press Stop Exit ...

Страница 125: ...ewSoft Presto PageManager 7 User s Guide can be viewed from the Help icon in NewSoft Presto PageManager 7 Features 9 OCR In one step you can scan an image recognize the text and edit it with a word processor Image Editing Enhance crop and rotate images or open them with an image editing program of your choice Annotation Add removable notes stamps and drawings to images Treeview Window View and arr...

Страница 126: ...Address Regus Center Fleethof Stadthausbrucke 3 20355 Hamburg Germany Telephone 49 40 37644530 Fax 49 40 37644500 E mail Address contact newsoft eu com URL http de newsoft eu com Company name SoftBay GmbH Postal Address Carlstrase 50 D 52531 Ubach Palenberg Telephone 49 0 2451 9112647 Fax 49 0 2451 409642 E mail Address newsoft softbay de URL http de newsoft eu com UK Company name Guildsoft Ltd Po...

Страница 127: ... mail Address Newsoft pie ie Italy Company name V I P Postal Address Not Open Telephone 166821700 Fax 532786999 E mail Address supporto gensoftonline com Spain Company name Atlantic Devices Postal Address Caputxins 58 08700 Igualada Telephone 938040702 33 Fax 938054057 E mail Address support atlanticdevices com Other countries E mail Address tech newsoft eu com ...

Страница 128: ...enter2 has the following operations a Scan directly to a file E mail word processor or graphics application of your choice 1 b Custom Scan buttons let you configure a button to meet your own application needs 2 c Access the Copy features available via your Macintosh 3 d Access the settings available to configure your device 4 e You can choose which machine ControlCenter2 will connect with from the...

Страница 129: ...rectly into any graphic viewer editor application You can choose the destination application such as Adobe PhotoShop or any kind of image editing application on your Macintosh OCR Default Apple Text Edit Lets you scan a page or document automatically run the OCR application and put text not a graphic image into a word processing application You can choose the target word processing application suc...

Страница 130: ... printer driver for enhanced copy operations You can scan a page on the machine and print the copies using any of the features of the machine s printer driver or you can direct the copy output to any standard printer driver installed on your Macintosh including network printers PC FAX Lets you scan a page or document and automatically send the image as a fax from the Macintosh Not available for DC...

Страница 131: ...u can configure your machine s Scan key for each ControlCenter2 button in the Device Button tab Image example Apple PreView 10 The Scan to Image feature lets you scan an image directly into your graphics application for image editing To change the default settings click the button while holding down the Ctrl key and choose Software Button ...

Страница 132: ...tion pop up menu You can add an application to the lists by clicking the Add button Enter the Application Name up to 30 characters and choose your preferred application by clicking the Browse button Also choose the File Type from the pop up menu You can delete an application that you have added Just choose the Application Name and click the Delete button Note This function is also available for Sc...

Страница 133: ...CR click the button while holding down the Ctrl key and choose Software Button To change the word processing application choose the destination word processing application from the Target Application pop up menu You can add an application to the list by clicking the Add button To delete an application click the Delete button If you want to scan and then crop a portion of a page after pre scanning ...

Страница 134: ...n 1 When you first start ControlCenter2 a default list of compatible E mail applications will appear in the pop up menu If you are having trouble using a custom application with ControlCenter2 you should choose an application from the list If you want to scan and then crop a portion of a page after pre scanning the document check the Show Scanner Interface box Supported file types 10 You can choos...

Страница 135: ...on while holding down the Ctrl key and choose Software Button Choose the file type for the saved image from the File Type pop up menu You can save the file to the default folder or choose your preferred folder by clicking the Browse button If you want to scan and then crop a portion of a page after pre scanning the document check the Show Scanner Interface box Note For supported file types see Sup...

Страница 136: ... into editable text files You can choose the destination application for the editable text You must install Presto PageManager for this feature Scan to E mail Attaches the scanned images to an E mail message You can choose any E mail application on your Macintosh You can also choose the file attachment type and create a quick send list of E mail addresses chosen from your E mail address book Scan ...

Страница 137: ...me in Name for Custom up to 30 characters to create the button name Choose the type of scan from the Scan Action field Settings tab Choose the Target Application File Type Resolution Scan Type Document Size Show Scanner Interface Brightness and Contrast settings ...

Страница 138: ... Custom up to 30 characters to create the button name Choose the type of scan from the Scan Action field Settings tab Choose the Target Application File Type OCR Software OCR Language Resolution Scan Type Document Size Show Scanner Interface Brightness and Contrast settings ...

Страница 139: ...ame in Name for Custom up to 30 characters to create the button name Choose the type of scan from the Scan Action field Settings tab Choose the E mail Application File Type Resolution Scan Type Document Size Show Scanner Interface Brightness and Contrast settings ...

Страница 140: ...le Type pop up menu Save the file to the default folder or choose your preferred folder by clicking the Browse button Choose the Resolution Scan Type Document Size Show Scanner Interface Brightness and Contrast settings If you want to specify the destination of the scanned image check Show Save As Window If you want to scan and then crop a portion of a page after pre scanning the document check th...

Страница 141: ...py up to 30 characters and choose Copy Ratio Choose the Resolution Scan Type Document Size Show Scanner Interface Brightness and Contrast settings to be used Before finishing the Copy button configuration set the Printer Name Then choose your print settings from the Presets pop up menu then click OK to close the dialog box By clicking the configured copy button the print dialog box opens To copy c...

Страница 142: ...k ink levels by clicking a button Remote Setup Not available for DCP models and MFC 240C 10 The Remote Setup button lets you open the Remote Setup Program window to configure the machine setting menus Note For details see Remote Setup Not available for DCP models and MFC 240C on page 143 ...

Страница 143: ...window in the Remote Setup Program so you can easily register or change the dial numbers on your Macintosh Ink Level 10 The Ink Level button opens the Brother Status Monitor window which displays the ink level for each cartridge Note The Brother Status Monitor application is located in Macintosh HD Library Printers Brother Utilities ...

Страница 144: ...ith a TCP IP address You can set or change the address settings from the control panel See Control Panel Setup in the Network User s Guide Note For network scanning maximum 25 clients can be connected to one machine on a network For example if 30 clients try to connect at a time 5 clients will not be shown on the LCD Before using Network Scanning 11 Configuring network scanning 11 a From Library c...

Страница 145: ... the Ethernet address You can also choose a machine from the list of the machines available Click Browse to show the list c Click OK Note To use Scan To button features on the machine click the check box for Register your computer with the Scan To functions at the machine Then enter the name you want to be displayed on the machine LCD for your Macintosh You can use up to 15 characters You can avoi...

Страница 146: ...sh for addressing to the recipient You can scan a black and white or color document and it will be sent with the E mail from the Macintosh as an attachment You can change the Scan configuration See E mail on page 128 a Load your document b Press the Scan key c Press a or b to choose Scan to E mail Press OK d Press a or b to choose the destination Macintosh you want to use for E mailing your docume...

Страница 147: ...t The machine starts the scanning process Scan to OCR 11 When you choose Scan to OCR your document will be scanned and sent directly to the Macintosh you designated on your network ControlCenter2 will activate the OCR software installed on your Macintosh Presto PageManager and convert your document into text for viewing and editing from a word processing application on the designated Macintosh You...

Страница 148: ... configured in ControlCenter2 on the designated Macintosh You can change the Scan configuration See File on page 129 a Load your document b Press the Scan key c Press a or b to choose Scan to File Press OK d Press a or b to choose the destination Macintosh you want to send to Press OK If the LCD prompts you to enter a Pin number enter the 4 digit Pin number for the destination Macintosh on the con...

Страница 149: ...ities OK Lets you start uploading data to the machine and exit the Remote Setup application If an error message is displayed enter the correct data again and then click OK Cancel Lets you exit the Remote Setup application without uploading data to the machine Apply Lets you upload data to the machine without exiting the Remote Setup application Print Lets you print the chosen items on the machine ...

Страница 150: ...port Each setting you export is saved as a single file If you need to change the machine that was registered to your Macintosh during the installation of MFL Pro Suite see the Quick Setup Guide or if the network environment was changed you need to specify the new machine Open the DeviceSelector and choose the new machine For network users only ...

Страница 151: ...ktop 1 This product also supports CompactFlash type1 2 MagicGate Memory Stick and Memory Stick Pro can be used but any music data that is stored on the stick cannot be read 3 This product supports xD Picture Card Type M Type H Large Capacity Note If you create a name for the volume level of the media card the name appears instead of Removable Disk b Double click the Removable Disk icon The files a...

Страница 152: ...ata or damage the card If you take out the media card while the PhotoCapture key is flashing you must restart your Macintosh at once before putting the same media card back into the machine If you do not restart your Macintosh the data on your media card may be destroyed Note The PhotoCapture Center will only read one card at a time so do not put more than one media card in at a time While the mac...

Страница 153: ...XX XXX XXX where XXX XXX XXX XXX is the IP address of your Brother machine Your browser software appears and a list of file names on your media card is shown c Click the name of the file you want to see When you take out a media card do the following to prevent damage to the media card 12 a Close the browser b Wait until the PhotoCapture key stops blinking before taking out the media card CAUTION ...

Страница 154: ...ng 78 simple style 87 P PaperPort Windows 42 43 exporting 43 importing 43 PhotoCapture Center Macintosh 145 Windows 94 Presto PageManager Macintosh 114 119 Print Macintosh Brother Ink driver 100 Windows Brother printer driver 5 R Remote Setup Macintosh 143 Windows 74 S Scan Macintosh Network 138 OCR 119 Presto PageManager 114 119 Resolution 109 Scan key 113 140 TWAIN compliant 107 Windows Network ...

Страница 155: ...n the World Wide Web http www brother com These machines are made for use in the USA and CANADA only We cannot recommend using them overseas because it may violate the Telecommunications Regulations of that country and the power requirements of your multi function center may not be compatible with the power available in foreign countries Using USA or CANADA models overseas is at your own risk and ...

Отзывы: