


CHAPTER 6 TROUBLESHOOTING
6-29
H
H
o
o
w
w
t
t
o
o
P
P
r
r
i
i
n
n
t
t
C
C
o
o
r
r
r
r
e
e
c
c
t
t
l
l
y
y
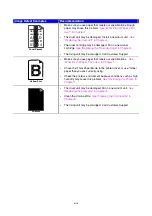
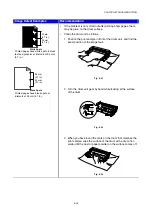
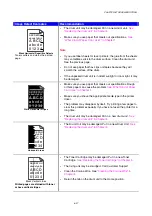
Problem
Recommendation
The printer prints unexpectedly
or it prints garbage.
•
Make sure the printer cable is not too long. We recommend you
use a parallel cable that is less than 2 metres (6 1/2 feet) long.
•
Check if the printer cable is damaged or broken.
•
If you are using an interface-switching device, remove it, and
then connect your computer directly to your printer and try again.
•
Check that you have chosen the appropriate printer driver as ‘Set
as Default’.
•
Check that the printer is not connected to the same port that is
also connected to a storage device or scanner. Remove all other
devices and connect the port to the printer only.
•
Turn off the status monitor in the Device / Options page on the
Advanced tab in the printer driver.
The DL size of envelopes that
have been creased after they
were printed.
•
Put in new DL size envelopes sideways, and print again.
‘Printing Envelopes’ in Chapter 1.
The printer cannot print full
pages of a document. An error
message “PRINT OVERRUN”
occurs.
•
Press the
Go
button to print the data that is left in the printer.
•
If this does not clear the error, reduce the complexity of your
document or reduce the print resolution.
•
Change the following settings in the supplied Windows
®
driver,
and then try again. The best combination of settings below will
vary depending on your document.
•
Graphics
mode
•
TrueType
mode
•
Use Printer TrueType Fonts
The printer cannot print full
pages of a document. A
"MEMORY FULL" error
message occurs.
•
Press the
Go
button to print the data that is left in the printer.
•
Reduce the print resolution or reduce the complexity of your
document.
•
Expand the printer memory by adding a commercially available
DIMM.
Содержание 1870N - HL B/W Laser Printer
Страница 58: ...2 12 Graphics Set the Resolution and so on ...
Страница 61: ...CHAPTER 2 DEIVER AND SOFTWARE 2 15 Layout Set the layout and so on ...
Страница 62: ...2 16 Specific Options Set the Media Type Resolution secure printing and so on ...
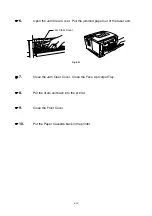
Страница 111: ...4 8 8 Re install the Interface Cover Fig 4 8 9 Plug the power cord into the AC outlet and then turn on the power switch ...
Страница 155: ...6 16 7 Put the drum unit back into the printer 8 Close the Front Cover ...
Страница 189: ...APPENDIX A 19 HP LaserJet 6P ...
Страница 191: ...APPENDIX A 21 HP LaserJet IIP 6P EPSON FX 850 IBM Proprinter XL EPSON FX 850 ...


