BROSA Single Size Upholstered Gaslift Bed Base Скачать руководство пользователя страница 24

We hope you enjoy your new piece of Brosa furniture. Correct 
maintenance will increase its durability and keep it looking beautiful for 
longer. Follow these tips as a guide.

1. Furniture should be assembled according to our Assembly Guides. 
You can find them at support.brosa.com
2. Store furniture in dry, ventilated rooms on tough flooring.
3. Plump cushions with your hands to restore its shape after 
transportation.
4. Keep furniture away from radiators, air conditioners and extreme 
temperatures (at least 30cm distance).
5. Protect your furniture from direct sunlight, which can discolour 
fabric and dry out leather.
6. We recommend dispersing weight evenly across the surface, rather 
than repeatedly lying in the same spot.
7. Don’t jump or apply sudden force to the furniture. This may damage 
the frame or suspension.
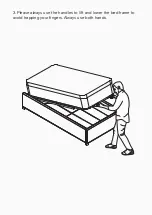
8. When moving furniture from one place to another, lift don’t drag.
9. Take caution with pets around furniture. Their claws and teeth may 
cause damage.
10. Avoid using cleaning products containing harsh chemicals or oil 
dissolving solvents.
11. Vacuum crevices of furniture on a low suction when needed.

Important points

1. Moisture 
Our products are made using wood and other materials that can be 
sensitive to moisture. We recommend keeping furniture in an 
environment with 45-60% relative moisture and at 10-25°C.
2. Sunlight 
After time the fabric colour will change slightly, which is a natural 
effect. To reduce this process, keep furniture out of direct sunlight.
3. Wear and Tear 
Using furniture for a long time will result in slight material changes. 
Leather will develop character and markings, while some fabric folds 
may appear.

User Recommendation 

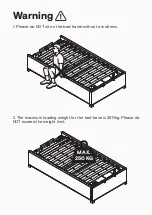
Содержание Single Size Upholstered Gaslift Bed Base

Страница 1: ...Single Size Upholstered Gaslift Bed Base A S S E M B LY G U I D E V1...

Страница 2: ...duct Avoid loose screws Tighten xtures every few months Assembly requires 2 people It s always easier with a friend Contact our support online or call 1300 027 672 Check the assembly guide for require...

Страница 3: ...way Simply visit www brosa com au pages product return and parts request Headboard x 1 Right Sideboard x 1 Hardware A x 2 M8 x 80 40 B x 4 8 C x 2 M8 D x 1 M8 E x 8 M8 x 60 F x 8 M8 G x 1 M8 H x 1 I x...

Страница 4: ...Loosen the pre attached bolts on both sideboards and the footboard using the Allen key I but do not remove them Step 1 I x 1 I I...

Страница 5: ...Hook the brackets to the bolts Screw the bolts with the Allen key I but do not tighten them yet Step 2 I x 1 I I...

Страница 6: ...Adjust and make sure the frame formed in Step 2 is aligned perfectly and then tighten all bolts with the Allen key I Step 3 I x 1 I...

Страница 7: ...Unscrew and remove the nut from the threaded rod of the gas lift arm Keep the removed nut for the following assembly Repeat this for the other side Step 4...

Страница 8: ...Lift the gas lift arm and the gas lift strut so that the threaded rod of the arm can t into the hole of the strut Step 5...

Страница 9: ...Secure the structure formed in Step 5 using the nut removed in Step 4 with the spanner G Repeat the process for the other side Step 6 G x 1 G...

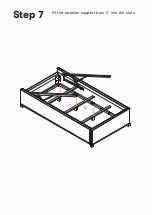
Страница 10: ...Fit the wooden support bars into the slots Step 7...

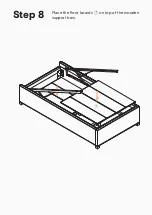
Страница 11: ...Place the oor boards on top of the wooden support bars Step 8...

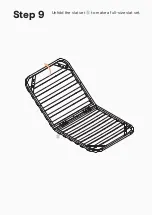
Страница 12: ...Unfold the slat set to make a full size slat set Step 9...

Страница 13: ...acing you Fit a at washer B to a long bolt A Insert the bolt from one side of the middle bars making sure it protrudes from the other side Fit a at washer B and a nut C to the bolt from the other side...

Страница 14: ...it with the holes on the gas lift arms Insert bolts E into corresponding holes on the slat set frame Attach ange nuts F onto the bolts from the other side and x them with the screwdriver H and spanne...

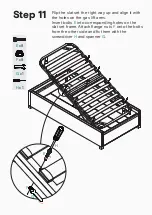
Страница 15: ...Attach both handles to the end of the slat set frame Step 12...

Страница 16: ...With a friend push the slats down It requires a fair amount of strength because there isn t a mattress on the slats to add weight yet Step 13...

Страница 17: ...otated into di erent positions Rotate both rubber blocks to be horizontally longer Repeat this for the other retainer Clip the mattress retainers to proper spots on the front end of the slat set frame...

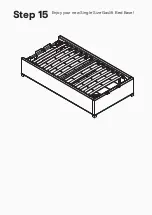
Страница 18: ...Enjoy your new Single Size Gaslift Bed Base Step 15...

Страница 19: ...1 Please do NOT sit on the bed frame without a mattress Warning 2 The maximum loading weight for the bed base is 250kg Please do NOT exceed the weight limit MAX 250 KG...

Страница 20: ...3 Please always use the handles to lift and lower the bed frame to avoid trapping your ngers Always use both hands...

Страница 21: ...4 To make sure that the gas lift mechanism performs properly and can be used for a longer time choose a mattress topper under 70kg 70KG...

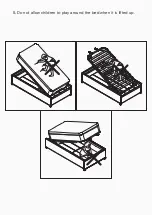
Страница 22: ...5 Do not allow children to play around the bed when it is lifted up...

Страница 23: ...24cm your mattress might go against your bedhead while you lift it up and stop your gas lift mechanism from locking into place 2 Moving your bed base a bit further away will give your high mattress m...

Страница 24: ...p or apply sudden force to the furniture This may damage the frame or suspension 8 When moving furniture from one place to another lift don t drag 9 Take caution with pets around furniture Their claws...

Страница 25: ...ing and protects your oor from scratches 7 Fabric Variation There may be di erences and very slight variations between fabrics The dyeing process means there isn t an absolute guarantee it will match...

Отзывы: