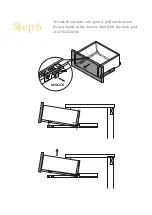
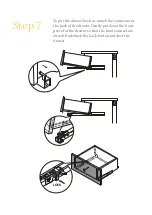
Step 6
UNLOCK
To take the drawer out, open it, pull out the Lock
button inside of the drawer. Gently lift the front part
of of the drawer.
Страница 1: ...ASSEMBLY GUIDE Kaneko Sideboard v1 0...
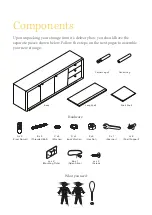
Страница 2: ...ollow the steps on the next pages to assemble your new storage A x 4 Cross Dowel B x 4 Threaded Bolt C x 4 Washer D x 4 Lock Washer E x 4 Hex Nut F x 1 Spanner J x 8 Shelf Support Hardware What you ne...
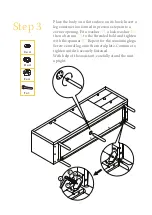
Страница 3: ...ross dowel A into the top hole of the corner leg so that the side marker faces the bolt hole Repeat for all four corner legs Step 2 Screw the threaded bolt B into the corner hole Repeat for all four l...
Страница 4: ...opening Fit a washer C a lock washer D then a hex nut E to the threaded bold and tighten with the spanner F Repeat for the remaining legs Screw central leg onto the metal plate Continue to tighten unt...
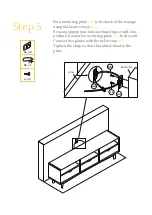
Страница 5: ...e same level Tilt the shelf so it fits into the opening Insert the shelf and rest on the supports While holding the other side higher insert the second pair of supports J into the facing holes Make su...
Страница 6: ...at head screws cc By using appropriate fastener based upon wall com position fix another mounting plate aa to the wall Connect two plates with the nylon srap bb Tighten the strap so that the table is...
Страница 7: ...Step 6 UNLOCK To take the drawer out open it pull out the Lock button inside of the drawer Gently lift the front part of of the drawer...
Страница 8: ...o put the drawer back in attach the connector in the back of the drawer Gently put down the front part of of the drawer so that the front connectors attach Push back the Lock button inside of the draw...
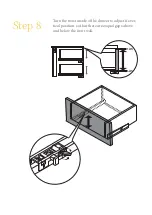
Страница 9: ...Step 8 Turn the twist inside of the drawer to adjust it s ver tical position so that there are exqual gaps above and below the front wall 2 5 2 5...
Страница 10: ...ia slots on mounting plate by slackening and retightening the screws on the mounting plate 9 2 Lateral adjustment by screw adjustent 9 3 Front to Back adjustment by slackening and retightening the hin...
Страница 11: ...flat head screws cc By using appropriate fastener based upon wall com position fix another mounting plate aa to the wall Connect two plates with the nylon srap bb Tighten the strap so that the table i...
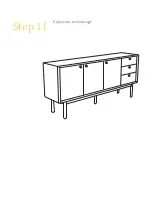
Страница 12: ...Step 11 Enjoy your new storage...