background image

Step 5

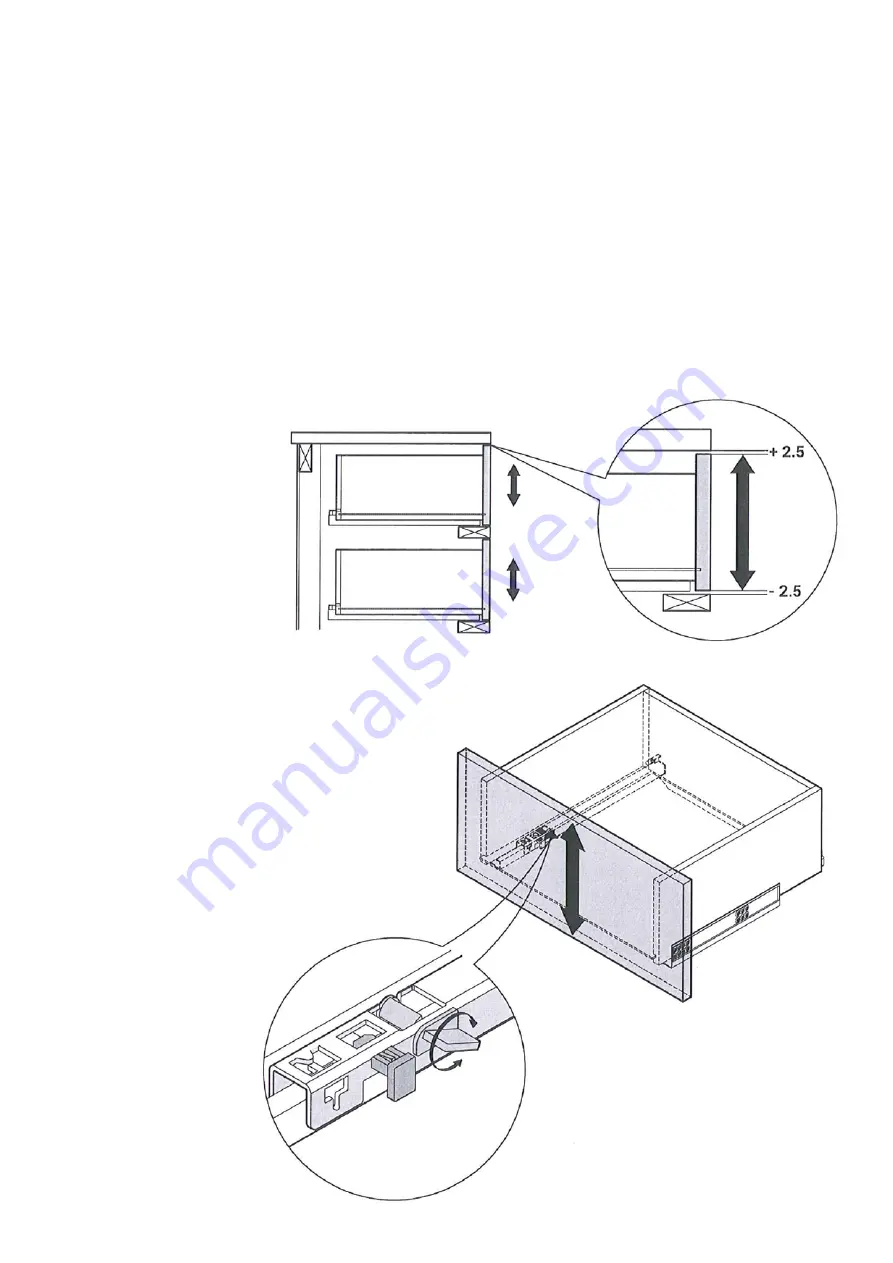
The following steps are to instruct how to vertically 

adjust the drawers if needed.

5.1

 Both of the drawers have (give or take) a 2.5mm gap 

on top and bottom of each drawer.

5.2

 To vertically adjust, twist the third tab inside the 

drawer to move the front panel up or down.

Step 5.1

Step 5.2

Содержание Elizabeth Sideboard

Страница 1: ...ASSEMBLY GUIDE Elizabeth Sideboard v1 0...

Страница 2: ...ow the steps on the next pages to assemble your new sideboard Sideboard x 1 Shelf x 1 Leg x 2 Leg x 1 Leg x 2 Hardware What you need aa x 2 Spec bb x 1 Spec cc x 2 Spec 4 x 17mm D x 4 Spec 8 4 x 2mm E...

Страница 3: ...s dowel A into the hole at the top of each leg 2 3 making sure it sits facing the correct way 1 2 Insert a threaded bolt B into the hole on the side of each leg 2 3 screwing it tightly in place A x 4...

Страница 4: ...g fits into the hole in the frame Fit a flat washer C to the bolt B followed by a lock washer D and a nut E using the spanner F to tighten the nut in place Repeat for the remaining legs 2 3 2 2 Align...

Страница 5: ...nto each desired hole inside the unit making sure that they are all level 3 3 Tilt the shelf 5 to a suitable angle and slide it into the unit first making sure that the holes on the shelves are facing...

Страница 6: ...needed 4 1 Lateral adjustment by screw adjustment 4 2 Front to Back by slackening and retightening the hinge arm mounting screw 4 3 Vertical adjustment via slots on mounting plate by slackening and re...

Страница 7: ...to vertically adjust the drawers if needed 5 1 Both of the drawers have give or take a 2 5mm gap on top and bottom of each drawer 5 2 To vertically adjust twist the third tab inside the drawer to mov...

Страница 8: ...cc 6 2 At the location the sideboard will be placed mark out two holes on the wall for the other bracket aa and using a drill form the holes Warning check the wall for hidden pipes and cables before d...

Отзывы: