background image


                      BRONKHORST CORI-TECH B.V. 

3.3  Zeroing 


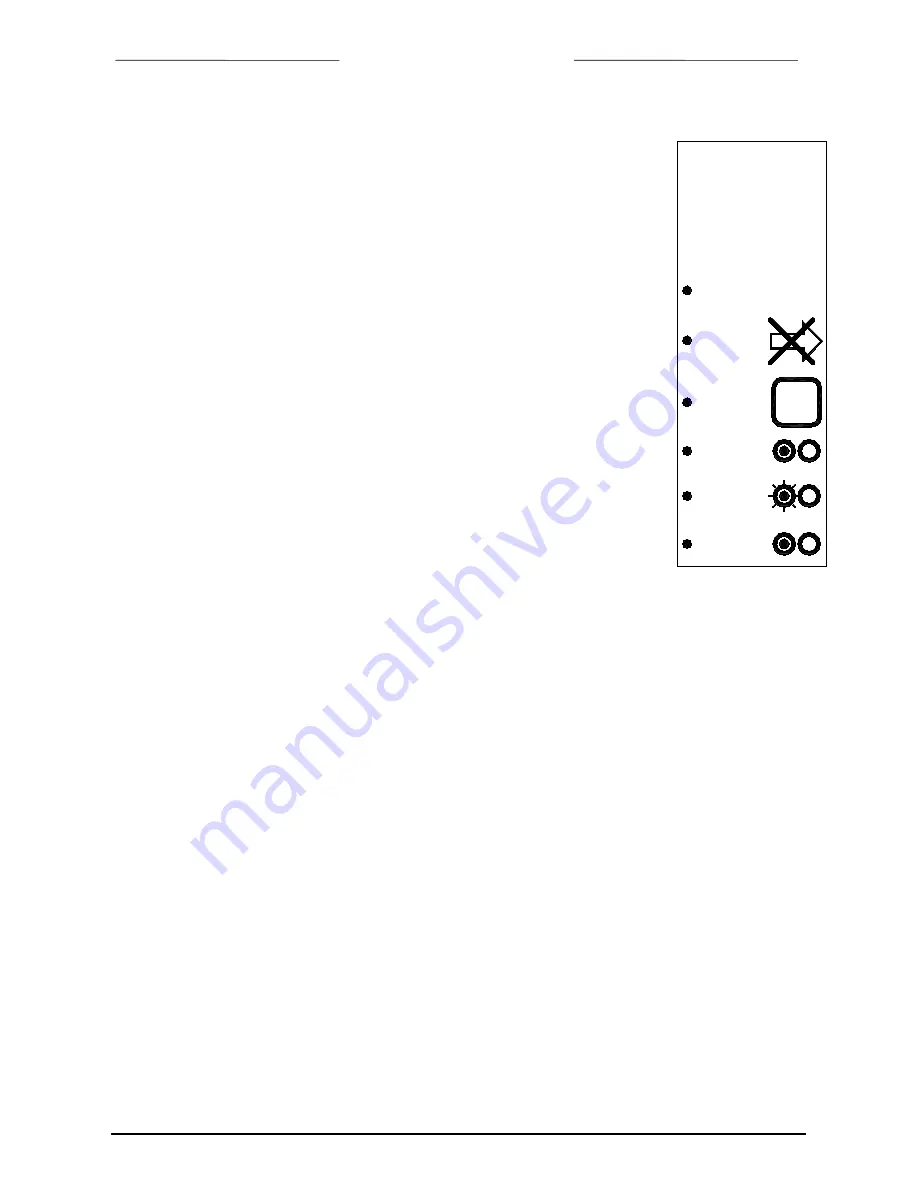
3.3.1  Zeroing with the Micro-switch  

Before using the instrument zeroing is required. 


Set process conditions 

After warm-up, pressure up the system and fill the CORI-FLOW according to


the process conditions 


Stop flow 

Make sure no flow is going through the instrument by closing valves near the 

instrument (for types M52, M53 and M54 two valves (one before and one after) 

the instrument are required).  


Press and hold, Until 

With no flow, use the push-button switch (#) on the right side of the instrument 

to start the zero adjustment procedure. 

Press the push-button (#) and hold it, after a short time the red LED will go ON 

and OFF then the green LED will go ON. At that moment release the push-

button (#). 


Zeroing 

The zeroing procedure will start at that moment and the green LED will blink 

fast. The zeroing procedure waits for a stable signal and saves the zero. If the 

signal is not stable zeroing will take long and the nearest point to zero is 

accepted. The procedure will take approx. 10 sec. 

So make always sure that there is going no flow through the instrument when 

performing the zeroing procedure. 


Ready 

When indication is showing 0% signal and the green indication LED is burning 

continuously again, then zero has been performed well. 


3.3.2  Zeroing through the digital communication 


It is also possible to start the automatic zero adjustment procedure through the FLOW-BUS, using a E-7000 

readout/control unit or a software program on a PC, connected to a FLOW-BUS interface module.  


The following parameters must be used for zeroing an instrument: 


Initreset 

[unsigned char, RW,0...255, DDEpar. = 7, Proces/par. = 0/10]


Cntrlmode 

[unsigned char, RW,0...255, DDEpar. = 12, Proces/par. = 1/4]


CalMode 

[unsigned char, RW,0...255, DDEpar. = 58, Proces/par. = 115/1]


Set process conditions 

Warm-up, pressure up the system and fill the instrument according to the process conditions. 


Stop flow 

Make sure no flow is going through the instrument by closing valves near the instrument. 


Send parameters 

Send the following values to the parameters in this sequence. 

Initreset 64 


Cntrlmode 


Calmode 

255 


Calmode 


Calmode 


Zeroing 

The zeroing procedure will start at that moment and the green LED will blink fast. The zeroing 

procedure waits for a stable signal and saves the zero. If the signal is not stable zeroing will take 

long and the nearest point to zero is accepted. The procedure will take approx. 10 sec. 

So make always sure that there is going no flow through the instrument when performing the zeroing 

procedure. 


Ready 

When indication is showing 0% signal and the green indication LED is burning continuously again, 

then zero has been performed well. Also parameter Cntrlmode goes back to zero. 


As last send 0 to parameter Initreset. 


ATTENTION

Zero instrument 

before use

#

Press and 

hold

Until

Zeroing

Ready

Stop flow

PROCEDURE

Set process conditions

page 18 

9.17.031 


Содержание CORI-FLOW

Страница 1: ... Flow instrument CORI FLOW Doc no 9 17 031I Date 27 01 2015 ATTENTION Please read this instruction manual carefully before installing and operating the instrument Not following the guidelines could result in personal injury and or damage to the equipment ...

Страница 2: ...s Multibus instruments have modular instruction manuals consisting of General instructions CORI FLOW document nr 9 17 031 Operation instructions digital instruments document nr 9 17 023 Fieldbus interface description FLOW BUS Interface document nr 9 17 024 PROFIBUS DP Interface document nr 9 17 025 DeviceNet Interface document nr 9 17 026 RS232 Interface with FLOW BUS protocol document nr 9 17 027...

Страница 3: ...ated properly during this period may be repaired or replaced at no charge Repairs are normally warranteed for one year or the balance of the original warranty whichever is the longer See also paragraph 9 of the Conditions of Sales The warranty includes all initial and latent defects random failures and indeterminable internal causes It excludes failures and damage caused by the customer such as co...

Страница 4: ...uctions of the supplier of the fittings Choose the mounting position according to the directions given in this manual Check the system for leaks before applying fluid pressure Electrical connections must be made with a standard cable or according to the hook up diagram in the back of this manual Short form start up Install instrument in your process Provide instrument with correct pressure s Analo...

Страница 5: ...c compatibility 15 Conditions for compliance with EMC requirements 15 2 15 Electro static discharge 17 3 OPERATION 17 3 1 General 17 3 2 Power and warm up 17 3 3 Zeroing 18 3 3 1 Zeroing with the Micro switch 18 3 3 2 Zeroing through the digital communication 18 3 4 Start up 19 3 5 Operating conditions 19 3 6 Instrument performance 19 3 6 1 Meters 19 3 6 2 Controllers 19 3 7 Manual operation 19 3 ...

Страница 6: ...BRONKHORST CORI TECH B V Appendices 1 Enclosures if applicable 2 Hook up diagram 3 Calibration certificate page 6 9 17 031 ...

Страница 7: ...is a real mass flow meter controller it measures the flow in mass it does not matter what the properties of the gases or liquids are The system can be completed with a control valve and flexible readout unit to measure and control gas and liquid flows It ranges from 20 g h up to 600 kg h at a P of 1 bar however this can be higher if a greater P is allowed depending on the specific type of instrume...

Страница 8: ...a port connector Valves for liquids C2I valve Direct operating valve for liquids open sleeve metal sealed with purge connector C2I valve normally closed F 004AI valve Direct operating valve for gases and liquids bellow F 004AI valve Normally closed C5I valve Direct operating valve for liquids open sleeve metal sealed C5I valve normally closed page 8 9 17 031 ...

Страница 9: ...ow the CORI FLOW measures the mass flow directly The measurement principle is independent of the density temperature viscosity pressure or conductivity The tubes always vibrate at their natural frequency which is a function not only of the tube geometry and the tube material properties but also the mass of the fluid in the vibrating tubes 1 3 Valve principles Control valves are not designed to pro...

Страница 10: ...olenoid operated control valve A special design incorporating a metal bellow allows for a relatively large orifice opening to be controlled The design is suited for low pressure or vacuum applications 1 4 Software for physical properties of gases and liquids Bronkhorst Cori Tech B V gathered the physical properties of over 600 fluids in a database called FLUIDAT Application software such as FLOW C...

Страница 11: ...th the instrument This to enable the factory to take sufficient precautionary measures to safe guard the staff in their repair department Take proper care of packaging If possible use the original packing box Seal instrument in plastic etc Contaminated instruments must be dispatched with a completely filled in declaration on contamination form Contaminated instruments without this declaration will...

Страница 12: ... in any case heavy accelerations or mechanical shocks on the instrument For liquids mount the CORI FLOW at a level in the pipe line system where gas enclosure is not possible and be certain that the CORI FLOW is filled all the time while operating For gases mount the CORI FLOW at a level in the pipe line system where condensate can not collect in the CORI FLOW Verification of leaks is required pri...

Страница 13: ...nnected to de CORI FLOW For best performance please use metal installation supports for the piping or two plastic supports at each side of the CORI FLOW Preferably use only rigid pipes in the system An example is shown in the pictures above Avoid abrupt pipeline reducers and other obstructions in the piping They can cause cavitation or flashing inside the meter tubes Mount reducers outside the rig...

Страница 14: ...Piping BE SURE THAT PIPING IS ABSOLUTELY CLEAN DO NOT install small diameter piping on high flowrates because the inlet jet flow will affect the accuracy DO NOT mount abrupt angles direct on in and outlet especially not with high flowrates We recommend at least 20 pipe diameters distance between the angle and the instrument Special care should be taken in regard to reducers placed just in front of...

Страница 15: ...red a material compatibility chart from a number of sources believed to be reliable However it is a general guide only Operating conditions may substantially change the accuracy of this guide Therefore there is no liability for damages accruing from the use of this guide The customer s application will demand its own specific design or test evaluation for optimum reliability So check if the seals ...

Страница 16: ...ielded wire terminals 1 For FLOW BUS S F TP data patch cable connection to M12 connectors follow the instructions of the supplier It is important to use shielded twisted pair cables and shielded RJ45 modular jack connectors 2 For PROFIBUS DP Modbus or DeviceNet data cable connections follow the instructions of the cable suppliers for the specific field bus system page 16 9 17 031 ...

Страница 17: ...l Operation via analog interface RS232 interface and an optional fieldbus can be performed at the same time A special parameter called control mode indicates to which setpoint the controller should listen analog or digital via fieldbus or RS232 The RS232 interface behaves like a FLOW BUS interface When using more interfaces at the same time reading can be done simultaneously without problems When ...

Страница 18: ...ssible to start the automatic zero adjustment procedure through the FLOW BUS using a E 7000 readout control unit or a software program on a PC connected to a FLOW BUS interface module The following parameters must be used for zeroing an instrument Initreset unsigned char RW 0 255 DDEpar 7 Proces par 0 10 Cntrlmode unsigned char RW 0 255 DDEpar 12 Proces par 1 4 CalMode unsigned char RW 0 255 DDEpa...

Страница 19: ...e control mode is factory set in such a way that after a stepwise change in the flow there will be little overshoot 3 7 Manual operation By means of manual operation of the push button switch some important actions for the instrument can be selected started These options are available in both analog and BUS digital operation modes See also manual operation in document number 9 17 023 These functio...

Страница 20: ...it is possible to connect the instrument to any supported fieldbus system or RS232 interface with special cable for reading changing parameters e g controller response or other fluid selection For FLOW BUS versions of the instruments a readout control module for digital instruments can be temporarily connected to the M12 Connector mA instrument output 0V common power supply instrument output I Sin...

Страница 21: ...e response time for stable control setpoint measure 2 Special software like FlowDDE FlowPlot and FlowView can be used to control these settings For operation of digital instruments by means of a specific fieldbus system or RS232 see following documents available as PDF file for FLOW BUS document number 9 17 024 for PROFIBUS DP document number 9 17 025 for DeviceNet document number 9 17 026 for RS2...

Страница 22: ...f the valve assembly c lift the cover coil assembly d unscrew the flange e lift valve assembly carefully from the base f unscrew set screw for the orifice and subsequently loosen the orifice and the orifice holder g remove the plunger assembly Clean parts and carefully re assemble in reverse order It is recommended to replace the O rings prior to re assembly After having re assembled the control v...

Страница 23: ...ffice or department Note When pressure testing a system incorporating a pilot operated control valve a special procedure must be followed in order to prevent damage to the valve In such cases it is necessary to contact the factory prior to do this 4 4 4 Bellows valve These valves are suited for low pressure or vacuum applications The user should not disassemble this model 4 5 Kv value calculation ...

Страница 24: ...the graph below Φ Φ v 2 v 2 H O customer customer H O r r in which Φv volume flow ρ density If liquids have viscosity s 15 cs water 1 cs the flat orifice and plunger type control mechanism cannot be used For measuring systems only check maximum possible viscosity with factory 4 6 Calibration procedure All instruments are factory calibrated For re calibration or re ranging contact supplier or facto...

Страница 25: ...s documentation software tool CD 6 INTERFACE DESCRIPTION For a description of the available interfaces see document numbers 9 17 024 for FLOW BUS 9 17 025 for PROFIBUS DP 9 17 026 for DeviceNet 9 17 027 for RS232 9 17 035 for Modbus special request These documents are available as PDF on the Multibus documentation software tool CD 9 17 031 page 25 ...

Страница 26: ...aminated 3b clean sensor with a gas or fluid Valve blocked contaminated 3c clean valve Valve internal damage swollen seat in plunger 3d replace plunger assembly and adjust valve or return Incorrect type of gas is used and or pressure diff pressure is to low 3e try instrument on conditions for which it was designed Flow is gradually decreasing Condensation occurs withNH3 hydrocarbons such as C H C ...

Страница 27: ...ial external valves like a Badger Meter valve and pumps with an analog input 4 20mA or 0 10V and still be an integrated controller The CORI FLOW can also be used as a batch controller for filling purposes Please contact the sales department for these special features 9 17 031 page 27 ...

Отзывы: