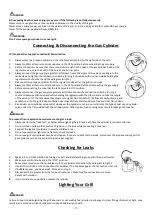
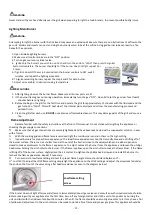
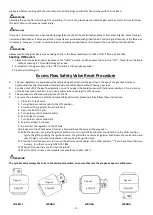
background image

- 19 - 


preheated before cooking with the main burner control settings on HIGH for five minutes with the lid closed. 
 

WARNING


Adjusting the air-shutter while the grill is operating. If it is still hot, please wear protective gear and be careful. Failure to follow 
this instruction could cause personal injury. 


Flare-Ups 

“Flare-ups” sometimes occur when food drippings fall onto the hot heat distribution plate or burners and ignite. Some flaring is 
normal and desirable as it helps impart the unique flavors associated with grilled foods. Controlling the intensity of the flare-ups 
is necessary, however, in order to avoid burned or unevenly cooked foods and to prevent the possibility of accidental fire. 

WARNING


Always monitor the grill closely when cooking and turn the flame level down to LOW or OFF if flare-ups intensify.


Shutting Off Burners 

1.


Always turn the valve knob(s) clockwise to the ‘’HIGH’’ position, and then press and turn it to ‘’OFF’’. Never force the knob 

without pressing it. This could damage the valve. 

2.


Promptly turn the gas supply to the “OFF” position at the propane cylinder. 

    3. Close the lid of the grill.


Excess Flow Safety Valve Reset Procedure 


The new regulators are equipped with a safety device that restricts the gas flow in the event of a gas leak. However, 
unsafe practices of grill operation could activate the safety device without having a gas leak. 


A sudden shut off of the gas flow typically occurs if you open the liquid propane (LP) tank valve rapidly, or if one or more 
of the burner control knobs is in an open position when opening the LP tank valve. 


This procedure is effective with all sizes of LP tank. 


To ensure the procedure is safely and successfully performed, please carefully follow these instructions: 

1.


Close the LP tank valve. 

2.


Turn all burner control knobs to the OFF position. 

3.


Disconnect the regulator from the LP tank. 

4.


Open the lid of the grill. 

5.


Turn burner control knobs to HIGH. 

6.


Wait at least 1 minute. 

7.


Turn burner control knobs OFF. 

8.


Wait for at least 5 minutes. 

9.


Re-connect the regulator to the LP tank. 

10.


Slowly turn the LP tank valve ¼ turn at a time and have the valve all the way open. 

11.


With the lid open: For grill with ignition button: turn on only ONE front burner control knob to the HIGH position. 

Ignite the grill by pushing the ignition button. For grill with an automatic ignition: Push down the control knob you 
want to light, turn counterclockwise until you hear the ignition click. 

12.


After the first front burner is lit, turn on the other control knob(s) to the HIGH position. **If you have more than two 

burners, turn them on only ONE AT A TIME. 

13.


When all front burners are lit, close the grill lid. 

14.


Wait for 10-15 minutes; the temperature should reach 400 – 450°F   

WARNING


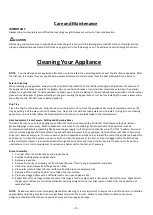
The cylinder valve always has to be in the horizontal position, to ensure that only the propane vapour is withdrawn. 


CORRECT                                    WRONG                                                WRONG                                            WRONG 

Vapour 

Vapour 

Vapour 

Vapour 

Содержание Premium BCP-5001L

Страница 1: ...r Manual BCP 500L BCP 500S BCP 600L BCP 600S BCP 5001L BCP 5001S FOR CUSTOMER SERVICE CALL 1 877 885 8227 TOLL FREE 10 00 A M 7 00 P M EST MONDAY FRIDAY BCP 500L BCP 500S BCP 600L BCP 600S BCP 5001L BCP 5001S ...

Страница 2: ...d grease fire and cover your grill to prevent rust Please refer to the owner s manual for details Always read and understand the WARNINGS and INSTRUCTIONS that are contained in this manual before attempting to use this gas barbecue grill to prevent possible bodily injury or property damage NOTE This grill must be used with propane gas only propane gas hose and cylinder not included Installer Leave...

Страница 3: ...Building BBQ Specifications 12 Installation Method 13 Conversion from LP to NG Grill 14 Operating Your Grill 16 Connecting Disconnecting Gas Cylinder 17 Checking for Leaks 17 Lighting Your Grill 17 Flame Adjustment 18 Excess flow safety valve reset procedure 19 Care and Maintenance 20 Cleaning Your Appliance 20 Troubleshooting 21 Warranty Program 23 BroilChef Premium Accessories 24 ...

Страница 4: ...d and marked in accordance with the specifications for LP gas cylinders of the National Standard of the Transportation of Dangerous Goods Commission of Canada for Cylinders Spheres and Tubes CAN CSA B139 13 This outdoor gas appliance is not intended to be installed in or on recreation vehicles and or boats 14 Do not attempt to move the grill while it is lit 15 Do not use the grill unless it is COM...

Страница 5: ... this grill conforms to the requirements of all local codes or in the absence of applicable local codes with the Canadian Standards Association s Natural Gas and Propane Installation Code CSA B149 1 Always confirm that the outdoor cooking gas grill when installed must be electrically grounded in accordance with local codes or in the absence of local codes with the National Electrical Code ANSI NFP...

Страница 6: ...other components Appliances must be registered within 30 days of purchase to validate this warranty See warranty section for details Model BCP 500S 5 BURNER Grill Dimensions 32 7 16 W x 23 1 2 D x 19 5 8 H BTU Output 15 000 BTU per Burner x4 Infrared Back Burner 12 000 BTU Total BTU 72 000 Primary Ignition Push N Turn Flame Thrower Secondary Ignition N A Cooking Grid Dimensions 30 X 18 Total Cooki...

Страница 7: ...st be registered within 30 days of purchase to validate this warranty See warranty section for details Model BCP 600S 6 BURNER Grill Dimensions 39 3 4 W x 23 3 8 D x 19 3 8 H BTU Output 15 000 BTU per Burner x5 Infrared Back Burner 12 000 BTU Total BTU 87 000 Primary Ignition Push N Turn Flame Thrower Secondary Ignition N A Cooking Grid Dimensions 38 X 18 Total Cooking Area 870sq in includes warmi...

Страница 8: ...st be registered within 30 days of purchase to validate this warranty See warranty section for details Model BCP 5001S Side Burner Dimensions 23 6 W x 18 9 D x 5 3 H BTU Output 12 000 BTU per Burner x2 Infrared Back Burner N A Total BTU 24 000 Primary Ignition Push N Turn Flame Thrower Secondary Ignition N A Flame Tamer Flame Stabilizer Grid Burner Stainless steel Gas Type Each grill contains an N...

Страница 9: ... 9 BBQ SPECIFICATIONS ...

Страница 10: ... BCP 500L 01 07 Knob Lamp BCP 500L 01 22 6 Burner Warming Rack BCP 600L 01 07 5 Burner Control Panel BCP 500L 01 23 Lamp BCP 500L 01 08 6 Burner Control Panel BCP 600L 01 23 5 Burner Body Top BCP 500L 01 09 Logo Plate BCP 500L 01 24 6 Burner Body Top BCP 600L 01 09 Knob Bezel BCP 500L 01 25 Rotis Burner BCP 500L 01 10 Knob BCP 500L 01 26 Ignition Needle Cover BCP 500L 01 11 Knob Lamp Switch BCP 50...

Страница 11: ...he gas line connection is not easily accessible when the appliance is installed support the appliance above counter level and attach the gas line to the appliance When the gas connection is made slide the appliance into the cut out If the gas line connection is accessible when the appliance installed slide the appliance into the cut out and then attach the gas line Be very careful not to kink the ...

Страница 12: ... Cut Out Dimensions MODEL DESCRIPTION WIDTH A DEPTH B HEIGHT C BCP 500L 32 5 Burner 30 3 4 19 3 4 8 1 4 BCP 500S 32 5 Burner 30 3 4 19 3 4 8 1 4 BCP 600L 40 6 Burner 38 19 3 4 8 1 4 BCP 600S 40 6 Burner 38 19 3 4 8 1 4 BCP 5001L Double Burner 11 21 2 1 2 BCP 5001S Double Burner 22 1 4 17 1 4 2 1 2 Note the vents should be within 5 inches of the top and within one inch of the bottom ...

Страница 13: ...g Teflon tape or pipe sealant 2 Use only sealant that is approved for use on LP gas Install the pipe tee assembly to the grill intake pipe 3 Tighten assembly and align the branch opening of the tee with the hole of the cabinet Connect the flexible hose male end to the pipe tee 4 Install and secure the side burner into the island by simply setting it in place 5 Connect the female end of the flexibl...

Страница 14: ...ou must have an authorized service technician perform this procedure If these instructions are not followed exactly a fire or explosion may result causing property damage personal injury or loss of life BroilChef Premium will not be held responsible for an improperly converted gas side burner Before you begin make certain the LP gas source has been disconnected Replacing Side Burner s Orifices BCP...

Страница 15: ... the Propane orifices 6 Replace the Main Burner Orifices with the New Natural Gas Orifices supplied 7 Re install the Main Burners Ensure that each burner is properly placed over the Main Burner orifice 8 Re install the Hair Pins that holds the burners at the back of the grill 9 Re install the Cooking Grids and Upper Flame Tamers Rear Burner 1 Using a 2 Phillips Screwdriver undo the 4 screws that h...

Страница 16: ...es for Transportation of Dangerous Goods and Commission as applicable and b Provided with a listed over filling prevention device c Provided with a cylinder connection device compatible with the connection for outdoor cooking appliances Only the pressure regulator and hose assembly supplied with the outdoor cooking gas appliance must be used Replacement pressure regulators and hose assembly must b...

Страница 17: ...ve See diagram to right Do not obstruct the flow of combustion air and ventilation air to the grill Keep ventilation openings of the cylinder enclosure free and clear from debris 9 Place dust cap on cylinder valve outlet whenever the cylinder is not in use Install only the type of dust cap on cylinder valve outlet that is provided with the cylinder valve Other types of caps or plugs may result in ...

Страница 18: ...tructions at the front of this manual Do not smoke while lighting the appliance or checking the gas supply connections Make sure that all gas connections are securely tightened and have been leak tested with a soapy water solution never with a flame With the cooking grids and flame tamers removed light the main burners and run them on the high setting Inspect burners for proper flame appearance Th...

Страница 19: ...having a gas leak A sudden shut off of the gas flow typically occurs if you open the liquid propane LP tank valve rapidly or if one or more of the burner control knobs is in an open position when opening the LP tank valve This procedure is effective with all sizes of LP tank To ensure the procedure is safely and successfully performed please carefully follow these instructions 1 Close the LP tank ...

Страница 20: ...ith the lid closed This allows any food particles or grease drippings to burn away Brush components to remove any remaining charred materials The appliance must be completely cooled before proceeding Make sure the gas supply is off and all control knobs are in the OFF position You must remove all cooking grids and flame tamers to expose the main burners in the appliance On the bottom rear of each ...

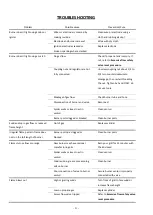
Страница 21: ...e and hose Disconnection of burner and valve Reconnect Spider webs or insect nest in venturi Clean venturi Burner ports clogged or blocked Clean burner ports Sudden drop in gas flow or reduced flame height Out of gas Replace cylinder Irregular flame pattern flame does not run the full length of burner Burner ports are clogged or blocked Clean burner ports Flames turn yellow or orange New burner ma...

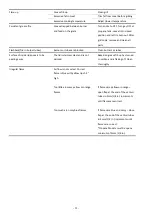
Страница 22: ... or tubes Surface of inside lid appears to be peeling away The lid is stainless steel and is not painted Baked on grease fill up has turned to carbon and is flaking off Clean thoroughly Irregular flame Air flow is not correct Correct flame is blue with yellow tips 1 2 high Too little air wavy yellow or orange flames Too much air noisy blue flames If flames are yellow or orange open flap at the end...

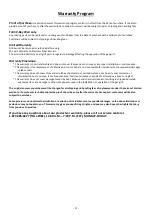
Страница 23: ...labor costs This warranty does not cover chips and scratches of porcelain or painted surfaces nor does it cover corrosion or discoloration due to misuse lack of maintenance hostile environment accidents alterations abuse or neglect This warranty does not cover damage caused by heat abrasive and chemical cleaners resulting in chipped porcelain enamel parts or any damage to other components used in ...

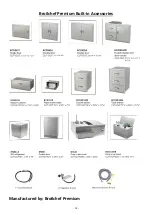
Страница 24: ... 24 Broilchef Premium Built in Accessories Manufactured by Broilchef Premium ...

Отзывы: