Page
3
of
4
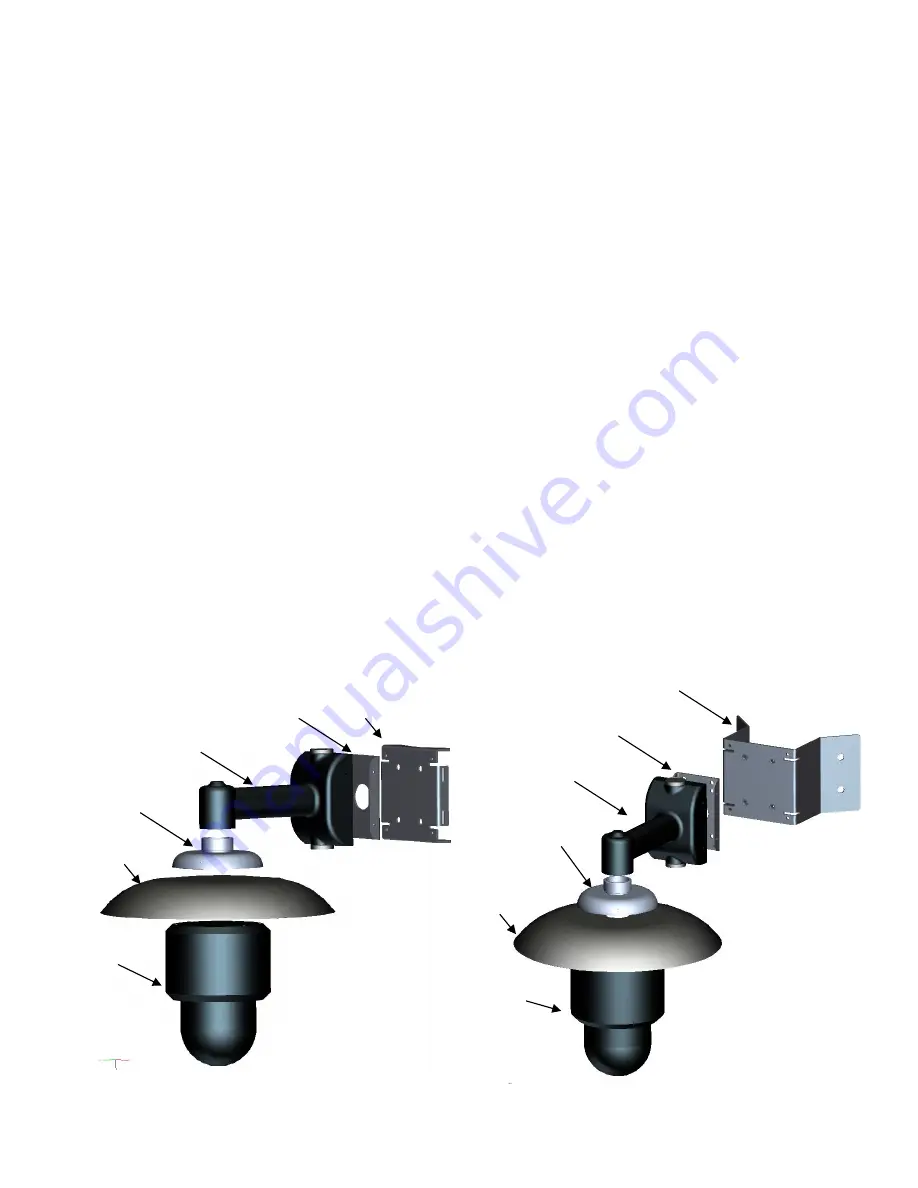
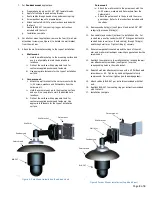
Figure 3 - Pole Mount Installation (Exploded View)
Figure 4 Corner Mount Installation (Exploded View)
7.
For
Pendant mount
applications:
a.
Prepare hanging pipe with 1.25
”
NPT female threads.
b.
Apply Teflon tape to pendant cap threads.
c.
Route cables through pendant cap and mounting ring.
d.
Screw pendant cap onto prepared pipe.
e.
Attach cables to BLK-247 per instructions included with
that unit.
f.
Reattach BLK-247 to mounting ring per instructions
included with that unit.
g.
Installation complete
8.
For all other mount applications: remove the four (4) wall arm
attachment screws (see Figure 4) to detach the wall bracket
from the wall arm.
9.
Attach the wall bracket according to the type of installation:
a.
Wall mount
:
i.
Hold the wall bracket up to the mounting surface and
use it is a template to mark the desired hole
locations.
ii.
Drill out the surface with appropriate tools for
customer-supplied anchors and fasteners.
iii.
Use appropriate fasteners for the type of installation
surface.
b.
Corner mount
:
i.
Attach the wall bracket to the corner mount with the
¼-20 screws, washers and flat washers from the
hardware kit.
ii.
Hold the corner mount up to the mounting surface
and use it is a template to mark the desired hole
locations.
iii.
Drill out the surface with appropriate tools for
customer-supplied anchors and fasteners. Use
appropriate fasteners for the type of installation
surface.
Pole mount:
iv.
Attach the wall bracket to the pole mount with the
¼-20 screws, washers and flat washers from the
hardware kit.
v.
Attach the pole mount to the pole with the worm
gear straps. Refer to the instructions included with
the straps.
10.
Remove conduit plug(s) (see Figure 2) and install 3/4" NPT
cordgrip(s) or conduit fitting(s).
11.
Run cable(s) and conduit (optional) to installation site. For
conduit runs, use flex conduit with 3/4" fittings and attach to
conduit holes in wall arm. Route cable(s) through fitting(s)
and through wall arm. Tighten fitting(s) securely.
12.
Ensure clear gasket is seated around the back of the wall
arm, and wall arm attachment screws have gaskets under the
screw heads.
13.
Reattach the wall arm to the wall bracket by locating the wall
arm attachment screw holes (see Figure 1) over the
corresponding holes in the wall bracket.
14.
Reinstall wall arm attachment screws with a #2 Phillips head
screwdriver or bit. Tighten by hand until gasket is firmly
compressed. Do not over-tighten (could damage gasket).
15.
Attach cables to BLK-247 per instructions included with that
unit.
16.
Reattach BLK-247 to mounting ring per instructions included
with that unit.
17.
Installation complete
Wall Arm
Wall bracket
Pole mount
Pendant cap
Solar shroud
BLK-247
Corner mount
Wall bracket
Wall Arm
Pendant cap
Solar shroud
BLK-247
Содержание BLK-247MKB
Страница 4: ...Page 4 of 4 www broadsightsystems com ...


