background image


KDR Series User Manual 


2

.


Panel Controls and OSD Function 


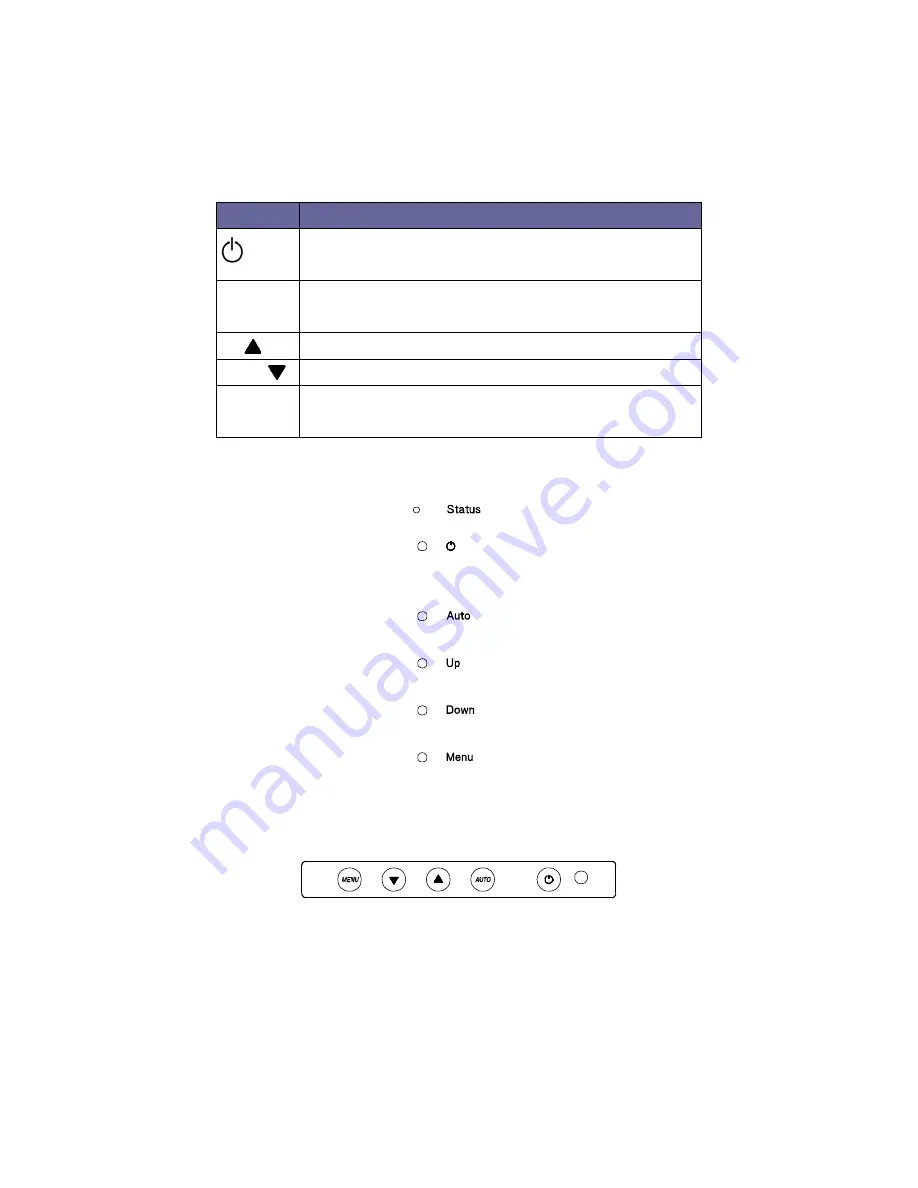
Table 2-1. Panel Controls


Figure 2-1. KDR-11501/ 11701 OSD Control Bar


Figure 2-2. KDR-11901 OSD Control Bar


2.1


Auto Tune 


Press the “auto tune” button. The panel will adjust the display size 

automatically and also tune the panel to its best condition. 

Controls 

Description 


Soft power on/off button. Adjacent LED is lit when 

on. 

Auto 

Auto-synchronize and scale down display to any 

valid factory preset timings. 

Up


Press to scroll the function you want to adjust. 

Down


Press to scroll the function you want to adjust. 

Menu 

To access the main menu. This button also acts as 
the “Enter” button. 

Содержание KDR Series

Страница 1: ...KDR Series Dual Rail LCD Console with Single Port KVM Switch User Manual Rev 1 0 ...

Страница 2: ...short single bracket Flat Screw x 4 For short single bracket Cap Screw x 28 Key x 2 One 1 8M signal cable One power cord One user manual CD One quick installation guide Check to make sure that the unit was not damaged in shipping If you encounter a problem contact your dealer Please read this manual thoroughly and follow the installation and operation procedures carefully to prevent any damage to ...

Страница 3: ...ipment to the power outlet 10 Please keep the power cord such a way that people can not step on it Do not place anything over power cord The power cord must rate for the voltage and current marked on the product s electrical ratings label The voltage and current rating of the cord should be greater than the voltage and the current rating marked on the product 11 All cautions and warning on the equ...

Страница 4: ...KDR Series User Manual III The equipment has dropped and damaged If the equipment has obvious signs or breakage ...

Страница 5: ...on 8 2 1 Auto Tune 8 2 2 Input Source 9 2 3 Brightness 9 2 4 Contrast 10 2 5 Color 10 2 6 Position 11 2 7 Language 12 2 8 Recall 12 2 9 Exit 13 2 10 Power Indicator 13 3 Installation 14 3 1 Install Console into Cabinet 14 3 1 1 Notes 14 3 1 2 Hardware Kits Contents 15 3 1 3 Installation Steps KDR 11501 11701 11901 17 3 2 Installing the Video Card and Video Driver 20 3 2 1 Configuring the Display S...

Страница 6: ...ages with clear definition even at high resolutions The KVM console panels are intelligent microprocessor based and have an ergonomically designed display The KVM console panels employ the latest in active matrix thin film transistor TFT technology providing crisp screen images and wide viewing angles Unlike CRT panels LCD panels are inherently immune to the magnetic fields commonly found on the p...

Страница 7: ...ght Dual Lamps for Back Light Supported Colors 16M Colors 6 bit with FRC Response Time Rising Time 2 ms Decay Time 6 ms Operating System Dos Unix Linux OSX Windows XP 7 8 Server 2012 R2 Connectors PC Port Daisy Chain Connectors 1 x VGA HDDB 15 pin 2 x PS 2 Mini Din 6 pin Power Connector 1 x AC Inlet Signal Cable KC 0303 Keyboard Mouse 106 key PS 2 keyboard with touch pad Sync 45 80 KHz Power Sourc...

Страница 8: ...KDR Series User Manual 3 Figure 1 1 KDR 11501 Dimension ...

Страница 9: ...s for Back Light Supported Colors 16 7M Colors 6 bit with FRC Response Time Rising Time 3 8ms Decay Time 1 2 ms Operating System Dos Unix Linux OSX Windows XP 7 8 Server 2012 R2 Connectors PC Port Daisy Chain Connectors 1 x VGA HDDB 15 pin 2 x PS 2 Mini Din 6 pin Power Connector 1 x AC Inlet Signal Cable KC 0303 Keyboard Mouse 106 key PS 2 keyboard with touch pad Sync 45 80 KHz Power Source 100 24...

Страница 10: ...KDR Series User Manual 5 Figure 1 2 KDR 11701 Dimension ...

Страница 11: ... for Back Light Supported Colors 16 7M Colors 6 bit with FRC Response Time Rising Time 3 6 ms Decay Time 1 4 ms Operating System Dos Unix Linux OSX Windows XP 7 8 Server 2012 R2 Connectors PC Port Daisy Chain Connectors 1 x VGA HDDB 15 pin 2 x PS 2 Mini Din 6 pin Power Connector 1 x AC Inlet Signal Cable KC 0303 Keyboard Mouse 106 key PS 2 keyboard with touch pad Sync 45 80 KHz Power Source 100 24...

Страница 12: ...KDR Series User Manual 7 Figure 1 3 KDR 11901 Dimension ...

Страница 13: ...ill adjust the display size automatically and also tune the panel to its best condition Controls Description Soft power on off button Adjacent LED is lit when on Auto Auto synchronize and scale down display to any valid factory preset timings Up Press to scroll the function you want to adjust Down Press to scroll the function you want to adjust Menu To access the main menu This button also acts as...

Страница 14: ...r and you will see VGA DVI 4 Use the Down and Up button to select the input source of signal 5 Press the menu button to enter 2 3 Brightness 1 Press the menu button 2 Use the Down and Up button to scroll Auto tune Input Source Brightness Contrast Color Position Language Recall Exit 3 Press the menu button to enter 4 Use the Down and Up button to adjust the brightness of the display 5 Press the men...

Страница 15: ...ess Contrast Color Position Language Recall Exit 1 Press the menu button to enter 2 Use the Down and Up button to adjust the contrast of the display 3 Press the menu button to enter 2 5 Color 1 Press the menu button 2 Use the Down and Up button to scroll Auto tune Input Source Brightness Contrast Color Position Language Recall Exit ...

Страница 16: ... to the previous page Table 2 2 Icon Description 4 Use the Down and Up button to adjust the color of the display 5 Press menu to enter 2 6 Position 1 Press the menu button 2 Use the Down and Up button to scroll Auto tune Input Source Brightness Contrast Color Position Language Recall Exit 3 Press the menu button to enter And you will see Icon Description Image Pos To adjust the position of the ima...

Страница 17: ...tune Input Source Brightness Contrast Color Position Language Recall Exit 3 Press the menu button to enter And you will see English German French Italian Spanish 4 Use the Down and Up button to scroll 5 Press the menu button to enter 2 8 Recall 1 Press the menu button 2 Use the Down and Up button to scroll Auto tune Input Source Brightness Contrast Color Position Language Recall ...

Страница 18: ... and you will see Yes No 4 Select Yes button then Menu button to recall the factory setting Select No to return to the previous page 2 9 Exit Press the exit button to quit OSD menu 2 10 Power Indicator GREEN ON RED STANDBY RED SUSPEND RED OFF OSD On Screen Display ...

Страница 19: ... peripherals and computers have been turned off 3 This product required front and rear mounting brackets Pre configure the deep of the rack to find the best rear bracket kits for your usage 4 The standard rear bracket kits are for 420 830 mm KDR 11501 11701 480 895 mm KDR 11901 as below figure contact your dealer if you need more longer rear bracket 5 Reliable grounding of rack mounted equipment s...

Страница 20: ... contents KDR 11501 11701 11901 1 Short Single Bracket x 2 2 Long Assembled Bracket x 2 3 Support Bracket x 2 4 Metal Plate x 2 For short single bracket 5 Copper Ring x 4 For short single bracket 6 Flat Screw x 4 For short single bracket 7 Cap Screw x 28 8 Key x 2 ...

Страница 21: ...01 KDR 11701 KDR 11901 Short single bracket 420 470 mm 480 530 mm Long single bracket none none Long assembled bracket 535 680 mm 595 745 mm Long assembled bracket w support bracket 680 830 mm 745 895 mm Table 3 1 Cabinet support depth ...

Страница 22: ...ear support during installation A Rack Depth 420 470 mm KDR 11501 11701 480 530 mm KDR 11901 1 Release the thumb screw of front bracket both side 2 Install front bracket from each side using cabinet screws 3 Install rear bracket from each side 4 Install rear bracket from each side using cabinet screws ...

Страница 23: ...01 1 Remove the screw of long assemblied bracket and keep screws 2 Combine I to console from each side using cap screw 5 pcs each side 3 Combine I and II from each side 7 pcs each side 4 Release the Thumb Screw of front bracket and Install front bracket from each side using cabinet screws ...

Страница 24: ...riginal screw and Install rear bracket from each side using cabinet screws Please use support bracket to replace III when rack depth is more than 680 mm KDR 11501 11701 745mm KDR 11901 6 Finish Installation as below 7 Attach provided cable and power cord to use ...

Страница 25: ... cases you adjust these settings by using a program or utility provided by the manufacturer of the video card Most video cards use the Windows Display Properties control panel to configure the display To open the Windows Display Properties click the right mouse button in a blank area of the Windows desktop and then select Properties The Settings tab usually lets you change the Color Palette and th...

Страница 26: ...3 Turning on the Console Make sure all cables and the power cord are connected properly Be sure to tighten all connector screws Grab the front handle of the panel Pull the panel all the way out then lift the panel up This will disengage the momentary on off switch and the unit should power on And check on off switch in the front of keyboard plate is on The LED left or underneath of the panel will ...

Страница 27: ...tter suit your video card and your personal preference Refer to Chapter 2 for more information on using the on screen menu to adjust the video display Before you begin make sure that powers to all the devices you will be connecting up have been turned off To prevent damage to your installation due to ground potential difference make sure that all the devices on the installation are properly ground...

Отзывы: