h.
To add additional ISG applications, enter the following commands to disconnect
from the new application, then repeat the previous steps.
localhost - Blue Coat SG-VA Series> Press
Ctrl+]
telnet>
send escape
6 Perform a Graceful Shutdown
a.
Confirm the appliance’s
Console
port is still connected to the serial terminal
and that the terminal software is configured as in
Step 4
.
b.
On the
Menu
screen, press
1
to open the CLI.
c.
To access privileged commands on the host appliance, enter:
localhost#
enable
Enable Password: <host-enable-password>
d.
To close any open ISG applications, enter:
localhost#
configure
localhost(config)#
applications
localhost(config-applications)#
attach-console
<app-name>
localhost - Blue Coat SG-VA Series>
enable
Enable Password: <app-enable-password>
localhost - Blue Coat SG-VA Series>
shutdown
If prompted... “shut down the appliance?” [no,yes]
yes
Wait for... “It is now safe to power off the system.”
localhost - Blue Coat SG-VA Series> Press
Ctrl+]
telnet>
send escape
localhost(config-applications)#
stop
<app-name>
localhost(config-applications)#
exit
localhost(config)#
exit
e.
To power off the host appliance, enter:
localhost#
shutdown
When prompted... “shut down the appliance?” [no,yes]
yes
Warning:
Do not power off the appliance with the soft power switch or by
removing the power cables. Abruptly removing power can result in data loss.
Always use the
shutdown
command to power off the host appliance.
7 Mount the Appliance
The appliance includes a slide-rail kit that allows the appliance to be mounted
in a four- or two-post equipment rack. For complete instructions, refer to the
mounting instructions included with the slide-rail kit.
Caution:
Before mounting the appliance, observe the following cautions.
•
Power off the appliance and disconnect all cables.
•
Verify that the weight of the system does not exceed the rack’s fully
populated weight limit. For more information, refer to the manufacturer’s
instructions included with the rack.
•
For weight stability, load the rack from the bottom up.
•
Read the “Safety Instructions” and “Rack Mounting” warnings in the
Advantech User Manual
, available at:
•
Take adequate safety and grounding measures to avoid creating an
electrical shock hazard and to prevent bodily injury.
•
The appliance is heavy. A two-person lift or mechanical aid is recom-
mended to lift the appliance from the carton and install it in the rack.
•
Do not place objects on the appliance or use it as a work surface. Its
mounting hardware does not support additional weight.
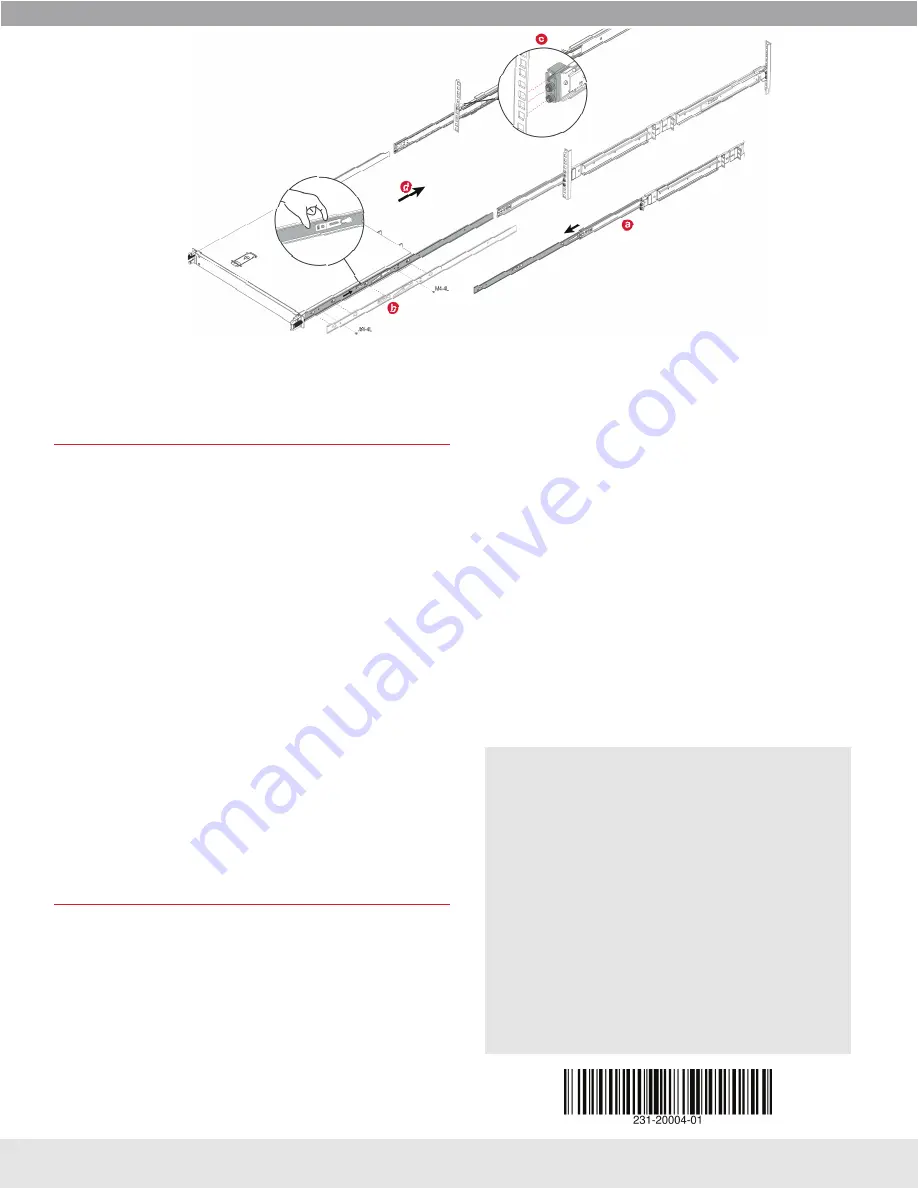
To mount the appliance in a four-post rack:
a.
Disassemble the two slide-rail assemblies by fully extending and removing
each inner rail while pressing the release lever.
b.
Attach each inner rail to the appliance by aligning and inserting the chassis’s
mounting posts into the rail holes, then lift the clip and slide the rail toward
the rear of the chassis until it snaps into place. Secure the rail with two
M4-4L screws.
c.
Attach each outer rail to the front and rear posts in the equipment rack by
aligning and inserting the bracket pins into the rack post holes while lifting
the rail’s lock lever. Release the lock lever to secure the rail.
d.
Insert the appliance into the equipment rack by aligning the chassis rails
(attached to the appliance) with the slide rails in the rack. Gently slide the
appliance all the way into the rack while pressing the release levers.
e.
For more information, refer to the manufacture’s instructions included with
the slide-rail kit.
f.
If applicable, reconnect the cables as in
Step 2—Connect Cables
, and
verify the appliance is functioning as in
Step 3—Power On the Appliance
and Verify LEDs
.
Broadcom reserves the right to make changes without further notice to any products or data herein to improve reliability, function, or design. Information furnished by Broadcom is believed to be accurate and reliable. However, Broadcom
does not assume any liability arising out of the application or use of this information, nor the application or use of any product or circuit described herein, neither does it convey any license under its patent rights nor the rights of others.
Technical Support
•
Go to:
Licenses and Downloads
•
Go to:
•
Click
My Entitlements
.
•
Enter your
Username
and
Password
and click
Sign In
.
•
Enter the
Serial Number
,
Site ID
, or
associated
with the appliance.
•
For software downloads, click the
Downloads
icon.
•
For licenses and appliance management, click the
License
icon.
Documentation
•
For S210 documentation, go to:
•
For ISG documentation, go to
and
enter
Integrated Secure Gateway
in the search field.
Page 2
SSP-S210 Quick Start Guide


