background image

14

15

Checklist


9

Check all connections and verify that child seat is secure. 

*  The child seat is secure when it cannot be moved front-to-

back or side-to-side more than 2.5 cm (1 in.) at the belt path. If 

the child seat is not secure, repeat the installation procedure 

or use a different seating location.


9

Check that any excess tether webbing is contained within 

your vehicle and secured in the elastic strap.

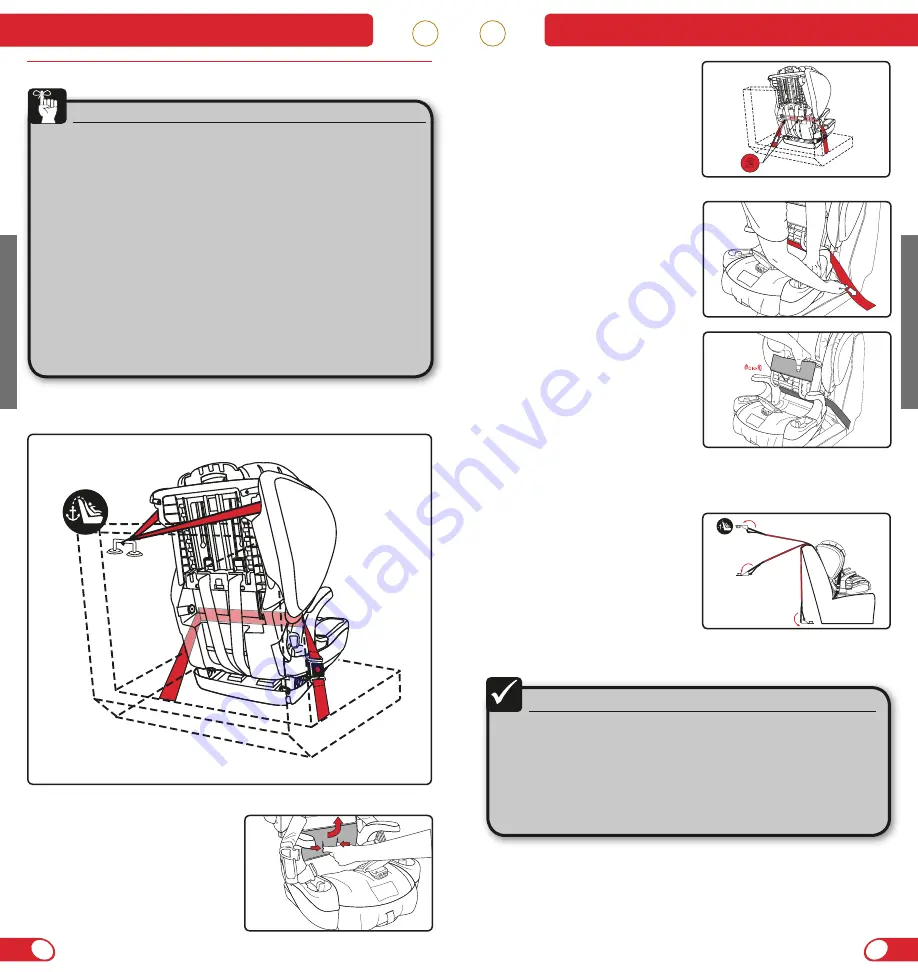
Pull the vehicle belt out and 

route along the green belt 

path. Verify that the belt is not 

twisted and then buckle. 


Lock and remove slack from 

the vehicle belt.

IMPORTANT: 

Only remove 

slack from the vehicle seat belt. 

Overtightening the belt may prevent 

the CLICKTIGHT from properly 

securing. 

Close the CLICKTIGHT. 

*   A click confirms the    

     CLICKTIGHT is secure.


*   The child seat is secure when      

     it cannot be moved front-to-  

     back or side-to-side more than  

     2.5 cm (1 in.) at the belt path.  

     If the child seat is not secure,  

     repeat the installation procedure  

     or use a different seating   

     location. 


Firmly press the tether hook 

over a designated vehicle 

tether anchor. Remove slack.

Secure excess webbing with 

the elastic strap

Lap Belt with CLICKTIGHT

Before you begin:


•  Check that your vehicle has a seat belt that can be locked.

*  Check your vehicle owner’s manual to determine what 

type of vehicle belt you have and how it can be locked 

for use with child seats.

•  Check that your vehicle has a top tether anchor. 

*  The top tether must be used at all times when installing 

the child seat. Using the top tether will improve the 

stability of your child seat and reduce the risk of injury. 

Check your vehicle owner’s manual for tether anchor 

locations.

•  Loosen the tether and place it over the child seat back to 

keep it from becoming pinned between the child seat and 

vehicle seat during installation.

•  Adjust the child seat to desired position and place forward 

facing on the vehicle seat.

Release the buckle and open 

the CLICKTIGHT. 

*   Locate the two slots in the     

     CLICKTIGHT cover.


*   Squeeze the CLICKTIGHT  

     release levers.


2

OR

OR

Installing the Child Seat: Harness Mode

Installing the Child Seat: Harness Mode

Содержание CLICKTIGHT PINNACLE

Страница 1: ...PINNACLE CLICKTIGHT User Guide Guíde d utilisation ...

Страница 2: ......

Страница 3: ...Lap Shoulder Belt with CLICKTIGHT 10 Harness Mode LUAS with CLICKTIGHT 12 Harness Mode Lap Belt with CLICKTIGHT 14 Positioning the Childseat 16 Booster Mode LUAS with CLICKTIGHT 16 Securing Your Child 18 Harness Mode 18 Booster Mode 20 Child Seat Functions 22 Switching Between Modes 29 Harness to Booster Mode Storing the Harness and Buckle 29 Booster to Harness Mode Restoring the Harness and Buckl...

Страница 4: ...33 Impact Absorbing Base 28 27 30 23 25 22 21 19 29 20 26 1 Cover 2 Side Impact Cushion 3 Arm Rest 4 Booster Mode Belt Guide 5 Cup Holder and Storage 6 Harness and Head Restraint Height Adjuster 7 Head Restraint 8 Shoulder Belt Guide 9 Comfort Pads 10 Impact Absorbing Chest Pads 11 Chest Clip 12 User Guide Storage in pocket behind cover 13 Harness Buckle 14 Lower Connector Storage under CLICKTIGHT...

Страница 5: ...65 lbs and whose height is between 76 2 and 147 3 cm 30 and 58 in and are at least 2 years of age Booster mode use only with children who weigh between 18 1 and 54 4 kg 40 and 120 lbs and whose height is between 114 3 and 157 5 cm 45 and 62 in Snugly adjust the belts provided with this child restraint around your child Secure the top tether strap provided with this child seat Secure this child res...

Страница 6: ...m 30 and 58 in in height and WARNING Harness mode use of this child seat is ONLY for children who meet ALL of the following requirements If the child does not meet all harness mode requirements because the child is too small another type of child seat MUST be used If your child does not meet all harness mode requirements because they are too large you may need to use this child seat in booster mod...

Страница 7: ...sition this seat in booster mode See below The vehicle belt fits properly when the lap part sits low across the child s upper thighs b and the shoulder part lies across the center of the child s chest and does not contact the child s neck when routed through the upper belt guide a a b WARNING Install forward facing only DO NOT use anything to raise the child seat off of the vehicle seat Do not ins...

Страница 8: ... more than 2 5 cm 1 in at the belt path If the child seat is not secure repeat the installation procedure or use a different seating location 5 Firmly press the tether hook over a designated vehicle tether anchor Remove slack 6 Secure excess webbing with the elastic strap Before you begin Check that your vehicle has a top tether anchor The top tether must be used at all times when installing the c...

Страница 9: ... seat is not secure repeat the installation procedure or use a different seating location 5 Firmly press the tether hook over a designated vehicle tether anchor Remove slack 6 Secure excess webbing with the elastic strap LUAS with CLICKTIGHT Before you begin Check that your vehicle has lower anchors Use the vehicle belt not lower connectors for harness mode installations with children who weigh mo...

Страница 10: ...procedure or use a different seating location 5 Firmly press the tether hook over a designated vehicle tether anchor Remove slack 6 Secure excess webbing with the elastic strap Lap Belt with CLICKTIGHT Before you begin Check that your vehicle has a seat belt that can be locked Check your vehicle owner s manual to determine what type of vehicle belt you have and how it can be locked for use with ch...

Страница 11: ...straint in booster mode To use this seat in booster mode without lower anchors see instructions for Securing Your Child on page 20 IMPORTANT Use lower anchors only to position this child seat in your vehicle seat Secure your child using the vehicle s lap shoulder belt system Check that your vehicle has lower anchors Check that your vehicle has a top tether anchor Loosen the tether and place it ove...

Страница 12: ...round to tighten Do not pull sideways Checklist Before traveling verify that the 9 9 Harness straps are not twisted 9 9 Harness is snug 9 9 Buckle is fastened 9 9 Chest clip is at the child s armpit level WARNING Never route the vehicle belt over the child when using this child seat in harness mode Adjust the belts provided with this child seat so they fit snugly around your child A snug strap sho...

Страница 13: ...ld seat to the upright position and place forward facing on the vehicle seat if not already installed see page 16 1 Adjust the head restraint so the bottom of the shoulder belt guides are in the closest position at or above the child s shoulders The child s ears should be below the top of the head restraint 3 Fasten the vehicle belt across the child The lap part of the vehicle belt must be routed ...

Страница 14: ...he CLICKTIGHT is secure Harness and Head Restraint Height Adjustment IMPORTANT Make all adjustments for the fit of your child before using the child seat Place the child seat on the floor and have your child sit in the seat Follow the instructions on the following pages to make the proper adjustments to the harness buckle and head restraint 1 Loosen the harness if necessary a Press release lever b...

Страница 15: ...h an audible click after inserting each buckle tongue Fastening the Buckle Releasing the Buckle Press the release button and pull the tongues from the buckle NOTE Periodically clean the buckle to ensure proper operation See Page 44 Using the Chest Clip 1 Squeeze to open 1 Push together to fasten NOTE Always position the chest clip at armpit level Using the Recline IMPORTANT This child seat cannot ...

Страница 16: ...r vehicle owner s manual or contact your vehicle man u fac tur er for assistance DO NOT modify your vehicle without advice from your vehicle manufacturer The top tether must be used at all times when installing the child seat in harness mode Using the top tether will improve the stability of your child seat and reduce the risk of injury Using the Lower Connectors The lower connectors are located u...

Страница 17: ... necessary Figure 1 shows the tether when the child seat is acceptable for continued use provided the child seat has not been involved in a crash The colored stitching will be intact and the webbing will be held under a tether label Figures 2 and 3 show examples of when the child seat is unacceptable for continued use If the tether label is torn or if one or both of the loops have pulled through t...

Страница 18: ...ur child 4 Place the seat cover back in its original position and attach the retaining clips to the seat shell 10 Tuck each harness strap under the side wing covers Fold the harness straps to remove any additional slack before tucking underneath the bib Slide the comfort pads chest pads chest clip and buckle tongues to the top of the harness strap before folding 9 Raise the head restraint to the h...

Страница 19: ...ly pad Harness to Booster Mode Removing the Harness and Buckle 1 Loosen the harness completely a Press release lever b Pull both harness straps forward 2 Unhook the harness straps from the yoke Store the yoke in a secure place in the base 3 Pull the harness straps out of the slots 8 Fasten the harness buckle 7 Fasten the chest clip Push together until a click is heard 9 Pull the adjuster strap to ...

Страница 20: ...CKTIGHT Locate the two slots in the CLICKTIGHT cover Squeeze the CLICKTIGHT release levers 5 Hook the harness straps to the CLICKTIGHT hip anchors Ensure that the harness is attached to the top of the hip anchor 6 Insert the harness straps through the slots in the cover and shell and over the harness adjuster plate to the back of the child seat IMPORTANT Select the slot closest to but not under th...

Страница 21: ...d when retracting NOTE To use a child seat with this type of vehicle belt you will need to switch the retractor for the lap section of the seat belt to the ALR mode Inflatable Lap Shoulder Belt Latch Plate Compatible Vehicle Seat Belts Vehicle seats and seat belts differ from vehicle to vehicle Refer to your vehicle owner s manual for specific information about your vehicle belts and their use wit...

Страница 22: ...kle then another seating position MUST be used WARNING The position of the vehicle belt buckle can adversely affect the stability of the child seat Incompatible Vehicle Seat Belts WARNING The following types of vehicle seat belts are NOT compatible with this child seat If any of the belt types listed below are in the chosen seating position choose another vehicle seating position or check your veh...

Страница 23: ...er from the child seat shell 8 Unhook the elastic band from the hook on the bottom of the CLICKTIGHT then pull the cover from the CLICKTIGHT Care and Maintenance 1 Loosen the harness a Press release lever b Pull both harness straps forward 2 Unbuckle the harness then move the harness adjuster to the highest position Cover Removal WARNING Never remove the buckle tongues from the harness DO NOT remo...

Страница 24: ...the cover using cold water and mild soap LINE DRY to prevent the cover from shrinking DO NOT Bleach Machine wash Machine dry Iron Cleaning the Harness SPONGE CLEAN the harness using warm water and mild soap TOWEL DRY DO NOT Disassemble the harness Bleach Machine wash Machine dry Iron Cleaning the Shell SPONGE CLEAN the shell using warm water and mild soap TOWEL DRY DO NOT use abrasive cleaners Rep...

Страница 25: ...ose the CLICKTIGHT A click confirms the CLICKTIGHT is secure Care and Maintenance 3 Place the seat cover back in its original position and attach the retaining clips to the seat shell Care and Maintenance Buckle Removal 1 Open the CLICKTIGHT Locate the two slots in the CLICKTIGHT cover Squeeze the CLICKTIGHT release levers Cleaning the Buckle If your child eats and drinks while in the child seat y...

Страница 26: ...products or to make substitutions To make a claim under this warranty you must contact BRITAX Consumer Services at 1 888 427 4829 or 1 704 409 1699 or write to us using the address on the back cover of this booklet PLEASE COMPLETE AND MAIL THE OWNER REGISTRATION CARD WITHIN 30 DAYS OF PURCHASE You may also register online at www Britax ca registration WARRANTY LIMITATIONS This warranty does not in...

Страница 27: ...Notes ...

Страница 28: ...vec CLICKTIGHT 58 Mode harnais DUA avec CLICKTIGHT 60 Mode harnais Ceinture sous abdominale avec CLICKTIGHT 62 Positionner le siège pour enfant 64 Mode rehausseur DUA avec CLICKTIGHT 64 Attacher votre enfant 66 Mode harnais 66 Mode rehausseur 68 Fonctions du siège pour enfant 70 Changer de mode 77 Du mode harnais au mode rehausseur Pour ranger le harnais et la boucle 77 Du mode rehausseur au mode ...

Страница 29: ...3 Base d absorption d impact Caractéristiques du siège pour enfant 1 Housse 2 Coussin d impact latéral 3 Coque 4 Accoudoir 5 Guide de ceinture pour mode rehausseur 6 Porte gobelet et rangement 7 Dispositif d ajustement du harnais et de lahauteur de l appui tête 8 Appui tête 9 Guide de la ceinture baudrier 10 Coussinets de confort 11 Coussinets de poitrine pour absorption d impact 12 Attache à la p...

Страница 30: ...tle Mode harnais utiliser avec des enfants qui pésent entre 11 3 kg et 29 4 kg 25 et 65 lb et qui mesurent entre 76 2 et 147 3 cm 30 et 58 po et qui sont d au moins 2 ans Mode rehausseur utiliser avec des enfants qui pésent entre 18 1 kg et 54 4 kg 40 et 120 lb et qui mesurent entre 114 3 et 157 5 cm 45 et 62 po Ajustez bien les sangles fournies avec cet ensemble de retenue pour enfant autour de v...

Страница 31: ...ien bas sur let haut des cuisses de l enfant REMARQUE BRITAX recommande d utiliser le mode rehausseur seulement lorsque l enfant a dépassé le mode harnais Mode rehausseur Conditions pour l ajustement du siège pour enfant Mode harnais MISE EN GARDE L utilisation du mode harnais avec ce siège pour enfant est SEULEMENT pour les enfants qui répondent à TOUTES les conditions suivantes Si l enfant ne co...

Страница 32: ... lorsque la partie sousabdominale repose sur la haut des cuisses de l enfant b et que la partie baudrier repose sur la poitrine de l enfant et n entre pas en contact avec le cou de l enfant lorsqu elle est acheminée au travers du guide de ceinture a Mode rehausseur MISE EN GARDE Installation orienté vers l avant seulement Ne pas utiliser quoi que ce soit pour soulever le siège hors du siège du véh...

Страница 33: ...rière ou de gauche à droite le long du chemin de la ceinture Si le siège pour enfant n est pas bien fixé répétez la procédure ou choisissez un autre emplacement pour l installation 5 Appuyez fermement sur le crochet de la courroie d ancrage au dessus un boulon d ancrage du véhicule et éliminez le jeu 6 Rangez la sangle en excès au moyen de la bande élastique Avant de commencer Vérifiez que votre v...

Страница 34: ... n est pas bien fixé répétez la procédure ou choisissez un autre emplacement pour l installation 5 Appuyez fermement sur le crochet de la courroie d ancrage au dessus un boulon d ancrage du véhicule et éliminez le jeu 6 Rangez la sangle en excès au moyen de la bande élastique DUA avec CLICKTIGHT Avant de commencer Vérifiez que le véhicule possède des barres d ancrage DUA Utilisez la ceinture du vé...

Страница 35: ... autre emplacement pour l installation 5 Appuyez fermement sur le crochet de la courroie d ancrage au dessus un boulon d ancrage du véhicule et éliminez le jeu 6 Rangez la sangle en excès au moyen de la bande élastique Ceinture sous abdominale avec CLICKTIGHT Avant de commencer Vérifiez que votre véhicule possède une ceinture de sécurité qui peut être vérouillée Vérifiez le manuel de l utilisateur...

Страница 36: ...s attaches inférieures seulement pour positionner le siège dans le siège du véhicule Vérifiez que votre véhicule est équipé d ancrages inférieurs Vérifiez que votre véhicule possède un boulon d ancrage supérieur Desserrez la courroie d ancrage et placez le par dessus le siège pour enfant pour l empêcher de se coincer entre le siège et le siège pour enfant lors du positionnement Réglez le siège pou...

Страница 37: ...troitement ajustées Une sangle bien ajustée n a aucun jeu Elle repose en ligne relativement droite sans s affesser Elle n appuie pas sur la peau de l enfant ou le déplace dans une position inconfortable Ajustez le harnais de façon à ce qu il s ajuste aux vêtements que l enfant porte Retirez les manteaux épais et ou vestons avant de placer l enfant dans le siège pour enfant Vérifiez que le siège po...

Страница 38: ...ion verticale et placez le face vers l avant sur le siège du véhicule voir la page 64 1 Ajustez l appuie tête pour que le bas du guide de ceinture baudrier est à la position la plus proche au niveau ou au dessus des épaules de l enfant Les oreilles de l enfant devraient être sous le haut de l appuie tête 3 Attachez la ceinture de sécurité autour de l enfant La partie sous abdominale de la ceinture...

Страница 39: ...e en sécurité du CLICKTIGHT Réglage de la hauteur du harnais et de l appuie tête IMPORTANT Faire tous les ajustements du siège avec l enfant avant d utiliser le siège pour enfant Placez le siège pour enfant sur le plancher et installez votre enfant Suivez les instructions sur les pages suivantes pour effectuer les ajustements du harnais et de l appuie tête 1 Desserrez le harnais a Appuyez sur le l...

Страница 40: ...cle Utiliser l attache à la poitrine 1 Pressez pour ouvrir 1 Poussez ensemble pour attacher REMARQUE Toujours positionner l attache à la poitrine au niveau des aisselles Utilisation de l inclinaison IMPORTANT Ne pas utiliser ce siège pour enfant dans la position incliné lorsqu il est installé en mode rehausseur 1 Tirez la poignée de réglage de l inclinaison et réglez le siège dans la position souh...

Страница 41: ...cant du véhicule pour obtenir de l aide NE PAS modifier votre véhicule sans aide du fabricant La courroie d ancrage du haut doit être toujours utilisée lors de l installation du siège pour enfant en mode harnais L utilisation de la sangle du haut permet d améliorer la stabilité de votre siège d auto et de réduire le risque de blessure MISE EN GARDE Utilisation des attaches inférieures Les attaches...

Страница 42: ... instructions ci dessous Si vous voulez enlever le harnais suivez les instructions à la page 80 Courroie d ancrage pour absorption d impact La courroie d ancrage peut indiquer lorsque le siège pour enfant a subit un accident grave ou modéré et que le remplacement du siège pour enfant est nécéssaire Illustration 1 affiche la courroie lorsque le siège pour enfant peut être utilisé si le siège n a pa...

Страница 43: ... celle sous l enfant 4 Remettez la housse du siège à leur position originale et attachez les étriers restants 7 Remettez la housse du siège à sa position initiale et attachez les étriers 9 Réglez l appuie tête à la position la plus haute 10 Glissez les sangles de harnais sous la housse des supports latéraux Pliez les sangles de harnais de façon à éliminer le jeu avant de les glisser sous la bavett...

Страница 44: ...ominal EZ Buckle Du mode harnais au mode rehausseur Pour enlever le harnais et la boucle 1 Desserrez totalement le harnais a Appuyez sur le levier de déverrouillage b Tirez vers l avant sur les sangles du harnais 2 Décrochez les sangles du harnais de la chape Rangez la chape dans un endroit sûr sous la coque du siège 3 Tirez sur les sangles du harnais pour les sortir des fentes 9 Tirez sur la sang...

Страница 45: ...ement du harnais a l arrière du siège pour enfant 5 Accrochez les sangles du harnais à son ancrage de hanche CLICKTIGHT Assurez vous que le harnais est attaché en haut de l ancrage de hanches Du mode rehausseur au mode harnais Pour remplacer le harnais et la boucle 1 Ouvrez le CLICKTIGHT Trouvez les deux fentes dans la housse du CLICKTIGHT Pressez sur les leviers de déverrouillage du CLICKTIGHT IM...

Страница 46: ...re du véhicule vous devrez changer le rétracteur de la partie sous abdominale de la ceinture de sécurité pour la fonction autobloquante Boucle Ceinture baudrier sous abdominal gonflable Boucle Boucle 2 Rétracteur à blocage d urgence avec boucle auto verrouillante a Possède une patte de la boucle qui ne permet pas à la portion sousabdominale de la ceinture de se désserrer après être bouclé b Le rét...

Страница 47: ...rière reste l endroit le plus sécuritaire pour les enfants de 12 ans et moins Certains véhicules n ont aucun siège adapté pour recevoir un siège pour enfant En cas de doute communiquez avec le fabricant du véhicule pour obtenir de l aide Les sièges du véhicule orientés vers l avant DOIVENT être utilisés avec ce siège pour enfant Les sièges orientés vers l arrière ou sur les côtés ne peuvent PAS êt...

Страница 48: ... siège pour enfant puis retirez la housse du siège 8 Décrochez la bande élastique du crochet en bas du CLICKTIGHT puis tirez sur la housse à partir du CLICKTIGHT Soin et entretien 1 Desserrez totalement le harnais a Appuyez sur le levier de déverrouillage b Tirez vers l avant sur les sangles du harnais 2 Débouclez le harnais puis déplacez le réglage du harnais sur la position la plus haute Retrait...

Страница 49: ...savon doux SÉCHER À PLAT pour empêcher la housse de rétrécir NE PAS Utiliser d eau de javel Laver à la machine Sécher à la machine Repasser Nettoyer le harnais ESSUYER LE HARNAIS À L ÉPONGE à l aide d eau tiède et de savon doux SÉCHER À L AIDE D UNE SERVIETTE NE PAS Désassembler le harnais Utiliser d eau de javel Laver à la machine Sécher à la machine Repasser Nettoyer la coque ESSUYER LA COQUE À ...

Страница 50: ...CKTIGHT Un clic confirme la fermeture en sécurité du CLICKTIGHT 3 Remettez la housse du siège à sa position initiale et attachez les étriers à la coque du siège pour enfant Soin et entretien Retrait de la boucle 1 Ouvrez le CLICKTIGHT Trouvez les deux fentes dans la housse du CLICKTIGHT Pressez sur les leviers de déverrouillage du CLICKTIGHT Nettoyage de la boucle Si votre enfant se nourrit ou boi...

Страница 51: ...u l inabilité d utiliser ce produit LIMITATIONS DES GUARANTIES AUTRES TERMES DE LA GUARANTIE ET LOIS PROVINCIALES Toute guarantie tacite incluant les guaranties de qualité marchande et de bon fonctionnement pour un but particulier seront limités à la durée et les termes de cette guarantie explicite Certaines provinces ne permettent aucune limite sur la durée d une garantie tacite ou l exclusion li...

Страница 52: ...96 Remarques ...

Страница 53: ......

Страница 54: ...8 427 4829 Tel 1 704 409 1699 www Britax ca Britax Child Safety Ltd P O Box 7289 RPO Brunswick Square Saint John NB E2L 4S6 A Britax Childcare Group Limited company Une société de Britax Childcare Group Limited ...

Отзывы: