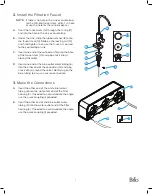
BRIO FUS300R Скачать руководство пользователя страница 8

8

4� 

Install the Battery

A� 

Lift off the top cover (A) of the filter housing and 

remove the transparent cover plate (B).

B� 

Insert the battery (E) into the indicator panel (D). 

The positive side of the battery should be facing 

outward.

C� 

Reassemble the transparent cover plate (B) and 

the top cover (A).

A

B

E

D

5� 

Flush the System

CAUTION: 

Do NOT drink water from your new 

system until you have completed the 

suggested flushing process.

A� 

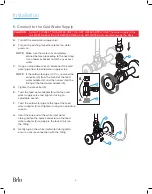
Turn on the filtration faucet first, and then turn on 

the cold water supply valve (3).

B� 

Allow the water to run for 10 minutes.

NOTE: 

Since the filter material contains granular 

activated carbon, it is normal that the water 

is black when dispensing for the first time.

C� 

Turn off the filtration faucet and wait for one hour. 

While waiting, monitor the system for any leaks. 

D� 

Turn on the filtration faucet again and allow the 

water to run for another 10 minutes to completely 

flush the system. 

E� 

Check again for leaks. If there are no leaks, the 

filtration faucet is ready for use.

3

Содержание FUS300R

Страница 1: ...3 Stage Under Sink Filtration System Instruction Manual Model No FUS300R...

Страница 2: ...tion 6 Connect to the Cold Water Supply 6 Install the Filtration Faucet 7 Make the Connections 7 Install the Battery 8 Flush the System 8 Operation 9 Operational Specifications 9 Indicator Panel Descr...

Страница 3: ...unstable install a pressure reducing valve at the water inlet for the product The design life of the product is 5 years Replace the whole unit when the life expires To ensure the health of you and yo...

Страница 4: ...rt Description A Top cover H PE tubing 1 4 in qty 2 B Transparent cover plate I Quick coupling 1 4 in qty 2 C Filter housing J Seal tape D Indicator panel K Feed water adapter E Battery CR2450 L Locki...

Страница 5: ...lation Overview 6 5 4 8 7 G 2 3 1 Part Description Part Description 1 Sediment filter stage 1 6 Inlet water tubing white 2 Carbon block filter stage 2 7 Outlet water tubing blue 3 Post carbon filter s...

Страница 6: ...ter pipe from the cold water supply valve NOTE If the cold water pipe is 1 2 in unscrew the converter 9 from the A end of the feed water adapter K and then screw it on the B end of the feed water adap...

Страница 7: ...nto the base of the faucet stem 10 and pop a lock clip L around the collet D Insert one end of the blue outlet water tubing 6 into the other end of the connector 14 and pop a lock clip L around the co...

Страница 8: ...ested flushing process A Turn on the filtration faucet first and then turn on the cold water supply valve 3 B Allow the water to run for 10 minutes NOTE Since the filter material contains granular act...

Страница 9: ...or Panel Description The indicator panel is used to indicate filter life The red LED 15 on the indicator panel flashes to indicate the filter life has expired If the faucet is turned on while the red...

Страница 10: ...move the filter by rotating counterclockwise 90 and then pulling downwards NOTE Install the new filters in reverse sequence stage 3 ultrafiltration filter stage 2 pre carbon filter and then stage 1 se...

Страница 11: ...y 950 Gallons 3600 Liters Filter Capacity 950 Gallons 3600 Liters Filter Capacity 950 Gallons 3600 Liters Flow Rate 0 5 GPM 2 LPM Flow Rate 0 5 GPM 2 LPM Flow Rate 0 5 GPM 2 LPM Suggested PSI 30 100 P...

Страница 12: ...in the tubing Ensure the tubing is straight The filters are clogged Replace the filters See Replace the Filters on page 10 The water smells or tastes bad The filter life may have expired Replace the f...

Страница 13: ...tine maintenance on the Product as set out in the User s Manual In addition this Limited Warranty does not cover damages to the finish such as scratches dents discoloration or rust after purchase This...

Страница 14: ...2022 Brio Water Technology Inc Contact Us Call 1 844 257 4103...

Отзывы: