background image

13

Clean the Dispenser

CAUTION: 

Before cleaning, make sure the power switch is in the O (off) position and unplug the water dispenser.

IMPORTANT: 

This dispenser contains UV technology that will help keep your dispenser clean. However, if you do 

need to clean your dispenser for any reason, follow these steps:

1 . 

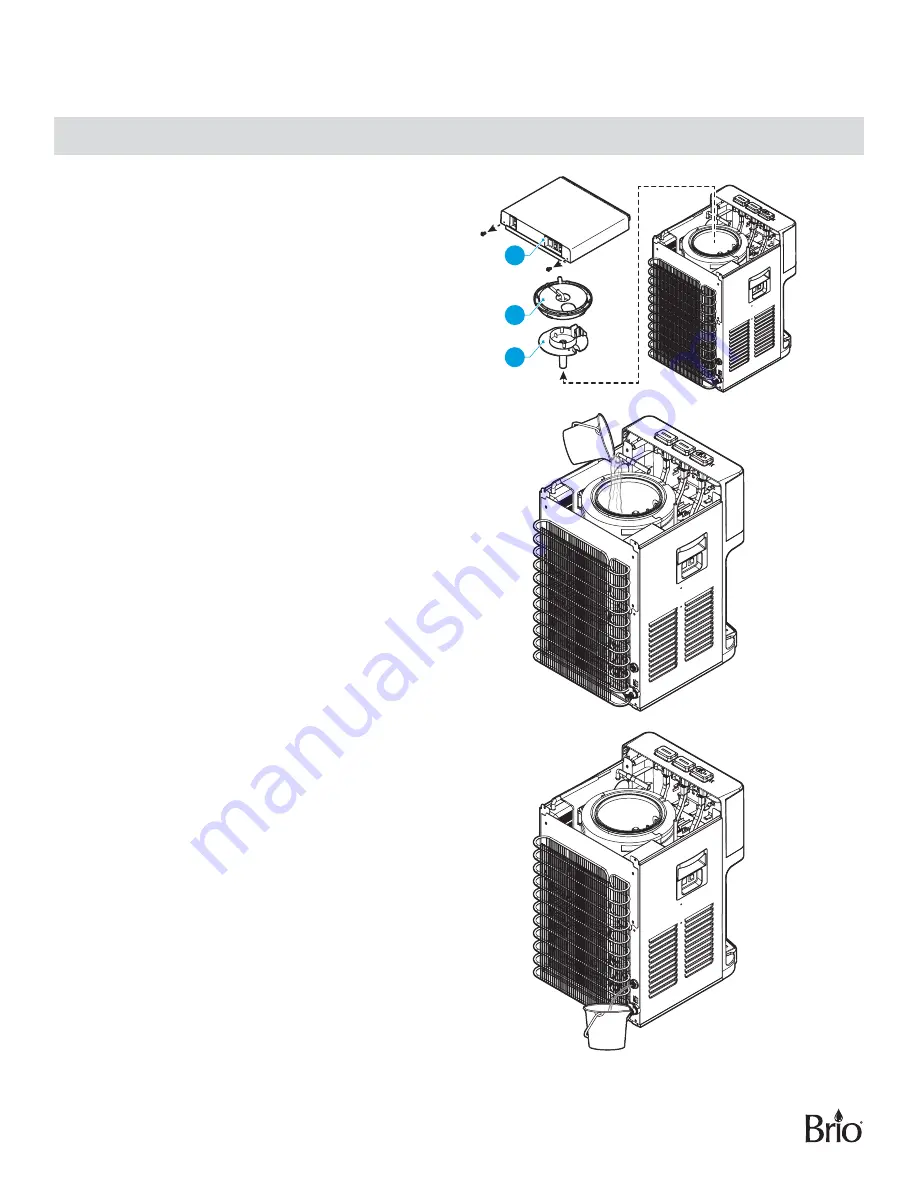
Remove remaining water from reservoirs in 

the dispenser by dispensing from the hot and 

cold taps into a pitcher or bucket.

2 . 

Remove the top cover (1), cold tank cover (2), 

and separator (3).

3 . 

Rinse off the separator (3) in the sink and wipe 

clean with a soft cloth.

3

2

1

4 . 

Create a cleaning solution of 0.3 gallons 

vinegar and 0.3 gallons hot tap water. Allow 

the cleaning solution to fill the reservoir and 

sit for at least 10 minutes.

5 . 

Place a large bucket beneath the drain outlet 

at the back of the dispenser.

6 . 

Remove the drain cover and drain the water.

7 . 

Reinstall the drain cover, separator, cold tank 

cover, and top cover after draining. Ensure 

all water supply connections are connected 

securely.

8 . 

Plug the dispenser back into the outlet and 

turn on.

Содержание CLCTPOU520UVF2

Страница 1: ...Counter Top Point of Use Water Dispenser Setup Manual Model No CLCTPOU520UVF2...

Страница 2: ...the Filters and Tubing 7 Connect to the Cold Water Supply 9 Flush the Filters and Complete the Installation 10 Operation 11 Turn the Dispenser On Off 11 Dispense Cold Water 11 Dispense Hot Water and...

Страница 3: ...otherwise damaged If the supply cord is damaged it must be replaced by the manufacturer its service agent or similarly qualified persons in order to avoid a hazard To protect against electric shock d...

Страница 4: ...nowledge unless they have been given supervision or instruction concerning use of the appliance by a person responsible for their safety Product Features 1 12 13 14 10 11 15 4 5 6 7 8 9 16 17 2 3 Part...

Страница 5: ...e 7 ft 1 C Elbow joint tube 1 D Filter flushing tube 4 ft 1 E Feed water adapter with extra nut 1 F Filter housing 2 G Filter 1 sediment 1 carbon 2 H Mounting bracket 2 I Filter clip 10 J Grounding br...

Страница 6: ...all and permit free airflow between the wall and water dispenser 2 Install the Dispenser WARNING To avoid a hazard due to instability of the appliance it must be secured in place in accordance with th...

Страница 7: ...s and Tubing A Click the two black mounting brackets H onto the top of the condenser H B Attach one filter housing F to the top of a mounting bracket H H F C Connect the filter connecting tube A to th...

Страница 8: ...end of the filter connecting tube A H A F E Connect the shut off valve with tube B to the left filter housing F B F F Connect the filters G into the filter housings F The sediment filter goes on the l...

Страница 9: ...nut is included on top of the feed water adapter E to attach to a 3 8 in or 1 2 in feed plumbing line E D Cut the shut off valve with tube B where indicated using the tubing cutter M E Connect the tw...

Страница 10: ...shut off valve with tube B Allow the water to flow out of the filter flushing tube D and into the sink receptacle D Flush the filters for a minimum of 5 minutes The recommended rate is 1 5 3 gallons...

Страница 11: ...ainst the cold water faucet to dispense cold water 2 Release when your container is full Dispense Hot Water and Activate Child Safety Lock CAUTION This unit dispenses water at temperatures that can ca...

Страница 12: ...l surface The heating tube may be generating a slight noise This is normal There is water leakage If the 3 lights are flashing a leak was detected The pipe is not connected properly Check all water co...

Страница 13: ...t 2 Remove the top cover 1 cold tank cover 2 and separator 3 3 Rinse off the separator 3 in the sink and wipe clean with a soft cloth 3 2 1 4 Create a cleaning solution of 0 3 gallons vinegar and 0 3...

Страница 14: ...ter reset button until the red indicator light turns off Filter Specifications Sediment Filter Carbon Filter Sediment Dirt and Rust Removal Taste and Impurity Removal Filter Capacity 950 Gallons Filte...

Страница 15: ...maintenance on the Product as set out in the User s Manual In addition this Limited Warranty does not cover damages to the finish such as scratches dents discoloration or rust after purchase This Limi...

Страница 16: ...2020 DTWUSA Contact Us Call 1 844 257 4103...

Отзывы: