background image

OPERATING INSTRUCTIONS

READ AND FOLLOW ALL INSTRUCTIONS CAREFULLY BEFORE OPERATING YOUR SOLAR LIGHT.

SAVE THIS MANUAL FOR FUTURE REFERENCE.

3

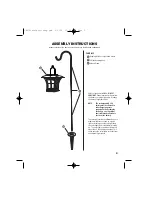
Step 1

To form a hanger for the solar light,
connect the hook section with one or
two stand sections, depending on the
height desired.

Step 2

Locate an area of solid ground where
you can place your solar lights and
insert ground stand. 

Step or press down on ground stand
to aid in driving stand into ground.
Make sure ground stand is inserted
all the way into ground.

NOTE: 

Ground can be softened by
soaking area with water first.

Step 3

Once ground stand is firmly in place,
insert hanging hook into center hole
of ground stand.

Step 4

Hang light fixture from hanging hook.
The photocell light sensor should
point away from other nighttime light
sources. 

Step 5

For optimum performance, it is best
to charge the solar light for a 

FULL,

SUNNY DAY

. The light will turn on

automatically at night. The Ni-Cd
rechargeable battery provides
increased brightness and stays on
longer as it cycles over time (days
and nights of charging and
discharging). The more direct
sunlight that the light receives during
the day, the brighter and longer the
light will stay on at night.

Ground Stand

Hook Section

Hanging Hook

Ground Stand

Stand Sections

Assembly

INSTR-minipost-hang.qxd  1/2/04  11:30 AM  Page 4

Содержание Endura 822-2502-2

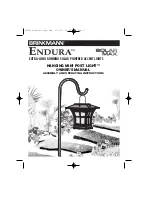
Страница 1: ...HANGING MINI POST LIGHT OWNER S MANUAL ASSEMBLY AND OPERATING INSTRUCTIONS EXTRA LONG RUNNING SOLAR POWERED ACCENT LIGHTS INSTR minipost hang qxd 1 2 04 11 30 AM Page 1...

Страница 2: ...e light turns on automati cally using the electricity stored during that day The number of hours the light will stay on is dependent on your geographical location weather conditions and seasonal light...

Страница 3: ...rechargeable Ni Cd battery must be allowed to fully charge to operate properly Partially charging the battery on a consistent basis will drastically reduce the life of the battery The selected locati...

Страница 4: ...r first Step 3 Once ground stand is firmly in place insert hanging hook into center hole of ground stand Step 4 Hang light fixture from hanging hook The photocell light sensor should point away from o...

Страница 5: ...am is part of our commitment to preserving our environment and conserving our natural resources Changing Battery Step 1 Remove lens from top housing by turning lens clockwise Step 2 With top housing u...

Страница 6: ...to hold a charge For best performance do not store for prolonged periods Storage Tips If your solar light does not turn on at night it may be caused by one the following conditions Battery is not ful...

Страница 7: ...r is reacting to the other light source Eliminate the other light source or relocate your solar lights Dirty solar panel A dirty solar panel will not allow the battery to fully charge This will shorte...

Страница 8: ...light under the terms of this warranty please call Customer Service Department at 1 800 527 0717 for a Return Authorization Number and further instructions A receipt or proof of purchase will be requ...

Отзывы: