background image

BURNER ASSEMBLY/MAINTENANCE

Keep appliance area clear and free from combustible materials, gasoline and other flammable vapors
and liquids.

Although your burner is constructed of cast iron, it may rust as a result of the extreme heat and
acids from cooking foods. Regularly inspect the burner for cracks, abnormal holes, and other signs
of corrosion damage. If found, replace the burner. 

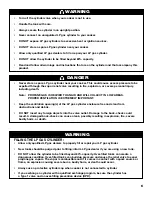
WARNING: DO NOT obstruct the flow of combustion and ventilation air.

Burner tube can become

blocked by spiders and other insects building their nests. A blocked burner tube can
prevent gas flow to the burner and could possibly result in a burner tube fire. To clean
the Burner Assembly follow these instructions to clean and/or replace parts of burner
assembly or if you have trouble igniting the cooker.

1.  Turn gas off at regulator control knob and LP cylinder valve.
2.  Disconnect hose regulator from burner assembly.
3. Use a narrow bottle brush or a stiff wire bent into a small hook to run through the burner tube.

Note: Wear eye protection when cleaning burner.

4. Check each port to make sure air comes out each hole. 
5. Wire brush entire outer surface of burner to remove food residue and dirt.
6. If burner is damaged, obtain a replacement burner.
7. Reinstall burner, heat shield and retaining nut on

support strap inside burner stand.

CLEANING & GENERAL MAINTENANCE

Check and tighten any loose hardware before
each use.

Clean appliance with mild dishwashing detergent,
hot water and sponge. A soft bristle brush can
also be used.

Inspect entire appliance including hose & regulator
and replace any damaged or worn parts. Use only
parts specified by The Brinkmann Corporation.

13

Spider Webs

WARNING:

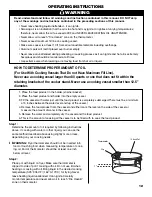
When using 10 quart pot & basket,

always hang basket directly over pan on the hang
tab. This allows hot liquid to drain back into the pan.
Hanging the basket in any other way could cause
the pan to tip over, spilling hot liquid. 10 quart pot &
basket and stock pot with strainer basket are NOT
to be used for frying turkeys.

Step 3:

Cook food to desired doneness. Carefully lift strainer
basket up to allow liquid to drain back into pot (use
hang tab for pan and basket). Carefully remove food.
Allow liquid to cool to 115°F (45°C) or below before
moving cooking vessel.

Step 4:

Always turn propane cylinder valve off first, then turn
the regulator control knob off. Allow fryer and oil to
cool completely. Never attempt to drain liquid or move
pot until liquid has cooled below 115°F (45°C) -
severe burns could result.

Stock Pot & Strainer Basket

(sold separately)

Not for frying turkeys

Pot & Basket Set

Not for frying turkeys

Содержание 4010 series

Страница 1: ...LEAVE THESE INSTRUCTIONS WITH THE OWNER FOR FUTURE REFERENCE NOTE Pre attached metal plate on product with safety warnings Do not remove this plate AVISO PARA EL INSTALADOR ENTREGUE ESTAS INSTRUCCIONES AL PROPIETARIO PARA REFERENCIA FUTURA KEEP THIS MANUAL FOR FUTURE REFERENCE CONSERVE ESTE MANUAL PARA FUTURAS REFERENCIAS Este manual de instrucciones contiene importante información necesaria para ...

Страница 2: ... an oil grease fire with water Failure to follow these instructions could result in fire explosion or burn hazard which could cause property damage personal injury or death DANGER IF YOU SMELL GAS 1 Shut off gas to the appliance at the LP cylinder 2 Extinguish any open flame 3 If odor continues keep away from the appliance and immediately call your Fire Department Failure to follow these instructi...

Страница 3: ...ous injury WARNING Be alert to the possibility of serious bodily injury if the instructions are not followed Be sure to read and carefully follow all of the messages CAUTION Indicates a potentially hazardous situation which if not avoided may result in minor or moderate injury CALIFORNIA PROPOSITION 65 WARNING This product contains chemicals including lead in the brass of certain component parts t...

Страница 4: ...r 072 0005 0 This thermometer can be obtained by contacting The Brinkmann Corporation at 1 800 527 0717 Test the thermometer before each use by inserting it into a cooking vessel of boiling water and ensure that it registers approximately 212 F 20 F 100 C 10 C If the thermometer does not function properly a replacement thermometer must be obtained before using this cooker This thermometer can be o...

Страница 5: ...perate this cooker with a gas leak Do not store or use gasoline or other liquid aerosols with flammable vapors in the vicinity of this cooker Storage of this appliance indoors is permissible only if the cylinder is disconnected and removed from the appliance and left outdoors Cylinders must be stored outdoors out of the reach of children and must not be stored in a building garage or any other enc...

Страница 6: ...cable with a listed over filling prevention device OPD INSTALLATION INFORMATION The installation of this appliance must be in accordance with All applicable local codes or in the absence of local codes either National Fuel Gas Code ANSI Z223 1 NFPA 54 Storage and Handling of Liquefied Petroleum Gases ANSI NFPA 58 Natural Gas and Propane Installation Code CSA B149 1 To check your local codes see yo...

Страница 7: ...on opening s of the LP gas cylinder enclosure free and clear from obstructions and debris DO NOT insert any foreign objects into the valve outlet Damage to the back check could result A damaged back check can cause a leak possibly resulting in explosion fire severe bodily harm or death WARNING DANGER WARNING FILLING THE LP GAS CYLINDER Allow only qualified LP gas dealers to properly fill or repair...

Страница 8: ...r use your cooker without leak testing all gas connections and hoses See the section on Leak Testing in this manual for proper procedures The pressure regulator and hose assembly supplied with your gas cooker is designed to work with an LP gas supply cylinder DO NOT attempt to connect it to any other fuel supply source such as a natural gas line DO NOT use any other pressure regulator hose assembl...

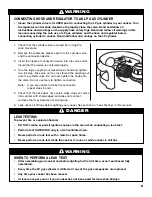
Страница 9: ...ng nut onto the cylinder valve Do not over tighten the knob onto the valve Do not use tools to tighten connection Note If you are unable to make the connection repeat steps 3 and 4 5 Check that the hose does not contain kinks does not come into contact with sharp edges and does not contact surfaces that may become hot during use 6 Leak check all fittings before lighting your cooker See section on ...

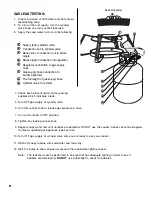
Страница 10: ...n hose 7 Turn control knob to OFF position 8 Tighten any leaking connections 9 Repeat soapy water test until no leaks are detected DO NOT use the cooker if leaks cannot be stopped Contact a qualified gas appliance repair service 10 Turn OFF gas supply at cylinder valve until you are ready to use your cooker 11 Wash off soapy residue with cold water and towel dry 12 Wait 5 minutes to allow all gas ...

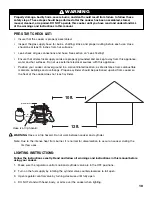
Страница 11: ...with this appliance Position your cooker on level ground in a well ventilated location a safe distance from combustible materials buildings and overhangs Propane cylinder should be positioned upwind from cooker so the heat of the cooker does not reach cylinder WARNING Hose is a trip hazard Do not walk between cooker and cylinder Note Due to the intense heat from burner it is normal for discolorati...

Страница 12: ...me provides the best heat Adjust the air shutter until the desired flame is achieved Note Make sure the male fitting on the cooker is screwed into the air shutter and tightened securely Do not over tighten as the air shutter needs to move freely in order to adjust air intake Check the attachment for proper connection every time propane tank is connected to cooker TURNING OFF THE COOKER 1 Turn OFF ...

Страница 13: ... the food product and holder into the empty vessel 3 Fill the vessel with water just until the food product is completely submerged There must be a minimum of 3 inches between the water level and top of the vessel 4 Remove the food product from the vessel and either mark the level on the side of the vessel or measure the amount of water in the vessel 5 Remove the water and completely dry the vesse...

Страница 14: ...er is damaged obtain a replacement burner 7 Reinstall burner heat shield and retaining nut on support strap inside burner stand CLEANING GENERAL MAINTENANCE Check and tighten any loose hardware before each use Clean appliance with mild dishwashing detergent hot water and sponge A soft bristle brush can also be used Inspect entire appliance including hose regulator and replace any damaged or worn p...

Страница 15: ...of of purchase will be required Tools required to assemble your cooker Adjustable wrench or the following wrench 10mm Open end wrench Screwdriver 1 Cooker Bottom Ring 1 Burner Assembly 4 Legs Pre attached Metal Plate with Safety Warnings Do Not Remove this Plate 1 Hose Regulator 1 Spring 1 Bottom Heat Shield 1 2 3 4 5 6 8 9 10 11 13 7 Proof of purchase will be required Inspect contents of the box ...

Страница 16: ...e attached wing nut from bracket adjust bracket to hold pot width tighten bracket using the wing nut Repeat for other two brackets Note For 10 24 and 30 quart pots install the brackets as illustrated to the left The 42 60 and 80 quart pot the brackets must be turned 180 so that the vertical part of the bracket is the furthest away from the rim Step 4 Remove the nut from the bottom of the burner Th...

Страница 17: ... using one M6 x 8 mm bolt as illustrated Repeat for other three heat shields STRAINER BASKET ASSEMBLY Step 1 Line up handle with bolt holes on basket and insert three bolts and nuts inside as illustrated then tighten securely 16 Assembled Heat Shield ...

Страница 18: ...les o la muerte PELIGRO SI HUELE GAS 1 Cierre el gas del aparato desde el cilindro LP Propano Líquido 2 Extinga cualquier llama abierta 3 Si los olores persistiesen manténgase alejado del aparato y llame a su Departamento de Bomberos La falta de cumplimiento de estas instrucciones puede ocasionar incendios o explosiones que podrían causar daños a la propiedad lesiones personales o la muerte ADVERT...

Страница 19: ...lesiones corporales graves si no se siguen las instrucciones Asegúrese de leer y seguir cuidadosamente todos los mensajes PRECAUCIÓN Indica una situación posiblemente peligrosa la cual si no se evita puede producir lesiones menores o moderadas PARA CUBIERTAS ACCESORIOS Y OTROS PRODUCTOS FAVOR DE VISITARNOS POR LA RED MUNDIAL EN CALIFORNIA PROPOSICIÓN 65 ADVERTENCIA Este producto contiene químicos ...

Страница 20: ...hirviendo y asegúrese de que registre aproximadamente 212 F 20 F 100 C 10 C Si el termómetro no fun cionara correctamente deberá reemplazar el termómetro antes de utilizar esta freidora Sólo use el termómetro de repuesto Nº 072 0005 0 Este termómetro se puede obtener contactándose con The Brinkmann Corporation al 1 800 527 0717 Si la temperatura excediese los 400 F 200 C o si el aceite comenzara a...

Страница 21: ...ste electrodoméstico en interiores es permisible sólo si se desconecta y remueve el cilindro del electrodoméstico y se lo deja en el exterior Los cilindros deben almacenarse en exteriores fuera del alcance de los niños y no deben almacenarse dentro de edificios garages ni ninguna otra área cerrada Se debe usar el montaje de la manguera y regulador de presión suministrado con el electrodoméstico Lo...

Страница 22: ...l Transporte de Mercaderías Peligrosas según corresponda con el dispositivo indicado de prevención de la sobresaturación OPD INFORMACIÓN PARA LA INSTALACIÓN La instalación de este electrodoméstico debe realizarse de acuerdo con Todos los códigos locales correspondientes o ante la ausencia de códigos locales ya sea El Código de Gas Combustible Nacional ANSI Z223 1 NFPA 54 Almacenamiento y Manipulac...

Страница 23: ... despejadas de obstáculos y basuras NO inserte ningún objeto extraño dentro de la salida de la válvula Podría causar daño en la retención de retroceso Una retención de retroceso dañada podría ocasionar fugas causando posibles explosiones incendios lesiones físicas severas o la muerte ADVERTENCIA PELIGRO ADVERTENCIA PARA LLENAR EL CILINDRO DE GAS LP Sólo permita que representantes de gas LP calific...

Страница 24: ... las mangueras y conexiones de gas Consulte la sección de Pruebas de Detección de Fugas en este manual para cumplir con los procedimientos apropiados El montaje de la manguera y regulador de presión provistos con su freidora a gas está diseñado para trabajar con un cilindro de suministro de gas LP NO intente conectarlo a ninguna otra fuente de suministro de gas tal como la línea de gas natural NO ...

Страница 25: ...o No ajuste en exceso la perilla de la válvula No utilice herramientas para ajustar la conexión Nota Si no hubiese podido realizar la conexión repita los pasos 3 y 4 5 Verifique que la manguera no esté retorcida que no entre en contacto con bordes cortantes ni se contacte con superficies que puedan calentarse durante el uso 6 Verifique las fugas en todas las adaptaciones antes de encender la freid...

Страница 26: ...illa de control para liberar la presión del gas de la manguera 7 CIERRE la perilla de control 8 Ajuste las conexiones que tengan fugas 9 Repita la prueba del agua jabonosa hasta que ya no se detecten fugas NO utilice la freidora si no se hubieran podido detener las fugas Contáctese con un servicio calificado de reparación de electrodomésticos a gas 10 CIERRE el suministro de gas desde la válvula d...

Страница 27: ...externas con este electrodoméstico Coloque su freidora a nivel del suelo en un lugar bien ventilado a una distancia prudente de los materiales combustibles acumulaciones y excedentes El cilindro de propano debe ubicarse con el viento contrario a la freidora para que el calor de la freidora no alcance el cilindro ADVERTENCIA La manguera es un peligro vinculado con los tropiezos No camine entre la f...

Страница 28: ...ue se mezcla con el gas LP La llama azul con poca o ninguna llama amarilla brinda el mejor calor Ajuste el apagador de aire hasta que se logre la llama deseada Nota Asegúrese de que la adaptación macho de la freidora esté atornillada dentro del regulador de aire y ajustado de manera segura No lo ajuste en exceso ya que el regulador de aire necesita moverse libremente para regular la admisión del a...

Страница 29: ... 1 Coloque el producto alimenticio en del soporte Pedestal o cesto colador para pavos 2 Coloque el producto alimenticio y el soporte dentro del recipiente vacío 3 Llene el recipiente con agua hasta que el producto alimenticio quede apenas cubierto Debe haber un mínimo de 3 pulgadas entre el nivel del agua y la parte superior de la olla 4 Extraiga el producto alimenticio de la olla y marque el nive...

Страница 30: ... un repuesto del mismo 7 Reinstale el quemador el escudo térmico y las tuerca de sujeción en la tira de apoyo dentro del pedestal del quemador LIMPIEZA Y MANTENIMIENTO GENERAL Verifique y ajuste todas las piezas flojas antes de cada uso Limpie el electrodoméstico con detergente suave para lavar la vajilla agua caliente y esponja También se puede usar un cepillo de cerdas duras Inspeccione todo el ...

Страница 31: ...compra Se requerirá una prueba de la compra Inspeccione los contenidos de la caja para asegurarse de que todas las partes estén incluidas y no tengan daños PARA CUBIERTAS ACCESORIOS Y OTROS PRODUCTOS FAVOR DE VISITARNOS POR LA RED MUNDIAL EN DISHWASHERSAFE 100 150 200 250 300 350 400 50 200 100 150 F R C 1 Anillo Inferior de la Cocina 1 Asamblea de la Hornilla 4 Piernas Placa de Metal Preanexada c...

Страница 32: ...s de 42 60 y 80 cuartos de galón los soportes deben ser 180º dados vuelta de modo que la pieza vertical del soporte sea la más lejos del borde Paso 3 Ate el soporte de la olla al cuerpo de la cocina usando dos pernos M6 x 8 mm Quite la tuerca de ala pre atada al soporte ajuste el soporte para llevar a cabo anchura de la olla apriete el soporte usando la tuerca de ala Repita para otros dos soportes...

Страница 33: ...un perno M6 x 8 mm según lo ilustrado Repita para otros tres escudos térmicos ASSAMBLEA CANASTA COLADOR Paso 1 Alinee la manija con los orificios de los pernos en la canasta y inerta tres pernos y tuercas segun lo ilustrado luego apriete con seguridad Armado Escudo Térmic ...

Страница 34: ...33 ...
Страница 35: ...The Brinkmann Corporation le garantiza al comprador original que la Olla de 10 Cuartos de Galén y Cesta está libre de defectos en la mano de obra o materiales Las obligaciones de The Brinkmann Corporation en esta garantía se limitan a las siguientes pautas Esta garantía no cubre las Cocinas que hayan sido alteradas modificadas o dañadas debido a el desgaste normal oxidación abuso mantenimiento ina...

Страница 36: ...RANTÍA IMPLÍCITA QUEDA EXCLUIDA EL CLIENTE RECONOCE QUE EL PRECIO DE COMPRA COBRADO SE BASA EN LAS LIMITACIONES CONTENIDAS EN LA GARANTÍA ARRIBA EXPUESTA ALGUNOS ESTADOS NO PERMITEN LA EXCLUSIÓN O LIMITACIÓN DE DAÑOS INCIDENTALES O CONSECUENTES POR LO QUE LAS LIMITACIONES O EXCLUSIONES ANTERIORES PODRÍAN NO APLICARSE A SU CASO ESTA GARANTÍA LE OTORGA DERECHOS LEGALES ESPECÍFICOS Y TAMBIÉN PUEDE GO...

Отзывы: