background image

 9

5.   Connect the appliance with power source, all icons will show on LCD display & all LED 

indicators turn on for 2 seconds with one beep sound, then the “STRENGTH” with one bean, 
AM & TIME would light solidly, and you can use “HOUR” and “MINUTE” buttons to adjust the 
time. After setting time, the appliance will return to standby mode, at that time, the LCD 
just show time with PM (or AM) & the “Strength with one bean”.

6.   Press “BREW-OFF” button, the appliance starts to work and brew coffee. 

WARNING:

 Do not open the top lid to avoid being burnt during operation. 

NOTE:

 Only the “BREW-OFF” button can work during the brewing process.

7.   After a while, the coffee dispenses from the coffee outlet and flows into the glass carafe. 

After finish brewing, the appliance will stop working and enter into the keep-warm mode, 

the “Time since brew” will show on LCD and the white background will turn off.  

NOTE:

 You can take out the glass carafe and pour coffee for serving at any time, and the 

appliance will stop dripping automatically. But the time cannot exceed 30 seconds. 

8.   After finish brewing, the appliance will have 3beeps sound for keep warm (if the beep 

sound does not turn off).

9.   To set the time under the standby mode, hold and press “HOUR” or “MINUTE” button for 

3 seconds, the “Time”, will flash while the “Strength with one bean” still lights solidly. Then 

you can use “HOUR” and “MINUTE” buttons to set the time. After setting the time, the time 

will continuous flash for 5 seconds and press “PROGRAM” button to confirm the time, and 

then the appliance returns to standby mode.

10.  To set the coffee strength, hold and press “PROGRAM”button for 3 seconds, the LCD will 

show time, “PM” or “AM”, and the “Strength with one bean” flashes, press “PROGRAM” 

button to adjust the coffee strength (one bean, two beans, three beans and 1-4cup in 
sequence). After setting the coffee strength, the selected coffee strength will continuous 

flash for 5 seconds for confirmation and then the appliance will return to standby mode.

11.  To set the auto-off time, hold and press “BREW-OFF” button for 3 seconds, the coffee 

strength will show on LCD display and the auto-off time flashes. Then you can use “HOUR” 

and “MINUTE” button to adjust the keep warm time (0’00”~4’00”, 15min increment ). After 

setting the time, the time will continuous flash for 5 seconds for confirmation and then the 

appliance will return to standby mode.

Содержание 50018

Страница 1: ... Instruction Manual 19 Bar Espresso 10 Cup Programmable Coffee Maker ...

Страница 2: ......

Страница 3: ...Permanent Coffee Filter Basket Not Included 4 Getting to Know Your 8 cup glass carafe with silicone sleeve 5 Before Using for the First Time 5 Pour Over Optimized 6 Hints for Great Tasting Coffee 6 Care Cleaning Instructions 7 Storing Instructions 7 Tasting Notes 8 9 Table of Contents Table of Contents ...

Страница 4: ...epair or adjustment 4 To protect against fire electric shock and injury to persons do not immerse cord plug or in water or other liquid 5 Close supervision is necessary when any appliance is used by or near children 6 Unplug from outlet when not in use and before cleaning Allow to cooling before putting on or taking off parts and before cleaning the appliance 7 The use of accessory not recommended...

Страница 5: ... steam 18 Some parts of appliance are hot when operated so do not touch with hand Use handles or knobs only 19 Never leave the empty carafe on the warming plate otherwise the carafe is liable to crack 20 Never use the appliance if the carafe shows any signs of cracks or carafe having a loose or weakened handle Only use the carafe with this appliance Use carefully as the carafe is very fragile 21 N...

Страница 6: ...it contact a qualified electrician Do not attempt to modify the plug in any way Notes on the cord a A short power supply cord or detachable power supply cord is provided to reduce risks resulting from becoming entangled in or tripping over a longer cord b Longer detachable power supply cords or extension cords are available and may be used if care is exercised in their use c If a long detachable p...

Страница 7: ...y cause the finish to darken permanent blemishes may occur or stains can appear Electric Power If the electrical circuit is overloaded with other appliances your appliance may not operate properly It should be operated on a separate electrical circuit from other appliances Coffee Yield 10 Cup Coffee Maker 10 5 oz cups NOTE A 5 oz cup is the American industry standard and is used by most Coffee Mak...

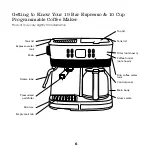
Страница 8: ...ee Maker Product may vary slightly from illustration Tank lid Top lid Tank lid Filter not shown Coffee funnel not shown Drip coffee water tank Control panel Main body Glass carafe Espresso water tank Knob Steam tube Pressurized portafilter Drip tray Empty alert tab ...

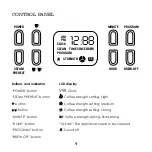
Страница 9: ...ton BREW OFF button LCD display Clock Coffee strength setting Light Coffee strength setting Medium Coffee strength setting Strong Coffee strength setting Extra strong CLEAN The appliance needs to be cleaned Sound off AM PM TIME SINCE BREW 12 88 CLOCK CLEAN PROGRAM STRENGTH 1 4 POWER STEAM PREHEAT MINUTE HOUR PROGRAM BREW OFF ...

Страница 10: ... A carafe of craft coffee without the fuss OPERATION The appliance has two brewing systems including Drip coffee brewing system and Espresso brewing system MAKE DRIP COFFEE 1 Open the drip coffee water tank lid and add some drinking water into the drip coffee water tank NOTE Do not fill the water tank with water exceeding the max level as indicated on the water level gauge The appliance can brew m...

Страница 11: ...liance will have 3beeps sound for keep warm if the beep sound does not turn off 9 To set the time under the standby mode hold and press HOUR or MINUTE button for 3 seconds the Time will flash while the Strength with one bean still lights solidly Then you can use HOUR and MINUTE buttons to set the time After setting the time the time will continuous flash for 5 seconds and press PROGRAM button to c...

Страница 12: ...ee the Clean icon will flash on LCD to indicate the appliance needs to be cleaned To enter the cleaning mode hold and press both of HOUR and MINUTE buttons for 3 seconds the Clean icon will show on LCD and press the BREW OFF button to start the clean cycle 14 Always turn the appliance off and disconnect the power supply when not use NOTE Pay attention to pour the coffee out otherwise you may be hu...

Страница 13: ...r of the selected button flashes and the LED indicator of POWER button lights up Release the selected button once desired volume is reached And the appliance will return to the standby mode after the coffee volume is adjusted 8 To reset the coffee volume to factory setting hold and press both of the One Cup and Two cup button for 3 seconds then the Power One Cup Two Cup buttons flash for 5 times w...

Страница 14: ...h then the appliance enters into the preheating mode NOTE If the knob stays at Steam or Hot Water position before press the POWER button the LED indicator of POWER button and STEAM PREHEAT button will flash until the knob is rotated to OFF position 3 Press STEAM PREHEAT button the LED indicator of POWER button illuminates and the LED indicator of STEAM PREHEAT button flashes the heater will work t...

Страница 15: ... maximum working time is 1 minute 8 During brewing cycle if there is no water in the water tank the LED indicators of One Cup Two Cup and STEAM PREHEAT buttons will flash and you can press Power One Cup or Two Cup to remove warning 9 If the user wants to empty the water inside Espresso water tank after long time of no use hold and press both of STEAM PREHEAT Two Cup button for 3 seconds the water ...

Страница 16: ...o not use abrasive cleaning agent for cleaning 6 The LCD display will show CLEAN when the appliance has performed 300 cycles of brewing drip coffee At that time CLEAN blinks Simultaneously hold and press HOUR and MIN buttons for 3 seconds to enter into the cleaning mode the CLEAN icon will show on LCD and press BREW OFF button to start the clean cycle After the clean cycle is finished the CLEAN ic...

Страница 17: ...for making great tasting coffee Regularly clean the coffee maker as specified in the CLEANING AND MAINTENANCE section Always use fresh cold water in the coffee maker 2 Store unused coffee powder in a cool dry place After opening a package of coffee powder reseal it tightly and store it in a refrigerator to maintain its freshness 3 For an optimum coffee taste buy whole coffee beans and finely grind...

Страница 18: ...______________________ Notes ______________________________________________________________________________________ _____________________________________________________________________________________________ _____________________________________________________________________________________________ _____________________________________________________________________________________________ __...

Страница 19: ...__________________________________________________________________ _____________________________________________________________________________________________ _____________________________________________________________________________________________ _____________________________________________________________________________________________ ___________________________________________________...

Страница 20: ...used under license from BRIM Brands LLC Sensio Inc New York NY 10016 USA For customer service questions or comments 1 866 832 4843 www brim coffee brimcoffee Perfect the art of artisanal brewing and discover great video tutorials recipes tips more by following us 50018 Rev 0 ...

Отзывы: