6. To avoid cross-threading, all spray gun parts should
be screwed in hand tight initially. If the parts cannot
easily be turned by hand, be sure that you have the
correct parts, unscrew, realign, and try again. Never
use excessive force in matching parts.
7. Use only accessories identified by the manufacturer
for the specific tool model.
8. When servicing a tool, use only identical replacement
parts and/or authorized parts.
9. Use only lubricants supplied with the tool or specified
by the manufacturer.
10. Maintain spray guns with care. Keep spray guns clean
and oiled for best and safest performance.
11. Store the tool out of reach of children and other
untrained persons when it is idle.
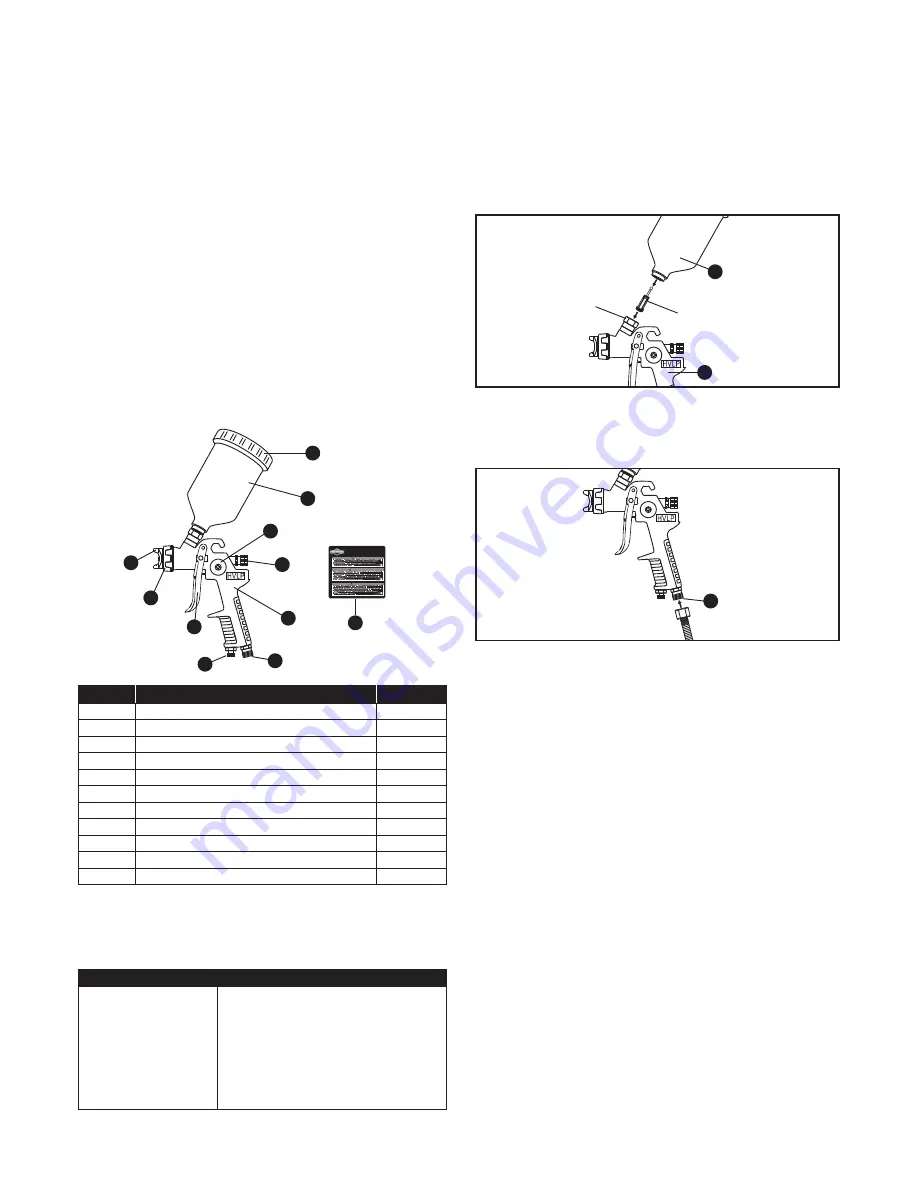
Product Description
A
B
C
D
E
F
G
I
J
H
DESCRIPTION
QUANTITY
PART
H.V.L.P Gravity Spray Gun
Paint Cup
Cup Lid
Air Cap
Air Cap Ring
Spray Pattern Adjustment Knob
Fluid Adjustment Knob
Air Adjustment Knob
Air Inlet
Trigger
Warning Label
1
1
2
1
1
1
1
1
1
1
1
A
B
C
D
E
F
G
H
I
J
K
Technical Specifications
SPECIFICATIONS
COMPONENT
Gravity
1.4 mm
600 ML
30-50 PSI
6.5 CFM
1/4 in. (6.35 mm) 18 NPS
1/4 in. (6.35 mm) (min. inner diameter)
Feed type
Fluid nozzle
Cup capacity
Operating pressure
Air consumption
Air inlet
Air hose
Assembly Instructions
Figure 1
Operation Instructions
A
B
Fluid filter
Fluid inlet
Figure 2
I
4
BRIGGSandSTRATTON.COM
NOTE
The working pressure refers to the air line pressure
when the spray gun trigger (J) is pulled fully under
working conditions.
NOTE
Apply the fluid filter to the fluid inlet of the spray
gun. (See Figure 1)
NOTE
●
Before using desired paint in the spray gun, spray a
compatible thinner or solvent through the gun to remove
any contaminants and residues.
●
Thin paints properly in accordance with the paint manufac-
turer's instructions before spraying. If necessary, carefully
strain the paint through a paint strainer or a piece of
cheesecloth.
●
Fill the paint cup (B) about 3/4 full and start the air
compressor.
●
Set up a piece of cardboard or other scrap material to use
as a target and adjust for best spray pattern.
1. Take out spray gun (A) and put on paint cup (B) with hand.
Make sure that the paint cup (B) is installed with spray gun
(A) tightly and correctly. (See Figure 1)
2. Connect air supply hose (not included) with the air inlet (I)
of spray gun (A). Use seal tape (not included) for airtight
connection. Do not overtighten. (See Figure 2)
3. Set the rated working pressure (i.e. 43 PSI) for best
performance.
DO NOT
exceed spray gun maximum
pressure of 50 PSI.
6388-00
Made in China/Hecho en China/Fabriqué en Chine
NE RETIREZ PAS CETTE ÉTIQUETTE
AVERTISSEMENT
DO NOT REMOVE THIS LABEL
WARNING
NO SAQUE ESTA ETIQUETA
ADVERTENCIA
PISTOLA DE PULVERIZACIÓN DE GRAVEDAD HVLP
H.V.L.P GRAVITY SPRAY GUN
PISTOLET À PEINTURE “GRAVITY” H.V.L.P
K
Not
for
Reproduction


