background image

 30 

Laddermill Owner’s Manual—2017 

Assembly 

NOTE:

 As the Laddermill is transported, air may become trapped in the hydraulic system and 

cause the pump to cavitate: this causes a loud rumbling and chain noise. It sounds bad, but it is 

natural and will go away with ini al use. To help purge the air, stand on the ground and slowly 

turn the ladder with your hands, le ng it rest every minutes. You can also just climb. The unit will 

get smoother and smoother with use.  There is varia on: some units may take longer than others.  


Before finishing the install inspect the Laddermill:  

   1) Make sure the  mer-counter is working properly. If it does not count feet as the wall is 

moving, check that the magnets and sensor are properly installed and adjusted 

   2) Check the auto-stop func on. Start climbing at a moderate speed. If you stop moving up, the 

wall should con nue down and stop moving downward when your foot reaches the bo om of the 

wall and triggers the foot peddle at the bo om of the channel. Do this test at all the angles.   

   3) Check the x-bracing on the A-frame. They should be equally adjusted (the turnbuckles should 

look the same) and  ght.  The Laddermill core should be ver cal. 


   If you have any issues or ques ons give us a call (800-707-9616) .  

Final Note - Tests 

Содержание Laddermill Ascender

Страница 1: ...Laddermill Ascender Owner s Manual 87 York Ave Randolph MA 02368 781 961 5200 www brewerfitness com Copyright 2017 Brewer Fitness ...

Страница 2: ......

Страница 3: ... Laddermill a Success 7 Informa on for Your Staff 8 Training Tips Guidelines 9 Ac vi es Promo onal Ideas 11 Frequently Asked Ques ons 13 General Maintenance 15 Troubleshoo ng 17 Service Instruc ons 18 Assembly instruc ons 23 Channel Assembly 24 A frame Assembly 27 Glossary 31 Warranty 32 Contact Info 34 Laddermill Complete Owners Manual ...

Страница 4: ...ii Laddermill Owner s Manual 2017 ...

Страница 5: ...g this exercise you may be surprised how quickly your strength and cardiovascular endurance are tested The owner s manual is designed to provide the purchaser with the resources needed to make the most of this equipment It will provide information and sources for programming ideas some simple and others more complex The workout is effective fun and customizable so now it is up to you all to extend...

Страница 6: ...ed to be li ed to a ver cal posi on For General Use Carefully read and understand the Laddermill Owner s Manual Provide a general overview of the basic opera ons and usage to new Laddermill users Do not place other equipment or any items in the fall zone Laddermill Specifica ons Weight 590 Pounds Dimensions 66 wide x 54 deep x 118 tall Width of climbing surface 30 feet Length of climbing surface 20...

Страница 7: ...ards With our auto stop technology if you stop climbing the Laddermill will stop and wait for you The Laddermill will not move unless you are on the wall and climbing upwards You can adjust the angle of the wall as well which makes it easy to cater to a large variety of abili es and fitness goals Easier angles are great for aerobic workouts and focus on the lower body Overhanging angles require a l...

Страница 8: ...e current and average speeds are displayed on the counter in feet min or meters min if needed Angle Changing To change the angle of the Laddermill you begin by moving the angle lever downward A range of 10 degree posi ve to 20 degrees nega ve is available to you and you can stop anywhere in the middle For a nega ve angle you need to be standing on the Laddermill Your body weight will move the Ladd...

Страница 9: ...0 00 00 0 1 2 3 4 5 6 7 8 9 0 Clear Home Screen The home screen shows real me data for a single climb When you pause for 5 seconds the counter will hold your data on the screen un l you begin climbing again and then it will start from where you le off To reset the counter for a new climber hit Reset Setup Screen To set a distance or me goal tap or hold the bu ons labeled Distance Goal or Time Goal ...

Страница 10: ...6 Laddermill Owner s Manual 2017 ...

Страница 11: ...y for most We recommend that a staff person be chosen as the main advocate for the product s introduction period This person might take on the following responsibilities 1 Read through the manual thoroughly and familiarize his herself with the Treadwall operation procedures use and set up 2 Formulate a plan to integrate this equipment into their classes personal training or general us age 3 Creati...

Страница 12: ...s a low impact full body workout which makes it an ideal complement to other fitness activities and sports It can be used as a warm up cool down or a high intensity programming Customize it to suit YOUR needs and GOALS 1 You should use the equipment yourself to get a first hand look at how the workout makes you feel learning to access angle speed for a variety of abilities and to reap the benefits...

Страница 13: ...10 are usually much faster so move lever slowly up when increasing speed All they have to do is hang on and reach for the speed lever and pull it up a small amount 4 Have them take it slow at first and focus on smooth movement 5 Emphasize the need to move your feet above the stop bar at the bottom of the machine 6 Tell them they can keep going even after the stop bar has engaged just keep climbing...

Страница 14: ...Body Burn Calories Lean Muscle Core Strength 1 Refer www brewerfitness com ownersmanual for downloadable versions of the Quick Start Training Logs re sources for articles on the benefits of climbing etc 2 Refer to our website for full training program ideas and short workouts 3 You may also consider referencing the Quick Start page in the manual 4 If the client is looking for a more complete chall...

Страница 15: ... on Mt Everest Club challenge Use the bulletin board to put up names and perhaps pictures Imagine climbing the height of Everest and tell me who wouldn t feel accomplished The Everest Club Climb 29 028 feet on the Treadwall and you are eligible to join You can find the Everest application and a training log at www brewerfitness com OwnersManual Special incentive Brewer Fitness provides free Everes...

Страница 16: ... Park 8842 Half Dome Yosemite National Park 9570 Mt Olympus Greece 11245 Mt Hood Oregon 13766 Grand Teton Wyoming 14161 Mt Shasta California 14495 Mt Whitney high point continental US 14692 The Matterhorn Germany 16864 Mt Vinson high point Antarctica 17011 Mt Arrarat Turkey 18510 Mt Elbrus high point of Europe 19938 Mt Kilimanjaro high point of Africa 20220 Mt McKinley high point of North America ...

Страница 17: ...ove after the climber steps off How long should I climb for This depends on your objectives Test out various methods and take a look at our training section www brewerfitness com index php info training Do I need special shoes to climb the Laddermill No Any well fitted athletic shoe will do quite well However special climbing shoes are more enjoyable to climb in Can anybody use the Laddermill Almo...

Страница 18: ...limbed not likely Most children spend many happy hours climbing play equipment and trees For adults climbing on the Laddermill recaptures much of that simple joy and natural vertical movement What kind of bodies does Vertical Movement build Climbing and gymnastics are similar promoting muscle tone flexibility and endurance with in creased agility and body awareness Your body will respond by burnin...

Страница 19: ...top system which is triggered when the weight of the climber reaches the bo om of the machine The Laddermill will not move when someone is standing and not climbing upwards The sensor for this system is located at the bo om of the machine There is a small foot peddle which closes a valve in the hydraulic system The rungs slide through the side channels on wear resistant plas c strips which help re...

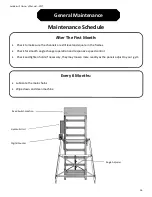
Страница 20: ...in the frames Check for smooth angle changer opera on and responsive speed control Check and ghten holds if necessary they may loosen more readily as the panels adjust to your gym Every 6 Months Lubricate the main chains Wipe down and clean machine Maintenance Schedule Digital Counter Angle Adjuster Hydraulic Unit Reed Switch Loca on ...

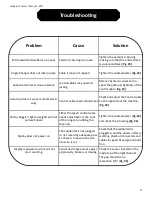
Страница 21: ...ill not pull wall down Either the speed control cable needs adjustment or the ends of the rungs are rubbing the channels Tighten the cable adjuster Pg 24 and check the x bracing Pg 23 Display does not power on The Laddermill is not plugged in not receiving adequate pow er there is a loose connector or a wire is cut Check that the Laddermill is plugged in and the power outlet is working Check all c...

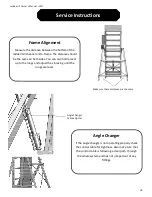
Страница 22: ... sides You can also hold a level up to the rungs and adjust the x bracing un l the rungs are level Make sure these distances are the same Angle Changer Cable adjuster Angle Changer If the angle changer is not opera ng properly check the control cable for ghtness Also make sure that the control cable is following a clear path through the whole system and has not jumped out of any fi ngs ...

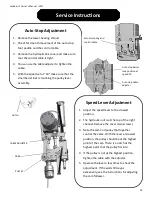
Страница 23: ...at the highest posi on ghten the cable with the adjuster 5 Operate the lever a few mes to check the adjustment If the wall s ll creeps excessively see the instruc ons for adjus ng the cam follower NOTCH Auto Stop Adjustment 1 Remove the lower bearing shroud 2 Check for smooth movement of the auto stop foot peddle and the control cable 3 Remove the hydraulic box cover and make sure that the control...

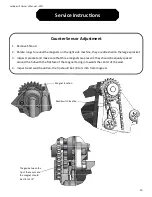
Страница 24: ... the large sprocket 3 Inspect sprocket and make sure that three magnets are present they should be equally spaced around the hub with the flat face of the magnet facing in towards the center of the wall 4 Inspect reed switch posi on the p should be 1 8 to inch from magnets Magnet loca on Reed Switch loca on The gap between the p of the sensor and the magnet should be 1 8 to 1 4 ...

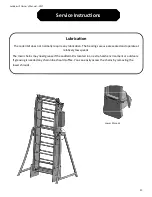
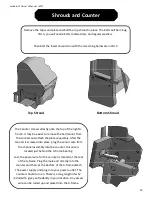
Страница 25: ...y lubrica on The bearings we use are sealed and operate at rela vely low speeds The main chains may need grease if the Laddermill is located in an extra harsh environment or outdoors If greasing is needed any chain lube should suffice You can easily access the chains by removing the lower shrouds Lower Shrouds ...

Страница 26: ...components need to be li ed to a ver cal posi on For General Use Carefully read and understand the Laddermill Owner s Manual Provide a general overview of the basic opera ons and usage to new Laddermill users Do not place other equipment or any items in the fall zone Laddermill Specifica ons Weight 590 Pounds Dimensions 66 wide x 54 deep x 118 tall Width of climbing surface 30 feet Length of climbi...

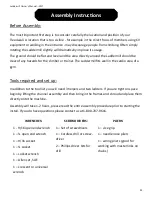
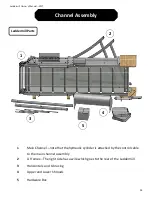
Страница 27: ...l in the cardio area of a gym Tools required and set up In addi on to the tool list you will need 3 helpers and two ladders If you are ght on space begin by li ing the channel assembly and then bring in the frames and shroud and place them directly onto the machine Assembly will take 1 2 hours please read the en re assembly procedure prior to star ng the install If you do have ques ons please cont...

Страница 28: ...n Channel note that the hydraulic cylinder is a ached by the control cable to the main channel assembly 2 A Frames The right side has a wire which goes to the rear of the Laddermill 3 Horizontals and X bracing 4 Upper and Lower Shrouds 5 Hardware Box Laddermill Parts ...

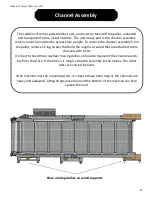
Страница 29: ...ove six lag screws that hold the lengths of wood that are a ached to the channels with bolts It is best to have three 4 wheel moving dollies on hand to transport the channel assem bly from the truck If the terrain is rough strap the assembly to the dollies The other parts are carried by hand If the machine must be moved upstairs it is best to have extra help as the channels are heavy and awkward L...

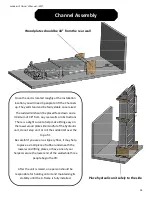
Страница 30: ...lower wood plates Be mindful of the hydraulic unit do not step on it or roll the Laddermill over the top of it Be careful if you are on a slippery floor it may help to place a small piece of rubber underneath the lower wood li ing plates or have one of your helpers secure the lower end of the wall while three people begin the li A er the unit is raised one person should be responsible for holding o...

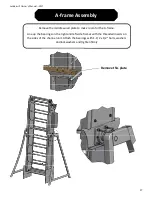
Страница 31: ...he middle wood plate to make room for the A frame Line up the bearings on the right and le side frames with the threaded inserts on the sides of the channel unit A ach the bearings with 1 1 2 x 1 2 bolts washers and lockwashers and ghten firmly Remove this plate ...

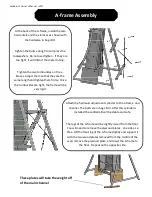
Страница 32: ...e the turnbuckles are ght the frame will be very rigid A ach the hydraulic adjustment cylinder to the a frame and channel The bolts are in bag LM 3 A er this cylinder is installed the Laddermill will be stable and safe The legs of the A frame will be slightly raised from the floor You will need to remove the plywood plates one side at a me Li the front leg of the A frame slightly and support it wit...

Страница 33: ...mount from the counter and a ach the plate separately A er the counter is screwed into place plug the sensor wire from the channel assembly into the counter this wire is located just behind the A frame bearing Last the power wire for the counter is located at the rear of the A frame Plug the male end directly into the counter and then at the bo om of the A frame a ach the power supply and plug int...

Страница 34: ...e finishing the install inspect the Laddermill 1 Make sure the mer counter is working properly If it does not count feet as the wall is moving check that the magnets and sensor are properly installed and adjusted 2 Check the auto stop func on Start climbing at a moderate speed If you stop moving up the wall should con nue down and stop moving downward when your foot reaches the bo om of the wall an...

Страница 35: ...a ver cal wall Channels Long metal pieces on either side of the Laddermill where the rungs slide Digital Counter An electronic display which tracks the climbers progress Shroud A cover at the top and bo om of the Laddermill Speed The rate at which a climber moves the wall down Rung The metal bar on which one climbs ...

Страница 36: ...l Purchaser and Brewer s Ledge Inc or their authorized dealer 5 WHAT IS NOT COVERED Normal wear and tear are excluded from this warranty Damages caused by a lack of maintenance out lined in the owner s manual by the Original Purchaser are excluded from this warranty No warranty shall be provided in the event the equipment is modified by Original Purchaser for parts not approved by Brewer s Ledge I...

Страница 37: ...pment the cost of capital the cost of subs tute equipment facili es or services down me the claims of third par es including customers and injury to property This limita on does not apply to claims for personal injury where such limita on would be a viola on of the applicable law Some states do not allow the exclusion or limita on of incidental or consequen al damages so the above limita on or exc...

Страница 38: ... Laddermill Owner s Manual 2017 Contact Informa on Website WWW BREWERFITNESS COM Email SALES BREWERFITNESS COM Address Please come by for a visit some me 87 York ave Randolph MA 02368 Phone 1 800 707 9616 ...

Отзывы: